D.I.Y. Installations/Modifications Do It Yourself guides and information for the G37. Stickies approved by Administrators and Moderators.

DIY: Whiteline Differential bushings

Thread Tools
 
Search this Thread
 
Old 03-27-2013, 01:16 PM
  #16  
TVPostSound
Registered Member
Thread Starter
iTrader: (9)
 
TVPostSound's Avatar
 
Join Date: May 2010
Location: Granada Hills, CA
Posts: 3,613
Received 114 Likes on 87 Posts
Originally Posted by Black Betty
You poked the bottom of the busing with a knife to drain out the silicone? Do you have to puncture the top as well? Would simply drilling into it work as well? What size bit did you use? Did you have any problem cutting through the outer sleeve and into the cross member?
I used a knife to drain it, just the bottom, so the drill wouldn't splatter silicone all over the place while spinning!!!

I used one that fit without binding.

The outer sleeve cut like butter with a 24T Sawzall blade. Tool all of 30 seconds.
Had to stop, a couple of times to make sure I wasnt going too far!!

The Sawzall was at a slight rotation angle so I would drag on the center sleeve.
Once it went through the tension was all but gone.

I didnt cut the crossmember.
Old 03-27-2013, 01:34 PM
  #17  
NeverBoneStock
Premier Member

iTrader: (25)
 
NeverBoneStock's Avatar
 
Join Date: May 2008
Location: Vancouver, WA
Posts: 3,179
Received 69 Likes on 56 Posts
Nice .. I will be attempting to do this when the CF Driveshaft is available so I can knock it all out at once . I have the Whiteline bushings and my SPL parts are starting to trickle in . Question .... Do you know if freezing the diff bushing makes for a easier install ? I keep seeing mixed reviews on that
Old 03-27-2013, 01:45 PM
  #18  
TVPostSound
Registered Member
Thread Starter
iTrader: (9)
 
TVPostSound's Avatar
 
Join Date: May 2010
Location: Granada Hills, CA
Posts: 3,613
Received 114 Likes on 87 Posts
Originally Posted by NeverBoneStock
Nice .. I will be attempting to do this when the CF Driveshaft is available so I can knock it all out at once . I have the Whiteline bushings and my SPL parts are starting to trickle in . Question .... Do you know if freezing the diff bushing makes for a easier install ? I keep seeing mixed reviews on that
The Whiteline? Dont freeze.

If I had a hoist, I probably would have been able to push it in by hand!!

Im on my back with jackstands!!
Old 03-27-2013, 02:02 PM
  #19  
Modme
Registered Member
iTrader: (17)
 
Modme's Avatar
 
Join Date: Jun 2006
Location: So Cal
Posts: 1,585
Likes: 0
Received 80 Likes on 56 Posts
Do the front round plates fit inside the subframe hole? I was planning to use them as a press plates to pull out the bushing. This is what im talking about:

Old 03-27-2013, 02:14 PM
  #20  
TVPostSound
Registered Member
Thread Starter
iTrader: (9)
 
TVPostSound's Avatar
 
Join Date: May 2010
Location: Granada Hills, CA
Posts: 3,613
Received 114 Likes on 87 Posts
Originally Posted by Modme
Do the front round plates fit inside the subframe hole? I was planning to use them as a press plates to pull out the bushing. This is what im talking about:

Bad link.
Old 03-27-2013, 02:18 PM
  #21  
TVPostSound
Registered Member
Thread Starter
iTrader: (9)
 
TVPostSound's Avatar
 
Join Date: May 2010
Location: Granada Hills, CA
Posts: 3,613
Received 114 Likes on 87 Posts
Originally Posted by Modme
Do the front round plates fit inside the subframe hole? I was planning to use them as a press plates to pull out the bushing. This is what im talking about:

If you're referring to his no drop no clamp DIY, he revised his DIY, to drill and Sawzall method, which I used. See his post #12

The rear almost falls out, and the fronts just pop out with a hammer and socket.
Old 03-27-2013, 02:27 PM
  #22  
Modme
Registered Member
iTrader: (17)
 
Modme's Avatar
 
Join Date: Jun 2006
Location: So Cal
Posts: 1,585
Likes: 0
Received 80 Likes on 56 Posts
Yeah, I'm still going to try the Frankenstein socket method. With the Sawzall method, it seems like you still need a long bolt and a bracket to pull in the new bushing.
Old 03-27-2013, 02:37 PM
  #23  
TVPostSound
Registered Member
Thread Starter
iTrader: (9)
 
TVPostSound's Avatar
 
Join Date: May 2010
Location: Granada Hills, CA
Posts: 3,613
Received 114 Likes on 87 Posts
Originally Posted by Modme
Yeah, I'm still going to try the Frankenstein socket method. With the Sawzall method, it seems like you still need a long bolt and a bracket to pull in the new bushing.
The reason being, that the bushing is egg shaped, and getting it in takes some effort. It wants to pop back out. Once in, it takes little pressure to pull it from the rear. In my case, as I was on my back.
If youre on a hoist, then pushing it in from the front, while standing, should be really easy.
Old 03-28-2013, 10:51 AM
  #24  
Black Betty
Lexus Defector
iTrader: (60)
 
Black Betty's Avatar
 
Join Date: Sep 2007
Posts: 21,148
Received 2,087 Likes on 1,267 Posts
Thanks for this thread and the photos and instruction as to how you did it. Great job.
The following users liked this post:
TVPostSound (04-13-2013)
Old 03-28-2013, 01:06 PM
  #25  
eVitO
Registered User
iTrader: (8)
 
eVitO's Avatar
 
Join Date: Jun 2011
Location: LA/UCSD
Posts: 674
Received 10 Likes on 10 Posts
Just curious, the only reason you drained the diff was because you installed the new cover, right? Or am I missing something?
Old 03-28-2013, 01:29 PM
  #26  
TVPostSound
Registered Member
Thread Starter
iTrader: (9)
 
TVPostSound's Avatar
 
Join Date: May 2010
Location: Granada Hills, CA
Posts: 3,613
Received 114 Likes on 87 Posts
Originally Posted by eVitO
Just curious, the only reason you drained the diff was because you installed the new cover, right? Or am I missing something?
Yup!!!

Doing the bushing was a great excuse to do the Nismo cover.
Old 03-28-2013, 01:29 PM
  #27  
TVPostSound
Registered Member
Thread Starter
iTrader: (9)
 
TVPostSound's Avatar
 
Join Date: May 2010
Location: Granada Hills, CA
Posts: 3,613
Received 114 Likes on 87 Posts
Originally Posted by Black Betty
Thanks for this thread and the photos and instruction as to how you did it. Great job.
Thanks for the sticky!!DOMO
Old 03-28-2013, 05:31 PM
  #28  
Tazicon
Registered User
iTrader: (1)
 
Tazicon's Avatar
 
Join Date: Jul 2011
Location: Vegas Baby!
Posts: 1,955
Received 24 Likes on 23 Posts
Nice write up, this will be happening with the Z in the near future.
Old 04-16-2013, 01:04 PM
  #29  
Modme
Registered Member
iTrader: (17)
 
Modme's Avatar
 
Join Date: Jun 2006
Location: So Cal
Posts: 1,585
Likes: 0
Received 80 Likes on 56 Posts
I did my whiteline bushing install this past weekend. It was more PIA than I expected. I have some extra bracing in the way, so it took a bit longer. Tvpostsound did a great write up and I don't have much to add. Sawzall is the way to go in terms of removing the center bushing.
The following users liked this post:
TVPostSound (04-16-2013)
Old 04-16-2013, 02:04 PM
  #30  
TVPostSound
Registered Member
Thread Starter
iTrader: (9)
 
TVPostSound's Avatar
 
Join Date: May 2010
Location: Granada Hills, CA
Posts: 3,613
Received 114 Likes on 87 Posts
Originally Posted by Modme
I did my whiteline bushing install this past weekend. It was more PIA than I expected. I have some extra bracing in the way, so it took a bit longer. Tvpostsound did a great write up and I don't have much to add. Sawzall is the way to go in terms of removing the center bushing.

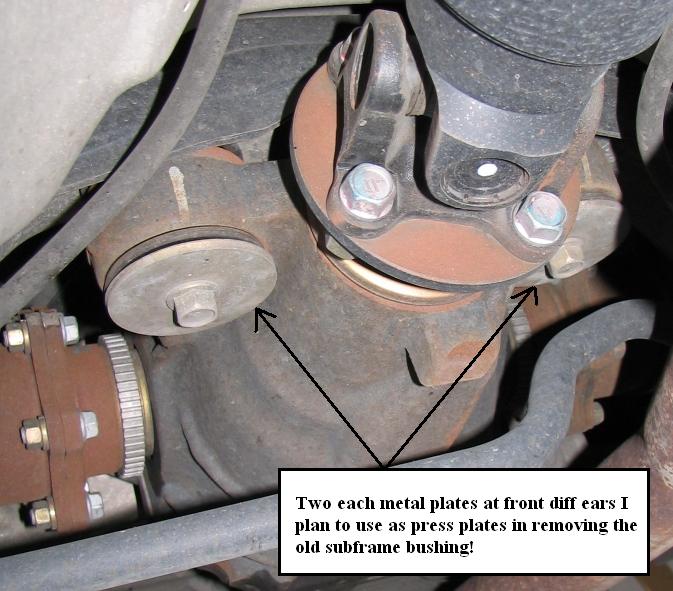
Lets add your pic to this!!


Quick Reply: DIY: Whiteline Differential bushings


All times are GMT -4. The time now is 03:04 PM.