
DIY: Whiteline Differential bushings


Thread Starter
Registered Member
iTrader: (9)
Joined: May 2010
Posts: 3,613
Likes: 117
From: Granada Hills, CA
Whiteline Differential bushings UPDATE: See post #84
SUCCESS!!
Eventually we will all need to have this done, as the OEM differential bushing is filled with silicone, and will burst, especially aggressive drivers!!
The bushing can not be replaced per Infiniti, and Nissan.
370Z drivers have a higher failure rate than we do.
The only OEM option is to replace the complete rear subframe, at a cost of $1,300.00 parts and labor.
You can get it replaced under warranty, but the dealer will find any excuse to not do this. As in your car is ,modified, you installed toe bolts, thus grinding the hole, which they say voids the warranty on that part.
I could probably talk my way into the warranty, but, I dont want them messing with my rear suspension mods. (DO a search, you will see what I did)
Now the only option for the G37/370Z right now is a solid bushing from SPL, it works very well, the Z guys love it, but it increases NVH (Do a search on NVH). We have a "Luxury sport" so comfort is reason we bought a G not a Z.
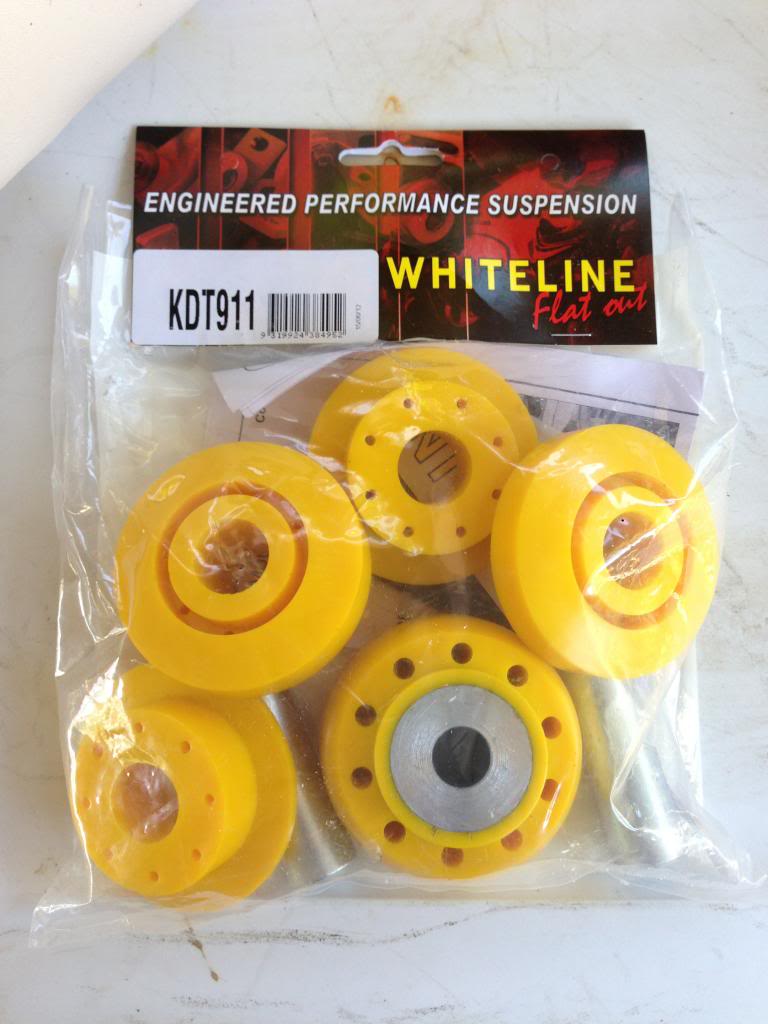
Whiteline makes a "urethane" for a lack of better word, bushing, "found it" (Synthetic Elastomer) but its meant for the G35, and they have never tested it on a G37. The OEM bushing for the G37 is ~1mm smaller, some say it wont work.
Its not urethane, as we know urethane cold melts under pressure, and time, leaving a distorted bushing. Whiteline came up with a new composite.
John at Z1 has confirmed to me that the G35/350Z Whiteline differential bushings will fit with no modification, as proven by an installation on a 370Z.
I will document the installation on my 2010 G37, which has blown the the differential bushing.
Now, theoretically, after this is done, if the Whiteline is not what I like, I can remove the Whiteline, without disassembly, and pop in a solid SPL from the rear.
I understand freezing a solid one in dry ice, will allow it to be pushed in with no force.
This is my story, I will add to this post as I progress:
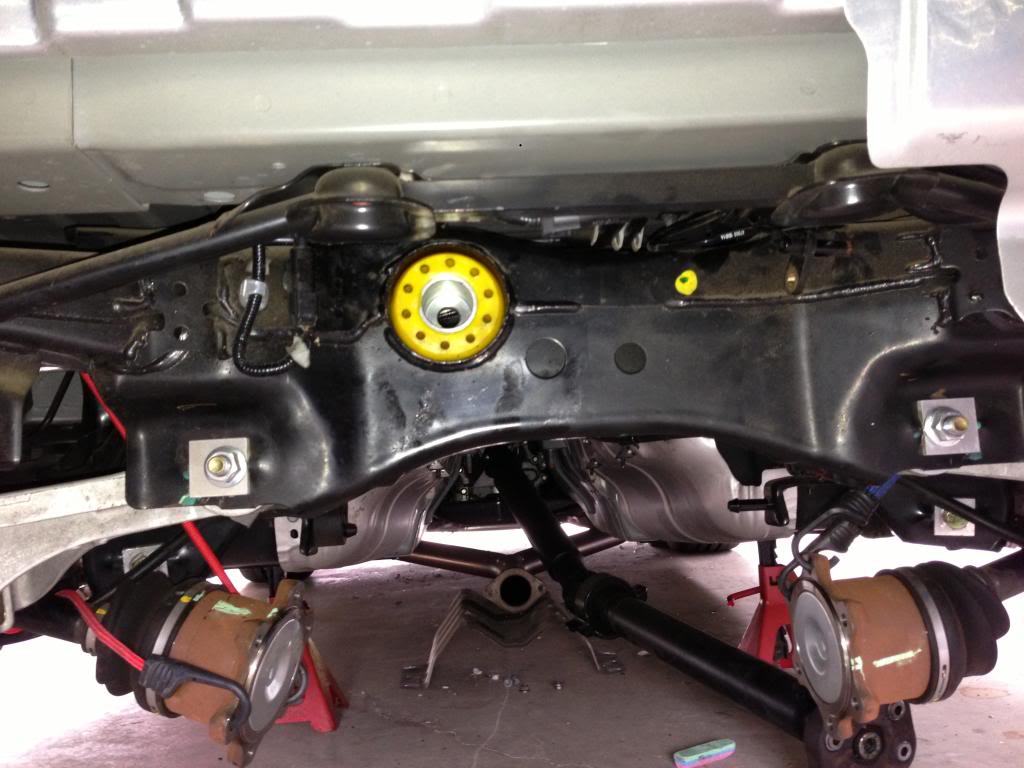
Evidence of the blown bushing:
Just received the package from Kyle at Import Parts Pro in Texas:
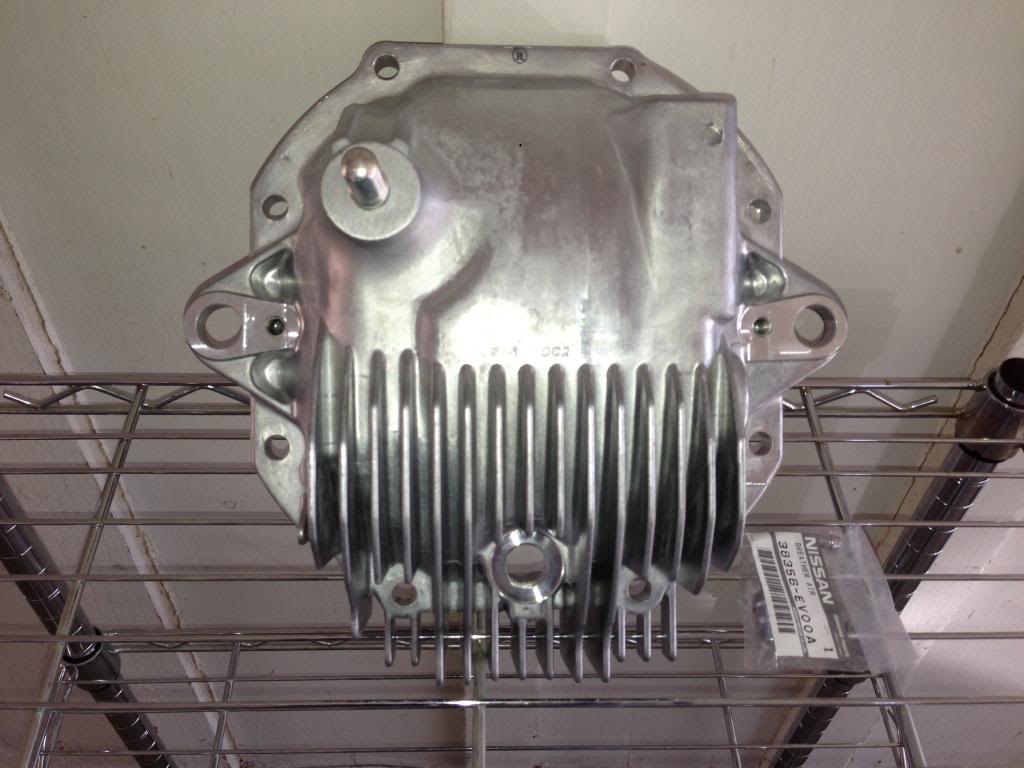
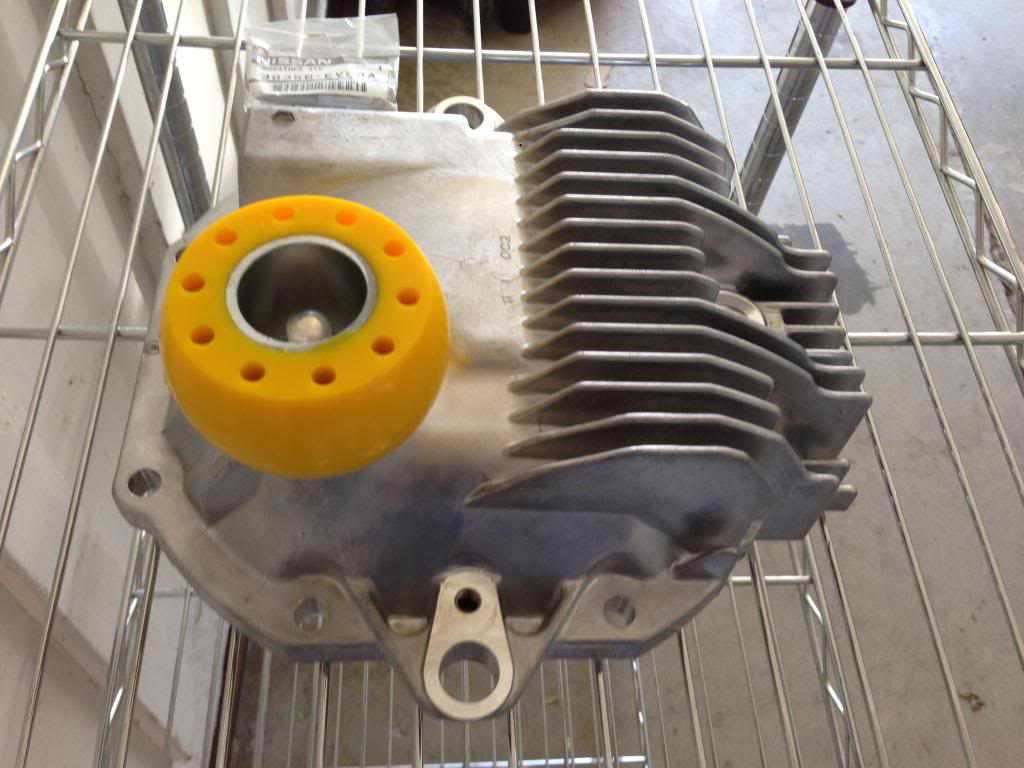
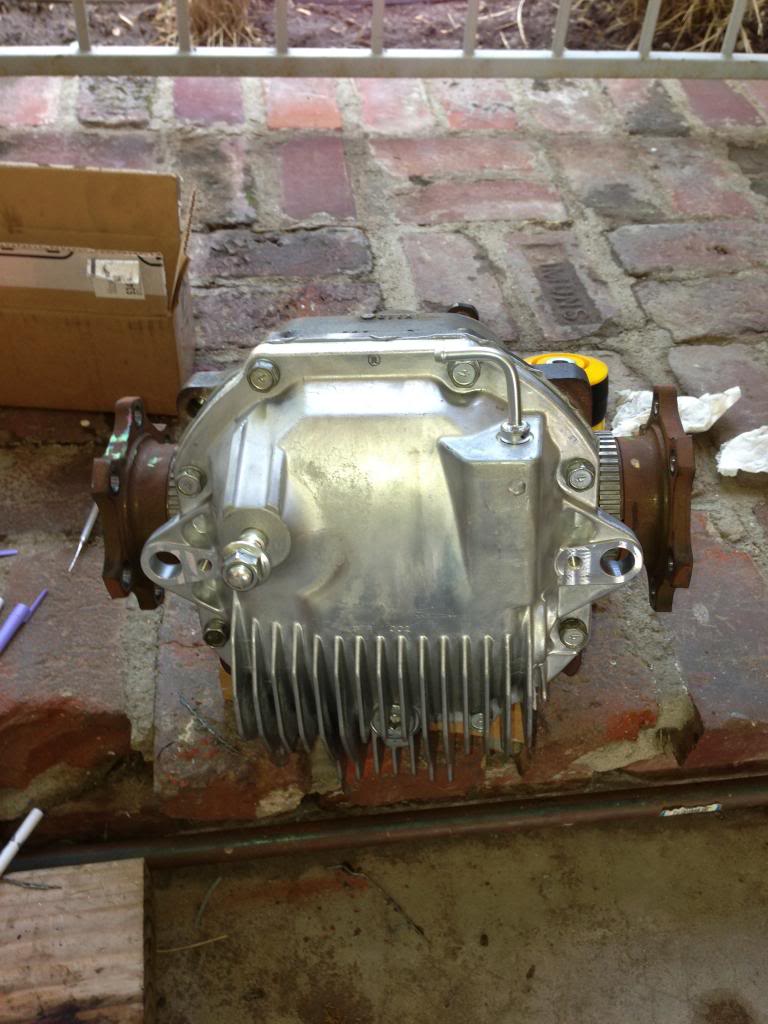
Im installing a Nismo finned differential cover, while the diff is dropped.
Here we go!!
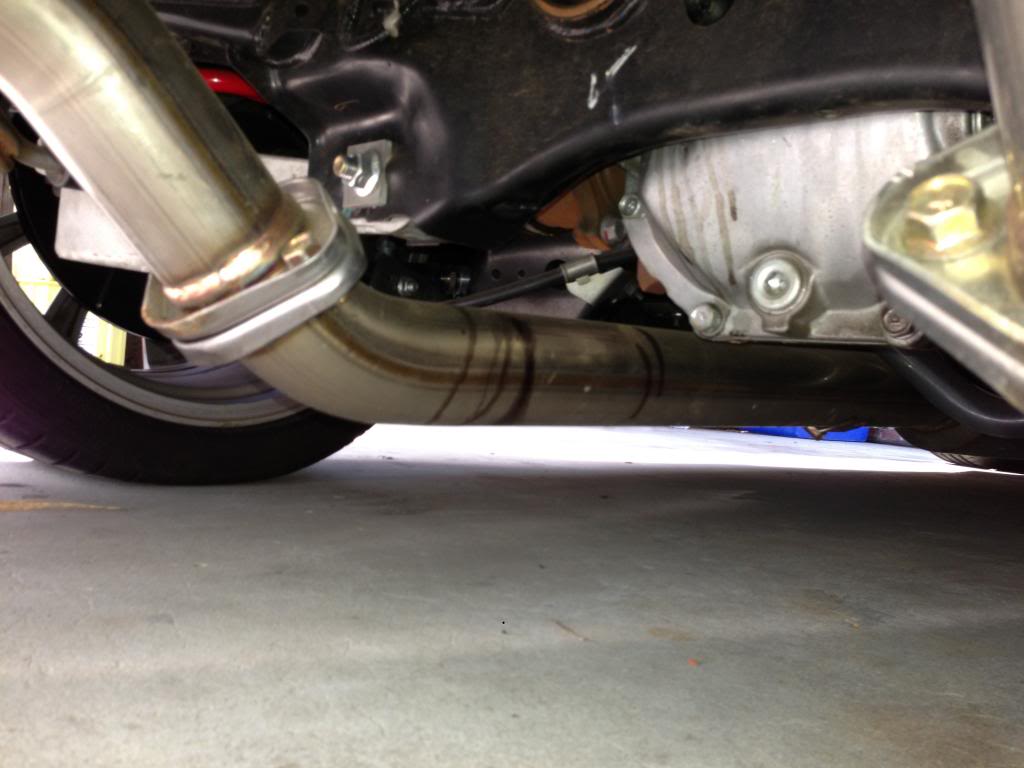
Muffler gone.
Mid Pipe gone.
Sway bar gone.
Driveshaft shields gone.
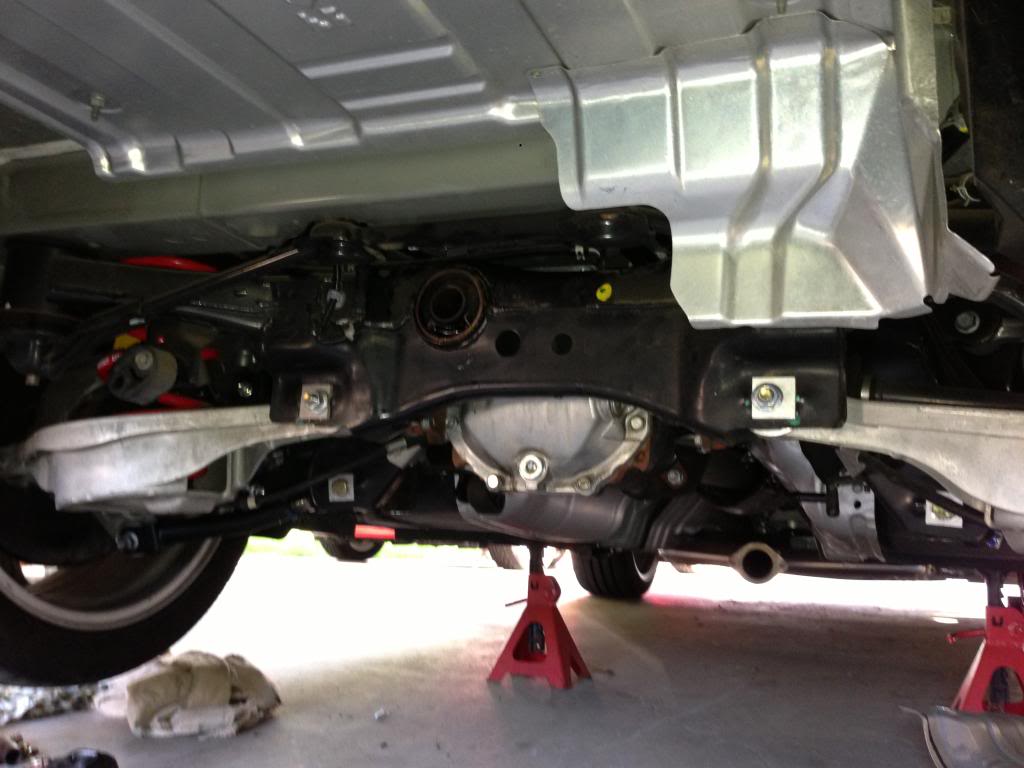
Disconnected diff vent hose.
Disconnected speed sensors at diff.
Marked axle shafts, and driveshaft.
Unbolted axle shafts, and driveshaft. (note to self, take the freaking car out of Park, and release the parking brake first!!)
Center support at driveshaft MUST be dropped, or driveshaft will not move far enough away from diff. There is a 1 inch pin on the diff flange.
Support axle shafts from dropping, using bungee cords to also keep shaft compressed, or CV joints come apart.
Slide Harbor Freight tranny jack ($59 parking lot sale) under diff. Priceless cause you cant bench press the MF while removing bolts)
Unbolt diff from rear crossmember, (3ft breaker bar)
Unbold front diff bolts.
Slide diff forward, and very slowly release jack, making sure nothing is hooked.
THERE IS A LARGE BLACK TAPERED WASHER ABOVE THE SIDE BUSHINGS. THEY WILL FALL TO THE GROUND, THEY NEED TO GO BACK ABOVE THE NEW BUSHINGS>
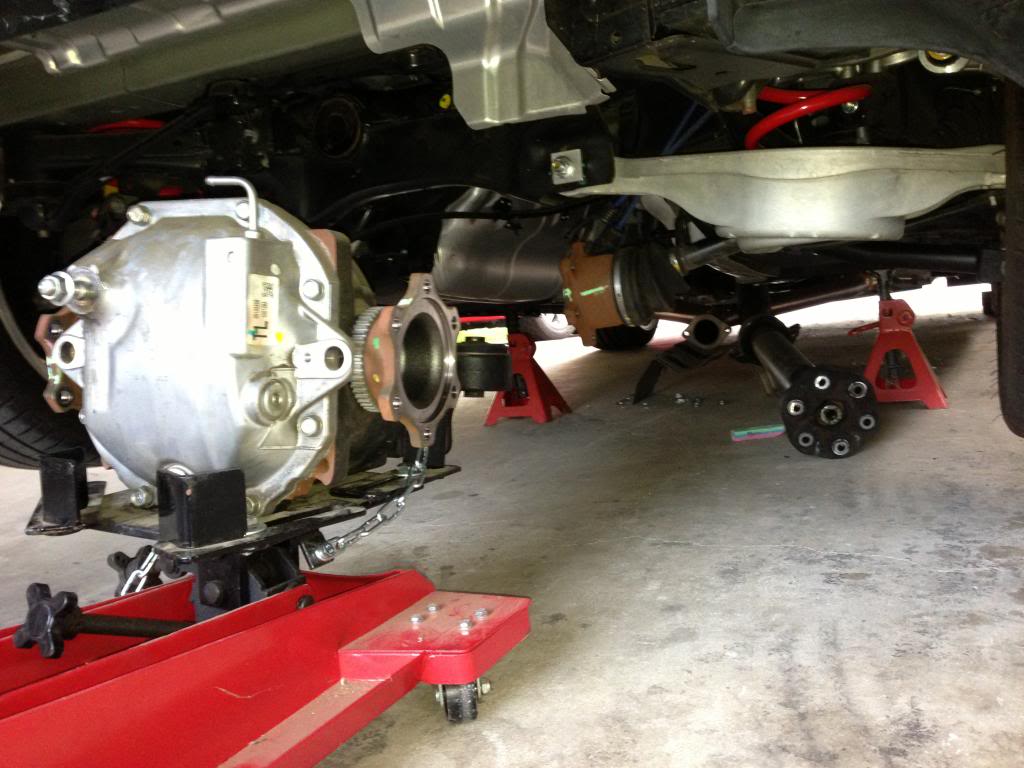
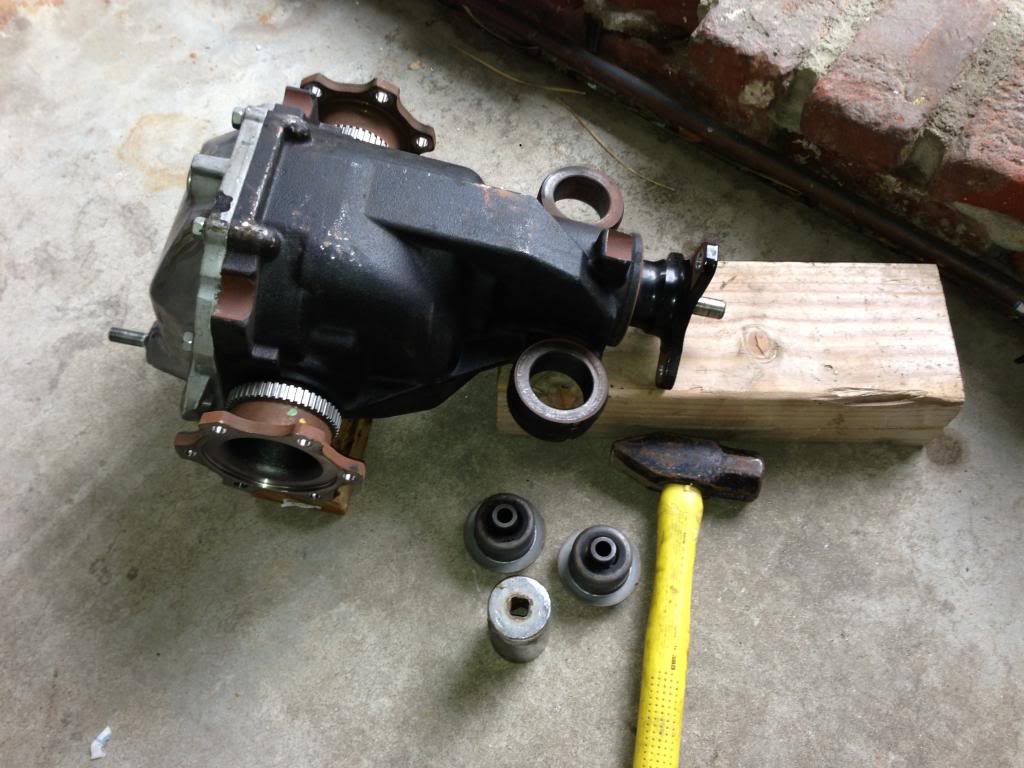
Drain differential, plug vent tube, turn upside down, set diff on a 2X4, and a 4X4 under the pinion.
1 7/16" socket and a BFH. Took only 2 whacks to get the bushings out.
There are flanges on the top of the bushings, they must be driven out from the bottom.
No cutting need on these.
Reuse the metal top hat, and lower washer, do not reuse the rubber insulator.
Crossmember bushing:
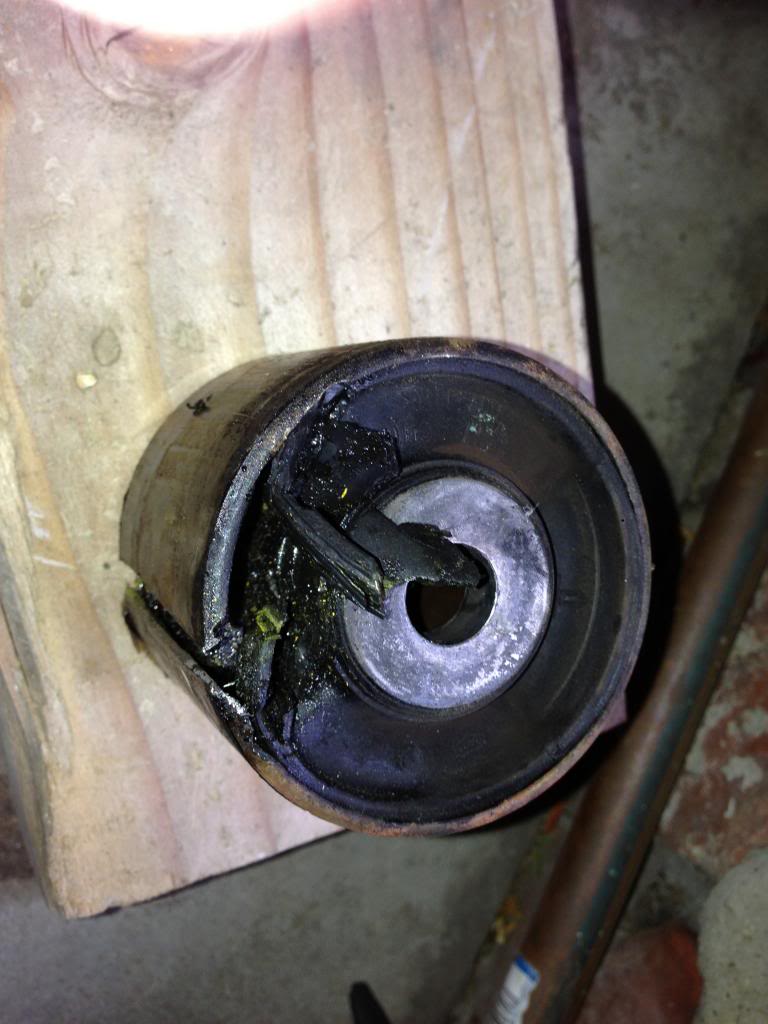
Cut the bushing with a knife to drain all the silicone, the bladders are on top and the bottom, the sides are solid rubber.
Use a drill to bore out the remaining bladder. If you dont drain the silicone, that drill will fling it all over the place.
Drill enough to get a Sawzall blade in there.
Grab a Sawzall (Reciprocating saw) with a 24T metal blase, and cut the outer sleeve.
Once cut, it only took the handle of the hammer to pop it out!!
Total time 2 minutes. GOTTA LOVE IT!!
Whiteline says to bolt the bushing on the diff, then install the diff, that will never work!!! Too hard to line up and push in.
The bushing is TIGHT!!, So I pushed it in from the rear, and used a washer, plate to receive, and a nut and bolt to draw it in from the rear. If I was on a hoist, I might have been able to just push the bushing in by hand.
If you go the rear route, you dont have to go in all the way, once the rear diff bolt is in the hole, and the front mounts are bolted in, you can draw the bushing in to the diff with the nut.
Remember tighten the front mounts first then the rear.
Do not hammer on it to get it in, its elastomer, and will bounce the hammer back in your face.
Front diff bushings just pop in!!

Damn, I forgot the Permatex RTV to change the diff cover, off to Pep Boys!!
JDM Nismo diff cover, hey, I had it off, why not!!
Letting the RTV dry.
Make bead, install bolts finger tight, let sit for one hour, tighten bolts.
Fill with 2 qts Mobil 1 LS gear lube.
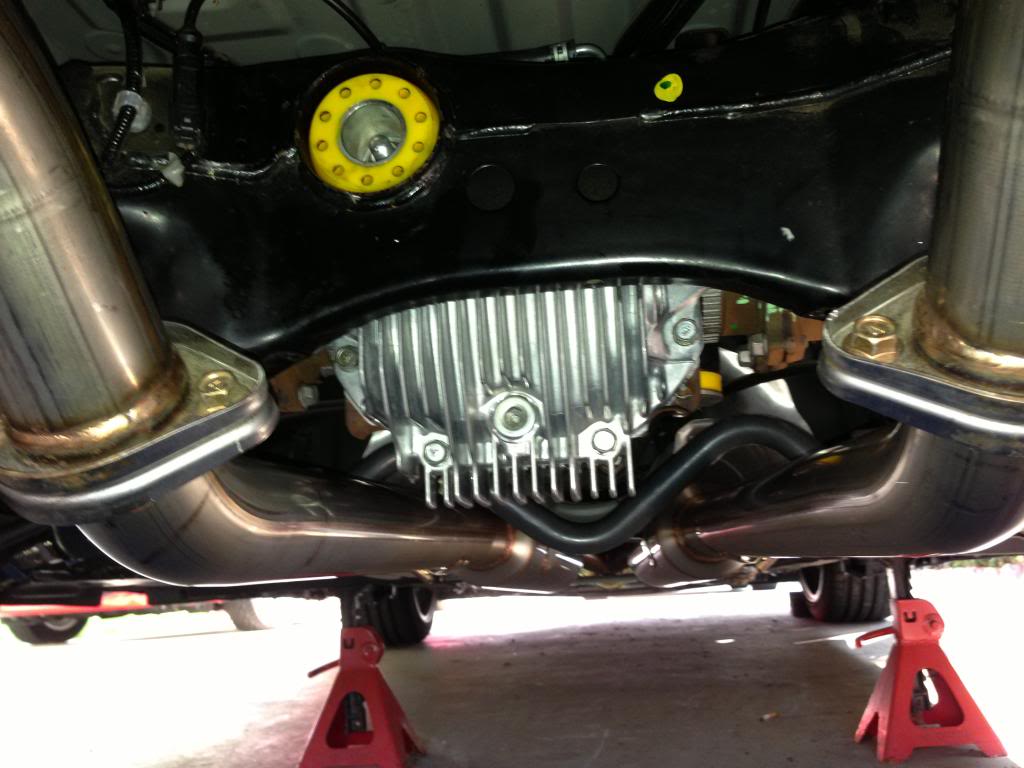
FINISHED!!!
Road test after shower!!
Road test finished.
No unusual sounds, no vibration, doesnt feel harsh.
There is a little more noise coming from the rear, feels more like a solid feeling, not bad whatsoever.
I'm trying to remember how it felt with the OEM bushing before it popped, but this now feels solid when accelerating.
My first feeling when the OEM went bad is a weird loose feeling when cornering from a stop, that all gone.
So this is a success in my book.
Total time to do this on my back using air tools, 4 hours.
If I had a hoist, maybe 2.5 hours tops.
Bottom line the G35 Whiteline bushings DO work on a G37!!
Lastly NO WHEEL HOP!!!
Over and out.
Leave me alone, I know what Im doing!!!
.
Eventually we will all need to have this done, as the OEM differential bushing is filled with silicone, and will burst, especially aggressive drivers!!
The bushing can not be replaced per Infiniti, and Nissan.
370Z drivers have a higher failure rate than we do.
The only OEM option is to replace the complete rear subframe, at a cost of $1,300.00 parts and labor.
You can get it replaced under warranty, but the dealer will find any excuse to not do this. As in your car is ,modified, you installed toe bolts, thus grinding the hole, which they say voids the warranty on that part.
I could probably talk my way into the warranty, but, I dont want them messing with my rear suspension mods. (DO a search, you will see what I did)
Now the only option for the G37/370Z right now is a solid bushing from SPL, it works very well, the Z guys love it, but it increases NVH (Do a search on NVH). We have a "Luxury sport" so comfort is reason we bought a G not a Z.
Whiteline makes a "urethane" for a lack of better word, bushing, "found it" (Synthetic Elastomer) but its meant for the G35, and they have never tested it on a G37. The OEM bushing for the G37 is ~1mm smaller, some say it wont work.
Its not urethane, as we know urethane cold melts under pressure, and time, leaving a distorted bushing. Whiteline came up with a new composite.
John at Z1 has confirmed to me that the G35/350Z Whiteline differential bushings will fit with no modification, as proven by an installation on a 370Z.
I will document the installation on my 2010 G37, which has blown the the differential bushing.
Now, theoretically, after this is done, if the Whiteline is not what I like, I can remove the Whiteline, without disassembly, and pop in a solid SPL from the rear.
I understand freezing a solid one in dry ice, will allow it to be pushed in with no force.
This is my story, I will add to this post as I progress:
Evidence of the blown bushing:
Just received the package from Kyle at Import Parts Pro in Texas:
Im installing a Nismo finned differential cover, while the diff is dropped.
Here we go!!
Muffler gone.
Mid Pipe gone.
Sway bar gone.
Driveshaft shields gone.
Disconnected diff vent hose.
Disconnected speed sensors at diff.
Marked axle shafts, and driveshaft.
Unbolted axle shafts, and driveshaft. (note to self, take the freaking car out of Park, and release the parking brake first!!)
Center support at driveshaft MUST be dropped, or driveshaft will not move far enough away from diff. There is a 1 inch pin on the diff flange.
Support axle shafts from dropping, using bungee cords to also keep shaft compressed, or CV joints come apart.
Slide Harbor Freight tranny jack ($59 parking lot sale) under diff. Priceless cause you cant bench press the MF while removing bolts)
Unbolt diff from rear crossmember, (3ft breaker bar)
Unbold front diff bolts.
Slide diff forward, and very slowly release jack, making sure nothing is hooked.
THERE IS A LARGE BLACK TAPERED WASHER ABOVE THE SIDE BUSHINGS. THEY WILL FALL TO THE GROUND, THEY NEED TO GO BACK ABOVE THE NEW BUSHINGS>
Drain differential, plug vent tube, turn upside down, set diff on a 2X4, and a 4X4 under the pinion.
1 7/16" socket and a BFH. Took only 2 whacks to get the bushings out.
There are flanges on the top of the bushings, they must be driven out from the bottom.
No cutting need on these.
Reuse the metal top hat, and lower washer, do not reuse the rubber insulator.
Crossmember bushing:
Cut the bushing with a knife to drain all the silicone, the bladders are on top and the bottom, the sides are solid rubber.
Use a drill to bore out the remaining bladder. If you dont drain the silicone, that drill will fling it all over the place.
Drill enough to get a Sawzall blade in there.
Grab a Sawzall (Reciprocating saw) with a 24T metal blase, and cut the outer sleeve.
Once cut, it only took the handle of the hammer to pop it out!!
Total time 2 minutes. GOTTA LOVE IT!!
Whiteline says to bolt the bushing on the diff, then install the diff, that will never work!!! Too hard to line up and push in.
The bushing is TIGHT!!, So I pushed it in from the rear, and used a washer, plate to receive, and a nut and bolt to draw it in from the rear. If I was on a hoist, I might have been able to just push the bushing in by hand.
If you go the rear route, you dont have to go in all the way, once the rear diff bolt is in the hole, and the front mounts are bolted in, you can draw the bushing in to the diff with the nut.
Remember tighten the front mounts first then the rear.
Do not hammer on it to get it in, its elastomer, and will bounce the hammer back in your face.
Front diff bushings just pop in!!
Damn, I forgot the Permatex RTV to change the diff cover, off to Pep Boys!!
JDM Nismo diff cover, hey, I had it off, why not!!
Letting the RTV dry.
Make bead, install bolts finger tight, let sit for one hour, tighten bolts.
Fill with 2 qts Mobil 1 LS gear lube.
FINISHED!!!
Road test after shower!!
Road test finished.
No unusual sounds, no vibration, doesnt feel harsh.
There is a little more noise coming from the rear, feels more like a solid feeling, not bad whatsoever.
I'm trying to remember how it felt with the OEM bushing before it popped, but this now feels solid when accelerating.
My first feeling when the OEM went bad is a weird loose feeling when cornering from a stop, that all gone.
So this is a success in my book.
Total time to do this on my back using air tools, 4 hours.
If I had a hoist, maybe 2.5 hours tops.
Bottom line the G35 Whiteline bushings DO work on a G37!!
Lastly NO WHEEL HOP!!!
Over and out.
Leave me alone, I know what Im doing!!!
.
Last edited by TVPostSound; Feb 3, 2014 at 07:47 PM.


Thread Starter
Registered Member
iTrader: (9)
Joined: May 2010
Posts: 3,613
Likes: 117
From: Granada Hills, CA

Registered Member


Joined: Mar 2012
Posts: 215
Likes: 14
From: Atlanta, GA
Interesting. I'm just at 60k. Was at the dealer last weekend to have some nit pick stuff fixed before I lost the warranty. Bought rear diff fluid while I was there. Moving on, got home and crawled underneath to take a look at the rear diff and see what I was up against. And I see a bunch of fluid marks all over the rear diff. I scratched my head on that one until now when I see this post. Makes total sense to me as I've been hearing the bang when I really shift hard from 1-2 in my sedan. Thanks for the pics!
Trending Topics

Thread Starter
Registered Member
iTrader: (9)
Joined: May 2010
Posts: 3,613
Likes: 117
From: Granada Hills, CA
Still need a full day to do this.
I now have my washing machine apart, only to find a broken gearbox.
Have to go with my better half to buy a new W/D set!!
She comes before the car!!
I now have my washing machine apart, only to find a broken gearbox.
Have to go with my better half to buy a new W/D set!!
She comes before the car!!
Don't fall for that. A washing machine gearbox is a $75 fix. You don't need to spend $2K on a new set, just fix the one you have and save that $ for stuff for your car. And get that damn bushing installed!
Thread Starter
Registered Member
iTrader: (9)
Joined: May 2010
Posts: 3,613
Likes: 117
From: Granada Hills, CA
It's been 10 years, got the wife a set of front loading LGs, OUCH!!! 2K?? She wanted the 4.3 CF Washer, and the 7 CF dryer it was more!!
They wont be here till next weekend, so while wifey is at the laudromat, Ive started!!
See first post!!
Last edited by TVPostSound; Mar 26, 2013 at 09:47 PM.
I just noticed your lockout nut on the toe bolt. I'm assuming you measured the eccentric bolt after an alignment and drilled a hole in a square plate? I thought about doing the same thing a while. How do you like it? Did you do another alignment afterwards to check the toe?
Found your thread on the toe lockouts. Definitely will be doing this too. Have you noticed any toe changes on your biweekly checks? Technically, the toe should never change as long as camber and ride height stays the same.
Thread Starter
Registered Member
iTrader: (9)
Joined: May 2010
Posts: 3,613
Likes: 117
From: Granada Hills, CA
I just noticed your lockout nut on the toe bolt. I'm assuming you measured the eccentric bolt after an alignment and drilled a hole in a square plate? I thought about doing the same thing a while. How do you like it? Did you do another alignment afterwards to check the toe?
I had the alignment done, measured the eccentric hole position.
Went to a machine shop, and had a waterj et cut the plates from T6061 aluminum. Used the SPL plates for the camber, and my plates for the toe.
Used SPL bolts.
The alignment was almost dead on, used SPL traction arms to adjust toe, but toe came back when camber was set!!
Cut the bushing with a knife to drain all the silicone, the bladders are on top and the bottom, the sides are solid rubber.
Use a drill to bore out the remaining bladder.
Grab a Sawzall (Reciprocating saw) with a 24T metal blase, and cut the outer sleeve.
Use a drill to bore out the remaining bladder.
Grab a Sawzall (Reciprocating saw) with a 24T metal blase, and cut the outer sleeve.