
Sedan Chat Thread

Definitely make the $60 investment for the toe/camber bolts now. Well worth it simply for the peace of mind knowing the shop will definitely be able to get you back within specs. Probably cheaper than having the car aligned twice and definitely way cheaper than toasting a set of tires in 2K miles because your rear toe is off (ask me how I know).

What you will need is 2 of part # 72265. Should cost you less than $60 total for both sets. Just make sure you have a Dremel and some good bits handy, plus a couple of hours to elongate the holes... not difficult, just time consuming.
https://www.z1motorsports.com/suspen...37-p-3981.html
Or

Awesome! I think you will be very pleased with this mod. I still believe the Hotchkis sways are one of the best bang for your buck mods for our cars and one of the best mods I've done to my car to date!


Question, about to buy some LED switchbacks, and the instructions note the following:
"Connect the wire to fuse box ACC for daytime running light feature or connect it to existing parking light positive for parking light feature"
I don't want the bulbs to be a DRL, just regular switchback. What would be required to "connect it to existing parking light positive"? Is this accessible at the bulb connector? Or would I have to find a fuse box? Trying to avoid cutting/splicing any factory wiring. TIA
Switchback LED Bulbs For Front Turn Signal & Daytime Running Lights
V3 TRITON GEN 2.5 WHITE AMBER LED SWITCHBACK SYSTEM 7440 | 1 SET - 7440 - Turn Signals Front - Shop Bulb Type


[QUOTE=2GoRNot2G;3991841]Definitely make the $60 investment for the toe/camber bolts now. Well worth it simply for the peace of mind knowing the shop will definitely be able to get you back within specs. Probably cheaper than having the car aligned twice and definitely way cheaper than toasting a set of tires in 2K miles because your rear toe is off (ask me how I know).
What you will need is 2 of part # 72265. Should cost you less than $60 total for both sets. Just make sure you have a Dremel and some good bits handy, plus a couple of hours to elongate the holes... not difficult, just time consuming.
https://www.z1motorsports.com/suspen...37-p-3981.html
Or
Awesome! I think you will be very pleased with this mod. I still believe the Hotchkis sways are one of the best bang for your buck mods for our cars and one of the best mods I've done to my car to date!
Yeah/, I decided to just go ahead and buy them since they cost just as much as an alignment. Paid $53 for them shipped.


Registered Member


Joined: Apr 2011
Posts: 1,854
Likes: 457
From: US
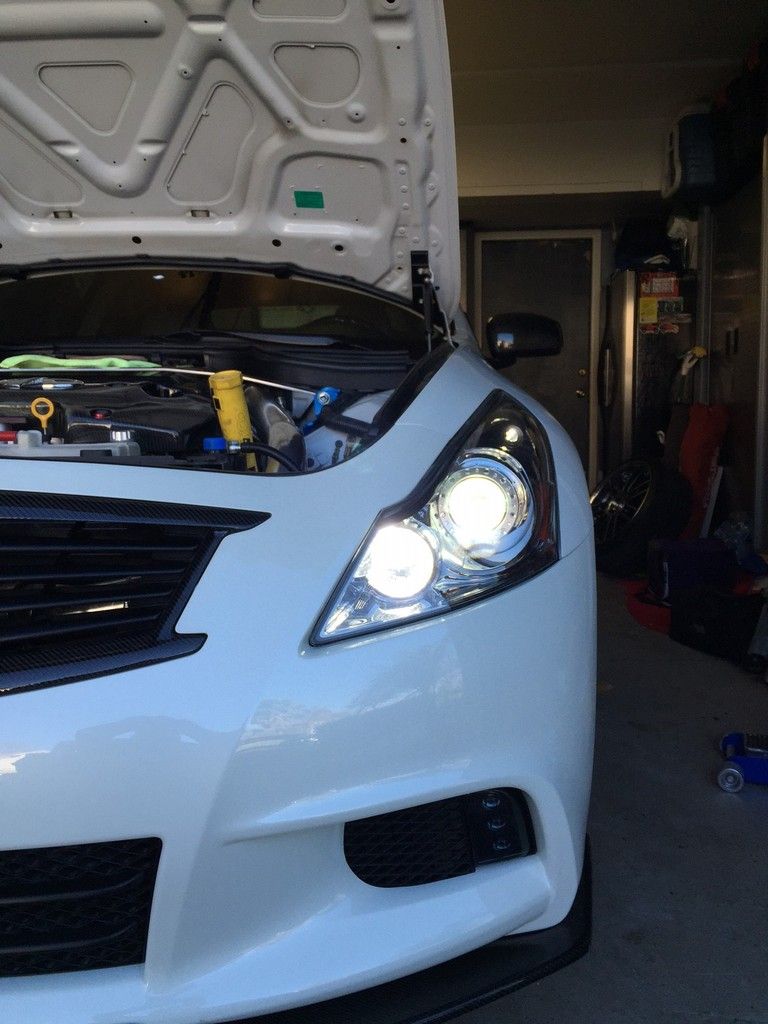
STownS, I believe the bulbs in the link you provided would require you tap into the factory headlight wiring harness for the parking light. I went with the below V3 Triton Switchbacks. They are pricey, but they have an external module that is plug and play with the factory wiring harness. Let me see if I can find some pics of the install that I can post up.
V3 TRITON GEN 2.5 WHITE AMBER LED SWITCHBACK SYSTEM 7440 | 1 SET - 7440 - Turn Signals Front - Shop Bulb Type
V3 TRITON GEN 2.5 WHITE AMBER LED SWITCHBACK SYSTEM 7440 | 1 SET - 7440 - Turn Signals Front - Shop Bulb Type
Do the bulbs fit the sockets and fit into the headlight housing easily?
Not afraid to pay more for quality

Registered Member
Joined: Sep 2015
Posts: 263
Likes: 33
From: Temple, PA

Remove the intake boxes and that is all you need to do. They include rubber washers to create a seal into the headlight.
Haha, yeah indeed they are especially after I cleaned them, and yes I did buy them before Christmas or more like at the beginning of December, trust me I do want to put them on, however that won't happen until it's definite the winter season is over, and given the abnormal weather we've been having here it's really hard to estimate. But they'll go on at the same time as the summer wheels, for which I'm planning on slapping some 275s in the rear and getting rid of the spacers
Sounds great. I understand what you mean want to wait for Spring for the install. I have the HIN San Diego show coming up this weekend and just detailed my car last weekend, so it's been sitting in the garage all week because I'm afraid to get it dirty.

FYI... I have a pair of used Bridgestone S04 P285/30R20's that came off the rear of my car if your interested in trying a cheap used set of tires before spending the $$ on brand new tires.
V3 Triton Switchbacks from VLED's:

Driver's Side Control Box & Load Resistor (black box with heat-sinks) Installed Mounted & Wired:

Passenger's Side:

After (Driver's Side Installed, Passenger's Side Stock):


Last edited by 2GoRNot2G; Feb 3, 2016 at 08:39 PM. Reason: Added Pics

Sounds great. I understand what you mean want to wait for Spring for the install. I have the HIN San Diego show coming up this weekend and just detailed my car last weekend, so it's been sitting in the garage all week because I'm afraid to get it dirty.
FYI... I have a pair of used Bridgestone S04 P285/30R20's that came off the rear of my car if your interested in trying a cheap used set of tires before spending the $$ on brand new tires.
FYI... I have a pair of used Bridgestone S04 P285/30R20's that came off the rear of my car if your interested in trying a cheap used set of tires before spending the $$ on brand new tires.

Registered Member
Joined: Apr 2011
Posts: 1,854
Likes: 457
From: US
The V3 Tritons are a very complete, high quality kit and well worth the extra $ in my opinion. I don't think you'd be disappointed with them. Yes, the easiest way to install is to jack up the front end of the car and remove the front section of the fender liner. This gives you plenty of access and space to mount the control box and tie in the wiring harness. The box simply plugs into the bulb socket (via an included adapter) on the original factory harness and then the new bulb (also attached to the control box) installs into the headlight housing. The kit also includes load resistors that plug into the control box as well (no splicing necessary). The only thing that I found to be slightly tricky is that the bulb comes with a couple of spacers, a couple of different gaskets and different screw lengths, which make this a fairly universal kit. After some trial and error (and a google search) I found that no spacers are required and you use the thinner of the two gaskets and the shorts screws (3 per bulb if I recall correctly). Here are some pics of the install.
Was the back of the headlight housings easily accessible with the fender liner peeled back? Heard it can still be pretty tight, but photos look like yu had plenty of room.
(If you can tell, first time tackling this type of install)
Car looks great by the way! Best execution for those LED DRL fixtures by far
The V3 Tritons are a very complete, high quality kit and well worth the extra $ in my opinion. I don't think you'd be disappointed with them. Yes, the easiest way to install is to jack up the front end of the car and remove the front section of the fender liner. This gives you plenty of access and space to mount the control box and tie in the wiring harness. The box simply plugs into the bulb socket (via an included adapter) on the original factory harness and then the new bulb (also attached to the control box) installs into the headlight housing. The kit also includes load resistors that plug into the control box as well (no splicing necessary). The only thing that I found to be slightly tricky is that the bulb comes with a couple of spacers, a couple of different gaskets and different screw lengths, which make this a fairly universal kit. After some trial and error (and a google search) I found that no spacers are required and you use the thinner of the two gaskets and the shorts screws (3 per bulb if I recall correctly). Here are some pics of the install.
V3 Triton Switchbacks from VLED's:

Driver's Side Control Box & Load Resistor (black box with heat-sinks) Installed Mounted & Wired:

Passenger's Side:

After (Driver's Side Installed, Passenger's Side Stock):

V3 Triton Switchbacks from VLED's:
Driver's Side Control Box & Load Resistor (black box with heat-sinks) Installed Mounted & Wired:
Passenger's Side:
After (Driver's Side Installed, Passenger's Side Stock):
 ) and, I'll be damned, they are bright. When I installed mine I also found that the extra spacers are not necessary, just the thinner foamy gasket and 3 little screws per bulb as you said, however there is one trick you may not be aware of is that you could could just use one pair of their 3Ohm resistors and hook them up to the taillights and then you wouldn't need an additional pair upfront in that case. I also recall you mentioning that you were going to get vled bulbs for the turn signals to complete the look with the tail as turn mod so in that case 3Ohm resistors would be great and neat and would save you from the risk of additional pair possibly going bad
I also noticed, you do have the sport bumper OEM DRL LED kit, but however I don't see the fog rings or fogs at all, and given you have upgraded your front end to the 2010+, it's just making me wonder, where did your fogs go?

Thanks a lot!
Was the back of the headlight housings easily accessible with the fender liner peeled back? Heard it can still be pretty tight, but photos look like yu had plenty of room.
(If you can tell, first time tackling this type of install)
Car looks great by the way! Best execution for those LED DRL fixtures by far
Thanks for the compliments... Much appreciated! The reason for the DRL's without any factory fogs is due to the location of my duel 18 row aftermarket oil and tranny coolers than are located behind those openings.
Regarding the light install... there's a good amount of room to work with once you remove the front wheels and liners, but depending on what kind of intake you have you may need to remove the air filter/air box in order to more easily get to the turn signal socket. I would also use this as a chance to change out your factory HID bulbs if you haven't already. I went with the Osram CBI 5K units (see below link) along with 5K LED's for the city lights bulbs. Incidentally the 6K V3 Tritons are the best color match for the 5K HID's for some reason, so that's what I'm running... I have another member on here (Qman) to thank for that useful advise.
D2S OSRAM XENARC 66240 CBI 5000K CRYSTAL WHITE | 1 PAIR - D2S - Headlights - Shop Bulb Type
Yes, the V3s are really worth every penny, I have mine although only amber ones, and they only light up when turn signal is applied( you know didn't want to mess up the whole look of the dual evil iron man ) and, I'll be damned, they are bright. When I installed mine I also found that the extra spacers are not necessary, just the thinner foamy gasket and 3 little screws per bulb as you said, however there is one trick you may not be aware of is that you could could just use one pair of their 3Ohm resistors and hook them up to the taillights and then you wouldn't need an additional pair upfront in that case. I also recall you mentioning that you were going to get vled bulbs for the turn signals to complete the look with the tail as turn mod so in that case 3Ohm resistors would be great and neat and would save you from the risk of additional pair possibly going bad
I also noticed, you do have the sport bumper OEM DRL LED kit, but however I don't see the fog rings or fogs at all, and given you have upgraded your front end to the 2010+, it's just making me wonder, where did your fogs go?
) and, I'll be damned, they are bright. When I installed mine I also found that the extra spacers are not necessary, just the thinner foamy gasket and 3 little screws per bulb as you said, however there is one trick you may not be aware of is that you could could just use one pair of their 3Ohm resistors and hook them up to the taillights and then you wouldn't need an additional pair upfront in that case. I also recall you mentioning that you were going to get vled bulbs for the turn signals to complete the look with the tail as turn mod so in that case 3Ohm resistors would be great and neat and would save you from the risk of additional pair possibly going bad I also noticed, you do have the sport bumper OEM DRL LED kit, but however I don't see the fog rings or fogs at all, and given you have upgraded your front end to the 2010+, it's just making me wonder, where did your fogs go?
Thanks for the comments, Mike. I actually considered getting the 3ohm resistors with the kit, but sine I had already installed 6 ohm load resistors on the rear I just went with the 6 ohm resistors for the front so I didn't have to change anything in the rear again. And I did end up replacing the rear amber turn signal bulbs with VLED's and now they all flash in time with the LED tails... next step is to make the tail lights sequential like you did.
Hahaha.. Noticed the lack of fogs, did ya?!? Yeah, I never added the factory fogs with the front end conversion because of clearance issues with my accessory oil coolers. Yes, there is actually an 18 row oil cooler behind each of those "now" intake ducts in the lower front fascia. I also have a 3rd oil cooler behind the front grill for my Rotrex SC.

