When you click on links to various merchants on this site and make a purchase, this can result in this site earning a commission. Affiliate programs and affiliations include, but are not limited to, the eBay Partner Network.
HEY! I'm new here.. Name's not actually Eric, just a name I use for accounts. It's actually Kurt. Okay.. So to everyone who is looking at the title and is like 'what...', hear me out. I'm performing a test theory. To start... Let me explain whats up.
Do you guys remember the original G37 coupe.. 2008? The one with that old 5AT? That transmission was actually a updated version of the 5AT from the old G's. Believe it or not, by observation, I have found a key thing. First off, the dipstick position. Lets go over to the.. Well.. 7AT.
Looking at pictures and peaking under my own car, 2010 G37 Sedan.. There's a capped hole on the passenger side of the transmission. Towards the bell housing. Has a bolt that's holding it down. It's a metal cap. That was where the old 5AT's dipstick was. So here's what I'm going to do. I bought one off of Ebay and I'm going to install it, or at least attempt to.
If this works, I think I might've broken the 4th wall or something. Or made Infiniti mad, same with Nissan. Plus I hate the whole sealed deal. I know you can change the fluid under the car.. But, I find it to be easier just to do it from the top. I hope this works. I shall keep everyone updated. Hopefully it will. The dipstick will arrive on Friday next week. And then I'll see if it'll fit. It should though. Crossing fingers!
THAT IT WORKED! IT ACTUALLY FREAKIN WORKED! Okay so here's the deal. Allow me to explain what I did. On the passenger side, towards the bell house, kind of a tight spot, the cap is there. If you get a flashlight, you can actually see where it is. Or if you look for it, you can see it from above behind the engine. I knew this was going to be a PITA, being a tight spot but it's do able, and you won't lose fluid either believe it or not.
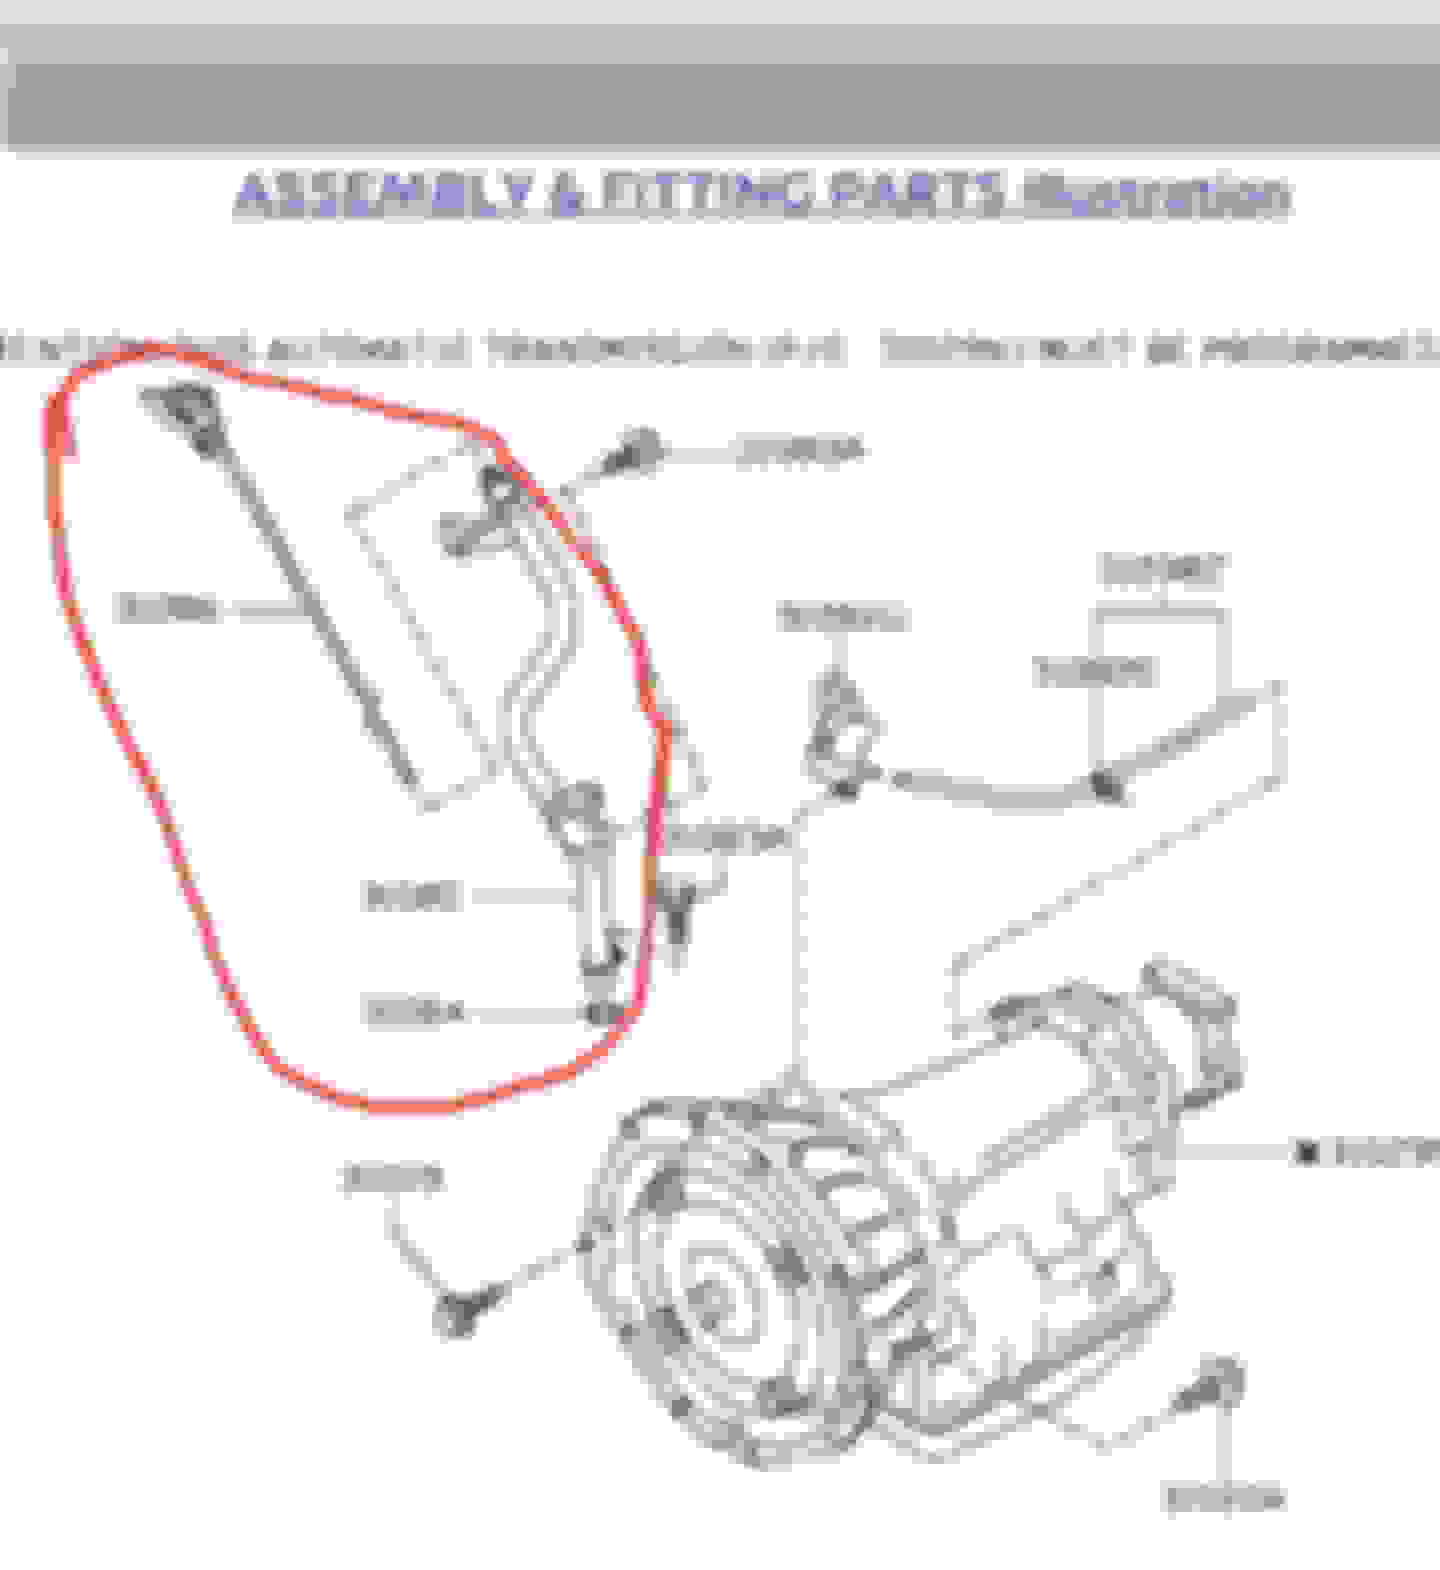
So the first thing you will need is a dipstick SPECIFICALLY from a 08 G37 coupe with a 5AT. The transmission is known by it's name, Aisin RE5R05A. Our 7at is called the Aisin RE7R01A. These two share one big thing in common, the casing. They're identical. You cannot use the RE5R01A from the previous generation of G35's, they are not the same. So you need the dipstick from the RE5R05A. This is very important okay?
Tools you will need:
1x 10MM shallow 3/8's socket
1x 3/8's ratchet
1x 10MM wrench
1x flashlight
1x short small flathead
1. Get the car either jackstands or ramps. You only need to raise the front, it doesn't need to be level as you are not adding fluid. And no it's not going to leak fluid out the port. If it does... You're overfilled anyways by way too much.
2. Locate the port. Be careful, do not attempt this if you just drove the car, it's right next to the catalytic converter (or test pipe if that's what you're running) plus the transmission is going to be incredibly hot itself. Wait a couple hours if need be. The port is going to be on the passenger side, towards the bell housing. You can see it from the top of the car as well if you look behind the engine on the passenger side. It's easy to spot from the bottom as it will have what looks like a tube casted into the transmission's side. Feel for the bolt, it's there and it's a 10mm.
3. Remove the bolt. If you have multiple extensions (I used a 12" and two 6" with a wobble knuckle), you can get it from the top. It's a lot easier that way then doing it from the bottom due to room.
4. From the bottom of the car, look up on the bell housing, you will see a metal bracket with a clip holding the wiring harness for the transmission. The bolt holding it is a 10mm. If you can save the clip, do it. I unfortunately went ahead and cut it. The dipstick tube will bolt there if it's not bent (curved) away from it. Sadly, mine was. Use multiple extensions to get to the bracket bolt from the back of the transmission, was much easier than trying to get to it in the little room I had. I used a small impact gun to take it out (milwaukee 3/8's, makes things easy).
5. Go head and remove the cap from the transmission. Why didn't I have you do it in step 3? So you don't get dirt and crud inside the transmission. Go ahead and use the flathead to pop it out. It's not really stuck in there. It literally just pops out. You could probably use your nail actually. Anyways, go ahead and remove the cap. Don't lose the o-ring in case your dipstick didn't come with one or is cracked and unusable. That's what I ended up doing.
6. Guide the dipstick tube without the dipstick down to the port. Easiest thing to do is come from the top, just remember the bolt was towards the back of the transmission and not the front. Once you are close, crawl under the car and guide it into the transmission. Take your bolt from the cap and thread it in. Don't tighten yet.
7. There is a hole on the back of the cylinder head where the dipstick will bolt to. Find a bolt that will thread in back there. It's very easy to find where it goes as the tube will naturally rest close to it or right over it. Leave finger tight.
8. Remember the wiring harness bracket I told you to take off? The middle point of the dipstick tube has it's own bracket and should line up right with the hole on the bellhousing. In my case, it did not. So I did not worry about it. If you saved the clip for the wiring harness, clip it to the dipstick tube. I zip tied it there as I'd cut the clip. And I didn't worry about the bolt. If it's like mine where it was a little bent away from there, do not worry about as you have two other points that are holding it (engine and tranny port). Just make sure the wiring harness is attached to this bracket.
9. Tighten up both the bolts on the transmission port for the dipstick and the back of the cylinder head.
10. Insert the dipstick into the tube and get your car down (off the ramps or jackstands). Start it, check for leaks. Go test drive it for a few minutes then come back and check for the leaks.
11. The most important part of all... Check the transmission fluid (the way it was supposed to be) and make sure it's at operating temp.
YOU ARE DONE and now you no longer have to do it the hard way with checking fluid, changing the fluid and checking the condition of it. And I am happy to report the dipstick is in fact accurate. HERE'S PICTURES
Dipstick coming out of said port (yes I have a coolant leak. I am currently fixing it as we speak. Just wanted to inform you guys now) The cap that sealed off the transmission, the port plug as you will. This right here marks it. A 7AT with a dipstick
Sorry for this messy instructional forum. And my rambling. Anyways I hope you guys have a good day
THAT IT WORKED! IT ACTUALLY FREAKIN WORKED! Okay so here's the deal. Allow me to explain what I did. On the passenger side, towards the bell house, kind of a tight spot, the cap is there. If you get a flashlight, you can actually see where it is. Or if you look for it, you can see it from above behind the engine. I knew this was going to be a PITA, being a tight spot but it's do able, and you won't lose fluid either believe it or not.
So the first thing you will need is a dipstick SPECIFICALLY from a 08 G37 coupe with a 5AT. The transmission is known by it's name, Aisin RE5R05A. Our 7at is called the Aisin RE7R01A. These two share one big thing in common, the casing. They're identical. You cannot use the RE5R01A from the previous generation of G35's, they are not the same. So you need the dipstick from the RE5R05A. This is very important okay?
Tools you will need:
1x 10MM shallow 3/8's socket
1x 3/8's ratchet
1x 10MM wrench
1x flashlight
1x short small flathead
1. Get the car either jackstands or ramps. You only need to raise the front, it doesn't need to be level as you are not adding fluid. And no it's not going to leak fluid out the port. If it does... You're overfilled anyways by way too much.
2. Locate the port. Be careful, do not attempt this if you just drove the car, it's right next to the catalytic converter (or test pipe if that's what you're running) plus the transmission is going to be incredibly hot itself. Wait a couple hours if need be. The port is going to be on the passenger side, towards the bell housing. You can see it from the top of the car as well if you look behind the engine on the passenger side. It's easy to spot from the bottom as it will have what looks like a tube casted into the transmission's side. Feel for the bolt, it's there and it's a 10mm.
3. Remove the bolt. If you have multiple extensions (I used a 12" and two 6" with a wobble knuckle), you can get it from the top. It's a lot easier that way then doing it from the bottom due to room.
4. From the bottom of the car, look up on the bell housing, you will see a metal bracket with a clip holding the wiring harness for the transmission. The bolt holding it is a 10mm. If you can save the clip, do it. I unfortunately went ahead and cut it. The dipstick tube will bolt there if it's not bent (curved) away from it. Sadly, mine was. Use multiple extensions to get to the bracket bolt from the back of the transmission, was much easier than trying to get to it in the little room I had. I used a small impact gun to take it out (milwaukee 3/8's, makes things easy).
5. Go head and remove the cap from the transmission. Why didn't I have you do it in step 3? So you don't get dirt and crud inside the transmission. Go ahead and use the flathead to pop it out. It's not really stuck in there. It literally just pops out. You could probably use your nail actually. Anyways, go ahead and remove the cap. Don't lose the o-ring in case your dipstick didn't come with one or is cracked and unusable. That's what I ended up doing.
6. Guide the dipstick tube without the dipstick down to the port. Easiest thing to do is come from the top, just remember the bolt was towards the back of the transmission and not the front. Once you are close, crawl under the car and guide it into the transmission. Take your bolt from the cap and thread it in. Don't tighten yet.
7. There is a hole on the back of the cylinder head where the dipstick will bolt to. Find a bolt that will thread in back there. It's very easy to find where it goes as the tube will naturally rest close to it or right over it. Leave finger tight.
8. Remember the wiring harness bracket I told you to take off? The middle point of the dipstick tube has it's own bracket and should line up right with the hole on the bellhousing. In my case, it did not. So I did not worry about it. If you saved the clip for the wiring harness, clip it to the dipstick tube. I zip tied it there as I'd cut the clip. And I didn't worry about the bolt. If it's like mine where it was a little bent away from there, do not worry about as you have two other points that are holding it (engine and tranny port). Just make sure the wiring harness is attached to this bracket.
9. Tighten up both the bolts on the transmission port for the dipstick and the back of the cylinder head.
10. Insert the dipstick into the tube and get your car down (off the ramps or jackstands). Start it, check for leaks. Go test drive it for a few minutes then come back and check for the leaks.
11. The most important part of all... Check the transmission fluid (the way it was supposed to be) and make sure it's at operating temp.
YOU ARE DONE and now you no longer have to do it the hard way with checking fluid, changing the fluid and checking the condition of it. And I am happy to report the dipstick is in fact accurate. HERE'S PICTURES
Dipstick coming out of said port (yes I have a coolant leak. I am currently fixing it as we speak. Just wanted to inform you guys now) The cap that sealed off the transmission, the port plug as you will. This right here marks it. A 7AT with a dipstick
Sorry for this messy instructional forum. And my rambling. Anyways I hope you guys have a good day
By the way, this is my car. 2010 Infiniti G37 Journey sedan. And yes she has paint problems on both the driver fender and the front bumper... She was repainted at some point and was done s*****y. One day will be fixed up and looking good! (among other things as well... 150k on the ODO)
Make this a sticky! I always wanted a transmission dipstick like the older cars! I might actually try and do this, since I've already wasted a lot of money for the interior. What is the part number Kurt?
I found the part numbers after running my 2008 (5AT) VIN:
Pipe Assembly: 31080-EY00B ($37.12);
Dipstick: 31086-EY00A ($15.43);
O-Ring Seal: 31084-20301 ($3.06);
Bolt: 31377-JL01A ($2.71).
Prices quoted as of 8 June 2019 from discountinfinitiparts.com
Hope this helps our 7AT members!
***ADDED BOLT PART NUMBER/PRICE***
Last edited by ILM-NC G37S; Jun 8, 2019 at 09:12 PM.
Reason: Added Bolt p/n & price
To be honest I bought the dipstick off of ebay so I didn't know the actual part number. Looks like someone found it though! Thank you sir ILM! As for the bolt, that I have no idea. I happened to have one in my shop that fit! But looks like from that picture, it has a part number too! Haha Infiniti is gonna be like "why are a lot of people suddenly buying dipsticks..." Now I'm no responsible for anything that goes wrong guys in case something does go wrong. But I doubt anything will. But yeah! I feel like I'm the first to try this...