
DIY: Headlight and Foglight Adjustment


I still dont get how to do it..I measured from the ground to center of my headlight then minus 2 inches i got 22.5 inches. I followed all the steps before adjustment and saw the cut light was actually higher than the 6 feet tape across. I found myself driving at night with high beam most of the time. If i adjust the cut light to the level of 6 feet tape , does it mean the light distance will be less ????
Last edited by teonguyen; Mar 3, 2014 at 02:09 PM.
Joined: Oct 2011
Posts: 6,103
Likes: 593
From: People's Republic of IL
I didn't use any measurements. Used a level concrete parking lot with no lights. Adjusted them to where I thought the light should hit (basically up a little bit).


So Ive got a little bit of an issue. Got involved in a car accident not too long ago. Long story short, the shop ended up installing an updated headlight unit on my 08 G coupe. I didnt even notice until I went and got my headlights painted and was told one side is different. So at the moment, ive got my right side headlight (the original one) with a parking light under the fog and then on the left hand side (the new one) just one bulb. So instead of going through the hassle of going back to the shop and demanding the correct unit, I'll just stick to the updated one I have. I went inside a parking structure and ended up adjusting the right hand side (the old unit) pretty easily. I found both of the ***** and turned the one furthest away from the actual headlamp. Worked like a charm. When I moved over to do the left side (updated unit), there was just one **** that I found that I could barely turn with my screwdriver. My question is, is that single **** the one I should be turning or is there another one? Also, should I try and use a socket wrench to turn the damn thing? Thanks.

Registered User
Joined: Oct 2014
Posts: 1,047
Likes: 104
From: Charlotte NC (sorta)
On my 2011 sedan, it took me a good 20 minutes to find the adjustment for the headlights, however, I don't have to remove anything. It's nothing more than moving some rubber trim out of the way which covers the hole for the adjustment. You just push it to get it to move, and there's the hole. I've forgotten exactly where it is, but it shouldn't take more than 30 seconds to find now that I know where it is. I also bought an 8" phillips screwdriver for the headlights and a 6" one for the fog lights. I could have probably used the 6" for both, but I wanted the extra length on the headlights. 8" is too long for the fog lights as I can't get it in the adjustment hole due to ground clearance. If I was lowered, I'm not even sure 6" would fit, and I know that 5" is too short.
Anyway, I've had the tools to do this for over a month now...I just haven't gotten around to it. I can't find a wall that goes all the way down. There's a curb/sidewalk/slab on every wall that I've driven by. I'll eventually give up and just deduct the height of the curb from my measurements, but I'd like to find a wall that goes all the way to the ground if possible.
I can't recall if it was this thread, or other online sources that say to have the fog lights end at 4" above the ground on the wall at 25ft. Is that right? Also, with the HID, there's a sharp cutoff. The fog lights won't be as sharp I assume...so do I put the hot center of the fog at 4" or the top of the beam at 4"?
EDIT:
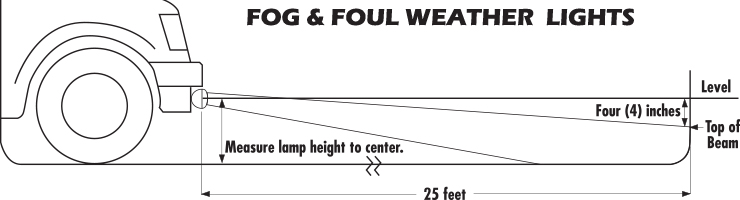
OK, I figured out where I got my 4" figure from. It's not 4" up from the ground at 25 ft...it's 4" below the center height of the fog lights (top of beam, not center) per PIAA:
Anyway, I've had the tools to do this for over a month now...I just haven't gotten around to it. I can't find a wall that goes all the way down. There's a curb/sidewalk/slab on every wall that I've driven by. I'll eventually give up and just deduct the height of the curb from my measurements, but I'd like to find a wall that goes all the way to the ground if possible.
I can't recall if it was this thread, or other online sources that say to have the fog lights end at 4" above the ground on the wall at 25ft. Is that right? Also, with the HID, there's a sharp cutoff. The fog lights won't be as sharp I assume...so do I put the hot center of the fog at 4" or the top of the beam at 4"?
EDIT:
OK, I figured out where I got my 4" figure from. It's not 4" up from the ground at 25 ft...it's 4" below the center height of the fog lights (top of beam, not center) per PIAA:
Last edited by G37Xtreme; Feb 3, 2015 at 04:28 PM.


Registered Member
Joined: Jul 2015
Posts: 1,397
Likes: 335
From: Maryland
I can finally see at night again! My headlight alignment was way off... my passenger side headlight was significantly lower than my driver side for some reason, and with the newly installed coilovers my headlights were basically pointing at the ground.
I used a super long 16" Phillips screwdriver to get to the adjustment ***** so I didn't need to remove anything. The driver side adjustment **** is super easy to access without removing anything. The passenger side, however, is a lot harder since more stuff is in the way. Without a longer screwdriver, it's tough to access the ***** unless you remove the airbox and windshield washer fluid reservoir.
Also, I have AFS and I can confirm that the headlights did not auto-level back down after I restarted the car. Hopefully they won't in the future, but for now they're good.
This is for an '09 sedan btw.
On my 2011 sedan, it took me a good 20 minutes to find the adjustment for the headlights, however, I don't have to remove anything. It's nothing more than moving some rubber trim out of the way which covers the hole for the adjustment. You just push it to get it to move, and there's the hole. I've forgotten exactly where it is, but it shouldn't take more than 30 seconds to find now that I know where it is. I also bought an 8" phillips screwdriver for the headlights and a 6" one for the fog lights. I could have probably used the 6" for both, but I wanted the extra length on the headlights. 8" is too long for the fog lights as I can't get it in the adjustment hole due to ground clearance. If I was lowered, I'm not even sure 6" would fit, and I know that 5" is too short.
Anyway, I've had the tools to do this for over a month now...I just haven't gotten around to it. I can't find a wall that goes all the way down. There's a curb/sidewalk/slab on every wall that I've driven by. I'll eventually give up and just deduct the height of the curb from my measurements, but I'd like to find a wall that goes all the way to the ground if possible.
I can't recall if it was this thread, or other online sources that say to have the fog lights end at 4" above the ground on the wall at 25ft. Is that right? Also, with the HID, there's a sharp cutoff. The fog lights won't be as sharp I assume...so do I put the hot center of the fog at 4" or the top of the beam at 4"?
EDIT:
OK, I figured out where I got my 4" figure from. It's not 4" up from the ground at 25 ft...it's 4" below the center height of the fog lights (top of beam, not center) per PIAA:
I started turning the white nut see post 91 and it does raise and lower the light. Is that the correct adjuster? I don't want to damage anything on my new lights. Please advise.
My question is this; those plastic rivets holding down the weather stripping would just not release. Ended up breaking both on one side. Later realized they don't really need to come off to gain access.
Where do I get these replacement rivets without paying an arm and a leg?
Where do I get these replacement rivets without paying an arm and a leg?
They're not very expensive.
Sean