
DIY: Headlight and Foglight Adjustment


Registered Member


Joined: Feb 2011
Posts: 1,284
Likes: 24
From: Ont.
Headlamp adjustment for 2010+ sedans?
Has anyone done headlamp aiming adjustment on a 2010+ sedan that does NOT have AFS (Active Front lighting System)?
Now that the fog lamps are in the lower bumper there is only one adjustment screw to locate for the headlamp projector. In other words, no fog lamp screw to worry about or cause any confusion.
Questions:
TIA
Now that the fog lamps are in the lower bumper there is only one adjustment screw to locate for the headlamp projector. In other words, no fog lamp screw to worry about or cause any confusion.
Questions:
- Is the 2010+ G37 sedan adjustment screw covered with a white plastic collar as seen here - (LINK)?
- If you have made adjustments to raise the beam, do you recall approximately how much you turned the screw clockwise? (I will follow the proper aiming adjustment procedure. I am simply curious)
- Does anyone have a good photo for the 2010+ sedan headlamp adjustment screw?
TIA

FWIW, on your second question, turning the screw on my '07 (or any other car i've had in the past for that matter) doesn't feel like a 1:1 thing, you'll be turning more than the bulb will move -- great for fine tuning.

Has anyone done headlamp aiming adjustment on a 2010+ sedan that does NOT have AFS (Active Front lighting System)?
Now that the fog lamps are in the lower bumper there is only one adjustment screw to locate for the headlamp projector. In other words, no fog lamp screw to worry about or cause any confusion.
Questions:
TIA
Now that the fog lamps are in the lower bumper there is only one adjustment screw to locate for the headlamp projector. In other words, no fog lamp screw to worry about or cause any confusion.
Questions:
- Is the 2010+ G37 sedan adjustment screw covered with a white plastic collar as seen here - (LINK)?
- If you have made adjustments to raise the beam, do you recall approximately how much you turned the screw clockwise? (I will follow the proper aiming adjustment procedure. I am simply curious)
- Does anyone have a good photo for the 2010+ sedan headlamp adjustment screw?
TIA
As for seeing how many turns I wouldnt know exactly I just lifted them up maybe an inch from stock. I probably will get banged on the forum because that might blind drivers but I will try that for now and fine tune it later on when I have more time.
Registered Member
Joined: Feb 2011
Posts: 1,284
Likes: 24
From: Ont.
To answer your questions, 1. It is that white thing but you would have to remove it which is a pain in the a**. But once it's gone it will show a long screw that is the adjustment screw.
As for seeing how many turns I wouldnt know exactly I just lifted them up maybe an inch from stock. I probably will get banged on the forum because that might blind drivers but I will try that for now and fine tune it later on when I have more time.
As for seeing how many turns I wouldnt know exactly I just lifted them up maybe an inch from stock. I probably will get banged on the forum because that might blind drivers but I will try that for now and fine tune it later on when I have more time.
I adjusted them a couple months ago. I used a 12" phillips to reach down and turn the adjuster gear. I could clearly see it, down through a hole, as soon as I moved the rubber molding a bit out of the way.
I will try a take a picture and post it.

Registered User
Joined: May 2011
Posts: 3
Likes: 0
From: riverside ca
Great DIY. I finally decided to adjust my headlights. I turned the gear too much and I beleive they fell out of place. I turn the gear but nothing happens now. Any idea how to put them back in place. Thanks in advance


Joined: Oct 2011
Posts: 6,103
Likes: 594
From: People's Republic of IL
No it's not in the white plastic.
I adjusted them a couple months ago. I used a 12" phillips to reach down and turn the adjuster gear. I could clearly see it, down through a hole, as soon as I moved the rubber molding a bit out of the way.
I will try a take a picture and post it.
I adjusted them a couple months ago. I used a 12" phillips to reach down and turn the adjuster gear. I could clearly see it, down through a hole, as soon as I moved the rubber molding a bit out of the way.
I will try a take a picture and post it.
I don't normally drive the car down pitch black country roads at night, but had little choice last night. At highway speeds, the lights were a bit too close for my liking.
Thanks!
Joined: Oct 2011
Posts: 6,103
Likes: 594
From: People's Republic of IL
Been meaning to do this for a while now.
We're finally getting some warm temps so I figured do it today.
In the later models (mine is a 2012 sedan), the core support arrangement is similar, but different - also, the lamps are different too because the fog lights are now part of the lower bumper, not part of the main lamp assembly.
With a good flashlight, I was able to locate the adjusting holes and used a make shift screwdriver (several 1/4" extensions + philips bit) to reach down in there. It does take quite a few rotations to get any noticeable movement. I just used my garage wall as a reference and raised both sides slightly. Will drive tonight to confirm if it's good or if I need to raise/lower more.
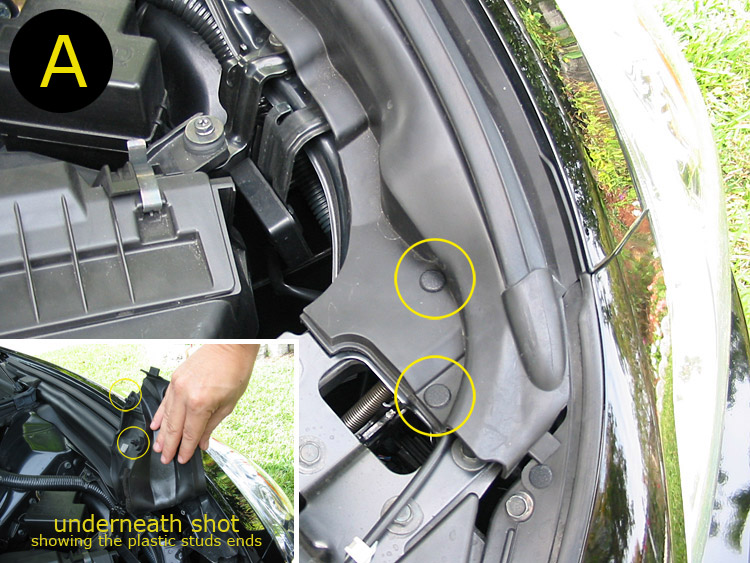
My question is this; those plastic rivets holding down the weather stripping would just not release. Ended up breaking both on one side. Later realized they don't really need to come off to gain access.
Where do I get these replacement rivets without paying an arm and a leg?
We're finally getting some warm temps so I figured do it today.
In the later models (mine is a 2012 sedan), the core support arrangement is similar, but different - also, the lamps are different too because the fog lights are now part of the lower bumper, not part of the main lamp assembly.
With a good flashlight, I was able to locate the adjusting holes and used a make shift screwdriver (several 1/4" extensions + philips bit) to reach down in there. It does take quite a few rotations to get any noticeable movement. I just used my garage wall as a reference and raised both sides slightly. Will drive tonight to confirm if it's good or if I need to raise/lower more.
My question is this; those plastic rivets holding down the weather stripping would just not release. Ended up breaking both on one side. Later realized they don't really need to come off to gain access.
Where do I get these replacement rivets without paying an arm and a leg?
Registered Member
Joined: Feb 2011
Posts: 1,284
Likes: 24
From: Ont.
Been meaning to do this for a while now.
We're finally getting some warm temps so I figured do it today.
In the later models (mine is a 2012 sedan), the core support arrangement is similar, but different - also, the lamps are different too because the fog lights are now part of the lower bumper, not part of the main lamp assembly.
With a good flashlight, I was able to locate the adjusting holes and used a make shift screwdriver (several 1/4" extensions + philips bit) to reach down in there. It does take quite a few rotations to get any noticeable movement. I just used my garage wall as a reference and raised both sides slightly. Will drive tonight to confirm if it's good or if I need to raise/lower more.
My question is this; those plastic rivets holding down the weather stripping would just not release. Ended up breaking both on one side. Later realized they don't really need to come off to gain access.
Where do I get these replacement rivets without paying an arm and a leg?
Sorry for not getting around to posting a pic.
One thing to note. You don't need to remove the rubber at all. It's flexible so just pull it back an inch or so to expose the hole in the metal that leads down to the adjustment gear.


Registered User
Joined: Oct 2013
Posts: 18
Likes: 0
Rpm,
Im wondering where can i find the screw to adjust the headlight... I have a 2011 G37 sedan and i cant seem to find the screw... I did find the cream color thing the other guy suggested it was, but i dont know if i should cut it as i dont know if that is what it is...
Thanks in advance,
Alejandro
Im wondering where can i find the screw to adjust the headlight... I have a 2011 G37 sedan and i cant seem to find the screw... I did find the cream color thing the other guy suggested it was, but i dont know if i should cut it as i dont know if that is what it is...
Thanks in advance,
Alejandro
Joined: Oct 2011
Posts: 6,103
Likes: 594
From: People's Republic of IL
Look in post #85. See the 2 rivets. You need to undo that part of the weather stripping. The adjustment screw is roughly below the rivet furthest away from the hood release cable. You'll need a long philips #2 to reach it.
Registered User
Joined: Oct 2013
Posts: 18
Likes: 0
Thank you.