

Has anyone replaced the front seats in their sedan?


I got a really good deal on the Bride seat MO brackets from my buddy, so I'm not sure what a good "street" price is for them. Someone like Evasive Motorsports can probably get them for you. Just keep in mind the specific models for the V36 sedan are special order from Japan, so they will probably take around 4 - 6 weeks to get them.
Evasive Motorsports | PH: 626.336.3400 Mon-Fri, 9am-6pm PST: BRIDE Type-MO Seat Rail (Reclining/Other Sport Seat Maker)
Evasive Motorsports | PH: 626.336.3400 Mon-Fri, 9am-6pm PST: BRIDE Type-MO Seat Rail (Reclining/Other Sport Seat Maker)


Faking out the air bag light in the instrument cluster is pretty easy. You will just need to add a 2.2 Ohm resistor to the car side of the seat air bag wiring harness under each seat (the yellow connector in the above pics). This resistance basically equals the same resistance that the car sees when it is attached to a working air bag. The more difficult issue to get around is the weight sensor in the passenger's seat that allows the passenger side air bag to work and control the light that's on the lower portion of the center stack below the HVAC controls. To work around this I purchase a used lower seat cushion (must be from a passenger's seat) from eBay and sacrificed it for the weight sensor. If you want the passenger's air bag to still turn on and off based on the weight sensed in the passenger's seat then you will need to install this weight sensor in the lower cushion of your new seat. Just be careful because this sensor is position sensitive and needs to be installed black side up (white side down) in the exact same orientation as it was in the original seat (i.e. same side forward, etc...), so you need to make note of it's orientation when you pull it out of the original seat cushion. The other option that I've heard works, but I have not tried is that you can wrap the sensor up and use rubber bands or tip ties to hold it together and just let it rest under the passenger's seat. Wrapping it like this is said to make the sensor believe that it is weight and should keep the passenger's air bag active at all times... basically it thinks you always having a passenger sitting in the seat. Another work around that I found during my research is a company that makes an occupancy sensor override module that connects to the passenger side occupancy/weight sensor connector under the passengers seat (the white connector with the red, purple, and black wires) which eliminates the need for the OEM sensor. This module is around $89 and can be found at the below link. I have not tried this method, so I cannot confirm it works, but it seems like a nice alternative.
Infinity G37 Passenger Seat Occupancy Sensor OCCUPANT CLASSIFICATION SENSOR EMULATOR
I also had seat heaters added to my custom seats and was able to successfully connect those to the OEM seat heater switches. The largest white connector has the wires for the factory OEM seat heaters. You'll need to tap into the black, grey, and yellow wires. The negative wire for your aftermarket seat heaters will be connected to the black wire, and the grey & yellow wires are for the positive leads for the low and high seat heater settings. The green wire in this connector will not be used as it feeds power to the factory seat motors that actually move the OEM seat.
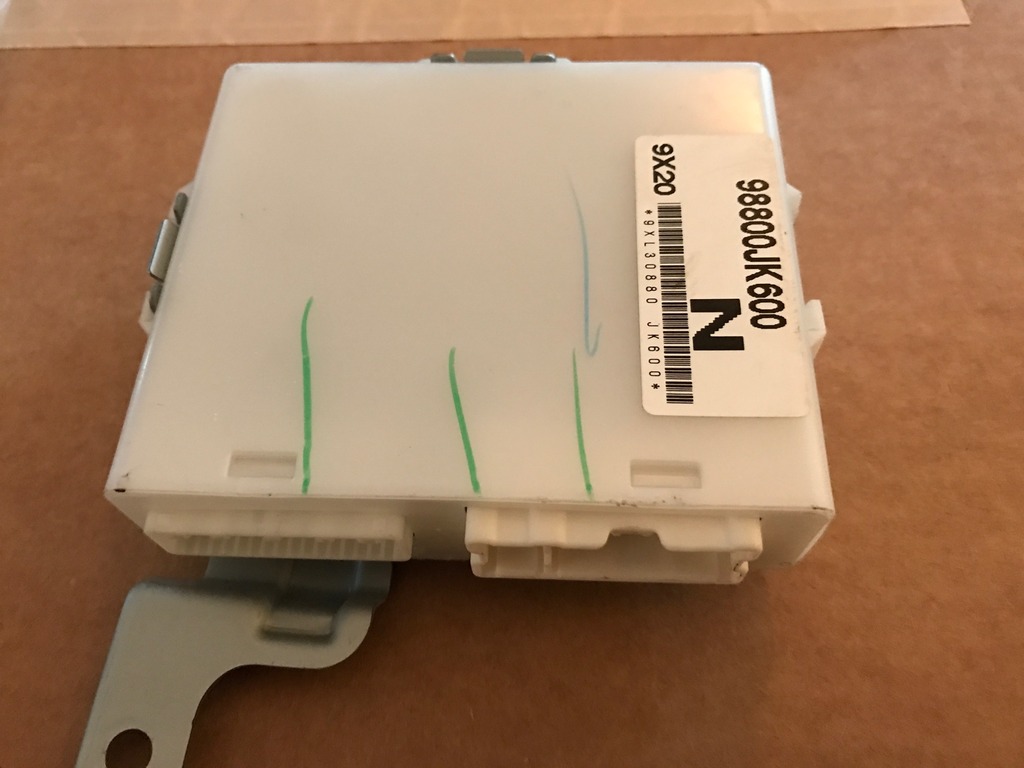
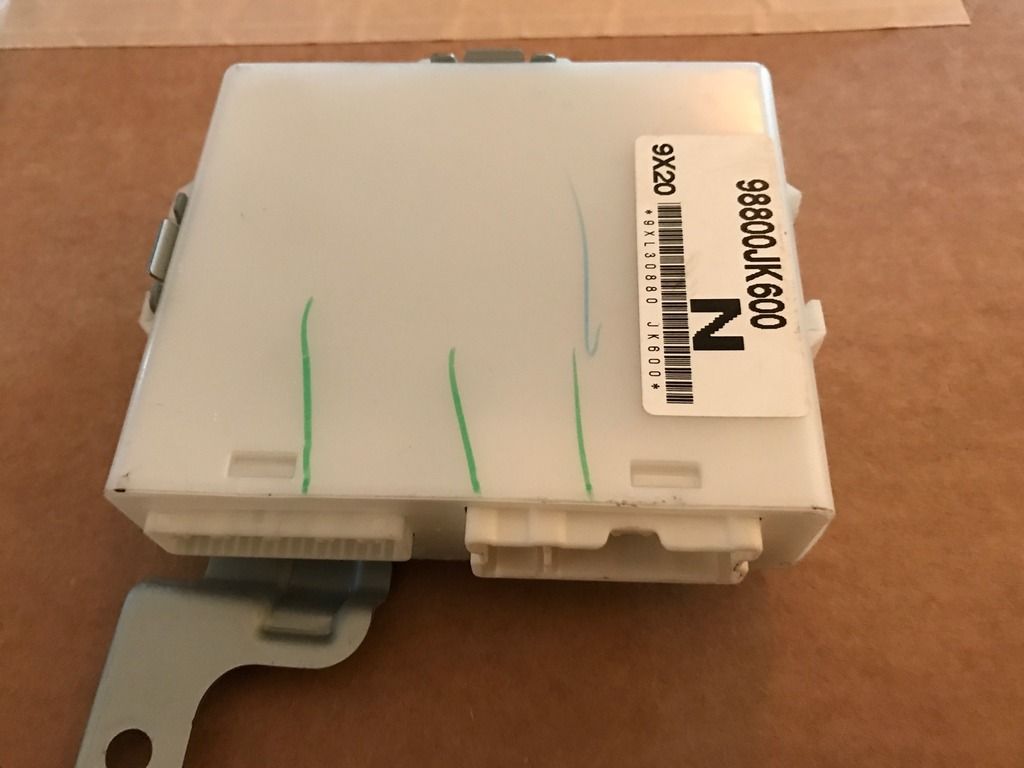
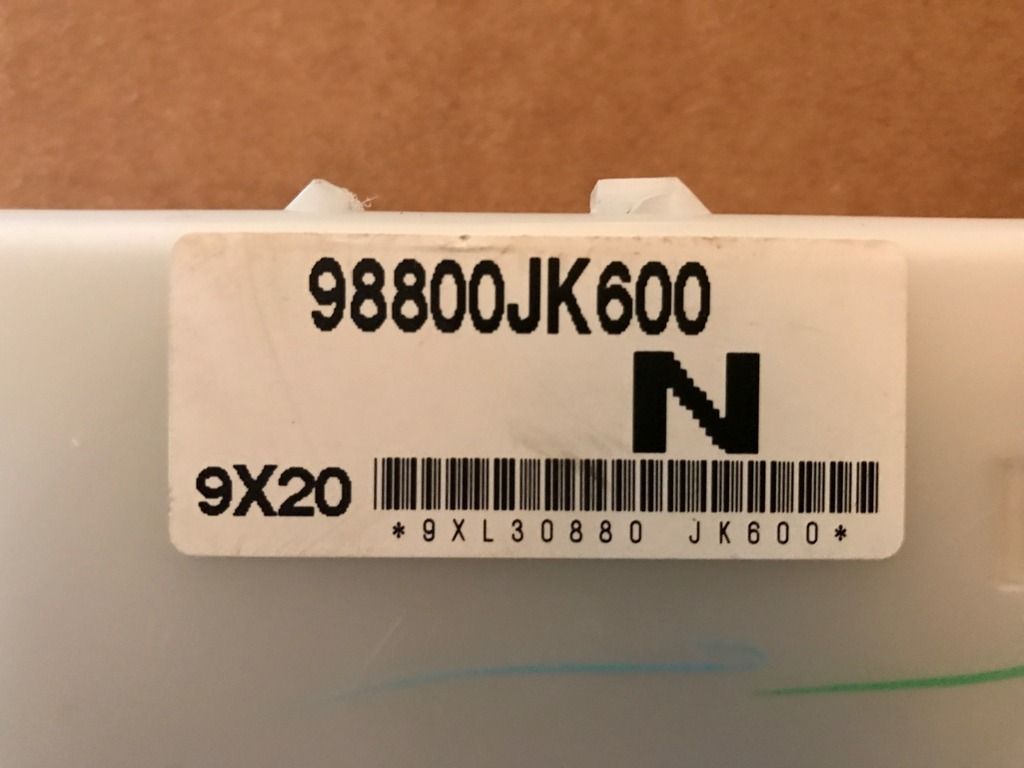
In order to keep your factory mirror controls and presets you will need to either keep your factory seat control module connected (under the driver's seat)... Or you can do what I did and purchase a used one on eBay I got mine for $15 shipped, so I could keep my factory seats fully intact. The part number for this control box should be the same for all years... 98800JK600.

Below is a link to another one available on eBay for $15 shipped.
http://www.ebay.com/itm/201693808437
The last connector (small white connector with white and black leads) gets connected to the seat belt connector on the OEM belt buckle connector.
Infinity G37 Passenger Seat Occupancy Sensor OCCUPANT CLASSIFICATION SENSOR EMULATOR
I also had seat heaters added to my custom seats and was able to successfully connect those to the OEM seat heater switches. The largest white connector has the wires for the factory OEM seat heaters. You'll need to tap into the black, grey, and yellow wires. The negative wire for your aftermarket seat heaters will be connected to the black wire, and the grey & yellow wires are for the positive leads for the low and high seat heater settings. The green wire in this connector will not be used as it feeds power to the factory seat motors that actually move the OEM seat.
In order to keep your factory mirror controls and presets you will need to either keep your factory seat control module connected (under the driver's seat)... Or you can do what I did and purchase a used one on eBay I got mine for $15 shipped, so I could keep my factory seats fully intact. The part number for this control box should be the same for all years... 98800JK600.


Below is a link to another one available on eBay for $15 shipped.
http://www.ebay.com/itm/201693808437
The last connector (small white connector with white and black leads) gets connected to the seat belt connector on the OEM belt buckle connector.

Originally Posted by 2GoRNot2G
Hey guys. The OP PM'ed me and asked me to post up in this thread about my experience with putting custom seats in my car.
I can confirm that the Wedge brackets for the G37 coupe do NOT fit our cars (V36 Sedans). I tried test fitting a set of these for Wedge and driver's side bracket was close with 3 of the 4 holes lining up but the passenger's side bracket didn't line up at all. All the companies I talked to about these seat brackets confirmed that the sedan and coupe are different. I even talked to a couple of other companies about custom making brackets, but without my car and/or the lower seat assemblies from the sedan they couldn't make them.
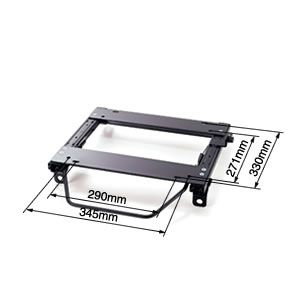
I have a buddy that works for Tanabe USA/Bride/SSR here in town and he also confirmed that Bride Japan is currently the only company making seat brackets for our V36 sedans. So, just like Tony, I ended up going with the Bride brackets (Part #'s N109MO and N110MO). Although these brackets seem pricey, they are high quality mounts and come with the mount, sliders and adapter plates. They also have mounting points for the factory seat belts, which a lot of the other coupe mounts seem to omit. The bride brackets will also fit most bottom mount aftermarket seats including Sparco and Cobra, assuming they have one of the bolt patterns listed in the below drawing.
I can confirm that the Wedge brackets for the G37 coupe do NOT fit our cars (V36 Sedans). I tried test fitting a set of these for Wedge and driver's side bracket was close with 3 of the 4 holes lining up but the passenger's side bracket didn't line up at all. All the companies I talked to about these seat brackets confirmed that the sedan and coupe are different. I even talked to a couple of other companies about custom making brackets, but without my car and/or the lower seat assemblies from the sedan they couldn't make them.
I have a buddy that works for Tanabe USA/Bride/SSR here in town and he also confirmed that Bride Japan is currently the only company making seat brackets for our V36 sedans. So, just like Tony, I ended up going with the Bride brackets (Part #'s N109MO and N110MO). Although these brackets seem pricey, they are high quality mounts and come with the mount, sliders and adapter plates. They also have mounting points for the factory seat belts, which a lot of the other coupe mounts seem to omit. The bride brackets will also fit most bottom mount aftermarket seats including Sparco and Cobra, assuming they have one of the bolt patterns listed in the below drawing.

Thank you for posting and confirming this. The internet has fooled me once again and it blows my mind that I found those few posts that were bogus lol
Thanks again for the info. I figured Tony's 08 g35 was the same as the 09+ g37 but just wanted to confirm.
Do either of you guys remember where you purchased these brackets from? Any help is greatly appreciated
Originally Posted by 2GoRNot2G
Faking out the air bag light in the instrument cluster is pretty easy. You will just need to add a 2.2 Ohm resistor to the car side of the seat air bag wiring harness under each seat (the yellow connector in the above pics). This resistance basically equals the same resistance that the car sees when it is attached to a working air bag. The more difficult issue to get around is the weight sensor in the passenger's seat that allows the passenger side air bag to work and control the light that's on the lower portion of the center stack below the HVAC controls. To work around this I purchase a used lower seat cushion (must be from a passenger's seat) from eBay and sacrificed it for the weight sensor. If you want the passenger's air bag to still turn on and off based on the weight sensed in the passenger's seat then you will need to install this weight sensor in the lower cushion of your new seat. Just be careful because this sensor is position sensitive and needs to be installed black side up (white side down) in the exact same orientation as it was in the original seat (i.e. same side forward, etc...), so you need to make note of it's orientation when you pull it out of the original seat cushion. The other option that I've heard works, but I have not tried is that you can wrap the sensor up and use rubber bands or tip ties to hold it together and just let it rest under the passenger's seat. Wrapping it like this is said to make the sensor believe that it is weight and should keep the passenger's air bag active at all times... basically it thinks you always having a passenger sitting in the seat. Another work around that I found during my research is a company that makes an occupancy sensor override module that connects to the passenger side occupancy/weight sensor connector under the passengers seat (the white connector with the red, purple, and black wires) which eliminates the need for the OEM sensor. This module is around $89 and can be found at the below link. I have not tried this method, so I cannot confirm it works, but it seems like a nice alternative.
Infinity G37 Passenger Seat Occupancy Sensor OCCUPANT CLASSIFICATION SENSOR EMULATOR
I also had seat heaters added to my custom seats and was able to successfully connect those to the OEM seat heater switches. The largest white connector has the wires for the factory OEM seat heaters. You'll need to tap into the black, grey, and yellow wires. The negative wire for your aftermarket seat heaters will be connected to the black wire, and the grey & yellow wires are for the positive leads for the low and high seat heater settings. The green wire in this connector will not be used as it feeds power to the factory seat motors that actually move the OEM seat.
In order to keep your factory mirror controls and presets you will need to either keep your factory seat control module connected (under the driver's seat)... Or you can do what I did and purchase a used one on eBay I got mine for $15 shipped, so I could keep my factory seats fully intact. The part number for this control box should be the same for all years... 98800JK600.
Below is a link to another one available on eBay for $15 shipped.
http://www.ebay.com/itm/201693808437
The last connector (small white connector with white and black leads) gets connected to the seat belt connector on the OEM belt buckle connector.


Thread Starter
Registered Member
iTrader: (7)
Joined: Sep 2015
Posts: 4,724
Likes: 697
From: Appleton, WI
2GoRNot2G- Thanks a ton for posting up all this good info. This is exactly what we needed. Now I just need to confirm that the Bride seat rails will bolt up ok with the Sparco seats and I am all set. Looks like it will be a bit of a project acquiring all the right parts, but not too bad.
Thanks for including the info on the heated seat part too. I'll see if I can make that work as well. I have a good custom interior place that should be able to heat the Sparcos if the padding would work with it. I wonder if I should try that since those seats were not originally intended to be heated. Hmmm...
Thanks for including the info on the heated seat part too. I'll see if I can make that work as well. I have a good custom interior place that should be able to heat the Sparcos if the padding would work with it. I wonder if I should try that since those seats were not originally intended to be heated. Hmmm...
No problem. Sorry it took me so long to post up on here, but I've been busy with work.
I did forget to mention that in order to keep you mirror controls/presets you will also need to purchase a driver's seat wiring harness (mine was part # 185Q0-A2323) along with the seat control box unless you decide to cannibalize your factory seat.
I did forget to mention that in order to keep you mirror controls/presets you will also need to purchase a driver's seat wiring harness (mine was part # 185Q0-A2323) along with the seat control box unless you decide to cannibalize your factory seat.
Originally Posted by 2GoRNot2G
No problem. Sorry it took me so long to post up on here, but I've been busy with work.
I did forget to mention that in order to keep you mirror controls/presets you will also need to purchase a driver's seat wiring harness (mine was part # 185Q0-A2323) along with the seat control box unless you decide to cannibalize your factory seat.
I did forget to mention that in order to keep you mirror controls/presets you will also need to purchase a driver's seat wiring harness (mine was part # 185Q0-A2323) along with the seat control box unless you decide to cannibalize your factory seat.

I'm not sure I fully understand your question... If you want to retail the power mirrors and memory features then you need to keep the OEM seat control box in the loop. Does this answer your question?
They new seats "appear" to sit a bit higher than the OEM seats, but I believe that is only because there is now so much extra space under the seats (due to lack of the power seat mechanism). But when you sit in the seats there isn't any noticeable difference in height.
Thread Starter
Registered Member
iTrader: (7)
Joined: Sep 2015
Posts: 4,724
Likes: 697
From: Appleton, WI
They new seats "appear" to sit a bit higher than the OEM seats, but I believe that is only because there is now so much extra space under the seats (due to lack of the power seat mechanism). But when you sit in the seats there isn't any noticeable difference in height.