
G37/G35 sedan trunk spoiler for $55 on Ebay


I'm looking for a 2009 G37S Sedan 6MT over the next few months, and would really like to have the rear lip spoiler on the trunk that comes with 4WAS. So finding this thread was perfect information for my not-too-distant plans. Well done.
Ok, here's my DIY install info, but first check out InTgr8r's nice Spoiler thread here~
http://g35driver.com/forums/v36-diy/...r-install.html
This install is quite simple and since I didn't use the push clips at the very ends of the spoiler you won't be drilling holes into the trunk outside of the existing chrome trunk trim. This is great in case you want to return it to stock at a later date, or if you have horrible luck drilling holes and end up w/ a real mess that you can't cover up w/out expensive body work
If you look on pg 4 of the above thread you'll see the hardware assortment and a pic of the spoiler & trunk button bracket (known as TBB in the rest of this thread). There's also a little plastic extender (not shown in the pics)that attaches to the TBB, this allows the trunk button to mount w/ the proper stock depth, without it the button would be behind the trunk button hole, not slightly sticking out like it needs to be. I'll detail this install later as it's different than how it mounts to the chrome lip.
Remove the chrome lip and unscrew the trunk button from the original TBB, you"ll also remove the TBB from the chrome lip since you'll be reusing all 6 of these screws (but not the old TBB) for the new spoiler. Install the new TBB on the new spoiler w/ just a couple screws, you'll be taking it off later to install the trunk button/switch, but you'll need it on the spoiler to get it drilled & fitted. The only other hardware you'll need are (4) M5 bolts aprox 1" long (4) M5 fender washers, and (4) M5 lock washers, I recommend stainless steel if you can get them.
If you want to paint your trunk button to match your new spoiler color now is the only time you'll be able to do it, it pops off easily from the wired switch so you can sand & paint (I plasti-dipped mine since I Plasti-dipped my original chrome lip). This will set you back for the install since you'll have to allow drying time w/ multiple coats so plan accordingly if you want a non-chrome trunk button.
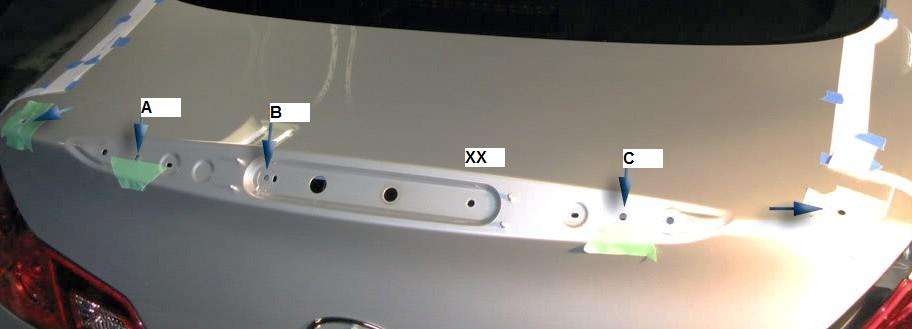
Here's the 4 holes involved in my install~XX is the only factory hole, AB&C are the new holes that you'll drill.
Put a pair of work gloves or a couple rags on the bottom trunk edge so the trunk won't keep closing & locking on you, you'll be opening & closing it a lot so no need to have to keep unlocking the thing
Lay spoiler lightly on the trunk just to see where you'll need to put down 3m blue painters tape to protect the paint while you're getting it fitted.
Apply painters tape to area where spoiler comes in contact w/ trunk paint. Once you've got it all protected you can test fit by putting a bolt into the XX hole and lightly snugging down the spoiler just to see how it'll look.
Looks pretty good huh
Now you're ready to drill the 3 new holes. Please measure the holes in your new spoiler just in case for some reason Infiniti decided to change things up (in that case you're on your own)
Using the center of XX as your starting point you'll mark the holes as follows: The center of Hole B is exactly the same center as XX and 9 7/8"
away, just lay your straight edge from the center of XX across the center of the existing hole (about 1/2" inside of the new hole B) and mark your drill point. Drill a 1/4" hole, carefully clean any drill shavings then lift the trunk , lay down the spoiler to make sure the spoiler holes line up and you can thread both bolts cleanly into the spoiler, if not you'll have to make a slightly larger hole, but if you measured correctly you'll be fine.
Next is hole A, this holes center is 1/16" higher (toward the roof) than the center lines of XX & B and is 17 1/8" from the center of XX. Run your straight edge from the center of XX through the center of B, and now to your new A drill point and mark a point 1/16th" higher, drill it, remove shavings, then test fit to make sure these 3 holes line up and again thread all 3 bolts in to be sure you're still fine. Once these are good it's on to hole C. This is 6 1/2" from the center of XX and again is 1/16" higher center than the center point of XX. Drill C, remove shavings and thread all 4 bolts in and make sure they snug up without any binding. Any binding and you'll need to make a hole or holes slightly larger.
If you feel that the spoiler isn't tight against the trunk on the outside edges you will want to use the push clips and drill those outside holes. This isn't something I felt was necessary as my spoiler fit very tight and once the double sided tape was applied it was very snug along the entire trunk lid. This is something you'll have to measure for and get some push clips. If you can't source the Nissan clips NAPA auto parts retainer clip #665-2431 Balkamp will work. This will be a very critical measurement and one that I can't help with since I didn't go this route.
Once you've got all 4 holes perfect you need to prime the new holes for rust prevention. Just get a can of spray primer for metal, spray some on a piece of cardboard til it puddles, then use a small brush to paint the inside & edges of the new holes (be sure to spray the paint a long way away from vehicle or spoiler). Now you're ready to install the TBB, plastic extender and trunk button/switch to the spoiler.
Take the plastic extender and place it against the TBB, you'll see the orientation holes to ensure you've got it on right. The trunk button metal tabs will be going on the outside of the extender. On the stock chrome lip the metal tabs were on the inside of the TBB. Screw the switch through the extender and into the TBB (they thread into the TBB), then screw the TBB on to the spoiler. Be sure you have everything in the right place. It's obvious if you've got it wrong as the button won't be in the right place.
At this point you want to hold the spoiler close to the trunk (a helper is handy here) reconnect the button wire and DON'T FORGET to test the trunk button to make sure it's working before installing the spoiler. When you confirm it's working put the grommet back in the hole. Now remove all the blue tape from trunk lid.
Look at the red tape backing on the spoiler and notice that there's one end on each strip that has a overhang where you can lift the tape from the glued edge. Make a note where these are as you'll have little room to see when you start lowering the spoiler down.
On the spoiler ends you'll notice a rubber seal rather than the sticky tape, put a piece of 1/2" foam or something else 1/2" thick and non abrasive (like a small folded micro cloth) under these ends, but not in the area of the sticky tape, you may want to use a couple small pieces of blue tape to hold them on to the trunk (but outside the spoiler area so you can remove the tape easily. Once you've got those pieces in place get the spoiler placed down (make sure the trunk button wire isn't crimped so pull it through the grommet but not too tight) and thread in bolts A & C, be sure to use the fender washers followed by the lock washers. Get the spoiler tight enough that it's about 1/2" up from the trunk lid then pull the red protective tape off the spoiler, you may want a helper now to keep the spoiler from rocking and possibly sticking anywhere. Carefully pull out the foam spacers while holding the spoiler firmly, then carefully lower the spoiler down. If it sticks anywhere on the way down just gently lift it away and continue on down making sure the spoiler isn't binding on the threaded bolts. The tape on the bottom of the spoiler (towards the bumper) needs to be kept slightly away from the metal while lowering, just ease it down and it won't adhere. Once it's all the way down, thread the remaining bolts down, snug everything up and press down all the edges of the spoiler to make a good tape seal. Simple (hopefully)
http://g35driver.com/forums/v36-diy/...r-install.html
This install is quite simple and since I didn't use the push clips at the very ends of the spoiler you won't be drilling holes into the trunk outside of the existing chrome trunk trim. This is great in case you want to return it to stock at a later date, or if you have horrible luck drilling holes and end up w/ a real mess that you can't cover up w/out expensive body work
If you look on pg 4 of the above thread you'll see the hardware assortment and a pic of the spoiler & trunk button bracket (known as TBB in the rest of this thread). There's also a little plastic extender (not shown in the pics)that attaches to the TBB, this allows the trunk button to mount w/ the proper stock depth, without it the button would be behind the trunk button hole, not slightly sticking out like it needs to be. I'll detail this install later as it's different than how it mounts to the chrome lip.
Remove the chrome lip and unscrew the trunk button from the original TBB, you"ll also remove the TBB from the chrome lip since you'll be reusing all 6 of these screws (but not the old TBB) for the new spoiler. Install the new TBB on the new spoiler w/ just a couple screws, you'll be taking it off later to install the trunk button/switch, but you'll need it on the spoiler to get it drilled & fitted. The only other hardware you'll need are (4) M5 bolts aprox 1" long (4) M5 fender washers, and (4) M5 lock washers, I recommend stainless steel if you can get them.
If you want to paint your trunk button to match your new spoiler color now is the only time you'll be able to do it, it pops off easily from the wired switch so you can sand & paint (I plasti-dipped mine since I Plasti-dipped my original chrome lip). This will set you back for the install since you'll have to allow drying time w/ multiple coats so plan accordingly if you want a non-chrome trunk button.
Here's the 4 holes involved in my install~XX is the only factory hole, AB&C are the new holes that you'll drill.
Put a pair of work gloves or a couple rags on the bottom trunk edge so the trunk won't keep closing & locking on you, you'll be opening & closing it a lot so no need to have to keep unlocking the thing
Lay spoiler lightly on the trunk just to see where you'll need to put down 3m blue painters tape to protect the paint while you're getting it fitted.
Apply painters tape to area where spoiler comes in contact w/ trunk paint. Once you've got it all protected you can test fit by putting a bolt into the XX hole and lightly snugging down the spoiler just to see how it'll look.
Looks pretty good huh
Now you're ready to drill the 3 new holes. Please measure the holes in your new spoiler just in case for some reason Infiniti decided to change things up (in that case you're on your own)
Using the center of XX as your starting point you'll mark the holes as follows: The center of Hole B is exactly the same center as XX and 9 7/8"
away, just lay your straight edge from the center of XX across the center of the existing hole (about 1/2" inside of the new hole B) and mark your drill point. Drill a 1/4" hole, carefully clean any drill shavings then lift the trunk , lay down the spoiler to make sure the spoiler holes line up and you can thread both bolts cleanly into the spoiler, if not you'll have to make a slightly larger hole, but if you measured correctly you'll be fine.
Next is hole A, this holes center is 1/16" higher (toward the roof) than the center lines of XX & B and is 17 1/8" from the center of XX. Run your straight edge from the center of XX through the center of B, and now to your new A drill point and mark a point 1/16th" higher, drill it, remove shavings, then test fit to make sure these 3 holes line up and again thread all 3 bolts in to be sure you're still fine. Once these are good it's on to hole C. This is 6 1/2" from the center of XX and again is 1/16" higher center than the center point of XX. Drill C, remove shavings and thread all 4 bolts in and make sure they snug up without any binding. Any binding and you'll need to make a hole or holes slightly larger.
If you feel that the spoiler isn't tight against the trunk on the outside edges you will want to use the push clips and drill those outside holes. This isn't something I felt was necessary as my spoiler fit very tight and once the double sided tape was applied it was very snug along the entire trunk lid. This is something you'll have to measure for and get some push clips. If you can't source the Nissan clips NAPA auto parts retainer clip #665-2431 Balkamp will work. This will be a very critical measurement and one that I can't help with since I didn't go this route.
Once you've got all 4 holes perfect you need to prime the new holes for rust prevention. Just get a can of spray primer for metal, spray some on a piece of cardboard til it puddles, then use a small brush to paint the inside & edges of the new holes (be sure to spray the paint a long way away from vehicle or spoiler). Now you're ready to install the TBB, plastic extender and trunk button/switch to the spoiler.
Take the plastic extender and place it against the TBB, you'll see the orientation holes to ensure you've got it on right. The trunk button metal tabs will be going on the outside of the extender. On the stock chrome lip the metal tabs were on the inside of the TBB. Screw the switch through the extender and into the TBB (they thread into the TBB), then screw the TBB on to the spoiler. Be sure you have everything in the right place. It's obvious if you've got it wrong as the button won't be in the right place.
At this point you want to hold the spoiler close to the trunk (a helper is handy here) reconnect the button wire and DON'T FORGET to test the trunk button to make sure it's working before installing the spoiler. When you confirm it's working put the grommet back in the hole. Now remove all the blue tape from trunk lid.
Look at the red tape backing on the spoiler and notice that there's one end on each strip that has a overhang where you can lift the tape from the glued edge. Make a note where these are as you'll have little room to see when you start lowering the spoiler down.
On the spoiler ends you'll notice a rubber seal rather than the sticky tape, put a piece of 1/2" foam or something else 1/2" thick and non abrasive (like a small folded micro cloth) under these ends, but not in the area of the sticky tape, you may want to use a couple small pieces of blue tape to hold them on to the trunk (but outside the spoiler area so you can remove the tape easily. Once you've got those pieces in place get the spoiler placed down (make sure the trunk button wire isn't crimped so pull it through the grommet but not too tight) and thread in bolts A & C, be sure to use the fender washers followed by the lock washers. Get the spoiler tight enough that it's about 1/2" up from the trunk lid then pull the red protective tape off the spoiler, you may want a helper now to keep the spoiler from rocking and possibly sticking anywhere. Carefully pull out the foam spacers while holding the spoiler firmly, then carefully lower the spoiler down. If it sticks anywhere on the way down just gently lift it away and continue on down making sure the spoiler isn't binding on the threaded bolts. The tape on the bottom of the spoiler (towards the bumper) needs to be kept slightly away from the metal while lowering, just ease it down and it won't adhere. Once it's all the way down, thread the remaining bolts down, snug everything up and press down all the edges of the spoiler to make a good tape seal. Simple (hopefully)
Last edited by blnewt; Dec 26, 2011 at 01:07 PM.


 You'd be paving the way for a lot of members over here for sure

well, i decided to get one and just got it installed. i have the camera, so i couldn't get this deal. nonetheless, i like it way better than the chrome thing. I installed it your way and didn't drill the outer 2 holes.

Registered User
Joined: Dec 2011
Posts: 21
Likes: 0
Any photos? I have the backup camera and would like to use the Ebay deal and modify the spoiler.
if you walk into a dealer, it's about $450. but you can find them online at other infiniti parts sources or even infiniti dealers for around $300 - $350, depending on your color.

Registered User
Joined: Jan 2012
Posts: 213
Likes: 2
From: Lowell, IN
Ordered one a couple days ago and will be getting it in today. I have to have my uncle paint it though as it isnt the Platinum Graphite like i needed. I will post pics whenever i have it painted. Might be awhile.

Registered User
Joined: Aug 2011
Posts: 28
Likes: 0
I received my spoiler today. It is an OEM spoiler and the paint was perfect. It only comes with a bracket. Shouldn't be too hard to install it. Don't see why everybody is so scared to do it without template.
I'm getting it painted ivory pearl as I speak and I will post pictures after that.
I'm getting it painted ivory pearl as I speak and I will post pictures after that.
Thanks!!!
