
Do I Need New Tires?


Okay guys, went to get my alignment done and here are the specs from the alignment job:
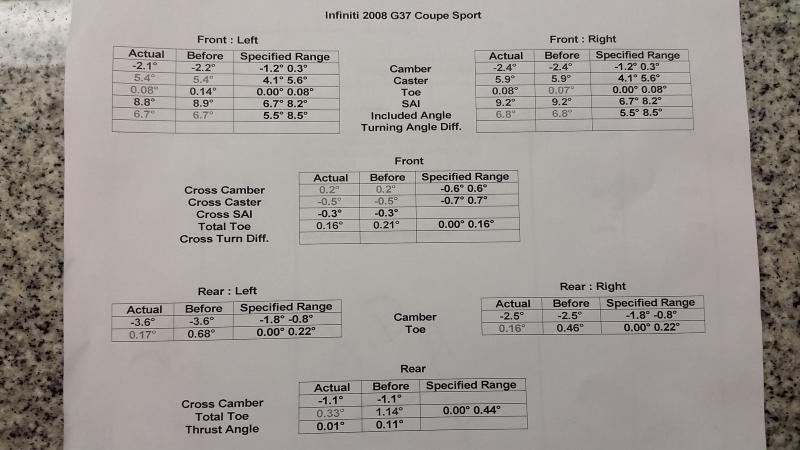
As you all stated, the cambers could not be adjusted but the tech was able to get all the toe within spec. It looks like he didn't adjust the toe to the middle though (for instance, the middle of the front left toe would be .04) because he mentioned something about performance. Maybe...the setup he put in is better for handling maybe? Not really sure...
Anyways, so I have some good news and some bad news. The good news is that the previous owner finally responded and said that the front tires (the ones shown in the first post) were never changed which means that they had about 20k miles on them. Now here's the bad news...the rear tires were being changed every 8 months!
Since many of you mentioned that the inner tire balding was due to bad alignment on the toe setting, since all the toes are in spec now, the tires should last longer right? Also, for the rear camber, on the driver side the negative camber is -3.6 but on the passenger side, it's -2.5...if I were to swap the wheels between the rear driver and passenger side every couple of thousand miles, would that help prolong the life of the tires also? Kind of like rotating tires? lol
Finally, I spoke to the tech about camber and bolt kits. The tech said that since I'm worried about treadlife, the rear camber kit will help and he will be able to make some adjustments because the adjustments will be made from the bottom of the wheel, not the top. Therefore, I shouldn't have to worry too much about the wheel hitting the fender. As far as the fronts go though, he commented that he's a bit more hesitant for those to be put on because he's had customers who had issues with the arms hitting the wheel well when going over speed bumps. Also, since the adjustments will be done at the top, it may have an issue with rubbing. However, I do have spacers on the front so maybe if I removed the spacers that shouldn't be an issue anymore?
After everything that has been said and done, here is what I am considering. Since the front camber arms are $350-$400, I think I'm going to pass on those for now since I don't have the funds readily available and 20k miles is pretty decent given the setup. As far as the rear cambers go though, I will probably end up getting the kit when I free up some money as I cannot afford new tires every 8 months.
So now my questions regarding the rear setup is as follows: since the rear toe was able to be put in spec without the bolt kit, would I still have to install the toe bolts or are the specs as is good enough? Also, if I did the toe and/or camber kit myself, how bad/dangerous would it be for me to drive about 40 miles with a bad alignment? There are no shops nearby that can get my car on their rack since it's lowered so it's a bit of a drive to get out to the shop to do so.
Okay guys, thanks again for all your help/inputs!
Last edited by sLADe781; Dec 30, 2014 at 10:25 PM.
Sounds like you found a good alignment tech, so you're already ahead of the game 
The older SPC front arms did have issues w/ hitting the fender well when dumped real low but have been redesigned to decrease the chance of that happening. I'm dropped about as low as you in front and haven't ever hit the fender wells w/ my camber arms.
Your front camber is high but reasonable compared to the back. You will be pulling the bottom of the tire in, but it will still push the top of the tire out due to the pivot point in the rear, it won't be the same proportion as the lower amount but it will still occur, getting your camber in back around the same -2.5 degrees as the front will greatly improve overall wear. Camber & toe is a balancing act as one will affect the other, that's why the rear kit is only complete when you get the arms and bolts. You can try to do the best you can w/out the toe kit but you're pretty low back there so it'll be an uphill battle for the tech. Maybe you can get him to agree to give you a re-align at a nice discount if the alignment isn't to your satisfaction w/ just the arms
Nice to see you're taking the proper steps to get your car more road-worthy, and it will save you time, headaches, and dollars down the road
As far as how safe it is to drive when you DIY the camber/toe sets~measure the length of your OEM arms and adjust your new arms to the same length, this will put your camber similar to where you were, the toe is a bit trickier, you make a mark at the top (12 o'clock) of the oem toe-bolt washer (that coincides w/ the center of the bolt head) and a scribe line on the metal bracket that the washer mates to. You then elongate the slot (only the inner side like I mentioned previously) and put the new bolt/washer in the slot and you then tighten the bolt so the center of the bolt (straight up the washer) meets the scribe line from the previous OEM bolt/washer. Hope that makes sense as it sounds much harder than it really is. And when you elongate the slot be sure to test fit the new bolt several times while making the new slot, you want it to spin freely but w/ no slop, so comfortably snug is what you're shooting for.
Last edited by blnewt; Dec 31, 2014 at 03:16 AM.
Originally Posted by blnewt
...getting your camber in back around the same -2.5 degrees as the front will greatly improve overall wear. Camber & toe is a balancing act as one will affect the other, that's why the rear kit is only complete when you get the arms and bolts. You can try to do the best you can w/out the toe kit but you're pretty low back there so it'll be an uphill battle for the tech.
 The only reasons why I'm even entertaining letting them do it is because 1-I don't have the proper tools at the moment but more importantly, 2-the safety aspect of driving back out there with the bad alignment.
In the mean time, would rotating the driver and passenger rear tires every thousand mile help since the driver side is -3.6 but the passenger side is only -2.5? I'm kind of hoping it will help even out the wear a bit. And by the way, how in the world did that happen? I would've thought dropping the car the same height everywhere would affect everything the same way.

Originally Posted by blnewt
As far as how safe it is to drive when you DIY the camber/toe sets~measure the length of your OEM arms and adjust your new arms to the same length, this will put your camber similar to where you were, the toe is a bit trickier, you make a mark at the top (12 o'clock) of the oem toe-bolt washer (that coincides w/ the center of the bolt head) and a scribe line on the metal bracket that the washer mates to. You then elongate the slot (only the inner side like I mentioned previously) and put the new bolt/washer in the slot and you then tighten the bolt so the center of the bolt (straight up the washer) meets the scribe line from the previous OEM bolt/washer. Hope that makes sense as it sounds much harder than it really is. And when you elongate the slot be sure to test fit the new bolt several times while making the new slot, you want it to spin freely but w/ no slop, so comfortably snug is what you're shooting for.
I THINK I understand what you mean as far as the toe adjustment goes but am a bit confused at the same time. Something like this?

Mark both the old washer and the black bracket and then basically put...okay maybe I don't understand.
I guess I'm getting confused because if the toe bolt spins and moves then how do we line up the camber bolt with the old specs since it turns when we turn it? Do we mark both washers on the same bolt? I'm also a bit unsure what you mean by the inner side. So I know the black bracket has 2 slots on there. Do you mean we only elongate the slot that is facing the inside of the car but the slot facing the outside we leave alone?

If the rear toe bolt kit was never installed, would the toe still be adjustable? The reason I ask is that I initially thought it couldn't be but since the tech was able to adjust it today I'm wondering if the previous owner did install it afterall?
Sorry for all the questions. Just want to make sure I understand and do it right if I decide to tackle the project myself.


You can find a whole camber kit for around 450-475 look through the suspension vendors in the marketplace. Also if you want a rotary tool go to Harbor freight and you'll find one for around $10 how well they work I'm not sure. If I remember correctly the DWS aren't directional so you should be able to rotate them every few months.


OK, hopefully for some clarity~
First off, rear camber and toe is adjustable w/ the concentric washers that slide onto the slotted bolts, as the offset-mounted bolts turn, the concentric washers will slide the bolt inward or outward in the factory slots. The problem is the factory slots aren't wide enough to slide the bolts far enough to get the camber/toe in spec when the suspension is changed very much.
When you elongate the slots w/ the new bolts/washers (the bolt is mounted even further off-center) the new bolts can slide about a 1/4" further which is enough to get back in range.
The bottom pic showing the toe bolt~
Each side of the control arm mount bracket needs to be elongated but only the side of the slot facing the rear differential needs to be cut out. So one cut on the black bracket facing you and one on the backside bracket that you can't really see.
As far as driving w/ a DIY job, if you get it close and don't have to be driving at hwy speeds you'll be OK as long as everything is tight and you get the new setup close to what you had prior.
As far as scribing the old toe bolt, basically just a mark straight up from the bolt head (or nut) center that would scribe into that black bracket right where the washer lays and about a 1/2" above. You then elongate the slot w/ the new toe bolt and install it w/ the center of the bolt in the same place (the new washer will probably be in a different position) as the old bolt center, this will keep your toe at a safe point.
Hope it's becoming clear.
As far as the proper tool, those cheap Harbor Freight dremel-type tools will suffice. What I used was thin cutoff wafer discs such as these

This allows you to keep the dremel tool perpendicular to the work area which is much easier to keep an eye on the job and allows for much better access to the slots. I'd go w/ a 15/16" disc and get a multi pack as you wear through the discs pretty quick, takes about 3 or 4 discs to get all the slots cutout. Just start real slow to get a feel for how it cuts and test fit the bolt as you get the slot cut, just a snug fit w/ no slop is your goal.
If your cutoff disc is too wide to get started wear the disc down a bit on some scrap metal to get the diameter down.
The Harbor tool and the disc pack will be under $20 so you won't have to invest much, plus I rarely let anyone else do stuff on my car, I like to know my car as it really adds to the whole car owning experience IMO.
You might even have a buddy or relative w/ a dremel tool so you might be out just the disc pack, lol.
First off, rear camber and toe is adjustable w/ the concentric washers that slide onto the slotted bolts, as the offset-mounted bolts turn, the concentric washers will slide the bolt inward or outward in the factory slots. The problem is the factory slots aren't wide enough to slide the bolts far enough to get the camber/toe in spec when the suspension is changed very much.
When you elongate the slots w/ the new bolts/washers (the bolt is mounted even further off-center) the new bolts can slide about a 1/4" further which is enough to get back in range.
The bottom pic showing the toe bolt~
Each side of the control arm mount bracket needs to be elongated but only the side of the slot facing the rear differential needs to be cut out. So one cut on the black bracket facing you and one on the backside bracket that you can't really see.
As far as driving w/ a DIY job, if you get it close and don't have to be driving at hwy speeds you'll be OK as long as everything is tight and you get the new setup close to what you had prior.
As far as scribing the old toe bolt, basically just a mark straight up from the bolt head (or nut) center that would scribe into that black bracket right where the washer lays and about a 1/2" above. You then elongate the slot w/ the new toe bolt and install it w/ the center of the bolt in the same place (the new washer will probably be in a different position) as the old bolt center, this will keep your toe at a safe point.
Hope it's becoming clear.
As far as the proper tool, those cheap Harbor Freight dremel-type tools will suffice. What I used was thin cutoff wafer discs such as these
This allows you to keep the dremel tool perpendicular to the work area which is much easier to keep an eye on the job and allows for much better access to the slots. I'd go w/ a 15/16" disc and get a multi pack as you wear through the discs pretty quick, takes about 3 or 4 discs to get all the slots cutout. Just start real slow to get a feel for how it cuts and test fit the bolt as you get the slot cut, just a snug fit w/ no slop is your goal.
If your cutoff disc is too wide to get started wear the disc down a bit on some scrap metal to get the diameter down.
The Harbor tool and the disc pack will be under $20 so you won't have to invest much, plus I rarely let anyone else do stuff on my car, I like to know my car as it really adds to the whole car owning experience IMO.
You might even have a buddy or relative w/ a dremel tool so you might be out just the disc pack, lol.
As far as driving w/ a DIY job, if you get it close and don't have to be driving at hwy speeds you'll be OK as long as everything is tight and you get the new setup close to what you had prior.
As far as scribing the old toe bolt, basically just a mark straight up from the bolt head (or nut) center that would scribe into that black bracket right where the washer lays and about a 1/2" above. You then elongate the slot w/ the new toe bolt and install it w/ the center of the bolt in the same place (the new washer will probably be in a different position) as the old bolt center, this will keep your toe at a safe point.
Hope it's becoming clear.
 Maybe I can try to go when there's traffic so that I can drive at lower speeds...but OMG, a 40 minute drive could easily be 2 hours in that case. lol
Okay, I think I understand about the toe alignment now. It's the bolt that needs to be kept at the same spot which is why the line that is scribed on the black bracket has to be centered with center of the bolt, right? lol Sorry it took awhile to understand what you were explaining but thank you for taking the time to explain it.
Question: when the toe is adjusted, does the whole bolt move or just one side of the bolt? Just wondering so I know if I need to scribe on both ends of the bracket/bolt or would one side be good enough for when I need to realign the new bolt.
As far as the proper tool, those cheap Harbor Freight dremel-type tools will suffice. What I used was thin cutoff wafer discs such as these
This allows you to keep the dremel tool perpendicular to the work area which is much easier to keep an eye on the job and allows for much better access to the slots. I'd go w/ a 15/16" disc and get a multi pack as you wear through the discs pretty quick, takes about 3 or 4 discs to get all the slots cutout. Just start real slow to get a feel for how it cuts and test fit the bolt as you get the slot cut, just a snug fit w/ no slop is your goal.
If your cutoff disc is too wide to get started wear the disc down a bit on some scrap metal to get the diameter down.
The Harbor tool and the disc pack will be under $20 so you won't have to invest much, plus I rarely let anyone else do stuff on my car, I like to know my car as it really adds to the whole car owning experience IMO.
You might even have a buddy or relative w/ a dremel tool so you might be out just the disc pack, lol.
, , or
I'm considering the Dremel 575 since you mentioned that it would be easier to cut at a 90 degree angle. The 575 will also allow me to use this which will hopefully help me cut straight without a slope (BTW, thank you for that little tip! I probably would not have noticed it if you didn't point it out). I'm thinking that since the wafers are flat I may have a higher likelihood of causing a slope during the cut so having something with more surface area may help.
I hope you all had a great time closing out 2014 and welcoming 2015...HAPPY NEW YEAR!!!

Get the dremel that plugs in. In my experience the battery ones suck. I bought a dremel 300 from Home Depot for $40 and its lasted me about 7 years. If you want something with a cheaper price point Harbor Freight works too. Also did you check the DIY section for the Toe kit install?
Here's a good DIY w/ good pics and details, should clear up your questions
DIY SPC Rear Camber & Toe Kit Install - G35Driver
You can also just use your original factory toe bolts put back into the same place after you elongate the slot and take your new toe kit to the shop and have them do the new setup, at least you'll have the labor done w/ the cutout.
Agree w/ Sunny, get the plug in tool.

Thread
Thread Starter
Forum
Replies
Last Post
mmnjtwa
Brakes, Suspension, Wheels & Tires
4
Sep 7, 2015 02:27 PM
footballmania32
Private Classifieds
0
Sep 4, 2015 03:06 PM