When you click on links to various merchants on this site and make a purchase, this can result in this site earning a commission. Affiliate programs and affiliations include, but are not limited to, the eBay Partner Network.
Mine doesn't even stay closed so i have that problem all the time. Anyone know how the thing stays closed (is there a magnet in it?) . I'm going to take it to the dealership when i have time to see if they can fix it, if not i'll just end up replacing the whole cup holder.
There is no magnet. I believe it uses a latch mechanism similar to the sunglass holder in the headliner. The tab that rides in the channel may be broken. If you take it apart, you may be able to find what's broken. I've used Plast-Aid to repair many plastic pieces like that, but again, you'd have to find out what piece is broken and figure out if it's repairable.
The whole console assembly is basically a puzzle that snaps together and its easier than you think, requires no tools. I'll do my best to talk you through it.
Step 1: Remove the shift ****. To do this pull down forcefully on the little metal trim piece attached to the leather of the shift boot. You should now see the bottom of the shift **** exposed. There will be a little metal fastener the thickness of a paperclip, remove it. The shift **** will now slide off easily, but before you remove it ensure the car is in neutral.
Step 2: Remove the shift boot/gear selector indicator/ash tray assembly. This is one piece. Push the leather of the boot down enough so you can get a firm grip on this piece and pull up. Don't be scared to use a bit of muscle. There will be a wire that connects to this piece so you pull to far away, you can choose to disconnect it or just let it dangle to the side.
Step 3: You now have plenty of room to work and removing the cup holder assembly is very straightforward. Been a while since I did it but I believe there are two screws.
Step 4: Remove the desired piece. Have a good look at how it's assembled. There are two screws on either side as well as a spring and a few little bits. Remove it all.
Step 5: Reassemble.
Good luck! Hope it helps.
Steve
Disregard below, just saw the recent post on this topic.
New member doing my first DIY. Sorry to revive an old thread but I'm not sure that with all my searching I felt I understood the process. The above post implies that this is simple, 2 screws and it slides out after removing the shifter boot and trim. I'm hoping it's that simple. I looked at the service manual but it didn't clear it up in my mind. I need to replace my cup holder as the door stays open and the previous owner gave me a complete replacement cup holder assembly. Any thoughts or input appreciated.
Thanks,
Mike
Last edited by Mikes19; Oct 16, 2016 at 10:34 PM.
Reason: Update
I just got a G37 with a cup holder wont close issue.
The trick to removing the cup holder is that you need to remove the whole center console. To do this you can follow instructions in service manual but basically:
- Remove plastic covers in front of shift **** (use plastic pry tool).
- Remove shift **** and shift cover (pull down metal trim below **** and remove retaining clip, then pry up cover with plastic pry tool)
- Remove 2 screws at front of console (underneath the radio trim panel)
- Remove screws in front of cup holder (mine were broken)
- Open center console box (behind cupholder) and remove black panel that contains power socket and USB port (use plastic pry tool to pull lower part of panel back toward rear of car about an inch, then push up and panel will come out)
- Disconnect the wire harness connected to black panel
- Move to back seat and remove vent (using plastic pry tool)
- Remove the 2 screw connecting the center console
- Disconnect any wire harnesses in center console (there are 5 or 6, including a rear one that is zip tied)
- Pull up on rear of center console and it will come out of car (moving seats up will help)
- Flip it upside down and cup holder is removed with 4 screws
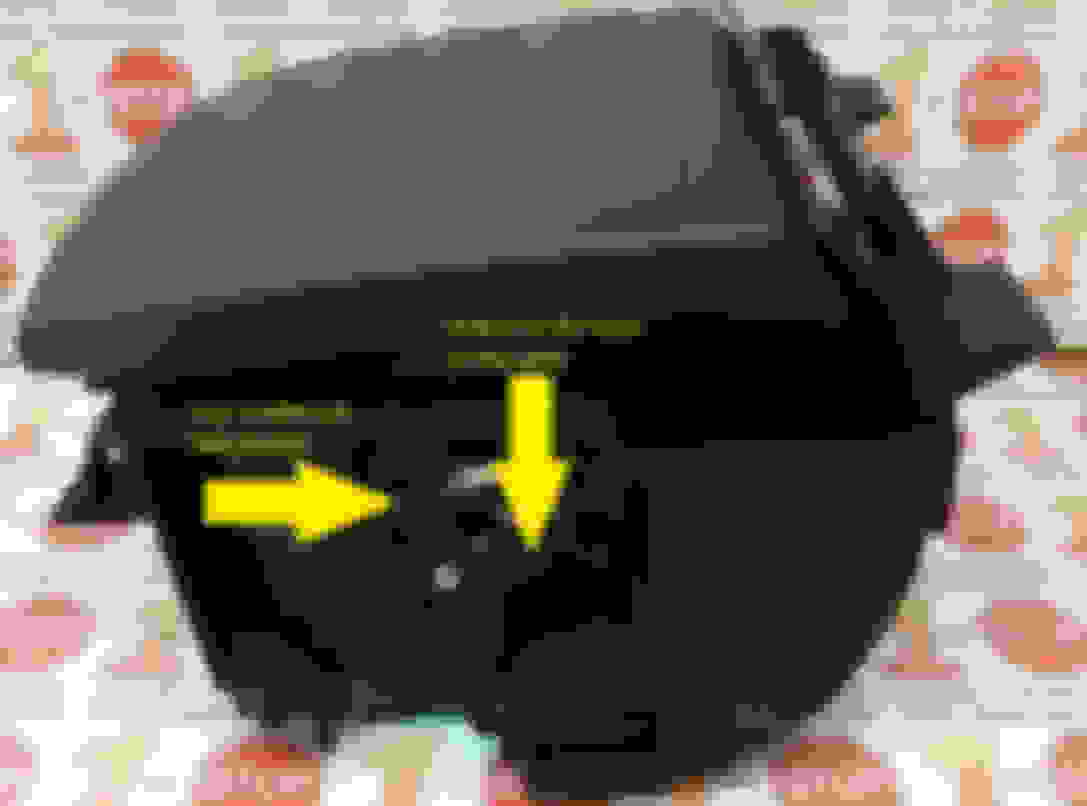
****Added bonus****
To repair cup holder that will not close you will need to remove the small "L shaped" arm on drivers side of cup holder (one screw). On the short leg of the "L" there is a small hole that is supposed to fit over a plastic pin on the cup holder lid side bracket. That pin has broken off and I replaced with small screw screwed into the cup holder lid side bracket. Boom it is fixed. Screw head needs to fit in hole on the short leg of the "L".
Last edited by oep1001; Feb 14, 2017 at 02:57 PM.
Reason: Added pic
hey @oep1001,
I wanted to ask you a question about this step:
- Open center console box (behind cupholder) and remove black panel that contains power socket and USB port (use plastic pry tool to pull lower part of panel back toward rear of car about an inch, then push up and panel will come out)
So in the manual it says (I have a 2013 AT G37) that you pull straight up and back, so you are saying go to the bottom and pull on it about an inch out and then lift up?
Hey tragicwhale,
Manual is correct you need to pull up (towards roof of car) on the power socket/USB panel to remove it. There is some play (less that 1/2 inch) for the lower part of the panel to move towards the back of car, which helps removal. Best method is to pry up on the bottom of the panel with a flat plastic pry bar. It is very difficult to do with your hands only.
Hey Guys,
I created a PDF of all the steps I took to remove the center console. I'll also be posting about 85 high def pics to make it easier to see all the parts but am just trying to figure out where to host them. If you want them I can email them to you. Good luck. Remember, this is the way I did it, do at your own risk.