
DIY: How to Install and Hardwire Radar Detector


How to Install and Hardwire Radar Detector
Hello Gents and Gentesses,
This DIY will cover how I hard wired in my Passport 9500ix to sit below my autodimming mirror. I have a 2012 G37s, YMMV.
The first thing is to assemble your bits.
Bits:
Mirror mount
WireTap, 9" custom w/inline fuse, MICRO sized taps
Radar Detector (this probably applies to the valentine detectors too, but I only know for sure that this works with my 9500ix)
Tools:
Hex wrench (mine came with mount)
Small flat bladed screwdriver
flashlight
small zip ties
This is a very quick install, it took me an hour, but that's because 45 minutes of it was trying to get the cursed wiretap into the wire harness. It should only take you 15 minutes tops.
Step 1: Turn your car off, might not hurt to disconnect the negative terminal of your battery just to be safe.
Step 2: Turn your mirror to face passenger seat (assuming you're sitting in the drivers seat)
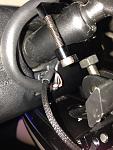
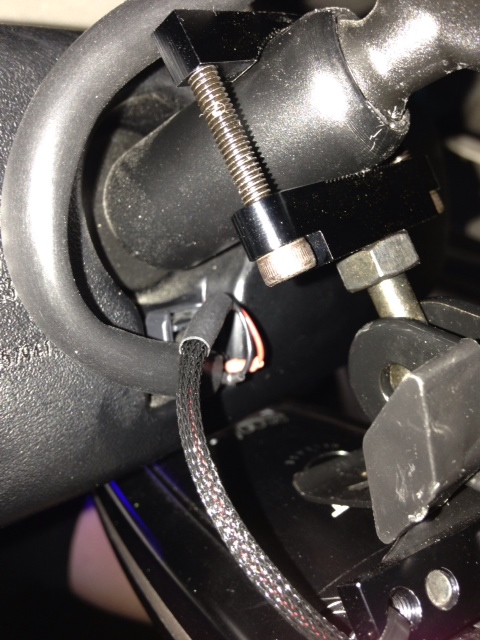
Step 3: Unplug the wire harness from the rear of the mirror. It should be a brown and white plug with a clip on the top you need to depress, I find jokes about its mother helps.
Step 4: Use your flat screwdriver, I used my housekey, and unclip the WHITE section of the plug from the BLACK section. Be careful when you lever the pieces apart, you won't need to remove it completely. This will allow the existing wires to pull free, so don't tug it too much.
Step 5: Insert your micro sized taps into the appropriate wire sockets.
The red HOT wire from the tap goes with the BROWN wire in the harness. This will allow your radar detector to draw power only when the car is on. The black GROUND wire from the tap goes with the BLACK wire in the harness.
Step 6: The taps should insert easily, reinsert the white clip back in to the plug and make sure it latches. It might not fit exactly as perfectly as it did before, but mine closed up and the wires were tight. I don't expect them to experience much force anyways.
Step 7: Plug your the wire harness back in to the back of the mirror.
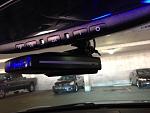
Step 8: Assemble your mirror mount. I used a mount I got off Amazon. Links below.
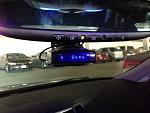
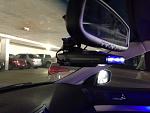
Step 9: Attach your detector to the mirror mount and mount the whole assembly to the mirror. Make sure it doesn't interfere with your ability to adjust your mirror.
Step 10: Wrap your wiretap around to plug in to the detector in the arrangement you want, then use zipties to keep everything tidy and from rattling.
Step 11: Reconnect the battery if you disconnected it, and enjoy! Make sure your radar detector is pointed straight forwards and backwards, if it's off kilter, it might not pick up signals as well.
Pics!
Links!
Mount
WireTap
Hope this helps, as always, PM if you have any specific questions.
Cheers,
Anthony
This DIY will cover how I hard wired in my Passport 9500ix to sit below my autodimming mirror. I have a 2012 G37s, YMMV.
The first thing is to assemble your bits.
Bits:
Mirror mount
WireTap, 9" custom w/inline fuse, MICRO sized taps
Radar Detector (this probably applies to the valentine detectors too, but I only know for sure that this works with my 9500ix)
Tools:
Hex wrench (mine came with mount)
Small flat bladed screwdriver
flashlight
small zip ties
This is a very quick install, it took me an hour, but that's because 45 minutes of it was trying to get the cursed wiretap into the wire harness. It should only take you 15 minutes tops.
Step 1: Turn your car off, might not hurt to disconnect the negative terminal of your battery just to be safe.
Step 2: Turn your mirror to face passenger seat (assuming you're sitting in the drivers seat)
Step 3: Unplug the wire harness from the rear of the mirror. It should be a brown and white plug with a clip on the top you need to depress, I find jokes about its mother helps.
Step 4: Use your flat screwdriver, I used my housekey, and unclip the WHITE section of the plug from the BLACK section. Be careful when you lever the pieces apart, you won't need to remove it completely. This will allow the existing wires to pull free, so don't tug it too much.
Step 5: Insert your micro sized taps into the appropriate wire sockets.
The red HOT wire from the tap goes with the BROWN wire in the harness. This will allow your radar detector to draw power only when the car is on. The black GROUND wire from the tap goes with the BLACK wire in the harness.
Step 6: The taps should insert easily, reinsert the white clip back in to the plug and make sure it latches. It might not fit exactly as perfectly as it did before, but mine closed up and the wires were tight. I don't expect them to experience much force anyways.
Step 7: Plug your the wire harness back in to the back of the mirror.
Step 8: Assemble your mirror mount. I used a mount I got off Amazon. Links below.
Step 9: Attach your detector to the mirror mount and mount the whole assembly to the mirror. Make sure it doesn't interfere with your ability to adjust your mirror.
Step 10: Wrap your wiretap around to plug in to the detector in the arrangement you want, then use zipties to keep everything tidy and from rattling.
Step 11: Reconnect the battery if you disconnected it, and enjoy! Make sure your radar detector is pointed straight forwards and backwards, if it's off kilter, it might not pick up signals as well.
Pics!


Links!
Mount
WireTap
Hope this helps, as always, PM if you have any specific questions.
Cheers,
Anthony
Last edited by GoFightNguyen; Oct 3, 2013 at 10:32 AM. Reason: Formatting

Very nice thanks for the write-up, this will be my next project 
Search eBay, just got my MirrorMount for $25.95 "Best Offer" direct from the makers, "http://www.performancepackage.com/".
http://www.ebay.com/itm/190900934566...84.m1439.l2649
Stealth Mirror Direct Cords by Safe-N-Sound1 on eBay for less than $10
http://www.ebay.com/itm/280262493064...84.m1439.l2649
Last edited by TONY37X; Oct 25, 2013 at 07:30 PM. Reason: ***Install Update Below***

Update 10/25/13: Just installed and everything went perfect, wish I knew these products existed years ago!
I did NOT bother to separate the white clip from the black plug, the Stealth cord above comes with very sturdy pins and I was able to work them into the corners of the Hot & Ground with just a little force and wiggling. The mirror mount comes with a new mount clip and two sets of bolts to accommodate fatter mirror supports (I needed to use the longer ones).
With these 2 products you can have a clean custom Radar Detector install for less than $40, and I would advise you to NOT pay anymore for those brand name options because the quality and install of these listed above is perfect!


Trending Topics
Only downside I found so far is that if anyone else drives your car and adjusts the mirror the radar mount will be thrown off alignment, but it has some play in it and easy enough to reset.


Registered User
Joined: Dec 2013
Posts: 4
Likes: 1
Just did this install in about 15 minutes. Thanks for the great write up! I also did not have to separate the plug. If you push hard enough, the taps go right in. I used needle-nose pliers. It's a good thing I found this thread because my darn power outlets don't work! Lucky I'm still under warranty!
Chris E.
2010 G37S
Chris E.
2010 G37S

Registered User
Joined: Nov 2012
Posts: 355
Likes: 18
I also just did this recently. It was very easy. I bought the MT-3000 series MirrorTap power cable, with 0.040" nano-taps. I was able to push the connectors in by hand without having to separate the molex connector. I highly recommend the nano-sized taps.
