
backyard DIY spring install


Thread Starter
Registered User
Joined: Aug 2007
Posts: 36
Likes: 0
backyard DIY spring install
received my springs in the mail a couple of days ago from hpauto.. thanks Andy decided to do a quick DIY for everyone that wants to save a couple hundred bucks.
okay straight to the point.. these are the tools you'll need:
jack stands
hyd. jack
sz. 12, 14, 17, 19mm sockets and open wrenches
ratchet, 1/2 extensions, torque pipe
lube spray
rubber mallet
and most important, spring compressor
first off this is a 2 man job make sure you have a buddy right beside you. okay we'll start with the front. make sure your handbrake is up and stoppers in the back tires.
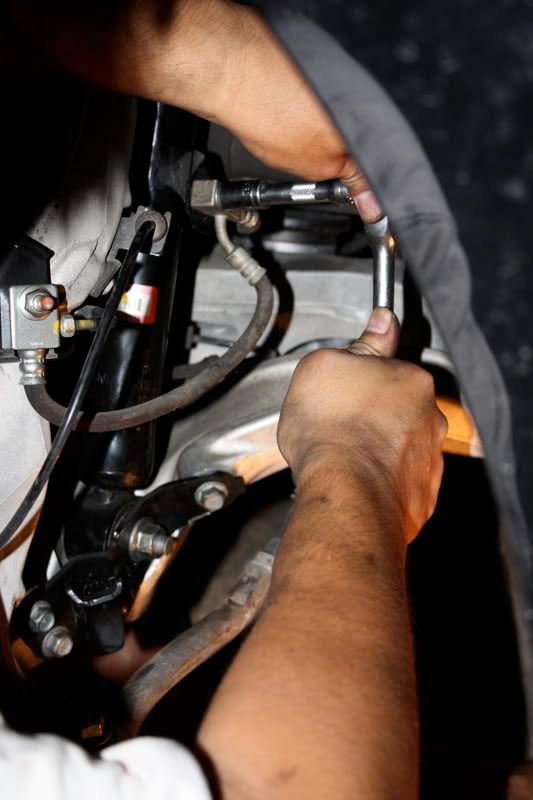
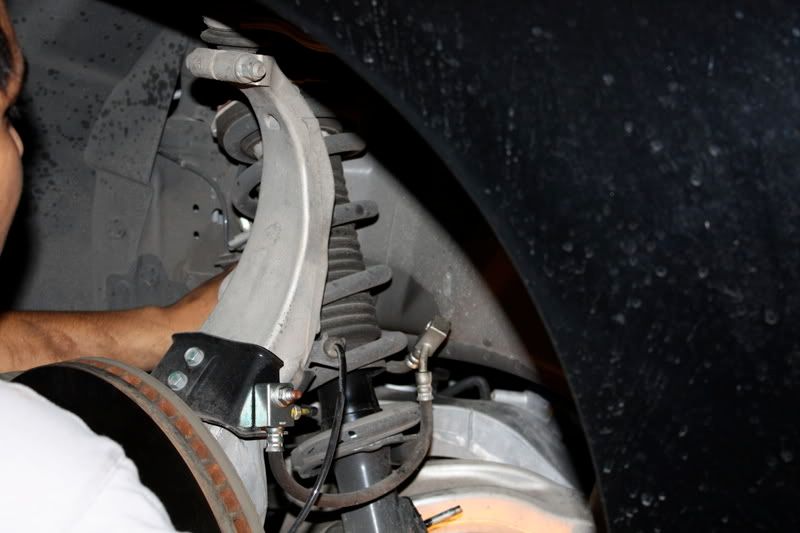
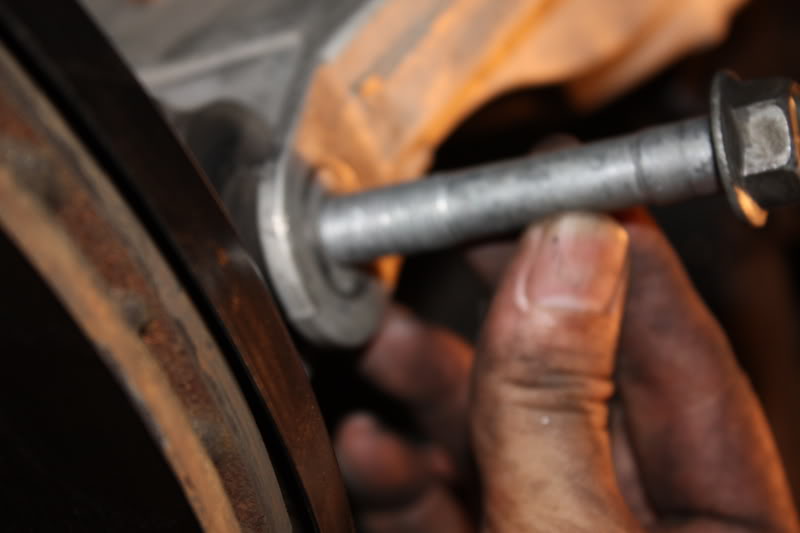
First, jack the car up from front side to side and properly place the jack stands in place. (the jack point in front of the car is pretty deep and couldnt slide a jack under there) unbolt and remove the tire. second unbolt the brake line shown in the picture.
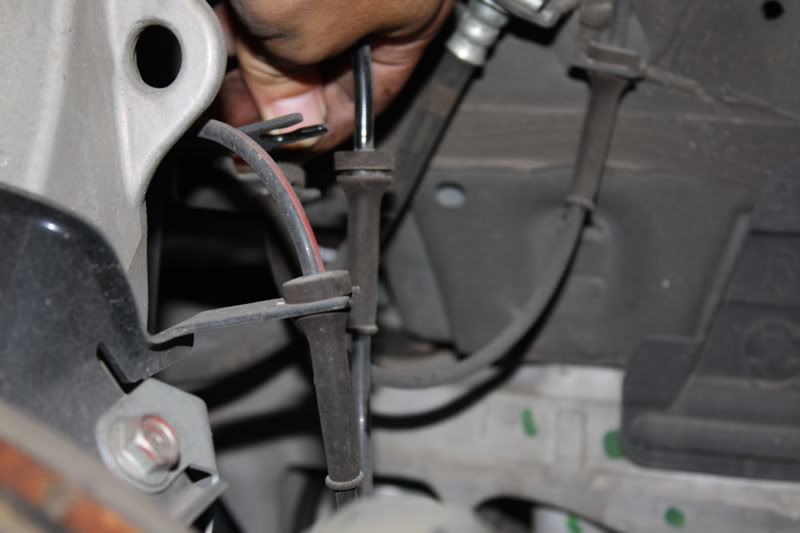
next pull out the sensors by hand
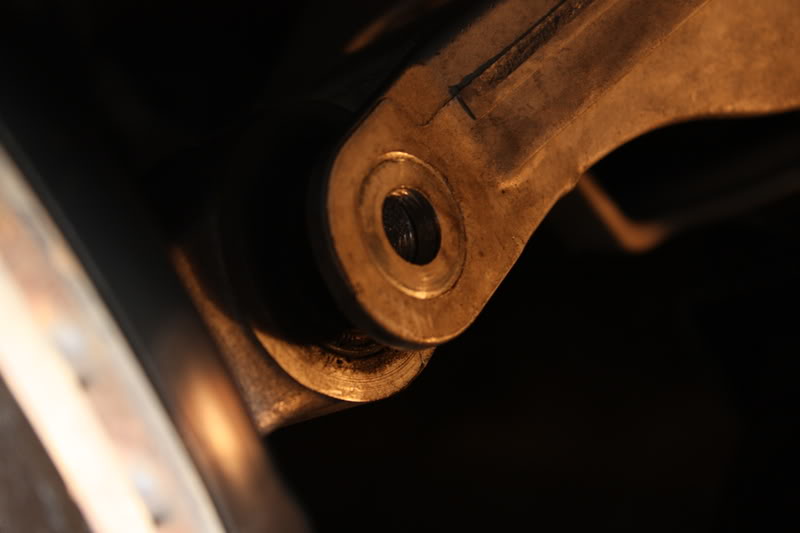
then, remove the 4 bolts shown in the picture. these are probably the hardest to come off. we used lube and a torque bar for better leverage. also turning the steering wheel to get the rotors out of the way helps alot.
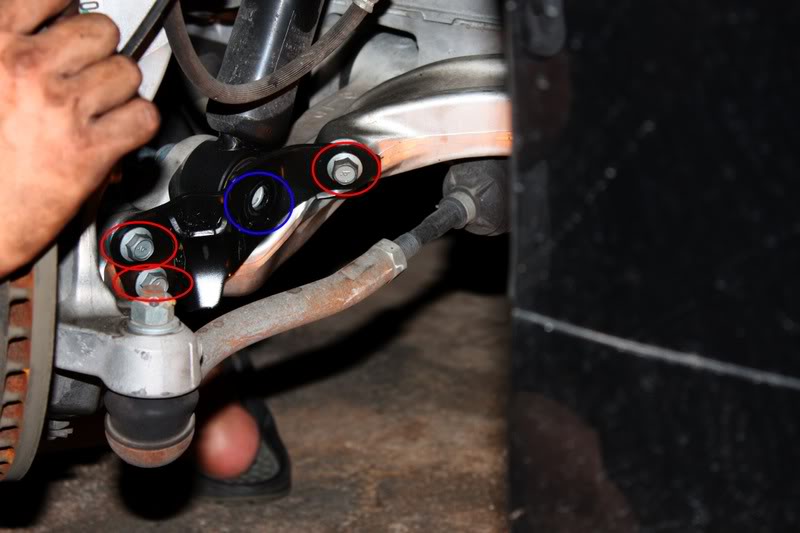
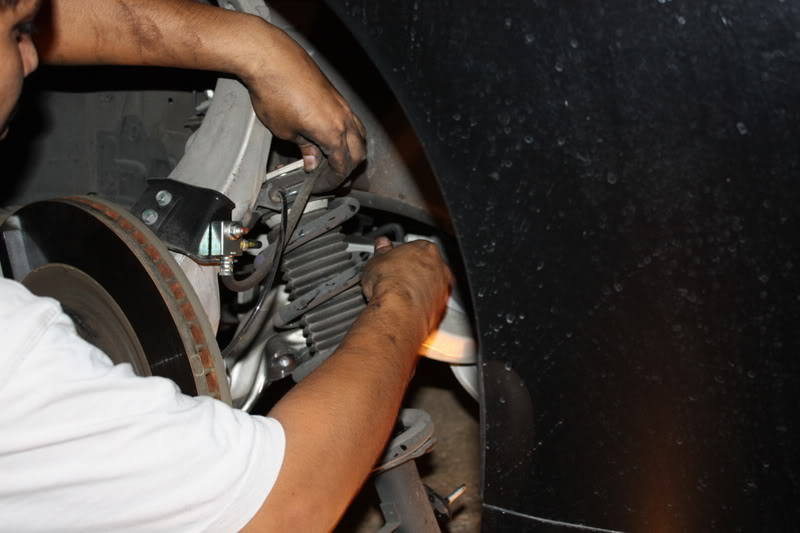
after getting the middle bolt off (blue)use the end side of the extension and give it a lil knock to loosen up the bolt. it should come off easily after. once all 4 bolts are out remove the black plate and your bottom part of the strut is now free! unbolt the 3 bolts on top and the strut should be loose
time to pull out the strut.. have your friend push down on the rotor. get the strut as low as possible while maneuvering the strut out. NOTE: watch out for the sensors and break lines. almost snagged one. (if your having trouble with this you can unbolt the a-arm)
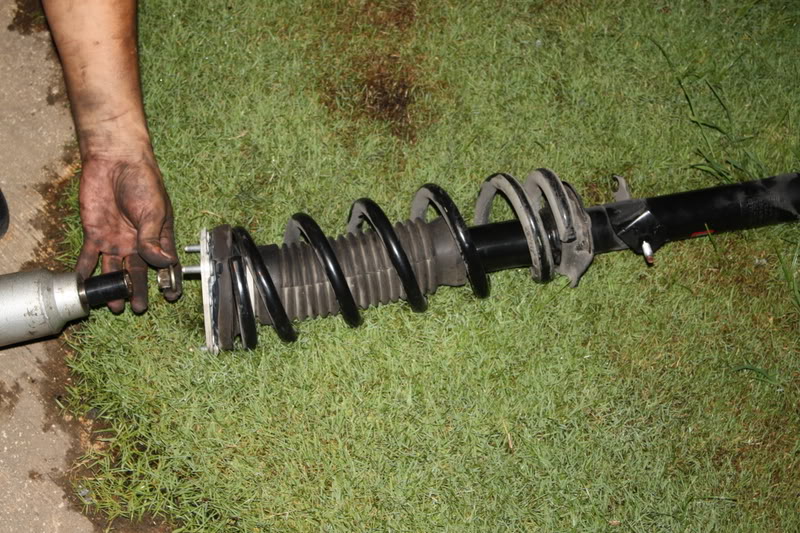
once the shocks are out, lay it on the ground and use a impact to loosen the bolt. looks kind of scary but there really is no compression in the stock springs. just a bit of a jolt when it unbolts.
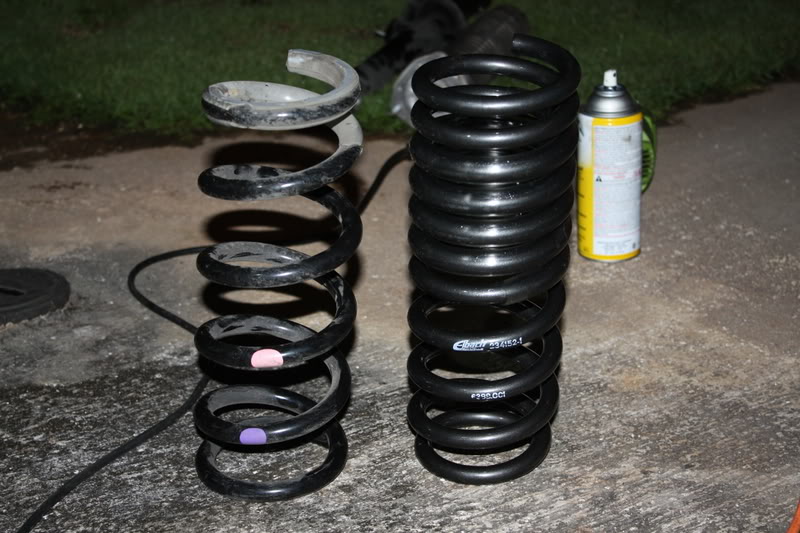
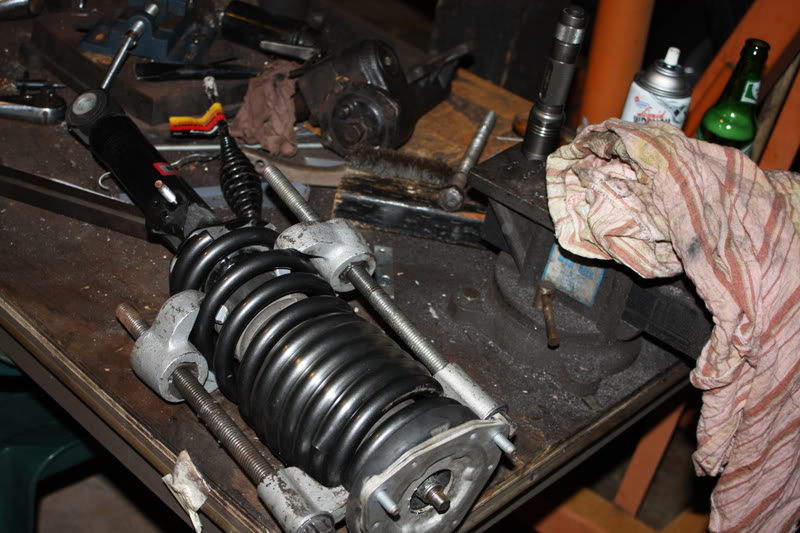
heres a comparison with stock and eibachs
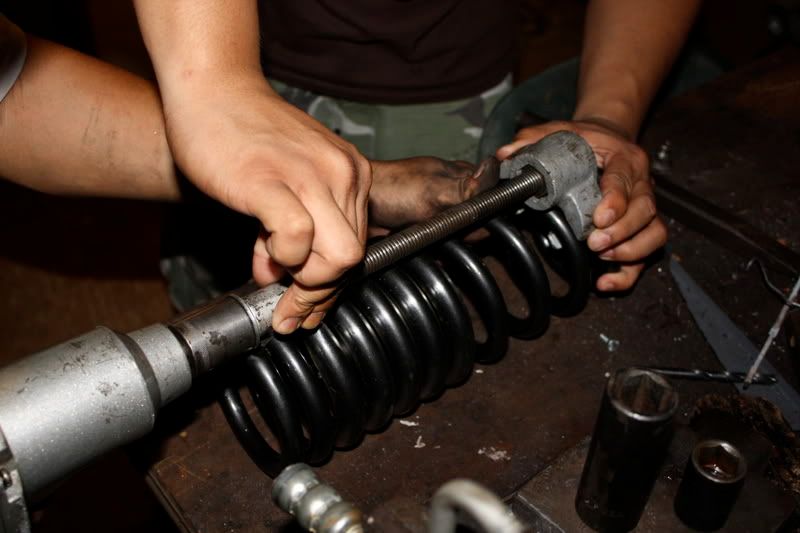
next, compress the spring. this is the scary part. please be carefull! need your buddy here too. once you get it compressed, use a open wrench to tighten the nut back and a open box wrench to hold tip of the bolt. make sure you transfer everything that came from the stock. all your switching out is the spring itself. not cutting involved also.
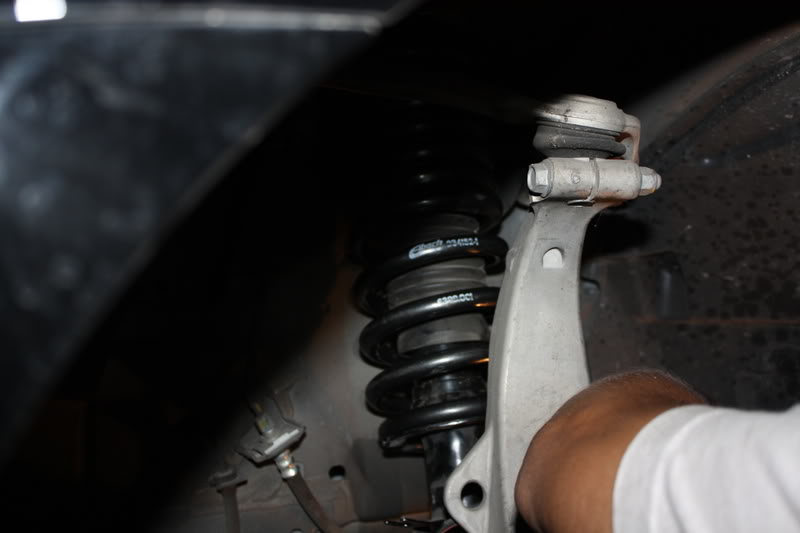
install the sucker back in and repeat on the other side.. also make sure the springs are are on right and not upside down.
the rear is simple, one bolt. remove the bolt push down on the arm and remove the spring. transfer the rubber bushing to the new springs and set it back in.
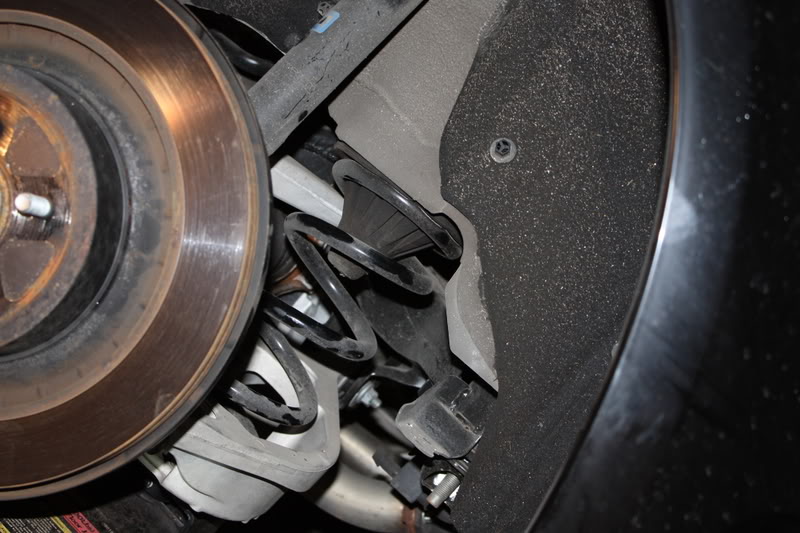
use a jack to compress the spring and match the holes into place. tap the bolt lightly into place and it should slide right in.

thats about it... difficulty is probably 2 1/2 out of 5 without the proper tools.
should be a breeze with a compressor, lift, etc..
hope this helps guys! feel free to ask questions and for those whose done this, please add on to this. i'll be doing my allignment as soon as the springs settle i'll post some after pics also.
decided to do a quick DIY for everyone that wants to save a couple hundred bucks.okay straight to the point.. these are the tools you'll need:
jack stands
hyd. jack
sz. 12, 14, 17, 19mm sockets and open wrenches
ratchet, 1/2 extensions, torque pipe
lube spray
rubber mallet
and most important, spring compressor
first off this is a 2 man job make sure you have a buddy right beside you. okay we'll start with the front. make sure your handbrake is up and stoppers in the back tires.
First, jack the car up from front side to side and properly place the jack stands in place. (the jack point in front of the car is pretty deep and couldnt slide a jack under there) unbolt and remove the tire. second unbolt the brake line shown in the picture.
next pull out the sensors by hand
then, remove the 4 bolts shown in the picture. these are probably the hardest to come off. we used lube and a torque bar for better leverage. also turning the steering wheel to get the rotors out of the way helps alot.
after getting the middle bolt off (blue)use the end side of the extension and give it a lil knock to loosen up the bolt. it should come off easily after. once all 4 bolts are out remove the black plate and your bottom part of the strut is now free! unbolt the 3 bolts on top and the strut should be loose
time to pull out the strut.. have your friend push down on the rotor. get the strut as low as possible while maneuvering the strut out. NOTE: watch out for the sensors and break lines. almost snagged one. (if your having trouble with this you can unbolt the a-arm)
once the shocks are out, lay it on the ground and use a impact to loosen the bolt. looks kind of scary but there really is no compression in the stock springs. just a bit of a jolt when it unbolts.
heres a comparison with stock and eibachs
next, compress the spring. this is the scary part. please be carefull! need your buddy here too. once you get it compressed, use a open wrench to tighten the nut back and a open box wrench to hold tip of the bolt. make sure you transfer everything that came from the stock. all your switching out is the spring itself. not cutting involved also.
install the sucker back in and repeat on the other side.. also make sure the springs are are on right and not upside down.
the rear is simple, one bolt. remove the bolt push down on the arm and remove the spring. transfer the rubber bushing to the new springs and set it back in.
use a jack to compress the spring and match the holes into place. tap the bolt lightly into place and it should slide right in.
thats about it... difficulty is probably 2 1/2 out of 5 without the proper tools.
should be a breeze with a compressor, lift, etc..
hope this helps guys! feel free to ask questions and for those whose done this, please add on to this. i'll be doing my allignment as soon as the springs settle i'll post some after pics also.

Florida G35 Club, Premier Member
iTrader: (3)
Joined: Oct 2005
Posts: 2,508
Likes: 0
From: Orlando, FL
thats how my install was. The rears were very easy, i couldn't believe it. for the fronts i was following a different guide, and i had issues until i realized i had to remove that bracket holding the front strut on. The rest was cake.
nice pics, thanks for sharing
nice pics, thanks for sharing


Trending Topics

Registered User
Joined: Jun 2008
Posts: 315
Likes: 1
From: Ewa Beach, Hawaii and Guam
Hey bro I see that you stole one of my most important tools! Lol it's good to see I am not the only alcoholic who works on cars while drinking Heineken I bet it came in handy when compressing the spring started to **** you off, I know it worked great for me. Guess there are two 370s riding on eibachs now
 Post some pics of what the finished product looked like, and thanks for the DIY!
I bet it came in handy when compressing the spring started to **** you off, I know it worked great for me. Guess there are two 370s riding on eibachs nowPost some pics of what the finished product looked like, and thanks for the DIY!

Registered User
Joined: Dec 2007
Posts: 51
Likes: 1
From: Hermitage, TN
first off this is a 2 man job make sure you have a buddy right beside you.
thats about it... difficulty is probably 2 1/2 out of 5 without the proper tools.
should be a breeze with a compressor, lift, etc..
hope this helps guys! feel free to ask questions and for those whose done this, please add on to this. i'll be doing my allignment as soon as the springs settle i'll post some after pics also.
I have not done this on the G37 but on several other vehicles. If I'm all wet please don't chastise me! The secret is to disconnect the upper ball joint and let the spindle completely disconnect from the upper A-arm. Start by loosening the nut on the ball joint, smack the spindle with a BFH to break loose then completely remove the nut on the ball joint and seperate. There is no prying as the entire spring/strut assembly almost falls off or lifts out. Strictly a one man job. The most time consuming part is jacking the car up and taking the wheel on and off.
Registered User
Joined: Jun 2008
Posts: 315
Likes: 1
From: Ewa Beach, Hawaii and Guam
I have not done this on the G37 but on several other vehicles. If I'm all wet please don't chastise me! The secret is to disconnect the upper ball joint and let the spindle completely disconnect from the upper A-arm. Start by loosening the nut on the ball joint, smack the spindle with a BFH to break loose then completely remove the nut on the ball joint and seperate. There is no prying as the entire spring/strut assembly almost falls off or lifts out. Strictly a one man job. The most time consuming part is jacking the car up and taking the wheel on and off.

Dang bro, you just had to keep us waiting for the after pics huh?!
You should be able to clean your car today. It hasn't rained, yet. LOL!
BTW, someone bought the Axis Elites from ProLine already, its on another G similar to mine. I saw it parked by Hagatna post office this morning.
Sooner or later, there'll be three.
You should be able to clean your car today. It hasn't rained, yet. LOL!
BTW, someone bought the Axis Elites from ProLine already, its on another G similar to mine. I saw it parked by Hagatna post office this morning.
Hey bro I see that you stole one of my most important tools! Lol it's good to see I am not the only alcoholic who works on cars while drinking Heineken I bet it came in handy when compressing the spring started to **** you off, I know it worked great for me. Guess there are two 370s riding on eibachs nowPost some pics of what the finished product looked like, and thanks for the DIY!
I bet it came in handy when compressing the spring started to **** you off, I know it worked great for me. Guess there are two 370s riding on eibachs nowPost some pics of what the finished product looked like, and thanks for the DIY!Sooner or later, there'll be three.
Last edited by myk1013; Oct 22, 2008 at 02:52 AM.
Thread Starter
Registered User
Joined: Aug 2007
Posts: 36
Likes: 0
sorry for the delay.. finally gotten around to some pics. pics kinda suck, it was starting to get dark.


eibach quick review:
very mild drop. alot of my friends cant really tell from looking at it but i can. front is perfect but wish the back was a little bit lower. hopefully it will settle. the ride quality is great. doesnt really feel like your driving a boat anymore. little harsher on bumps versus stock but not that bad. the drop does need a camber kit. thatll be th next thing i get.

So, hypothetically speaking, lets say someone lived alone and had no friends who were willing to help him. Lets also say that the only jack this person has is the one that comes with the car, in the spare tire kit. And this person doesn't own jack stands. Furthermore, the only tools he owns are a few wrenches and ratchets and screwdrivers.
Could he do the rears by himself? Or should he just suck it up and pay someone to do the whole job?
Could he do the rears by himself? Or should he just suck it up and pay someone to do the whole job?
Registered User
Joined: Jun 2008
Posts: 315
Likes: 1
From: Ewa Beach, Hawaii and Guam
You should be able to do the back yourself with the tools you mentioned. Just use the jack to relieve the spring tention by lifting the plate that holds the spring in place and just remove one of the 2 bolts holding the plate to the car (17mm or 19mm I think) and then lower the jack.
So, hypothetically speaking, lets say someone lived alone and had no friends who were willing to help him. Lets also say that the only jack this person has is the one that comes with the car, in the spare tire kit. And this person doesn't own jack stands. Furthermore, the only tools he owns are a few wrenches and ratchets and screwdrivers.
Could he do the rears by himself? Or should he just suck it up and pay someone to do the whole job?
Could he do the rears by himself? Or should he just suck it up and pay someone to do the whole job?