
Spoiler Install


Thread Starter
Registered User
Joined: Mar 2005
Posts: 38
Likes: 0
From: carlsbad, ca
Spoiler Install
I am not a mechanic and take no responsibility for the following thoughts:
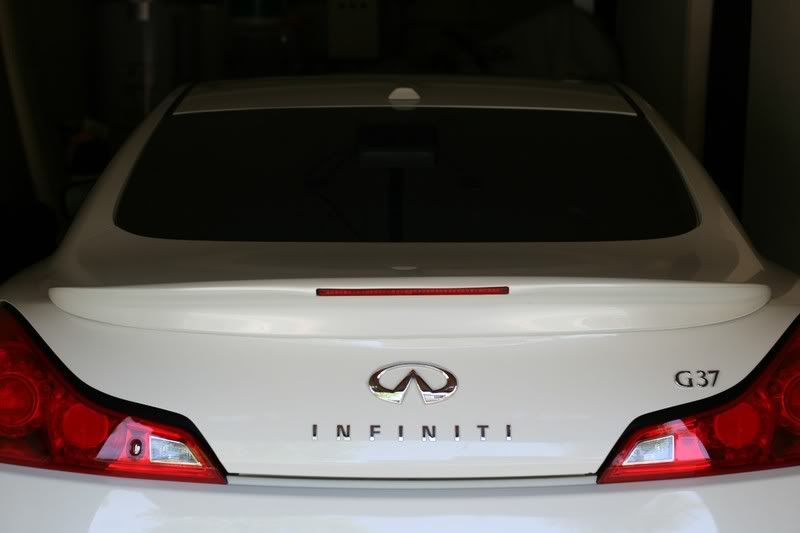
My car is a Journey Auto with the chrome spoiler.
Recieved and installed the Grubbs Spoiler today, $317 shipped.
Instructions sucked and were not specific to Infiniti cars. Spoiler is nice.
It took me several hours for the install because I didn't know what I was doing, didn't want to mess up my new car and the instructions were useless.
Here's what I did. I used a flat screwdriver, pliers, electrical tape, drill and a flashlight. I would recommend unhooking the battery before messing with your car's electronics.
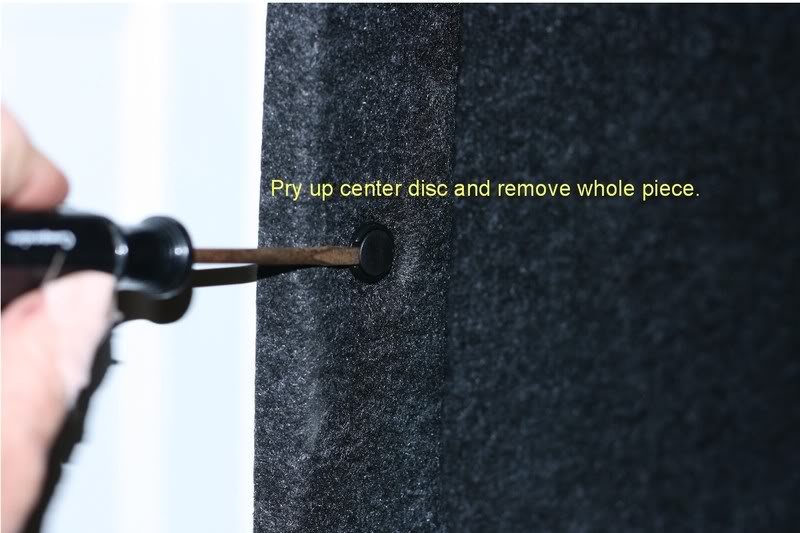
First remove the truck lid liner by prying everything loose. Remove the little round clips, the 2 big round ones, the trunk lid handle and emergency lid release.
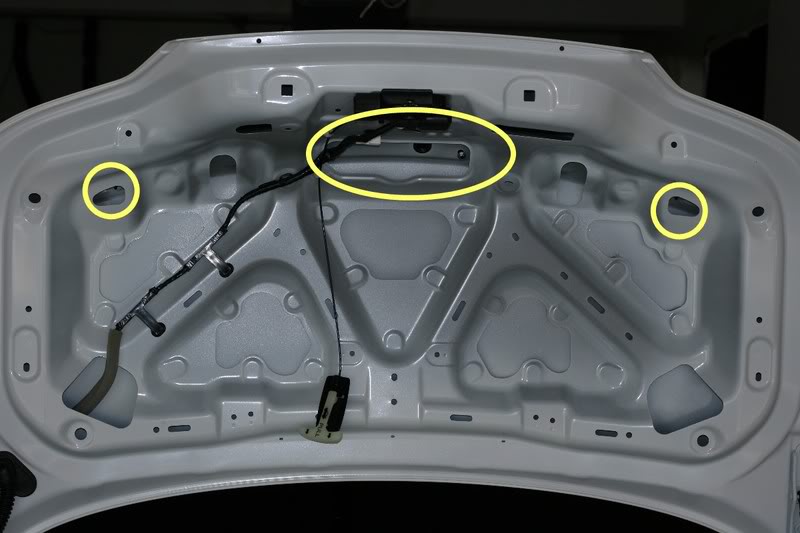
The chrome spoiler is held on by 4 nuts.
After removing nuts, carefully pry off the spoiler.
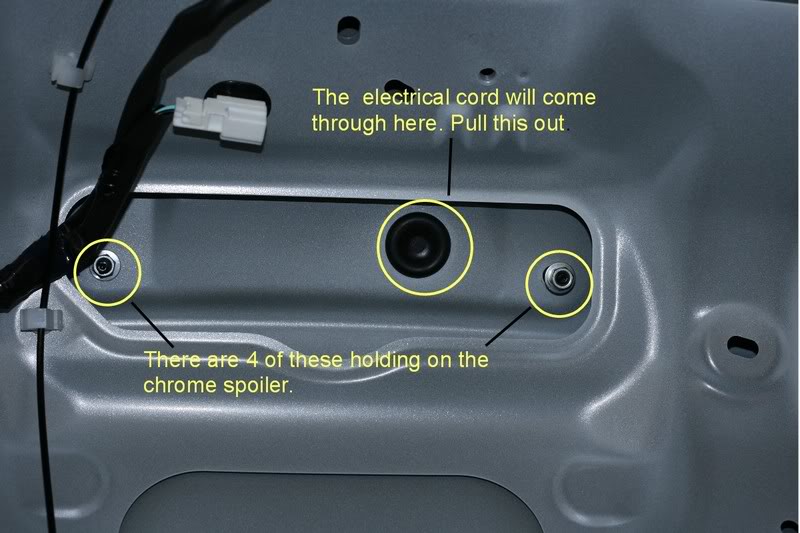
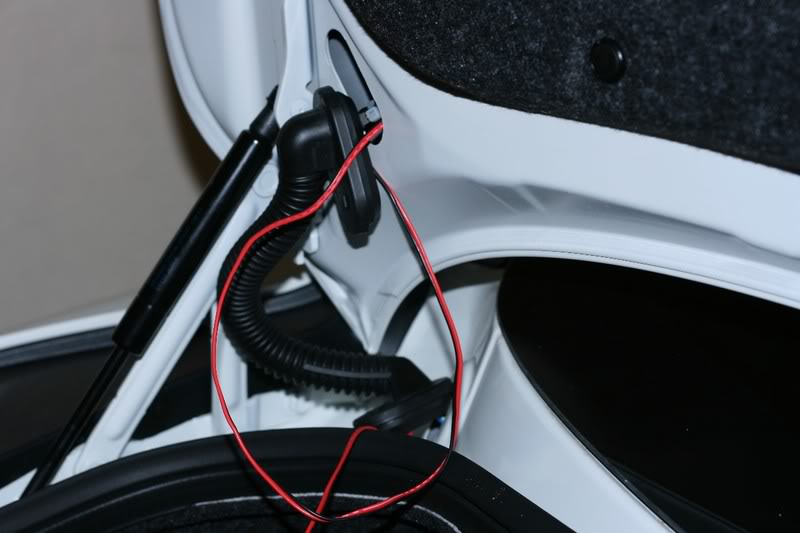
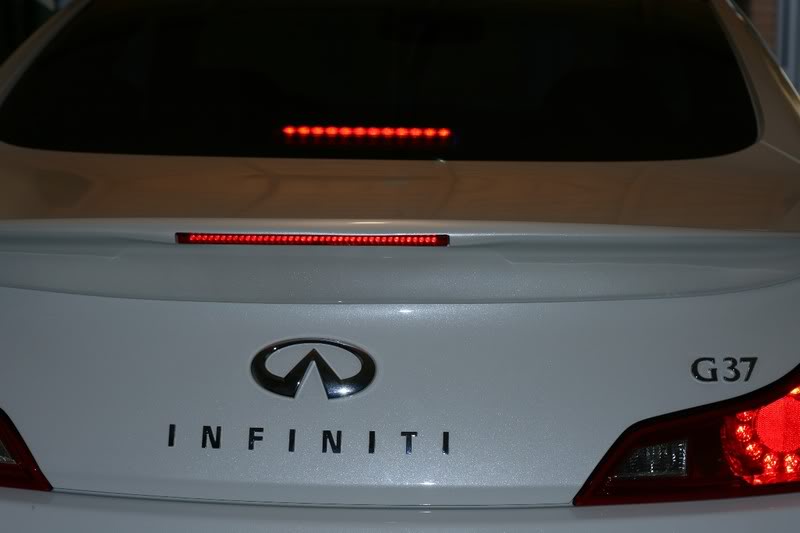
Check the fit of the new one, and use some masking tape to mark the correct postion. Feed all of the wire through the hole shown in the picture. Because of the 3M tape, it is not super easy to move around once placed on the car. I followed the recommendation of spraying some water on the adhesive so it wouldn't stick so much.
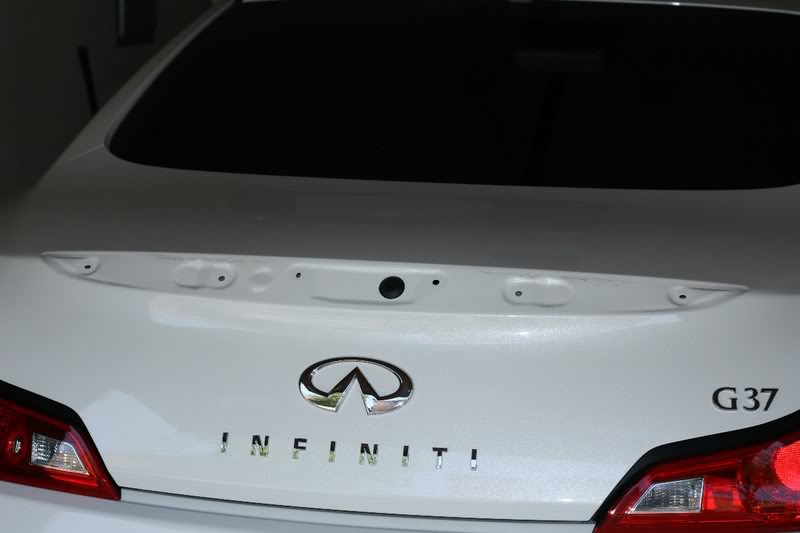
Once I got it on in the right location, it was time to figure out how the heck to deal with the screws. I started with the 2 far end screws and needed to drill a new hole in the spoiler, because the pre-drilled hole did not line up.
For the inner part, I decided to use the original holes from the chrome spoiler, even though there were no holes in the new spoiler there. I drilled some pilot holes into the spoiler and found that it is extremely thin in that area. I used these holes anyhow because I had a pretty good feeling that between the tape and the outer screws, it was going to be solid. There are some strong support holes in the spoiler, but there is no easy access to them in the trunk lid, without opening up some new holes for access. Part of me wonders if the tape itself would be enough?
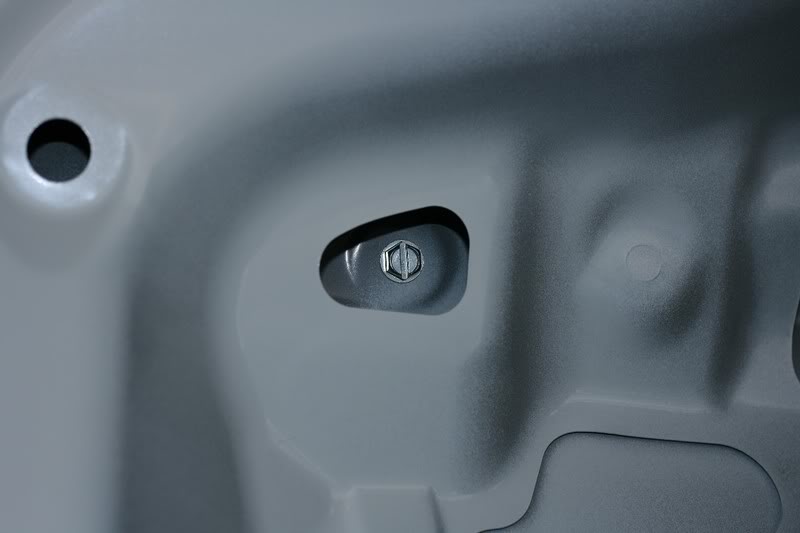
Near the trunk latch was an unused electrical plug, that I thought would be for the brake light. Wrong, it must be for a rear view camera? I wasted time splicing into this wiring in an effort to hook up the LED brake light.
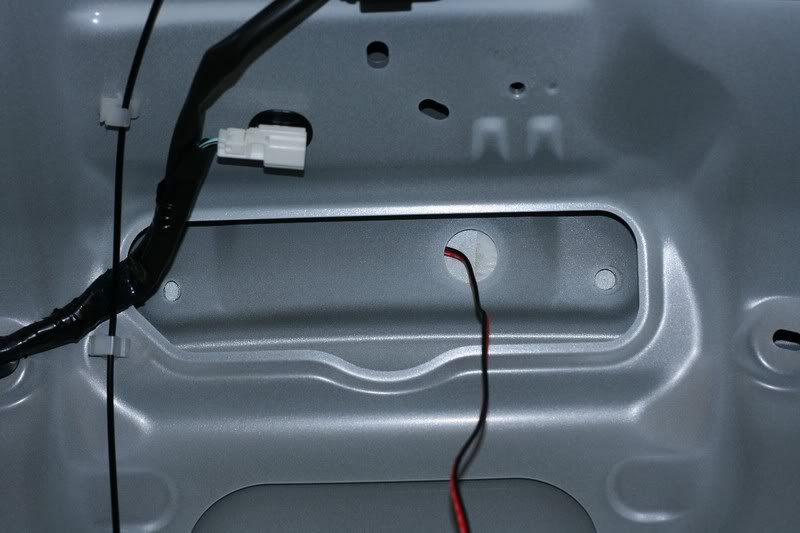
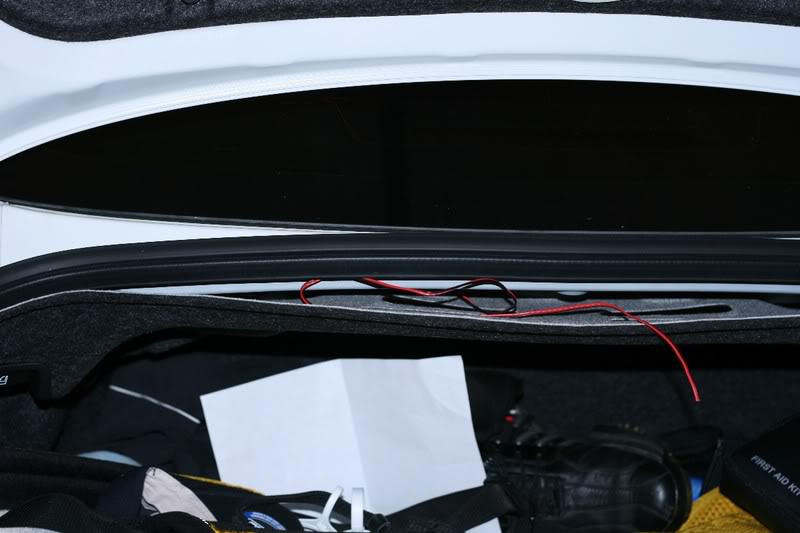
You will need to feed the wire across the trunk lid, into the body of the trunk (through the rubber tube and into the area of the brake light in your rear window). At first I wasn't sure how to get the wire through the tube, but I was able to work it thru somehow. At this point I replaced the trunk lid liner, since I was finished with that portion of the install.
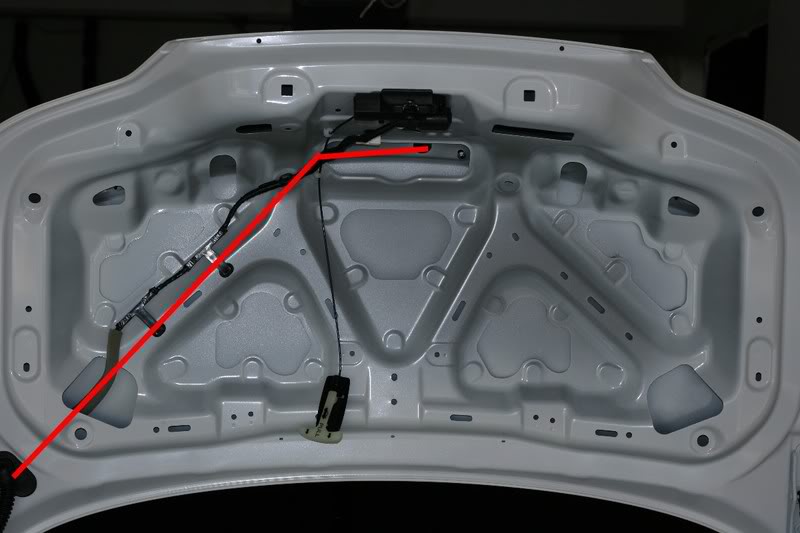
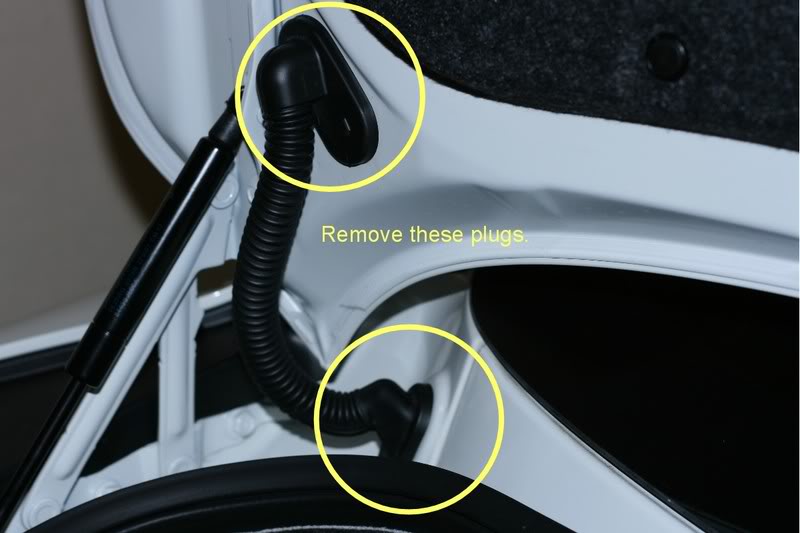
Remove the 3 central liner clips and feed the wire across towards the trunk light.
You will need to splice into the wires that feed into the rear window brake light. The wires come out of the window light and into a plug, then continue on. This is where I spliced, after the plug. I've got to admit, I was very uncomfortable with this part. I was thinking if I screwed up somehow, I'd lose my brake lights and have to go to the dealer with my tail between my legs. If you do not want to use the brake light in the window, all you need to do is unplug it at this point. I was carefull to be conservative with the splicing, afaraid that if I made a mistake there might not be enough factory wire to redo it.
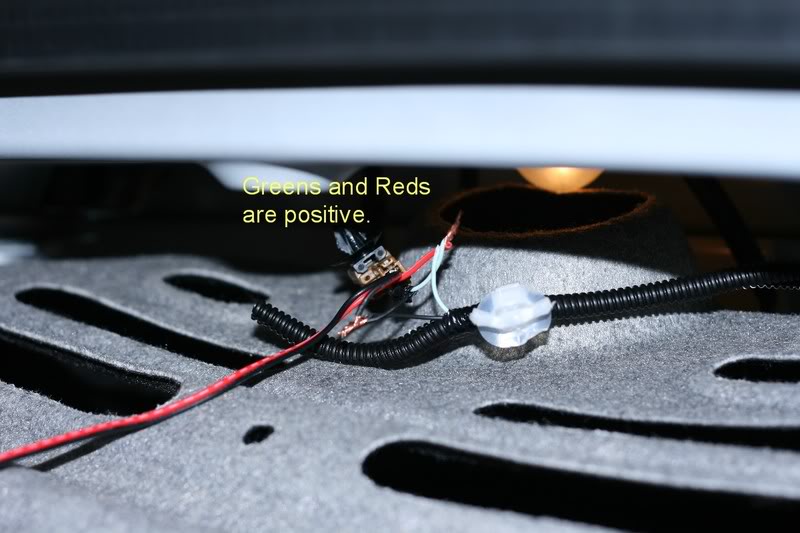
After splicing, I checked to see if it worked. It did!
I carefully and concientously taped up all the splicing and wiring, hoping to avoid failures and rattles.
I'm happy with the outcome, but it was a bit more stressful than I had anticipated.
Hope this helps.
My car is a Journey Auto with the chrome spoiler.
Recieved and installed the Grubbs Spoiler today, $317 shipped.
Instructions sucked and were not specific to Infiniti cars. Spoiler is nice.
It took me several hours for the install because I didn't know what I was doing, didn't want to mess up my new car and the instructions were useless.
Here's what I did. I used a flat screwdriver, pliers, electrical tape, drill and a flashlight. I would recommend unhooking the battery before messing with your car's electronics.
First remove the truck lid liner by prying everything loose. Remove the little round clips, the 2 big round ones, the trunk lid handle and emergency lid release.
The chrome spoiler is held on by 4 nuts.
After removing nuts, carefully pry off the spoiler.
Check the fit of the new one, and use some masking tape to mark the correct postion. Feed all of the wire through the hole shown in the picture. Because of the 3M tape, it is not super easy to move around once placed on the car. I followed the recommendation of spraying some water on the adhesive so it wouldn't stick so much.
Once I got it on in the right location, it was time to figure out how the heck to deal with the screws. I started with the 2 far end screws and needed to drill a new hole in the spoiler, because the pre-drilled hole did not line up.
For the inner part, I decided to use the original holes from the chrome spoiler, even though there were no holes in the new spoiler there. I drilled some pilot holes into the spoiler and found that it is extremely thin in that area. I used these holes anyhow because I had a pretty good feeling that between the tape and the outer screws, it was going to be solid. There are some strong support holes in the spoiler, but there is no easy access to them in the trunk lid, without opening up some new holes for access. Part of me wonders if the tape itself would be enough?
Near the trunk latch was an unused electrical plug, that I thought would be for the brake light. Wrong, it must be for a rear view camera? I wasted time splicing into this wiring in an effort to hook up the LED brake light.
You will need to feed the wire across the trunk lid, into the body of the trunk (through the rubber tube and into the area of the brake light in your rear window). At first I wasn't sure how to get the wire through the tube, but I was able to work it thru somehow. At this point I replaced the trunk lid liner, since I was finished with that portion of the install.
Remove the 3 central liner clips and feed the wire across towards the trunk light.
You will need to splice into the wires that feed into the rear window brake light. The wires come out of the window light and into a plug, then continue on. This is where I spliced, after the plug. I've got to admit, I was very uncomfortable with this part. I was thinking if I screwed up somehow, I'd lose my brake lights and have to go to the dealer with my tail between my legs. If you do not want to use the brake light in the window, all you need to do is unplug it at this point. I was carefull to be conservative with the splicing, afaraid that if I made a mistake there might not be enough factory wire to redo it.
After splicing, I checked to see if it worked. It did!
I carefully and concientously taped up all the splicing and wiring, hoping to avoid failures and rattles.
I'm happy with the outcome, but it was a bit more stressful than I had anticipated.
Hope this helps.
Last edited by shaybly; Apr 2, 2008 at 12:10 AM. Reason: finishing
Looks good, spray some water around there and make sure there are no leaks. This was a common problem for many G35 owners who added the factory spoiler down the road. Thanks for the write-up!

 ...someone else have an opinion?
Thread Starter
Registered User
Joined: Mar 2005
Posts: 38
Likes: 0
From: carlsbad, ca
Actually, the color matches really great. I went to the store and saw no issues. I hope it fades correctly though.
As far as leaks go, the 3M tape appeared as though it would keep out the water. I will check it though, thanks for the tip Diamond.
As far as leaks go, the 3M tape appeared as though it would keep out the water. I will check it though, thanks for the tip Diamond.

Registered User
Joined: Oct 2007
Posts: 4,404
Likes: 5
From: Chatsworth CA
Yea i think its the lighting as well.... The paint they use sucks IMO mine is already fading and i hardly ever park in the sun.... And it leaks now.. :/ master grade where are you with your carbon trunk with the camera hole?!?!
Trending Topics


Registered User
Joined: Apr 2008
Posts: 89
Likes: 0
From: Palm Beach Florida
For not being a mechanic, I think you did an awsome job. And thats coming from a mechanic. Actually your also a body man. Pat yourself on the back. The only thing I noticed in the pics was that you twisted the wires together at the splice. Slide some heat shrink over the wire first. then use wire connectors and crimp the wires together. Slide the heat shrink back over the connection and heat it. It will look like a factory job and you can earn yourself 1 stripe . You should submit your install instructions to the spoiler manufacturer. They look better than technical drawings I've seen on more important things. Again, GREAT JOB.
Last edited by koelzmod; Jun 30, 2008 at 10:48 PM.


Registered User
Joined: Apr 2008
Posts: 23
Likes: 0
From: Logan, West "By God" Virginia
Thanks for the write up and the pics. It really helped me. Your spoiler looks great. No way to tell how the paint looks one a pic with shadows, but I am sure it looks great! It looks great to me. But I just wanted to say that this post was exactly what I was looking for. Thanks again.
JB
JB

one other tip is to just peel enough of the blue backing off the double-sided tape so that you have an end for each strip hanging out when you place the spoiler. This, in addition to spraying some glass cleaner or clean water on before setting the spoiler down, makes it very easy to make any necessary adjustments in position. then when it's just right, peel the rest of the tape and press the whole thing down. Did the same thing with the illuminated kick plates, works like a charm. Oh yeah, and put some silicone caulk around the screw holes before tightening to prevent leaks.

no paint issues with mine. I got a chance to compare this spoiler side by side with the OEM spoiler - I like this one better. It is more pronounced than the OEM. my opinion only of course. I switched to the spoiler brake light also. I see that there is a rear deck available that doesn't have the brake light, but it is something like $500.
Last edited by ufo; Mar 18, 2009 at 10:45 AM.