When you click on links to various merchants on this site and make a purchase, this can result in this site earning a commission. Affiliate programs and affiliations include, but are not limited to, the eBay Partner Network.
Wow I really like the way that sits and looks. Very OEM-ish appeal to it imo. Is the upper bolster on the side pillar there? Also you plan on getting a harness or sticking with the oem seat belt?
Thanks! I also like the fact that these seats look relatively oem instead of full on race seats. They match the interior pretty well. Even better is the comfort (especially lower back), ability to hold you in place and lighter weight.
The upper bolster is very close to the B-pillar. It does slide past, but very close.
I will probably stick with the stock seat belt. One nice thing about the Bride seat rails is that they come with the mount and hardware for the oem seatbelt- one less dash light I have to worry about.
Last night I installed a new resistor and connectors to the wiring for the driver's side air bag to hopefully get rid of the airbag light. I am having a technician reset the warning light on the dash.
Hopefully, this will take care of it. It looked like the issue might just be that the oem wire inside the connectors may not have been making full/consistent contact. That is the only thing I can think of since it worked fine for about a month before.
Here are the resistors and connectors
Here is everything assembled with electrical tape covering the resistor
My technician just tried to reset the airbag light, but now it comes back on instantly and the car throws the code below. Anyone with any electrical experience or experience removing your seat with advice on how to fix this?
So I think I am getting a little closer to a solution to my air bag light. ConceptZperformance carries a 2.2 ohm resistor that works for steering wheels and they think it might work for my seat side air bag issue. I would probably just buy a pack of 10 resistors on amazon for a fraction of what they want, but I now know that their resistor is 2.2 ohms and 1/2 watt.
It sounds dumb, but their technical guy thinks my issue might be partly that I have a 2.0 ohm resistor instead of 2.2 ohms and also that I hooked up the stock wiring harness (not air bag sensor) for the seat with my 2.0 ohm resistor attached. He said once you throw an airbag light the car becomes very sensitive to wiring differences. One of my techs seconded this idea.
We think that if I get a 2.2 ohm 1/2 watt resistor, re-install the factory seat, disable the airbag light, disconnect the battery (so the car does not see the change in wiring), and re-wire the resistor, then I should be ok. Has anyone had a similar issue or have any insight?
Well, this Sparco seat install has become an interesting journey. I tried to install the new 2.2 ohm resistor on Friday night to get rid of the airbag light. Everything went well at first and I was even able to reset the factory airbag light without a scan tool. (BONUS!)
Then I remembered 2GorNot2G posting up a picture of a white box on the bottom of the factory seat that was held on by two bolts that would allow me to keep my power mirrors and memory system if I plugged it into the wires in the floor of the car.
Apparently this is not the right box because my car would not fire up, but would turn on every accessory and even the headlights (even though they were off) and would not shut off. I had to disconnect the battery just to get the car to shut off and it smelled like an electrical fire. I was afraid I toasted the ECU, but the Z1 tunes were still there. I unplugged the white box and the car tried to start, but would cut out after 1 second like it was in a limp mode to protect itself.
Fortunately, I have an extended warranty that covered towing the car to my store. Sat afternoons are not busy for my service department so my lead tech. spent the afternoon clearing codes, but surprisingly did not have to replace any parts. Now it has been 3 days and no airbag light. Fingers crossed I am all good now.
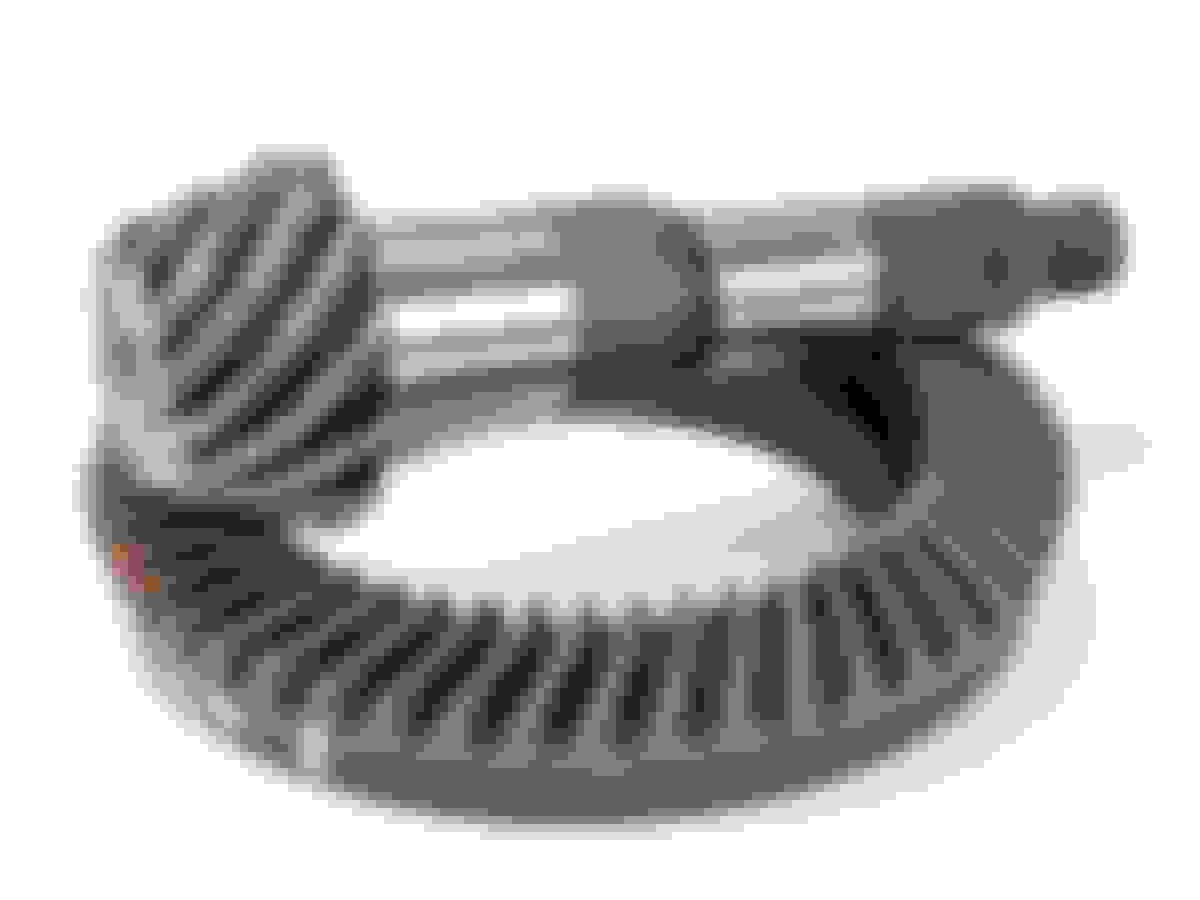
Well, I have been thinking a lot about a vented hood lately to help with underhood temps on track days. I think I will do that relatively soon, but I remembered that one of my seals on the rear diff was leaking so I will probably do rear gears first. It looks like two of the part numbers have been updated and I should be able to save about $100 getting the parts through work.
The "rebuild kit" is just a collection of OEM bearings and bushings. Labor costs will obviously vary, but this is at least a full-day job, maybe more. In any event, you're going to be all in between $1500 and $2000 on this project, and it will be worth every penny.
4.083, or are you going to go crazy with the super short 4.36? Seems the interweb opinions describe the 4.36 as useful for the short strip, and awkward on the course track. Nah, pointless ask... you'd be getting the 4.08 final drive. This is primarily your DD anyway.
Psyched to see you finally take on this mod, 4DRZ.
Last edited by Rochester; Mar 4, 2018 at 07:29 AM.
I did give some thought to the 4.36, but after talking to one of the Z1 guys I will probably go with the 4.08. Because I have a diff seal leaking my extended warranty should cover a good portion of the labor (unfortunately the seal that leaks only costs $10), but it will still be about $1,000-$1,200 all in.
If these are all Nissan Frontier parts, couldn't you just buy a whole used rear diff off a Frontier for a few hundred dollars?
This weekend I washed my car and clay bar cleaned my bumpers and side sills for an upcoming carbon fiber wrap project that will hopefully happen later this week if the weather clears up.
I removed the front splash guards and had a lot of work to do to clean up the original paint underneath. I was surprised how much cleaner the lines on the car are without the front guards.
My front and rear bumpers were repainted and the dumb dealership repainted the rear bumper with the rear splash guards attached so there is a paint line with them off. I tried every compound I have, but ultimately decided it is probably for the best to leave the guards on since the tires are wider in back.
Looks a lot cleaner with the front splash guards off
So I finally did an upgrade to the exterior appearance of my car even though I like to keep my cars looking like sleepers. There are so few options for body kits for sedans. So after looking at the shape of the lower front and rear bumpers for a long time I thought I could wrap them in carbon and it would look like a chin spoiler and rear diffuser. I also wrapped the lower half of the side sills, but it is difficult to see on black pavement. It turned out great and the car looks a lot more aggressive- especially from the front.
I will probably wrap the chrome on the grille in carbon and put a mesh grille into it from behind (similar to the lower mesh in the bumper). Then I plan on wrapping the mirror covers and chrome window frames in carbon. I might do the rear emblems and I am torn on swapping over to Nissan Skyline badges.
The thing I really need to figure out is the hood since I want to go vented for track days. I keep thinking of reverse naca ducts in the factory hood, but there just does not seem to be enough room for them between the factory bracing. So I might do a full carbon hood (not sure if it will be too "ricey) or get fiberglass and paint it or wrap it in the same carbon.
Rear "diffuser"
Lower half of side sills carbon wrapped- hard to see with the shadow below it.
"Chin spoiler" looks very aggressive in person and highlights the fact I need to do the grille.
You can barely see the carbon weave if you blow it up full size.
You can just start to see the carbon weave here. Looks awesome in person!
Hood Option 1. Carbon Creations carbon fiber hood from CarID. This hood looks really glossy and nice close up. I'm just not sure if a carbon fiber hood is a step too far in the direction of rice for an Infiniti sedan or if it will tie in nicely with my other carbon wrapped parts. I do think it looks weird below without any other carbon on the car.
Option 2. Paint match a Duraflex fiberglass hood from CarID. This would look closer to stock, but I think it really highlights how the shape of the vents is incongruent with the other styling lines on the front of the car. Might also look strange with carbon wrap at least on the front grille frame and lower "splitter" secton of the front bumper. Not sure yet how much it would cost to paint, but will find out soon.


 )
)