

Painted my Headlights


Thread Starter
Registered Member
iTrader: (2)
Joined: Jun 2015
Posts: 515
Likes: 58
From: Bay Area (925)
Painted my Headlights
Hey guys so I just finished painting my headlights this weekend and I just thought I'd share! Work/school starts tomorrow so this was the last mod of the summer for me haha. Sorry in advance for the low quality pictures, it was evening when I finished and lighting wasn't the best.
I used the painted headlights DIY posted up by Black Betty himself as well as one from G35Driver, along with a DIY for bumper removal. I have an 07 Sedan (don't kill me I know it's technically not a G37 ) and the headlights are older so it may have been slightly different.
Removing the bumper and headlights wasn't that bad. Disconnecting the wiring was a little tough, but taking the headlight itself apart was a lot harder. After the first one I got good at it though and got the second one apart with only one 10-minute baking in the oven. Pic of in between taking them apart + my oven mitts lol:
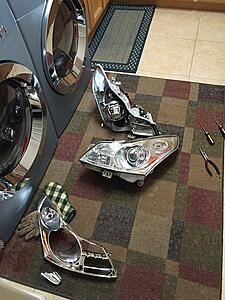
Honestly the hardest part was putting the headlights back together, especially getting the lens+chrome pieces back on fitting exactly as they were originally while dealing with the old glue. I'd say I got it to 95% of the original fit through several rounds of hairdryer heating cycles, it just wasn't feasible to heat the headlight in the oven over and over again to adjust it a little bit. I used clear RTV to seal it as well. Pic of the painted bezels:

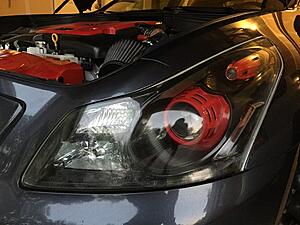
Now reinstalling the headlights was easier since I knew where everything went. The trickiest part here was re-wiring everything in a tight space(those wires don't have that much slack). Putting the bumper back on was super easy. Finished product pic:
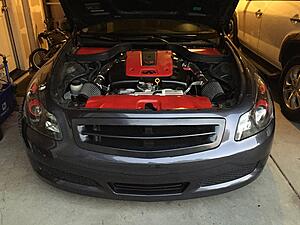
I realize not everybody would go for the two-tone color scheme (I also kind of regret not painting the headlight shroud and parking light shroud blue slate to match the exterior instead of red), but I like how it stands out and matches my engine bay paint. Also, I decided not to paint the fog light and turn signal reflectors because they would have been really hard to get out, and I figured as reflectors painting them would limit the functionality. Bonus front end pic :
:
Overall I'd rate the difficulty of this mod as a 3, 1 being an oil change and 5 being "take it to the shop". Mainly, it was just time consuming (and painful for your hands haha). Thanks for reading, if anyone has any questions I'd be glad to answer!
I used the painted headlights DIY posted up by Black Betty himself as well as one from G35Driver, along with a DIY for bumper removal. I have an 07 Sedan (don't kill me I know it's technically not a G37
) and the headlights are older so it may have been slightly different.Removing the bumper and headlights wasn't that bad. Disconnecting the wiring was a little tough, but taking the headlight itself apart was a lot harder. After the first one I got good at it though and got the second one apart with only one 10-minute baking in the oven. Pic of in between taking them apart + my oven mitts lol:

Honestly the hardest part was putting the headlights back together, especially getting the lens+chrome pieces back on fitting exactly as they were originally while dealing with the old glue. I'd say I got it to 95% of the original fit through several rounds of hairdryer heating cycles, it just wasn't feasible to heat the headlight in the oven over and over again to adjust it a little bit. I used clear RTV to seal it as well. Pic of the painted bezels:

Now reinstalling the headlights was easier since I knew where everything went. The trickiest part here was re-wiring everything in a tight space(those wires don't have that much slack). Putting the bumper back on was super easy. Finished product pic:

I realize not everybody would go for the two-tone color scheme (I also kind of regret not painting the headlight shroud and parking light shroud blue slate to match the exterior instead of red), but I like how it stands out and matches my engine bay paint. Also, I decided not to paint the fog light and turn signal reflectors because they would have been really hard to get out, and I figured as reflectors painting them would limit the functionality. Bonus front end pic
:
Overall I'd rate the difficulty of this mod as a 3, 1 being an oil change and 5 being "take it to the shop". Mainly, it was just time consuming (and painful for your hands haha). Thanks for reading, if anyone has any questions I'd be glad to answer!

Yep, looks like a fine job to me too!
And who cares if it's an 07, especially one that's well kept like yours.
BTW, did you have any problems with those brittle prongs that hold the upper marker shrouds in? I broke a couple of mine off and had to get by w/ silicone
It's been a few years and it's still holding OK though.
And who cares if it's an 07, especially one that's well kept like yours.
BTW, did you have any problems with those brittle prongs that hold the upper marker shrouds in? I broke a couple of mine off and had to get by w/ silicone
It's been a few years and it's still holding OK though.

 after a few more write-ups like yours I'm edging closer...but still miles away.

Trending Topics


Taking the headlights apart, there is a DIY in the DIY section. If you use a paint like Kylon fusion, no prep work or clear coat is needed. Although, doing some prep work wouldn't hurt.


Thread Starter
Registered Member
iTrader: (2)
Joined: Jun 2015
Posts: 515
Likes: 58
From: Bay Area (925)
My lenses have spider cracks in them too so the lens does actually take away from the overall look a bit but it's still a lot nicer to me. Downsides of an 8 year old car haha.
And yes blnewt those things were really brittle. The first headlight I attempted I broke 2/4 of the parking light shroud prongs and the second I still broke one. I used silicone too.
Also, prepwork was minimized to a soap wash, sanding with 1500, and rubbing alcohol. I was kind of on a time crunch. No clear or primer either because I read others have had good results without.
Side effect of this: I was an idiot and fiddled with the adjustment ***** when trying to get the shroud out so now my passenger headlight points 5 feet in front of the car on the ground *facepalm*. Gotta adjust that this weekend I guess.
And yes blnewt those things were really brittle. The first headlight I attempted I broke 2/4 of the parking light shroud prongs and the second I still broke one
. I used silicone too.Also, prepwork was minimized to a soap wash, sanding with 1500, and rubbing alcohol. I was kind of on a time crunch. No clear or primer either because I read others have had good results without.
Side effect of this: I was an idiot and fiddled with the adjustment ***** when trying to get the shroud out so now my passenger headlight points 5 feet in front of the car on the ground *facepalm*. Gotta adjust that this weekend I guess.
Your bay and your lights are looking sweet. Nice work!
These are the projects I've been saving for last mostly because of fear. The whole "bake your headlights open and rip them apart" thing really got me
But I plan on starting with the engine bay for more practice painting and then stepping to my heads and tails.
Thanks for the mini-write up.
These are the projects I've been saving for last mostly because of fear. The whole "bake your headlights open and rip them apart" thing really got me
But I plan on starting with the engine bay for more practice painting and then stepping to my heads and tails.
Thanks for the mini-write up.

