Body Interior Exterior Lighting
Sponsored by:
Sponsored by: CARiD

Beginning Custom Headlights

Thread Tools
 
Search this Thread
 
Old Dec 25, 2013 | 07:59 AM
  #61  
GoFightNguyen's Avatar
GoFightNguyen
Because Racecar
iTrader: (14)
 
Joined: May 2013
Posts: 2,543
Likes: 759
From: Houston
Originally Posted by ninjitsui1
Nice bro! What color are the shrouds?
On my 2012 g37 the headlight shrouds come in black chrome already, so there was no need to paint anything.

Last edited by GoFightNguyen; Dec 25, 2013 at 08:29 AM.
Reply
Old Dec 25, 2013 | 12:14 PM
  #62  
connoisseurr's Avatar
connoisseurr
Thread Starter
Premier Member
iTrader: (5)
 
Joined: Oct 2013
Posts: 1,374
Likes: 182
From: DMV
Looks great! The color combo in there is just perfect. Can't wait to see them all wired up correctly.
Reply
Old Dec 25, 2013 | 02:49 PM
  #63  
blnewt's Avatar
blnewt
Movin On!
iTrader: (13)
 
Joined: Nov 2009
Posts: 24,876
Likes: 4,949
That's going to be a killer combo Anthony, looking forward to the end result.
Reply
Old Dec 25, 2013 | 02:59 PM
  #64  
GoFightNguyen's Avatar
GoFightNguyen
Because Racecar
iTrader: (14)
 
Joined: May 2013
Posts: 2,543
Likes: 759
From: Houston
I'm gonna do a headlight restore after these get wired up. I'll put up a DIY for a tsx-r lens swap, and for wiring the angel eyes.
Reply
Old Dec 25, 2013 | 03:02 PM
  #65  
blnewt's Avatar
blnewt
Movin On!
iTrader: (13)
 
Joined: Nov 2009
Posts: 24,876
Likes: 4,949
Originally Posted by GoFightNguyen
I'm gonna do a headlight restore after these get wired up. I'll put up a DIY for a tsx-r lens swap, and for wiring the angel eyes.
That would be great, those DIYs are surely needed
Reply
Old Dec 25, 2013 | 03:39 PM
  #66  
connoisseurr's Avatar
connoisseurr
Thread Starter
Premier Member
iTrader: (5)
 
Joined: Oct 2013
Posts: 1,374
Likes: 182
From: DMV
I'll be working on a thorough DIY for the sedans as I haven't found a true detailed one. I plan to include the disassembly of the housings, lens swap, painting, LED installation and testing.
Reply
Old Jan 1, 2014 | 04:24 PM
  #67  
GoFightNguyen's Avatar
GoFightNguyen
Because Racecar
iTrader: (14)
 
Joined: May 2013
Posts: 2,543
Likes: 759
From: Houston
Got my inverter board and finally had some time to wire up and test one of my lights. Are you ready?


Beginning Custom Headlights-image-3074783671.jpg
Reply
Old Jan 1, 2014 | 08:42 PM
  #68  
GoFightNguyen's Avatar
GoFightNguyen
Because Racecar
iTrader: (14)
 
Joined: May 2013
Posts: 2,543
Likes: 759
From: Houston
Beginning Custom Headlights-image-1755310875.jpg


Beginning Custom Headlights-image-1318408162.jpg

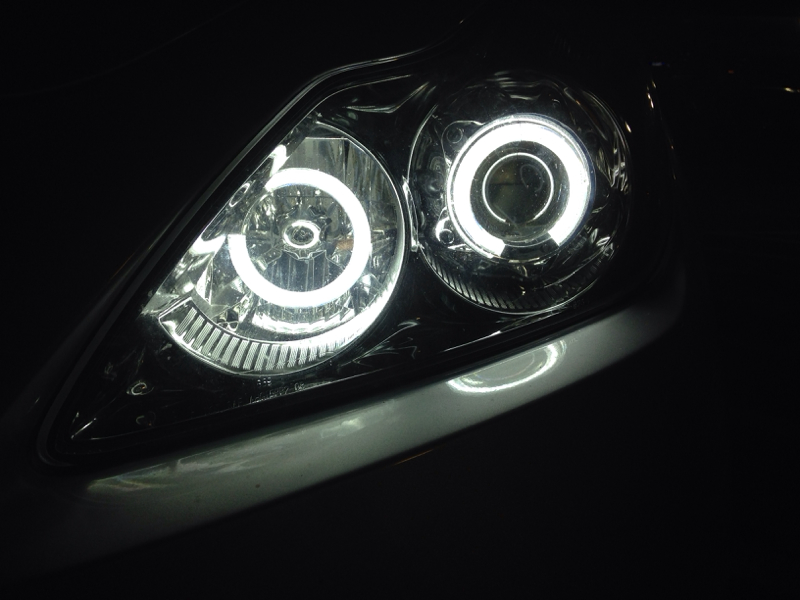
This turned out better than I could have possibly imagined! Thanks for all the help guys, i have exactly what I wanted, quad angel eyes on a DRL harness, for less than 180 would charge all in!
Reply
Old Jan 1, 2014 | 10:15 PM
  #69  
blnewt's Avatar
blnewt
Movin On!
iTrader: (13)
 
Joined: Nov 2009
Posts: 24,876
Likes: 4,949
Looking nice Anthony, how long did that take (once the parts finally arrived)?
Reply
Old Jan 1, 2014 | 10:31 PM
  #70  
GoFightNguyen's Avatar
GoFightNguyen
Because Racecar
iTrader: (14)
 
Joined: May 2013
Posts: 2,543
Likes: 759
From: Houston
Originally Posted by blnewt
Looking nice Anthony, how long did that take (once the parts finally arrived)?
Not that long. My harness worked perfectly, and I eventually found the right fuse to tap 12v acc from. I spent the lions share of the time troubleshooting connections. I used butt splices for a lot of connections and a few were loose. Probably all in, it took me 14 hours spread out over 3 days to remove, open, mod, and reinstall the headlights and relay harness.
Reply
Old Jan 1, 2014 | 10:34 PM
  #71  
blnewt's Avatar
blnewt
Movin On!
iTrader: (13)
 
Joined: Nov 2009
Posts: 24,876
Likes: 4,949
Originally Posted by GoFightNguyen
Not that long. My harness worked perfectly, and I eventually found the right fuse to tap 12v acc from. I spent the lions share of the time troubleshooting connections. I used butt splices for a lot of connections and a few were loose. Probably all in, it took me 14 hours spread out over 3 days to remove, open, mod, and reinstall the headlights and relay harness.
That's not bad, BTW you swapped to TSX-R lenses right? How do you like the new cutoff and overall output?
Reply
Old Jan 1, 2014 | 10:41 PM
  #72  
GoFightNguyen's Avatar
GoFightNguyen
Because Racecar
iTrader: (14)
 
Joined: May 2013
Posts: 2,543
Likes: 759
From: Houston
I did the swap, there's some good color flicker. When I get a chance, I need to aim them more accurately. As is, I get a big "step down" in the cutoff where the drivers side headlight cutoff dips to around 6 inches lower than the passenger cutoff at 25 feet.

I like the new output, it adds a little more blue tinge. The swap was odd, since I had to use a brass punch to pry off the lock ring holding the lens on.
Reply
Old Jan 1, 2014 | 10:53 PM
  #73  
blnewt's Avatar
blnewt
Movin On!
iTrader: (13)
 
Joined: Nov 2009
Posts: 24,876
Likes: 4,949
Originally Posted by GoFightNguyen
I did the swap, there's some good color flicker. When I get a chance, I need to aim them more accurately. As is, I get a big "step down" in the cutoff where the drivers side headlight cutoff dips to around 6 inches lower than the passenger cutoff at 25 feet.

I like the new output, it adds a little more blue tinge. The swap was odd, since I had to use a brass punch to pry off the lock ring holding the lens on.
I've heard the coupe 2.5" lens is secured differently than the sedan, interested to see the way it's secured. How much spacing did you use for the lens?
Reply
Old Jan 1, 2014 | 11:08 PM
  #74  
GoFightNguyen's Avatar
GoFightNguyen
Because Racecar
iTrader: (14)
 
Joined: May 2013
Posts: 2,543
Likes: 759
From: Houston
Originally Posted by blnewt
I've heard the coupe 2.5" lens is secured differently than the sedan, interested to see the way it's secured. How much spacing did you use for the lens?
There's no screws to undo to remove the lens. The lens is seated in a frame and there is an aluminum ring that fits over it. The ring is then bent into divots in the frame to hold it in place. Pretty shoddy way to hold it on.

I didn't see any spacers in the OEM setup, so I just dropped the lens in with no spacers. I think that was the right decision.
Reply
Old Jan 1, 2014 | 11:22 PM
  #75  
blnewt's Avatar
blnewt
Movin On!
iTrader: (13)
 
Joined: Nov 2009
Posts: 24,876
Likes: 4,949
Originally Posted by GoFightNguyen
There's no screws to undo to remove the lens. The lens is seated in a frame and there is an aluminum ring that fits over it. The ring is then bent into divots in the frame to hold it in place. Pretty shoddy way to hold it on.

I didn't see any spacers in the OEM setup, so I just dropped the lens in with no spacers. I think that was the right decision.
I didn't use much spacing w/ mine either, did yours come w/ a wire ring spacer or cardboard spacers? I didn't like the way the lens was secured w/ that wire ring so I just used a bit thicker cardboard to sharpen the cutoff a bit.

So your lens isn't even securely screwed down like this~
Reply


All times are GMT -4. The time now is 01:38 PM.