
Painting Headlight Units (Final Product Pictures) - Precaution + Instructions


Thread Starter
Registered User
iTrader: (1)
Joined: Apr 2010
Posts: 1,700
Likes: 15
From: Pacific NW
Painting Headlight Units (Final Product Pictures) - Precaution + Instructions
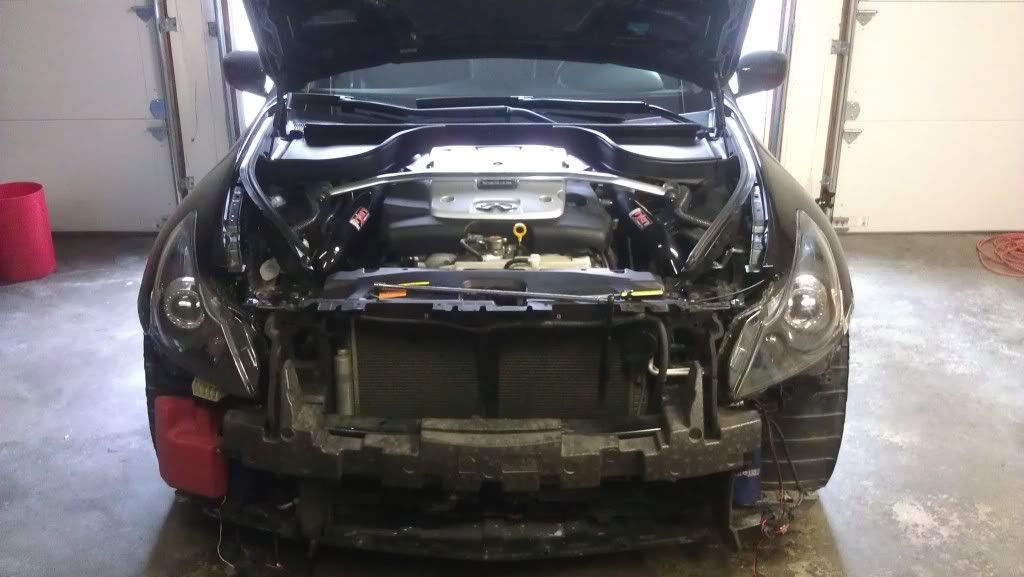
I just wanted to throw this tid bit out there - I haven't seen too many DIYs on the sedan side in particular. The entire process is much easier than you think. If you do have any concerns of questions, please do feel free to PM me. Anyways, the process of taking off the bumper and headlights are both very simple. A bit tedious, but nothing impossible. It's simply a couple of bolts and screws. Note that when you're taking off the bumper - be sure to add tape to both fender lines (will prevent scratching when you're putting the bumper back on). If I remember correctly, the headlights are held in by ~6 bolts on each side (you'll need an extension to access some of them).
Here's what I did (when I did it successfully): Each headlight unit went into my oven for 8 minutes ******ON A PAN***** on ******TOP OF CARDBOARD****** for a total of 8 minutes at a temperature of 200 degrees. Feel feel to place into an oven at lower temperatures as well. NOTHING OVER 200 though. If you haven't already heard the story, at 250 degrees, a wire harness of mine that I accidentally left hanging, caught fire and disfigured the entire headlight plastic piece in the back. I caught it within time, and long story short, I found the burnt harness online from another member (SPECIAL SHOUT OUT TO VAIO who kindly looked through his material and shipped out the correct wire to me - I'd by out some major $$$ without you, sir). Note that ALL pieces of the headlight should be removed; others have done it without removing any of the bulbs, etc. but why take the risk? The wire harness that I left IN controls the high beam function and it's difficult to actually unhook (almost impossible to be honest). Leave that harness in if you must, but make SURE IT DOES NOT HANG off the pan.
As far as the removal of the lens went, I used brute muscle to rip it open; I was paranoid -- I took the headlight out early several times; if left in the oven for the proper time, it would've separated much easier. Anyways, tear apart the unit slowly. I ripped ONE tap, but to this date have been unable to retrace where it came from. The chrome trimmed pieces in the unit are held in by a few screws. I would recommend taking a picture prior so that you know where everything goes.
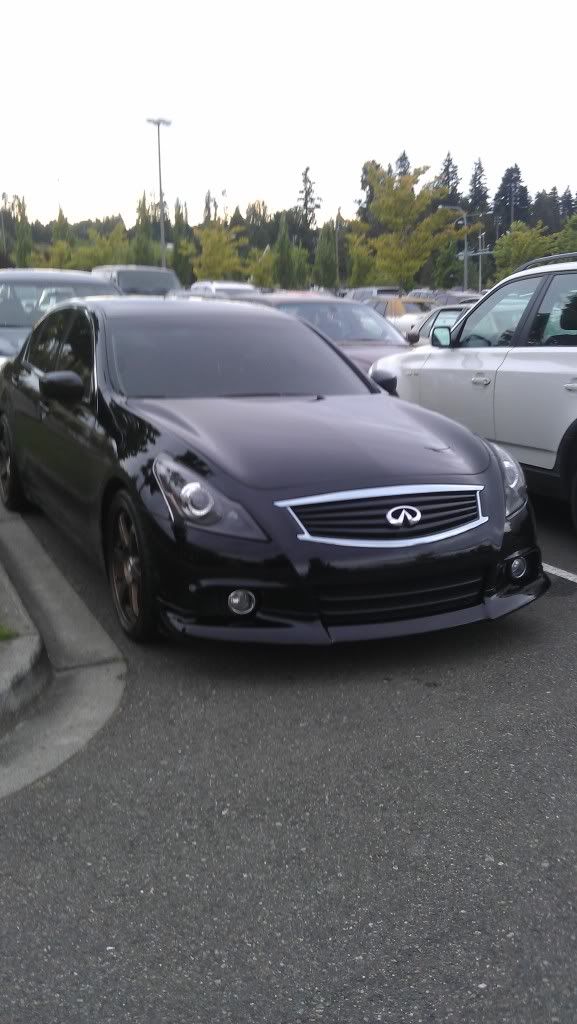
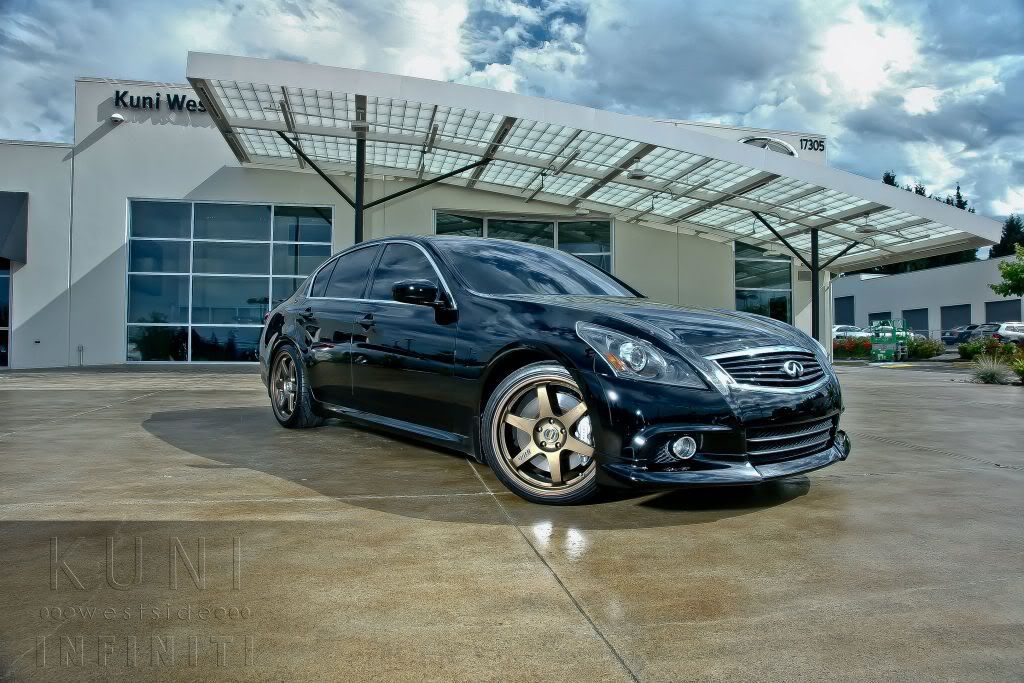
I sprayed them individually using engine enamel (satin black). I'll share a final picture with you all in a bit.
When you're putting the units back together, remember to use lots of silicone + clamps to the hold the plastic lens and housing together. I waited a day to actually place the pieces back together; on my previous vehicle, I did it too quickly and the newly painted pieces distorted the lenses with a hue of color (from curing I'm assuming). To put them back together, I used a roof based, high temp/waterproof silicone. I placed an initial line around the housing first, and then once I reattached the plastic lens with the housing, I placed another good layer of silicone around each unit. I used a flat head to spread/dab the silicone around, heavily. The headlights have yet to condense, so I'm assuming I'm safe.
In my opinion, probably the biggest appearance changing mod (even more so than my wheels).
Lastly, I do apologize that I was not able to take picture during the process - I was extremely...flustered from...this -->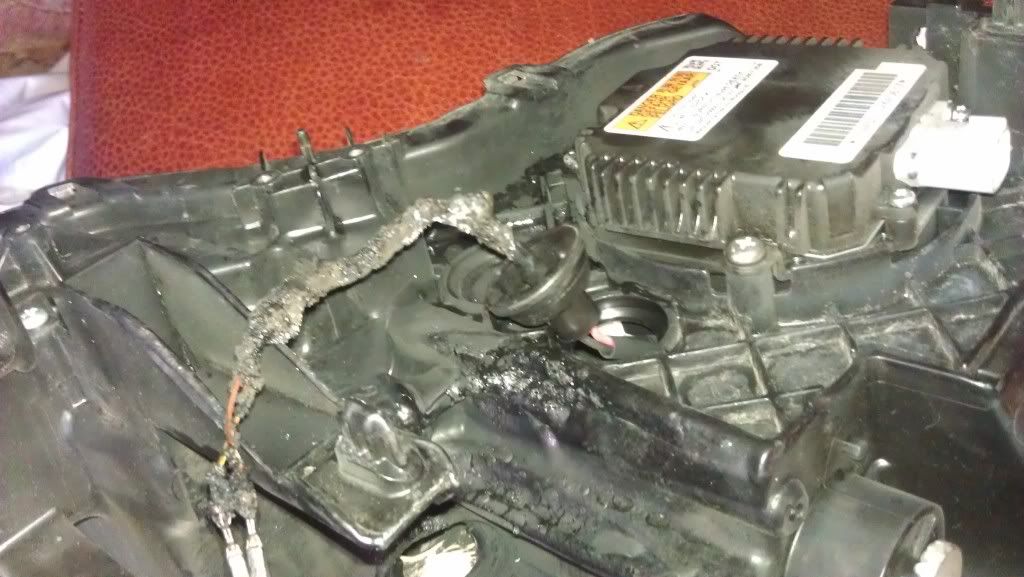

Good luck!
Eric
Here's what I did (when I did it successfully): Each headlight unit went into my oven for 8 minutes ******ON A PAN***** on ******TOP OF CARDBOARD****** for a total of 8 minutes at a temperature of 200 degrees. Feel feel to place into an oven at lower temperatures as well. NOTHING OVER 200 though. If you haven't already heard the story, at 250 degrees, a wire harness of mine that I accidentally left hanging, caught fire and disfigured the entire headlight plastic piece in the back. I caught it within time, and long story short, I found the burnt harness online from another member (SPECIAL SHOUT OUT TO VAIO who kindly looked through his material and shipped out the correct wire to me - I'd by out some major $$$ without you, sir). Note that ALL pieces of the headlight should be removed; others have done it without removing any of the bulbs, etc. but why take the risk? The wire harness that I left IN controls the high beam function and it's difficult to actually unhook (almost impossible to be honest). Leave that harness in if you must, but make SURE IT DOES NOT HANG off the pan.
As far as the removal of the lens went, I used brute muscle to rip it open; I was paranoid -- I took the headlight out early several times; if left in the oven for the proper time, it would've separated much easier. Anyways, tear apart the unit slowly. I ripped ONE tap, but to this date have been unable to retrace where it came from. The chrome trimmed pieces in the unit are held in by a few screws. I would recommend taking a picture prior so that you know where everything goes.
I sprayed them individually using engine enamel (satin black). I'll share a final picture with you all in a bit.
When you're putting the units back together, remember to use lots of silicone + clamps to the hold the plastic lens and housing together. I waited a day to actually place the pieces back together; on my previous vehicle, I did it too quickly and the newly painted pieces distorted the lenses with a hue of color (from curing I'm assuming). To put them back together, I used a roof based, high temp/waterproof silicone. I placed an initial line around the housing first, and then once I reattached the plastic lens with the housing, I placed another good layer of silicone around each unit. I used a flat head to spread/dab the silicone around, heavily. The headlights have yet to condense, so I'm assuming I'm safe.
In my opinion, probably the biggest appearance changing mod (even more so than my wheels).
Lastly, I do apologize that I was not able to take picture during the process - I was extremely...flustered from...this -->
Good luck!
Eric


Registered User
Joined: Sep 2007
Posts: 297
Likes: 3
Thread Starter
Registered User
iTrader: (1)
Joined: Apr 2010
Posts: 1,700
Likes: 15
From: Pacific NW
simply for looks - i wanted to retain some of the chrome on the car to go along with the grill and the foglight pieces 
the lip (oe) came "with the car" when i purchased it. sorry!
the lip (oe) came "with the car" when i purchased it. sorry!

Trending Topics

Registered User
Joined: Jun 2010
Posts: 300
Likes: 1
From: So Cal
Props for having the cojones to strip your car down like that. I know it's no big deal, but just the thought of it runs chills down my spine. I'm good at eventually getting over it and jumping in to get it done, but I'm still in the warm-up stage. 
Looks really good and thanks for sharing your ups and downs, ins and outs on the project!
Looks really good and thanks for sharing your ups and downs, ins and outs on the project!


Minnesota G owners
Joined: Dec 2009
Posts: 2,317
Likes: 3
From: Rochester
What did you do btw to get amber part of the headlight darkened like that? I know some people on the 05s put in a totally different light to remove the amber piece. Did you just spray over that too? I will be doing this again this winter. I did it on my 05 coupe and it turned out great....at least until I sat on one of the housings and snapped it. I tried to put it back together and paint over it but you could still see it even afterwards, so I just bought the 06 projectors instead 
Thread Starter
Registered User
iTrader: (1)
Joined: Apr 2010
Posts: 1,700
Likes: 15
From: Pacific NW
What did you do btw to get amber part of the headlight darkened like that? I know some people on the 05s put in a totally different light to remove the amber piece. Did you just spray over that too? I will be doing this again this winter. I did it on my 05 coupe and it turned out great....at least until I sat on one of the housings and snapped it. I tried to put it back together and paint over it but you could still see it even afterwards, so I just bought the 06 projectors instead

Thread
Thread Starter
Forum
Replies
Last Post
superjoey
D.I.Y. Installations/Modifications
31
Mar 22, 2023 11:56 PM

