
Why I like HDR Photos...


Thread Starter
Registered User
iTrader: (3)
Joined: May 2006
Posts: 2,929
Likes: 5
From: Sacramento, CA
Wezbian and I held a mini photoshoot for a friend of ours on G35Driver last night in Old Sacramento.
I've got a lot more pics in the editing queue and will be posted in a new thread later. This is just a teaser to show off the pros of auto-bracketing for HDR merging.
Normal Photos
0 Ex +2 Ex
+2 Ex  -2 Ex
-2 Ex 
After Merging in Photomatix
I've got a lot more pics in the editing queue and will be posted in a new thread later. This is just a teaser to show off the pros of auto-bracketing for HDR merging.
Normal Photos
0 Ex
 +2 Ex
+2 Ex  -2 Ex
-2 Ex 
After Merging in Photomatix


Thread Starter
Registered User
iTrader: (3)
Joined: May 2006
Posts: 2,929
Likes: 5
From: Sacramento, CA
Thread Starter
Registered User
iTrader: (3)
Joined: May 2006
Posts: 2,929
Likes: 5
From: Sacramento, CA
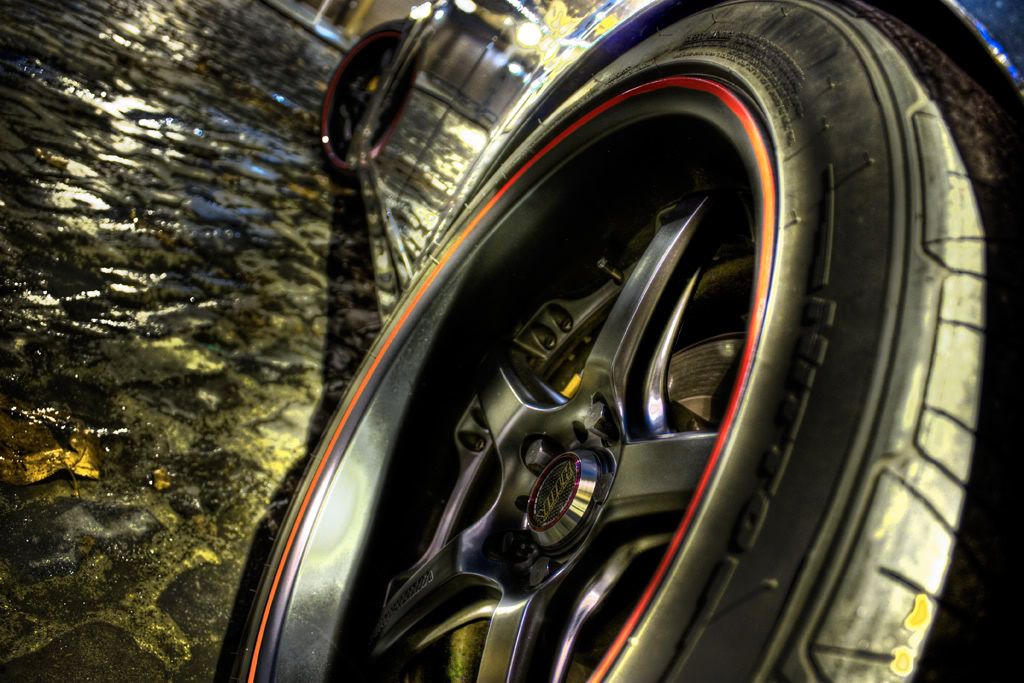
if you look at the first post, there are three clickable thumbnails. these three photos are shot in succession. the camera shoots the normal exposure first, then dials the shutter speed down and shoots the low (-2) exposure next, finally, the camera lengthens the shutter speed and shoots the high (+2) exposure.
once you have all three, you can bring them in to photoshop to correct white balance or what have you. once done there, you import into Photomatix and generate a crude HDR shot. After that, you use the Tone Mapping function in Photomatix to make it look cool (artsy or realistic - your choice).
the benefits of HDR - which are visible in the final above - is that it takes usefull information from all three shots and makes them visible in one total image.
you can tell that the low exposure isn't really used in the above shot. mainly the 0 and +2. the 0 shot provides most of the detail, while the +2 shot gives the detail of the inner part of the rim and rotor to the final pic. subtle but effective.
Trending Topics

Premier Member
Joined: Mar 2008
Posts: 2,291
Likes: 2
From: OC, and SFV
if you look at the first post, there are three clickable thumbnails. these three photos are shot in succession. the camera shoots the normal exposure first, then dials the shutter speed down and shoots the low (-2) exposure next, finally, the camera lengthens the shutter speed and shoots the high (+2) exposure.
once you have all three, you can bring them in to photoshop to correct white balance or what have you. once done there, you import into Photomatix and generate a crude HDR shot. After that, you use the Tone Mapping function in Photomatix to make it look cool (artsy or realistic - your choice).
the benefits of HDR - which are visible in the final above - is that it takes usefull information from all three shots and makes them visible in one total image.
you can tell that the low exposure isn't really used in the above shot. mainly the 0 and +2. the 0 shot provides most of the detail, while the +2 shot gives the detail of the inner part of the rim and rotor to the final pic. subtle but effective.
once you have all three, you can bring them in to photoshop to correct white balance or what have you. once done there, you import into Photomatix and generate a crude HDR shot. After that, you use the Tone Mapping function in Photomatix to make it look cool (artsy or realistic - your choice).
the benefits of HDR - which are visible in the final above - is that it takes usefull information from all three shots and makes them visible in one total image.
you can tell that the low exposure isn't really used in the above shot. mainly the 0 and +2. the 0 shot provides most of the detail, while the +2 shot gives the detail of the inner part of the rim and rotor to the final pic. subtle but effective.
Thread Starter
Registered User
iTrader: (3)
Joined: May 2006
Posts: 2,929
Likes: 5
From: Sacramento, CA
you can make a quasi HDR shot from one single RAW file from a camera. with a RAW editor, you can change the exposure of the image and generate three separate JPGs at the exposures listed above. from there, you repeat the above process.
i've tried both, and they both work. However, the three separate shots turn out better with the true image information captured at that particular exposure.
i've tried both, and they both work. However, the three separate shots turn out better with the true image information captured at that particular exposure.
Premier Member
Joined: Mar 2008
Posts: 2,291
Likes: 2
From: OC, and SFV
you can make a quasi HDR shot from one single RAW file from a camera. with a RAW editor, you can change the exposure of the image and generate three separate JPGs at the exposures listed above. from there, you repeat the above process.
i've tried both, and they both work. However, the three separate shots turn out better with the true image information captured at that particular exposure.
i've tried both, and they both work. However, the three separate shots turn out better with the true image information captured at that particular exposure.
If I didn't mention before, cool shots.

