
Tint, BB Overlays, Eibach Coils all this weekend!


Thread Starter
Registered User
Joined: Dec 2011
Posts: 171
Likes: 0
From: Sacramento, CA
Tint, BB Overlays, Eibach Coils all this weekend!
Hey guys its been a minute since I last posted but Im getting really excited as I am having my 2012 G37 Sedan tinted tomorrow. I had found a Groupon a month ago for all windows for $150. Im going to do the back in limo tint, and the front doors in a light tint since I live in Sacramento, CA. While its there, I am going to have them install my BlueBatmobile Overlays on the headlights and tailights!
The other cool news is I found a guy on Craigslist selling Eibach Pro Kit coils from his late model G35 for only $125. I hit the guy up and it ended up being a good friend of mine from my high school days, circa 96'. So once I get my car back from the tint shop, my buddy and I will be installing the Eibach coils on my car. I cant wait!
He showed me pics of his car before and after, and it looks good. I am still so used to my Tacoma X-Runner that I hear of an 1" drop or less and I think that its nothing, since my truck had to have a 4" and 3" drop just to make it look good. But I'm forgetting that cars arent always sitting as high as trucks are. Hope to love the stance, we will see.
I still plan on buying a full suspension setup in the future, this is just for now. Pics coming soon! Later peeps
Awesome! My sedan is still a work in progress and I know what you mean about the light tint on the front window...had to do the same with mine being down here in LA. Have fun modding bro, I am!!!
Thread Starter
Registered User
Joined: Dec 2011
Posts: 171
Likes: 0
From: Sacramento, CA
Thanks guys! Yeah I got it in December and already got it debadged, pasti-dipped black grill, sub & amp installed, JWT Pop Chargers as well as full Dyiode Dynamics LEDs & Switchback bulbs, 8k headlights and yellow PIAA bulbs too. More to come 


Trending Topics
Thread Starter
Registered User
Joined: Dec 2011
Posts: 171
Likes: 0
From: Sacramento, CA
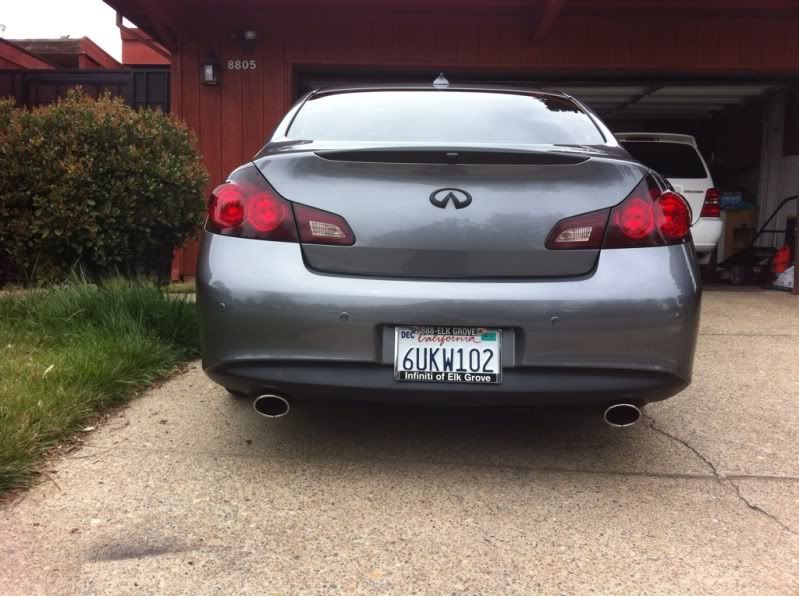
What a weekend! Got the tint done and they did a great job with it. Its Limo tint in the rear and 35% in the front. Its pretty dark in the front I didnt expect that when I chose it. If I could do it over I would have got the 1 step lighter, 50%. I guess Ill just have to see if I get messed with by the California Highway Patrol  . I tried to have the tint shop install my bluebatmobile Overlays but the guy couldnt, he was knockin the product and saying its not cut right and theres not enough material, blah blah. In the process of trying to lay it on, he stretched out an overlay and almost ruined it. So I went to my buddy's Graphic shop that Ive know from back in the day when he would make just stickers, but now he does full wraps and what not. He was able to save the jacked up overlay and applied the other one. We had a few issues applying it, but on the 2nd one we got the process down, so its not 100% perfect up close, but it turned out well. Im going to order a new set and redo them and have my headlight overlays done at that time too, but for now im very happy with it.
Springs were super easy to install, especially in the rear. It rides awesome and can't even tell its lowered. I got some Toe bolts to adjust the toe from my friend who I bought the springs from so I still gotta get those installed. Finally with all of the new items on, especially with the tailight overlays, the chrome peice on my trunk stuck out like a sore thumb, so I decided to plasti-dip it to match my Infiniti emblem. While I was at it, I taped off the area where a rear difuser would go and plasti-dipped that as well. I think it looks amazing now. Only big thing left over I need is some wheels and a camber kit. Shots out to Andy @ BlueBatmobile, Great guy and a huge help when the tint folks screwed up the overlay.
On to the pics...


. I tried to have the tint shop install my bluebatmobile Overlays but the guy couldnt, he was knockin the product and saying its not cut right and theres not enough material, blah blah. In the process of trying to lay it on, he stretched out an overlay and almost ruined it. So I went to my buddy's Graphic shop that Ive know from back in the day when he would make just stickers, but now he does full wraps and what not. He was able to save the jacked up overlay and applied the other one. We had a few issues applying it, but on the 2nd one we got the process down, so its not 100% perfect up close, but it turned out well. Im going to order a new set and redo them and have my headlight overlays done at that time too, but for now im very happy with it.Springs were super easy to install, especially in the rear. It rides awesome and can't even tell its lowered. I got some Toe bolts to adjust the toe from my friend who I bought the springs from so I still gotta get those installed. Finally with all of the new items on, especially with the tailight overlays, the chrome peice on my trunk stuck out like a sore thumb, so I decided to plasti-dip it to match my Infiniti emblem. While I was at it, I taped off the area where a rear difuser would go and plasti-dipped that as well. I think it looks amazing now. Only big thing left over I need is some wheels and a camber kit. Shots out to Andy @ BlueBatmobile, Great guy and a huge help when the tint folks screwed up the overlay.
On to the pics...
Looking good, nice drop too
I DIY'd my headlight/Taillight overlays and until you get the hang of how the vinyl shrinks/stretches, and how to get them placed just right, it can be a bee-atch, but pretty easy once you figure it out
Any plans for wheel upgrades (you may have said it in your initial post but I'm too lazy to scroll up )
I DIY'd my headlight/Taillight overlays and until you get the hang of how the vinyl shrinks/stretches, and how to get them placed just right, it can be a bee-atch, but pretty easy once you figure it out
Any plans for wheel upgrades (you may have said it in your initial post but I'm too lazy to scroll up
)
Thread Starter
Registered User
Joined: Dec 2011
Posts: 171
Likes: 0
From: Sacramento, CA
Looking good, nice drop too
I DIY'd my headlight/Taillight overlays and until you get the hang of how the vinyl shrinks/stretches, and how to get them placed just right, it can be a bee-atch, but pretty easy once you figure it out
Any plans for wheel upgrades (you may have said it in your initial post but I'm too lazy to scroll up )
I DIY'd my headlight/Taillight overlays and until you get the hang of how the vinyl shrinks/stretches, and how to get them placed just right, it can be a bee-atch, but pretty easy once you figure it out
Any plans for wheel upgrades (you may have said it in your initial post but I'm too lazy to scroll up
)As far as wheel upgrades, I just need to decide. I want 20's thats for sure, but Im not sure about offset etc yet. Ill probabally do Tein Coilovers when im done. Im thinking about some Vossen's.
Thanks! Yeah I know what you mean. With the shape of my lights we had to use a ton of heat from the heat gun. To be specific, where we messed up a bit was, in my opinion, we used too hard of a 'squeege' type graphic material thing to apply the material and it left not so clean of a finished product on it. I thought it was tint, but it is transperant vinyl which makes sense. So were gonna redo it and be a little gentler. Also, my buddy tried to just use heat, no water. Although it applied good, we found it easier to use water AND heat.
As far as wheel upgrades, I just need to decide. I want 20's thats for sure, but Im not sure about offset etc yet. Ill probabally do Tein Coilovers when im done. Im thinking about some Vossen's.
As far as wheel upgrades, I just need to decide. I want 20's thats for sure, but Im not sure about offset etc yet. Ill probabally do Tein Coilovers when im done. Im thinking about some Vossen's.
IME the thinner vinyl for these heads/tails really needs water to get the proper placement and once it's stuck dry it really doesn't come back to original shape well at all. I didn't use much heat at all, only for the final shrinking around the recesses around the bulbs and to do the edge seals. The thicker vinyl used for auto wraps is a breeze to install dry and overall a much easier vinyl to work with since most of the newer wrap vinyls have air-release technology so no need to be chasing bubbles out from the vinyl fo what seems like hours at a time. Keep us posted on your mods, sounds like it'll keep getting nicer!
Thread Starter
Registered User
Joined: Dec 2011
Posts: 171
Likes: 0
From: Sacramento, CA
Definitely some nice mods you've got planned.
IME the thinner vinyl for these heads/tails really needs water to get the proper placement and once it's stuck dry it really doesn't come back to original shape well at all. I didn't use much heat at all, only for the final shrinking around the recesses around the bulbs and to do the edge seals. The thicker vinyl used for auto wraps is a breeze to install dry and overall a much easier vinyl to work with since most of the newer wrap vinyls have air-release technology so no need to be chasing bubbles out from the vinyl fo what seems like hours at a time. Keep us posted on your mods, sounds like it'll keep getting nicer!
IME the thinner vinyl for these heads/tails really needs water to get the proper placement and once it's stuck dry it really doesn't come back to original shape well at all. I didn't use much heat at all, only for the final shrinking around the recesses around the bulbs and to do the edge seals. The thicker vinyl used for auto wraps is a breeze to install dry and overall a much easier vinyl to work with since most of the newer wrap vinyls have air-release technology so no need to be chasing bubbles out from the vinyl fo what seems like hours at a time. Keep us posted on your mods, sounds like it'll keep getting nicer!
Off the topic question, how do you put that verbiage at the bottom of your posts with your mod list?
Click on "user cp" upper left on blue bar then go to edit your signature. Not a lot of room, only one line allowed.

Thread
Thread Starter
Forum
Replies
Last Post
optikol
Private Classifieds
2
Jan 28, 2016 07:31 PM
Murkr
Audio, Video & Electronics
4
Sep 28, 2015 10:45 AM