
Invidia Q300 Cat-Back Review and Installation Guide


Thread Starter
Registered User
Joined: Aug 2010
Posts: 24
Likes: 1
Invidia Q300 Cat-Back Review and Installation Guide (lots of pics)
I just installed an ividia q300 sedan catback. For $784 shipped to my door from CVR, it was the cheapest full cat back available. From what I saw, the tanabe's were running high $500's. After looking at the dinky tube post resonator on the way to the muffler, I couldn't stomach almost $600 for mufflers. For $200 more you get a full 2.5 inch t-304 stainless cat back (FI, Stillen, HKS, ARK were just too much). Waiting for a full break-into get wide open throttle video. The sound is nice and deep, close to the G35 coupes of 'ol. No drone on highway; no rasp at all. When you're at cruise speed you can't even tell it's there. Punch in and it comes alive nicely. I do agree that the tanabe's sound great and are easy to remove, but still the 200 increase over "just mufflers" was a deal breaker for me, especially with little to no gains (not saying that i'm getting fabulous gains from the invidia either)
I wanted a little extra power, but wanted to maintain some class of the G and set it apart from the average G. Didn't want something too loud or riced out. No titanium tips...just rolled stainless. Fit and finish is top notch with nice welds. All hardware was included. Packing was good (One tiny dent on the passenger tube past the X-pipe). I installed it without a lift or jack, just some rhino ramps. took about 3 hours taking my time.
Old Exhaust: now resides in my attic...RIP
<table style="width: auto;"><tbody><tr><td> </td></tr><tr><td style="font-family: arial,sans-serif; font-size: 11px; text-align: right;">From G37</td></tr></tbody></table>
Old Flex Point:
<table style="width: auto;"><tbody><tr><td>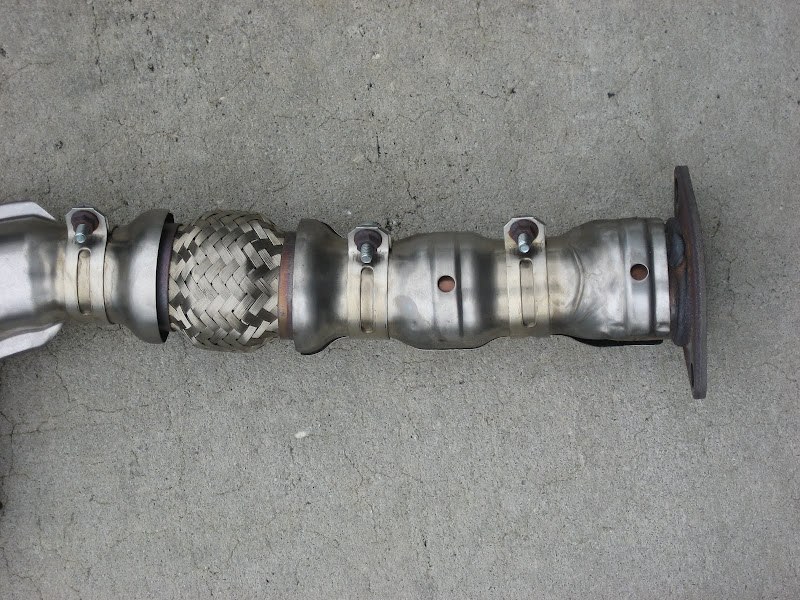 </td></tr><tr><td style="font-family: arial,sans-serif; font-size: 11px; text-align: right;">From G37</td></tr></tbody></table>
New Flex Point:
<table style="width: auto;"><tbody><tr><td>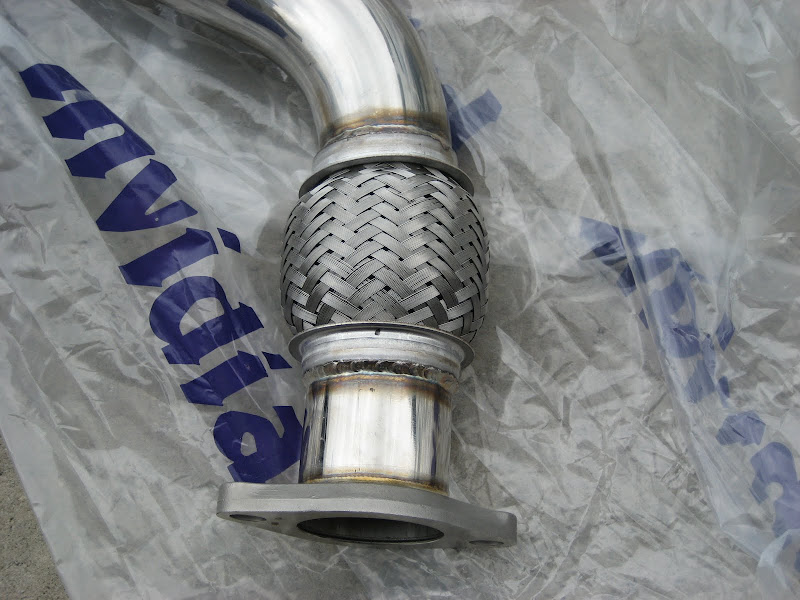 </td></tr><tr><td style="font-family: arial,sans-serif; font-size: 11px; text-align: right;">From G37</td></tr></tbody></table>
Old Resonators:
<table style="width: auto;"><tbody><tr><td> </td></tr><tr><td style="font-family: arial,sans-serif; font-size: 11px; text-align: right;">From G37</td></tr></tbody></table>
New Resonators and X-Pipe:
<table style="width:auto;"><tr><td><a href="http://picasaweb.google.com/lh/photo/yMzZBGj0KBitxRSN27w_ZQ?feat=embedwebsite"><img src="http://lh3.ggpht.com/_XzPJAUZk6IY/THwAtHMevKI/AAAAAAAABdc/2R3uDWG6P0I/s800/IMG_1492.JPG" /></a></td></tr><tr><td style="font-family:arial,sans-serif; font-size:11px; text-align:right">From <a href="http://picasaweb.google.com/109880575440290106849/G37?feat=embedwebsite">G37</a></td></tr></table>
Side by Side:
<table style="width: auto;"><tbody><tr><td>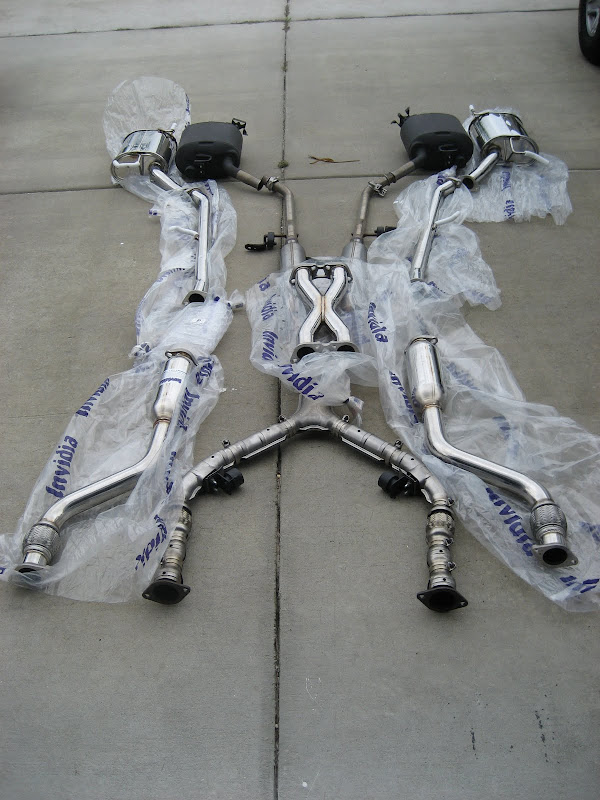 </td></tr><tr><td style="font-family: arial,sans-serif; font-size: 11px; text-align: right;">From G37</td></tr></tbody></table>
X-Pipe:
<table style="width: auto;"><tbody><tr><td> </td></tr><tr><td style="font-family: arial,sans-serif; font-size: 11px; text-align: right;">From G37</td></tr></tbody></table>
Dent:
<table style="width: auto;"><tbody><tr><td>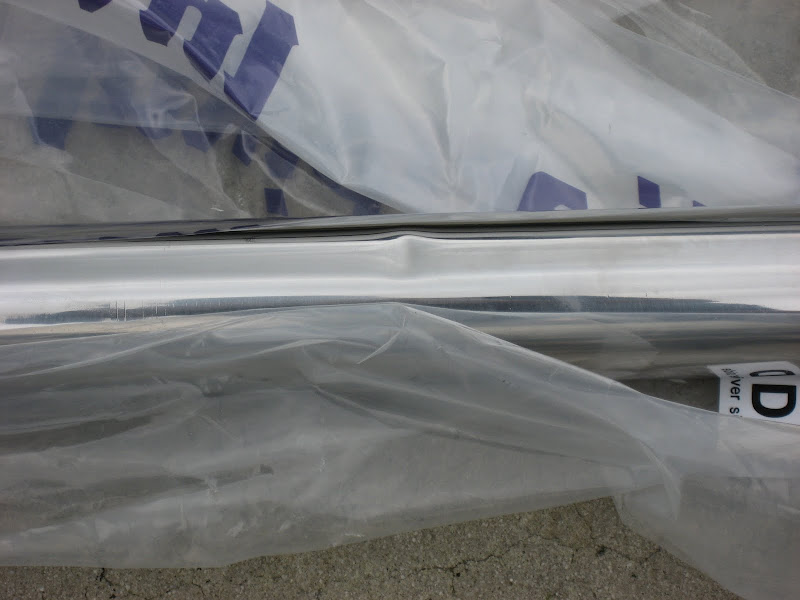 </td></tr><tr><td style="font-family: arial,sans-serif; font-size: 11px; text-align: right;">From G37</td></tr></tbody></table>
Nice Cans: dinky inlet pipe to muffler
<table style="width: auto;"><tbody><tr><td>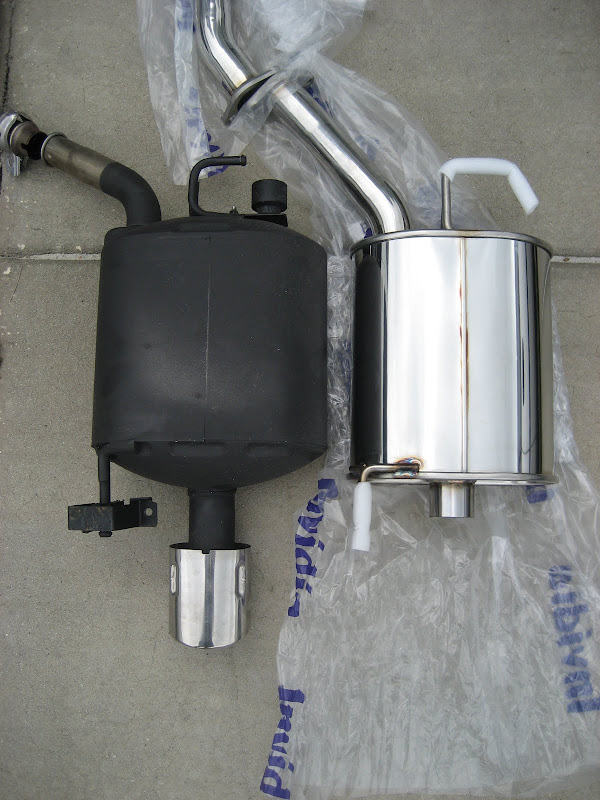 </td></tr></tbody></table>
Again:
<table style="width: auto;"><tbody><tr><td>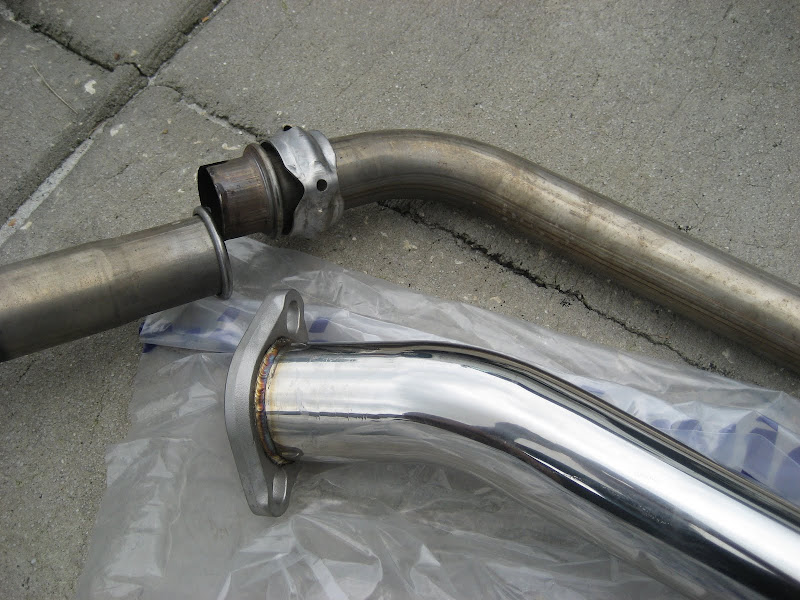 </td></tr><tr><td style="font-family: arial,sans-serif; font-size: 11px; text-align: right;">From G37</td></tr></tbody></table>
Naked:
<table style="width:auto;"><tr><td><a href="http://picasaweb.google.com/lh/photo/XWkVAQx2CAKiNPdRFb8lCw?feat=embedwebsite"><img src="http://lh5.ggpht.com/_XzPJAUZk6IY/THwArCEcAGI/AAAAAAAABa0/5nrAvUMHkMU/s800/IMG_1486.JPG" /></a></td></tr><tr><td style="font-family:arial,sans-serif; font-size:11px; text-align:right">From <a href="http://picasaweb.google.com/109880575440290106849/G37?feat=embedwebsite">G37</a></td></tr></table>
Front Section:
<table style="width:auto;"><tr><td><a href="http://picasaweb.google.com/lh/photo/vgHFCiGz5nal308lSA8jUQ?feat=embedwebsite"><img src="http://lh5.ggpht.com/_XzPJAUZk6IY/THwAv-7Rb1I/AAAAAAAABbg/NDaYFjzmqGo/s800/IMG_1497.JPG" /></a></td></tr><tr><td style="font-family:arial,sans-serif; font-size:11px; text-align:right">From <a href="http://picasaweb.google.com/109880575440290106849/G37?feat=embedwebsite">G37</a></td></tr></table>
Resonators:
<table style="width:auto;"><tr><td><a href="http://picasaweb.google.com/lh/photo/bpEKQtT-V51icpgEpq_TgQ?feat=embedwebsite"><img src="http://lh3.ggpht.com/_XzPJAUZk6IY/THwAwLyWawI/AAAAAAAABbk/MTXL9hrUrsM/s800/IMG_1498.JPG" /></a></td></tr><tr><td style="font-family:arial,sans-serif; font-size:11px; text-align:right">From <a href="http://picasaweb.google.com/109880575440290106849/G37?feat=embedwebsite">G37</a></td></tr></table>
X-Pipe:
<table style="width:auto;"><tr><td><a href="http://picasaweb.google.com/lh/photo/sLcwEdK63JJMie4jKXNTaQ?feat=embedwebsite"><img src="http://lh3.ggpht.com/_XzPJAUZk6IY/THwAwrW03hI/AAAAAAAABbo/2VN4fSNSnxQ/s800/IMG_1499.JPG" /></a></td></tr><tr><td style="font-family:arial,sans-serif; font-size:11px; text-align:right">From <a href="http://picasaweb.google.com/109880575440290106849/G37?feat=embedwebsite">G37</a></td></tr></table>
Rear:
<table style="width:auto;"><tr><td><a href="http://picasaweb.google.com/lh/photo/We3Zr9Ud0lMK7iDGuKt3YQ?feat=embedwebsite"><img src="http://lh5.ggpht.com/_XzPJAUZk6IY/THwAzqAStBI/AAAAAAAABcE/wueKAD04arI/s800/IMG_1506.JPG" /></a></td></tr><tr><td style="font-family:arial,sans-serif; font-size:11px; text-align:right">From <a href="http://picasaweb.google.com/109880575440290106849/G37?feat=embedwebsite">G37</a></td></tr></table>
<table style="width:auto;"><tr><td><a href="http://picasaweb.google.com/lh/photo/F5lACSdPj-DYhkqskg39cw?feat=embedwebsite"><img src="http://lh5.ggpht.com/_XzPJAUZk6IY/THwAxdYLR-I/AAAAAAAABbw/HTlkylelqUg/s800/IMG_1501.JPG" /></a></td></tr><tr><td style="font-family:arial,sans-serif; font-size:11px; text-align:right">From <a href="http://picasaweb.google.com/109880575440290106849/G37?feat=embedwebsite">G37</a></td></tr></table>
<table style="width:auto;"><tr><td><a href="http://picasaweb.google.com/lh/photo/F7cKwtgtIpR0k5bWEy18Cw?feat=embedwebsite"><img src="http://lh4.ggpht.com/_XzPJAUZk6IY/THwAxqRxuaI/AAAAAAAABb0/DlN32l8Tu14/s800/IMG_1502.JPG" /></a></td></tr><tr><td style="font-family:arial,sans-serif; font-size:11px; text-align:right">From <a href="http://picasaweb.google.com/109880575440290106849/G37?feat=embedwebsite">G37</a></td></tr></table>
<table style="width:auto;"><tr><td><a href="http://picasaweb.google.com/lh/photo/b_OBzO4FgdD4dWEY7_xpEw?feat=embedwebsite"><img src="http://lh6.ggpht.com/_XzPJAUZk6IY/THwAzRxQTwI/AAAAAAAABcA/f3qIb2AzUn8/s800/IMG_1505.JPG" /></a></td></tr><tr><td style="font-family:arial,sans-serif; font-size:11px; text-align:right">From <a href="http://picasaweb.google.com/109880575440290106849/G37?feat=embedwebsite">G37</a></td></tr></table>
I wanted a little extra power, but wanted to maintain some class of the G and set it apart from the average G. Didn't want something too loud or riced out. No titanium tips...just rolled stainless. Fit and finish is top notch with nice welds. All hardware was included. Packing was good (One tiny dent on the passenger tube past the X-pipe). I installed it without a lift or jack, just some rhino ramps. took about 3 hours taking my time.
Old Exhaust: now resides in my attic...RIP
<table style="width: auto;"><tbody><tr><td>
</td></tr><tr><td style="font-family: arial,sans-serif; font-size: 11px; text-align: right;">From G37</td></tr></tbody></table>Old Flex Point:
<table style="width: auto;"><tbody><tr><td>
</td></tr><tr><td style="font-family: arial,sans-serif; font-size: 11px; text-align: right;">From G37</td></tr></tbody></table>New Flex Point:
<table style="width: auto;"><tbody><tr><td>
</td></tr><tr><td style="font-family: arial,sans-serif; font-size: 11px; text-align: right;">From G37</td></tr></tbody></table>Old Resonators:
<table style="width: auto;"><tbody><tr><td>
</td></tr><tr><td style="font-family: arial,sans-serif; font-size: 11px; text-align: right;">From G37</td></tr></tbody></table>New Resonators and X-Pipe:
<table style="width:auto;"><tr><td><a href="http://picasaweb.google.com/lh/photo/yMzZBGj0KBitxRSN27w_ZQ?feat=embedwebsite"><img src="http://lh3.ggpht.com/_XzPJAUZk6IY/THwAtHMevKI/AAAAAAAABdc/2R3uDWG6P0I/s800/IMG_1492.JPG" /></a></td></tr><tr><td style="font-family:arial,sans-serif; font-size:11px; text-align:right">From <a href="http://picasaweb.google.com/109880575440290106849/G37?feat=embedwebsite">G37</a></td></tr></table>
Side by Side:
<table style="width: auto;"><tbody><tr><td>
</td></tr><tr><td style="font-family: arial,sans-serif; font-size: 11px; text-align: right;">From G37</td></tr></tbody></table>X-Pipe:
<table style="width: auto;"><tbody><tr><td>
</td></tr><tr><td style="font-family: arial,sans-serif; font-size: 11px; text-align: right;">From G37</td></tr></tbody></table>Dent:
<table style="width: auto;"><tbody><tr><td>
</td></tr><tr><td style="font-family: arial,sans-serif; font-size: 11px; text-align: right;">From G37</td></tr></tbody></table>Nice Cans: dinky inlet pipe to muffler
<table style="width: auto;"><tbody><tr><td>
</td></tr></tbody></table>Again:
<table style="width: auto;"><tbody><tr><td>
</td></tr><tr><td style="font-family: arial,sans-serif; font-size: 11px; text-align: right;">From G37</td></tr></tbody></table>Naked:
<table style="width:auto;"><tr><td><a href="http://picasaweb.google.com/lh/photo/XWkVAQx2CAKiNPdRFb8lCw?feat=embedwebsite"><img src="http://lh5.ggpht.com/_XzPJAUZk6IY/THwArCEcAGI/AAAAAAAABa0/5nrAvUMHkMU/s800/IMG_1486.JPG" /></a></td></tr><tr><td style="font-family:arial,sans-serif; font-size:11px; text-align:right">From <a href="http://picasaweb.google.com/109880575440290106849/G37?feat=embedwebsite">G37</a></td></tr></table>
Front Section:
<table style="width:auto;"><tr><td><a href="http://picasaweb.google.com/lh/photo/vgHFCiGz5nal308lSA8jUQ?feat=embedwebsite"><img src="http://lh5.ggpht.com/_XzPJAUZk6IY/THwAv-7Rb1I/AAAAAAAABbg/NDaYFjzmqGo/s800/IMG_1497.JPG" /></a></td></tr><tr><td style="font-family:arial,sans-serif; font-size:11px; text-align:right">From <a href="http://picasaweb.google.com/109880575440290106849/G37?feat=embedwebsite">G37</a></td></tr></table>
Resonators:
<table style="width:auto;"><tr><td><a href="http://picasaweb.google.com/lh/photo/bpEKQtT-V51icpgEpq_TgQ?feat=embedwebsite"><img src="http://lh3.ggpht.com/_XzPJAUZk6IY/THwAwLyWawI/AAAAAAAABbk/MTXL9hrUrsM/s800/IMG_1498.JPG" /></a></td></tr><tr><td style="font-family:arial,sans-serif; font-size:11px; text-align:right">From <a href="http://picasaweb.google.com/109880575440290106849/G37?feat=embedwebsite">G37</a></td></tr></table>
X-Pipe:
<table style="width:auto;"><tr><td><a href="http://picasaweb.google.com/lh/photo/sLcwEdK63JJMie4jKXNTaQ?feat=embedwebsite"><img src="http://lh3.ggpht.com/_XzPJAUZk6IY/THwAwrW03hI/AAAAAAAABbo/2VN4fSNSnxQ/s800/IMG_1499.JPG" /></a></td></tr><tr><td style="font-family:arial,sans-serif; font-size:11px; text-align:right">From <a href="http://picasaweb.google.com/109880575440290106849/G37?feat=embedwebsite">G37</a></td></tr></table>
Rear:
<table style="width:auto;"><tr><td><a href="http://picasaweb.google.com/lh/photo/We3Zr9Ud0lMK7iDGuKt3YQ?feat=embedwebsite"><img src="http://lh5.ggpht.com/_XzPJAUZk6IY/THwAzqAStBI/AAAAAAAABcE/wueKAD04arI/s800/IMG_1506.JPG" /></a></td></tr><tr><td style="font-family:arial,sans-serif; font-size:11px; text-align:right">From <a href="http://picasaweb.google.com/109880575440290106849/G37?feat=embedwebsite">G37</a></td></tr></table>
<table style="width:auto;"><tr><td><a href="http://picasaweb.google.com/lh/photo/F5lACSdPj-DYhkqskg39cw?feat=embedwebsite"><img src="http://lh5.ggpht.com/_XzPJAUZk6IY/THwAxdYLR-I/AAAAAAAABbw/HTlkylelqUg/s800/IMG_1501.JPG" /></a></td></tr><tr><td style="font-family:arial,sans-serif; font-size:11px; text-align:right">From <a href="http://picasaweb.google.com/109880575440290106849/G37?feat=embedwebsite">G37</a></td></tr></table>
<table style="width:auto;"><tr><td><a href="http://picasaweb.google.com/lh/photo/F7cKwtgtIpR0k5bWEy18Cw?feat=embedwebsite"><img src="http://lh4.ggpht.com/_XzPJAUZk6IY/THwAxqRxuaI/AAAAAAAABb0/DlN32l8Tu14/s800/IMG_1502.JPG" /></a></td></tr><tr><td style="font-family:arial,sans-serif; font-size:11px; text-align:right">From <a href="http://picasaweb.google.com/109880575440290106849/G37?feat=embedwebsite">G37</a></td></tr></table>
<table style="width:auto;"><tr><td><a href="http://picasaweb.google.com/lh/photo/b_OBzO4FgdD4dWEY7_xpEw?feat=embedwebsite"><img src="http://lh6.ggpht.com/_XzPJAUZk6IY/THwAzRxQTwI/AAAAAAAABcA/f3qIb2AzUn8/s800/IMG_1505.JPG" /></a></td></tr><tr><td style="font-family:arial,sans-serif; font-size:11px; text-align:right">From <a href="http://picasaweb.google.com/109880575440290106849/G37?feat=embedwebsite">G37</a></td></tr></table>
Last edited by Gwhipped; Aug 30, 2010 at 05:17 PM.
Thread Starter
Registered User
Joined: Aug 2010
Posts: 24
Likes: 1
Install Instructions
Install Instructions: none were included, but it's sort of a no brainer.
My only caution is to place the least pressure on the Cat's when unbolting the stock system
1) Unbolt stock system from each side where the cats end: 2 14mm nuts on each side. Be sure to brace the pipe properly as not to place any undue stress on the cats and headers since these are fixed. Be sure to save the 2 gaskets and nuts as these WILL be reused.
<table style="width: auto;"><tbody><tr><td>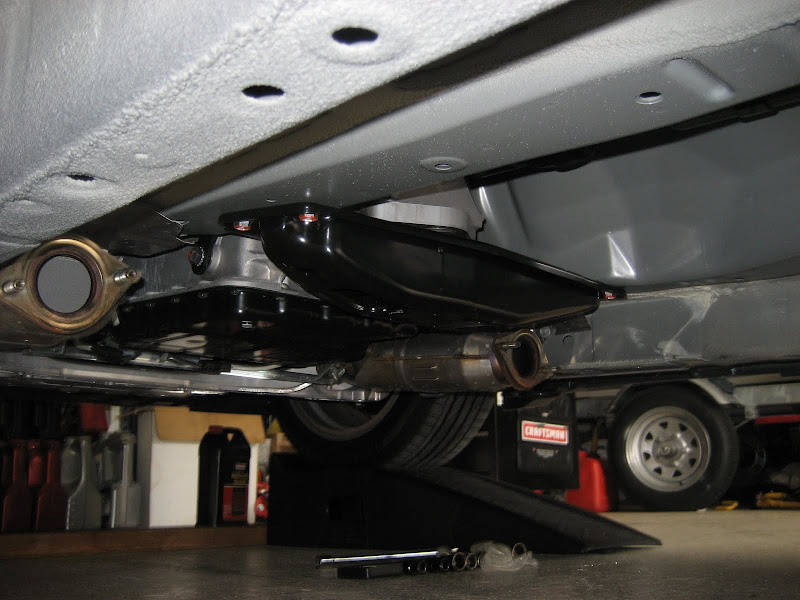 </td></tr><tr><td style="font-family: arial,sans-serif; font-size: 11px; text-align: right;">From G37</td></tr></tbody></table>
2) Unbolt the Crossmemeber and remove: 4 12mm bolts
<table style="width: auto;"><tbody><tr><td>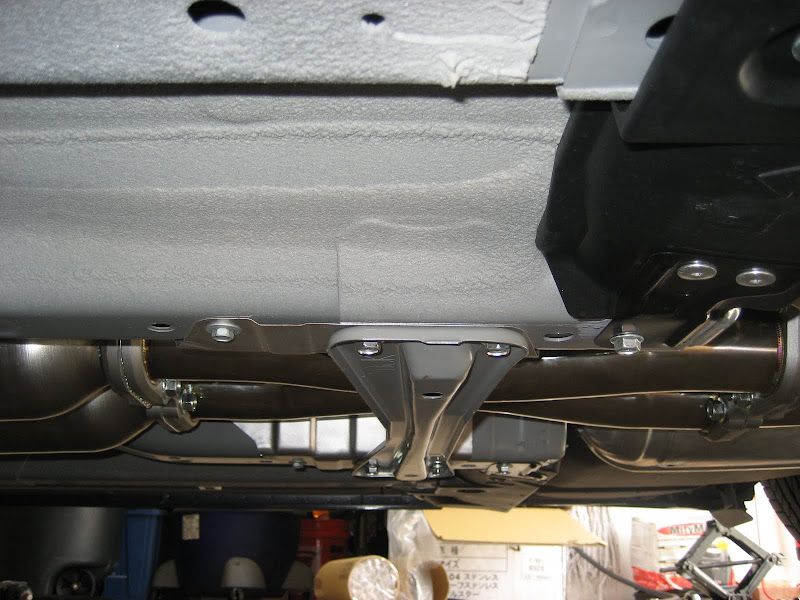 </td></tr><tr><td style="font-family: arial,sans-serif; font-size: 11px; text-align: right;">From G37</td></tr></tbody></table>
3) Unbolt the Y-pipe from the resonators: 2 14mm nuts: bottom of picture
<table style="width: auto;"><tbody><tr><td></td></tr><tr><td style="font-family: arial,sans-serif; font-size: 11px; text-align: right;">From G37</td></tr></tbody></table>
4) Unbolt the mufflers: 2 12mm bolts holding the joint clamp on each side. once the bolts are off you can gently pry open the clamps:see clamps in pic
<table style="width: auto;"><tbody><tr><td>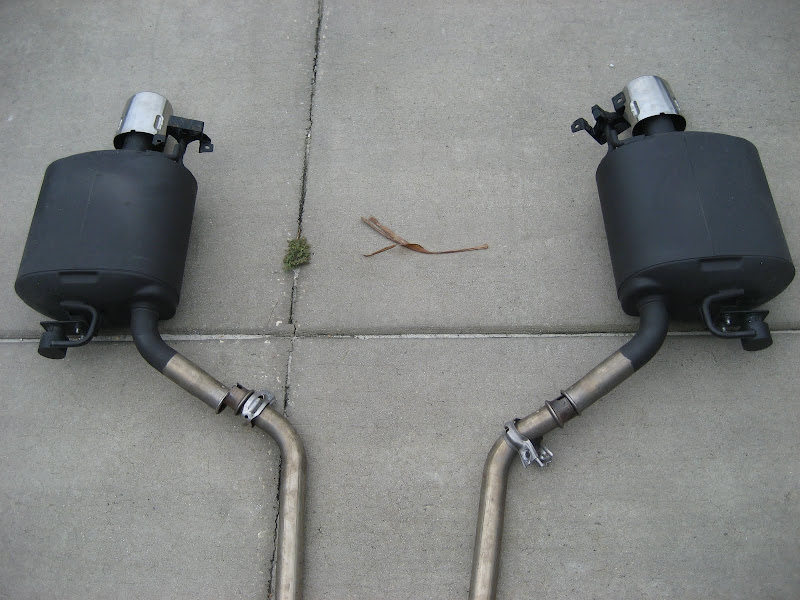 </td></tr><tr><td style="font-family: arial,sans-serif; font-size: 11px; text-align: right;">From G37</td></tr></tbody></table>
Now the entire system is still in place, all the fasteners are off.
5) Grease all the rubber hangers:
- 1 on each resonator pipe
- 2 on each muffler
6) Place a scissors jack underneath the plate holding the 2 resonators together (don's have to jack it up, just support the weight) and another where the Y-pipe joins the resonator
7) Remove the stock Muffler by unbolting the rear hanger bracket: 2 12mm nuts - unbolted bracket below
<table style="width: auto;"><tbody><tr><td>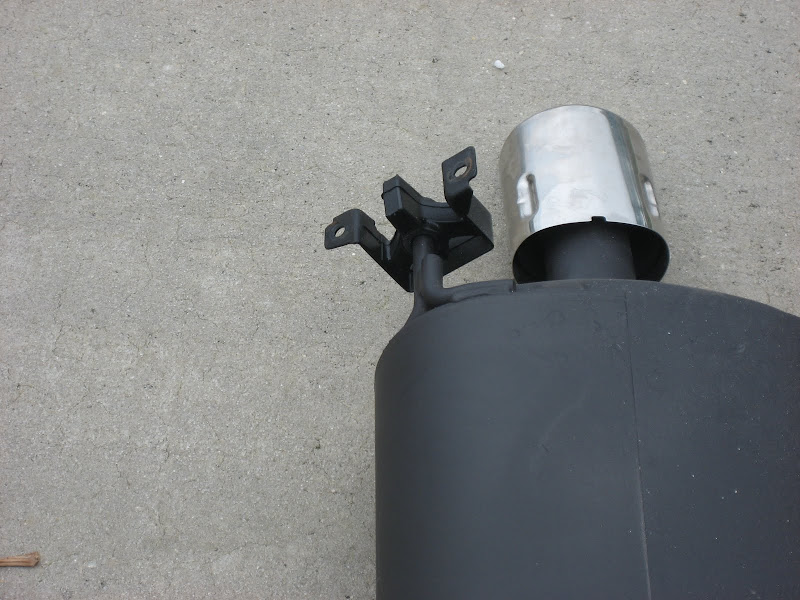 </td></tr><tr><td style="font-family: arial,sans-serif; font-size: 11px; text-align: right;">From G37</td></tr></tbody></table>
8) Support the Rear weight of the muffler and Wiggle the rear muffler rubber mount off (can be best accessed right behind rear wheel). You now have to support the weight of the muffler and slide it off the dinky tube....paying attention not to place too much stress on the resonator pipe with working the muffler off.
9) Repeat on opposite side
10) You could probably slide the resonator hanger off of the rubber mount, but I chose to remove the bracket: 1 12mm nut
<table style="width:auto;"><tr><td><a href="http://picasaweb.google.com/lh/photo/yWccpv0QqSn92cF7kYrILg?feat=embedwebsite"><img src="http://lh5.ggpht.com/_XzPJAUZk6IY/THwAj0f5ziI/AAAAAAAABZ8/aU_7nNww9P4/s800/IMG_1473.JPG" /></a></td></tr><tr><td style="font-family:arial,sans-serif; font-size:11px; text-align:right">From <a href="http://picasaweb.google.com/109880575440290106849/G37?feat=embedwebsite">G37</a></td></tr></table>
11) Remove the opposite resonator hanger
12) Remove the resonator pipe (largest section of exhaust system). The jack from step 6 helps support some weight
13) Remove the Y-pipe and the stock system is off.
Usually you would revers install the exhaust. Seeing that it was a 1 man job. I decided to go from the back again, using the jacls for help.
Included hardware: note the 2 sets of 14mm bolts to the right (reused from stock system)
<table style="width:auto;"><tr><td><a href="http://picasaweb.google.com/lh/photo/QdIumfXCYxdO5sXjR1u6Sw?feat=embedwebsite"><img src="http://lh3.ggpht.com/_XzPJAUZk6IY/THwAq5ejEVI/AAAAAAAABaw/NLODQzrNgLA/s800/IMG_1485.JPG" /></a></td></tr><tr><td style="font-family:arial,sans-serif; font-size:11px; text-align:right">From <a href="http://picasaweb.google.com/109880575440290106849/G37?feat=embedwebsite">G37</a></td></tr></table>
1) I loosely bolted together the 2 front pieces with the flex point to the X-Pipe. Don't forget to use the supplied gaskets between all joints.
<table style="width:auto;"><tr><td><a href="http://picasaweb.google.com/lh/photo/yMzZBGj0KBitxRSN27w_ZQ?feat=embedwebsite"><img src="http://lh3.ggpht.com/_XzPJAUZk6IY/THwAtHMevKI/AAAAAAAABdc/2R3uDWG6P0I/s800/IMG_1492.JPG" /></a></td></tr><tr><td style="font-family:arial,sans-serif; font-size:11px; text-align:right">From <a href="http://picasaweb.google.com/109880575440290106849/G37?feat=embedwebsite">G37</a></td></tr></table>
2) using the jacks to support the weight, I slowly lifted the front half into place and loosely bolted it in. Don't forget to use the stock gaskets for each side next to the cats:
<table style="width:auto;"><tr><td><a href="http://picasaweb.google.com/lh/photo/elm7e6zTiokzv7fEkMiaDw?feat=embedwebsite"><img src="http://lh5.ggpht.com/_XzPJAUZk6IY/THwAu9E1TeI/AAAAAAAABbc/plavcVzzivs/s800/IMG_1496.JPG" /></a></td></tr><tr><td style="font-family:arial,sans-serif; font-size:11px; text-align:right">From <a href="http://picasaweb.google.com/109880575440290106849/G37?feat=embedwebsite">G37</a></td></tr></table>
<table style="width:auto;"><tr><td><a href="http://picasaweb.google.com/lh/photo/1C2Y7SvnSlCfYDpSBRJRBA?feat=embedwebsite"><img src="http://lh5.ggpht.com/_XzPJAUZk6IY/THwAuWwPGOI/AAAAAAAABbY/mkZf3khnyJQ/s800/IMG_1495.JPG" /></a></td></tr><tr><td style="font-family:arial,sans-serif; font-size:11px; text-align:right">From <a href="http://picasaweb.google.com/109880575440290106849/G37?feat=embedwebsite">G37</a></td></tr></table>
<table style="width:auto;"><tr><td><a href="http://picasaweb.google.com/lh/photo/qtFnH98Ul8z6e40kAW7j-w?feat=embedwebsite"><img src="http://lh3.ggpht.com/_XzPJAUZk6IY/THwAthpEcrI/AAAAAAAABbQ/DWGb8EaFr9I/s800/IMG_1493.JPG" /></a></td></tr><tr><td style="font-family:arial,sans-serif; font-size:11px; text-align:right">From <a href="http://picasaweb.google.com/109880575440290106849/G37?feat=embedwebsite">G37</a></td></tr></table>
<table style="width:auto;"><tr><td><a href="http://picasaweb.google.com/lh/photo/eENctM9QBsyL0Tc03wlfrQ?feat=embedwebsite"><img src="http://lh6.ggpht.com/_XzPJAUZk6IY/THwAt-4i2EI/AAAAAAAABbU/yJro5pvj03E/s800/IMG_1494.JPG" /></a></td></tr><tr><td style="font-family:arial,sans-serif; font-size:11px; text-align:right">From <a href="http://picasaweb.google.com/109880575440290106849/G37?feat=embedwebsite">G37</a></td></tr></table>
3) Install the driver and pass post resonator sections. Don't forget to transfer the rubber hanger and mount to the new pipe.
4) I installed the hanger bracket described above first and then loosely bolted the section to the back of the X-pipe. Let the jacks be your extra set of hands
5) install the muffler by using the rear rubber hanger to support the weight. Then re-attach the rear hanger using the 2 12mm nuts (from step 7 in removal section)
6) Bolt everything up from rear to front. Again, don't forget you gaskets. (doing it rear to front decreases the stress on the cats/headers)
7) Recheck torque on all nuts/bolts
8) attach tips using the supplied clamps
9) Start up and enjoy the rumble
10) check for leaks (condensation leaking from joints)
It's normal for some smoke as grease/remnants from manufacturing process burn off
Hope this helps, please PM with any questions. I would have liked to taken more pics during the install, but being by myself made this difficult
Video to follow soon
My only caution is to place the least pressure on the Cat's when unbolting the stock system
1) Unbolt stock system from each side where the cats end: 2 14mm nuts on each side. Be sure to brace the pipe properly as not to place any undue stress on the cats and headers since these are fixed. Be sure to save the 2 gaskets and nuts as these WILL be reused.
<table style="width: auto;"><tbody><tr><td>
</td></tr><tr><td style="font-family: arial,sans-serif; font-size: 11px; text-align: right;">From G37</td></tr></tbody></table>2) Unbolt the Crossmemeber and remove: 4 12mm bolts
<table style="width: auto;"><tbody><tr><td>
</td></tr><tr><td style="font-family: arial,sans-serif; font-size: 11px; text-align: right;">From G37</td></tr></tbody></table>3) Unbolt the Y-pipe from the resonators: 2 14mm nuts: bottom of picture
<table style="width: auto;"><tbody><tr><td>
</td></tr><tr><td style="font-family: arial,sans-serif; font-size: 11px; text-align: right;">From G37</td></tr></tbody></table>4) Unbolt the mufflers: 2 12mm bolts holding the joint clamp on each side. once the bolts are off you can gently pry open the clamps:see clamps in pic
<table style="width: auto;"><tbody><tr><td>
</td></tr><tr><td style="font-family: arial,sans-serif; font-size: 11px; text-align: right;">From G37</td></tr></tbody></table>Now the entire system is still in place, all the fasteners are off.
5) Grease all the rubber hangers:
- 1 on each resonator pipe
- 2 on each muffler
6) Place a scissors jack underneath the plate holding the 2 resonators together (don's have to jack it up, just support the weight) and another where the Y-pipe joins the resonator
7) Remove the stock Muffler by unbolting the rear hanger bracket: 2 12mm nuts - unbolted bracket below
<table style="width: auto;"><tbody><tr><td>
</td></tr><tr><td style="font-family: arial,sans-serif; font-size: 11px; text-align: right;">From G37</td></tr></tbody></table>8) Support the Rear weight of the muffler and Wiggle the rear muffler rubber mount off (can be best accessed right behind rear wheel). You now have to support the weight of the muffler and slide it off the dinky tube....paying attention not to place too much stress on the resonator pipe with working the muffler off.
9) Repeat on opposite side
10) You could probably slide the resonator hanger off of the rubber mount, but I chose to remove the bracket: 1 12mm nut
<table style="width:auto;"><tr><td><a href="http://picasaweb.google.com/lh/photo/yWccpv0QqSn92cF7kYrILg?feat=embedwebsite"><img src="http://lh5.ggpht.com/_XzPJAUZk6IY/THwAj0f5ziI/AAAAAAAABZ8/aU_7nNww9P4/s800/IMG_1473.JPG" /></a></td></tr><tr><td style="font-family:arial,sans-serif; font-size:11px; text-align:right">From <a href="http://picasaweb.google.com/109880575440290106849/G37?feat=embedwebsite">G37</a></td></tr></table>
11) Remove the opposite resonator hanger
12) Remove the resonator pipe (largest section of exhaust system). The jack from step 6 helps support some weight
13) Remove the Y-pipe and the stock system is off.
Usually you would revers install the exhaust. Seeing that it was a 1 man job. I decided to go from the back again, using the jacls for help.
Included hardware: note the 2 sets of 14mm bolts to the right (reused from stock system)
<table style="width:auto;"><tr><td><a href="http://picasaweb.google.com/lh/photo/QdIumfXCYxdO5sXjR1u6Sw?feat=embedwebsite"><img src="http://lh3.ggpht.com/_XzPJAUZk6IY/THwAq5ejEVI/AAAAAAAABaw/NLODQzrNgLA/s800/IMG_1485.JPG" /></a></td></tr><tr><td style="font-family:arial,sans-serif; font-size:11px; text-align:right">From <a href="http://picasaweb.google.com/109880575440290106849/G37?feat=embedwebsite">G37</a></td></tr></table>
1) I loosely bolted together the 2 front pieces with the flex point to the X-Pipe. Don't forget to use the supplied gaskets between all joints.
<table style="width:auto;"><tr><td><a href="http://picasaweb.google.com/lh/photo/yMzZBGj0KBitxRSN27w_ZQ?feat=embedwebsite"><img src="http://lh3.ggpht.com/_XzPJAUZk6IY/THwAtHMevKI/AAAAAAAABdc/2R3uDWG6P0I/s800/IMG_1492.JPG" /></a></td></tr><tr><td style="font-family:arial,sans-serif; font-size:11px; text-align:right">From <a href="http://picasaweb.google.com/109880575440290106849/G37?feat=embedwebsite">G37</a></td></tr></table>
2) using the jacks to support the weight, I slowly lifted the front half into place and loosely bolted it in. Don't forget to use the stock gaskets for each side next to the cats:
<table style="width:auto;"><tr><td><a href="http://picasaweb.google.com/lh/photo/elm7e6zTiokzv7fEkMiaDw?feat=embedwebsite"><img src="http://lh5.ggpht.com/_XzPJAUZk6IY/THwAu9E1TeI/AAAAAAAABbc/plavcVzzivs/s800/IMG_1496.JPG" /></a></td></tr><tr><td style="font-family:arial,sans-serif; font-size:11px; text-align:right">From <a href="http://picasaweb.google.com/109880575440290106849/G37?feat=embedwebsite">G37</a></td></tr></table>
<table style="width:auto;"><tr><td><a href="http://picasaweb.google.com/lh/photo/1C2Y7SvnSlCfYDpSBRJRBA?feat=embedwebsite"><img src="http://lh5.ggpht.com/_XzPJAUZk6IY/THwAuWwPGOI/AAAAAAAABbY/mkZf3khnyJQ/s800/IMG_1495.JPG" /></a></td></tr><tr><td style="font-family:arial,sans-serif; font-size:11px; text-align:right">From <a href="http://picasaweb.google.com/109880575440290106849/G37?feat=embedwebsite">G37</a></td></tr></table>
<table style="width:auto;"><tr><td><a href="http://picasaweb.google.com/lh/photo/qtFnH98Ul8z6e40kAW7j-w?feat=embedwebsite"><img src="http://lh3.ggpht.com/_XzPJAUZk6IY/THwAthpEcrI/AAAAAAAABbQ/DWGb8EaFr9I/s800/IMG_1493.JPG" /></a></td></tr><tr><td style="font-family:arial,sans-serif; font-size:11px; text-align:right">From <a href="http://picasaweb.google.com/109880575440290106849/G37?feat=embedwebsite">G37</a></td></tr></table>
<table style="width:auto;"><tr><td><a href="http://picasaweb.google.com/lh/photo/eENctM9QBsyL0Tc03wlfrQ?feat=embedwebsite"><img src="http://lh6.ggpht.com/_XzPJAUZk6IY/THwAt-4i2EI/AAAAAAAABbU/yJro5pvj03E/s800/IMG_1494.JPG" /></a></td></tr><tr><td style="font-family:arial,sans-serif; font-size:11px; text-align:right">From <a href="http://picasaweb.google.com/109880575440290106849/G37?feat=embedwebsite">G37</a></td></tr></table>
3) Install the driver and pass post resonator sections. Don't forget to transfer the rubber hanger and mount to the new pipe.
4) I installed the hanger bracket described above first and then loosely bolted the section to the back of the X-pipe. Let the jacks be your extra set of hands
5) install the muffler by using the rear rubber hanger to support the weight. Then re-attach the rear hanger using the 2 12mm nuts (from step 7 in removal section)
6) Bolt everything up from rear to front. Again, don't forget you gaskets. (doing it rear to front decreases the stress on the cats/headers)
7) Recheck torque on all nuts/bolts
8) attach tips using the supplied clamps
9) Start up and enjoy the rumble
10) check for leaks (condensation leaking from joints)
It's normal for some smoke as grease/remnants from manufacturing process burn off
Hope this helps, please PM with any questions. I would have liked to taken more pics during the install, but being by myself made this difficult
Video to follow soon
Last edited by Gwhipped; Aug 30, 2010 at 07:19 PM.


Trending Topics

Registered User
Joined: Feb 2010
Posts: 464
Likes: 0
From: NorCal
^...CVR for around $784 shipped. Both CVR and THM are vendors in here pluggin the Invidia systems dontchya know.
Hey OP....how 'bout those sound clips? Would love to hear this system on the G37 sedan (idle, revs, loaded?). Also, was there a noticeable weight difference between the Invidia & stock? How about throttle response...more pep?
Looks nice!
Hey OP....how 'bout those sound clips? Would love to hear this system on the G37 sedan (idle, revs, loaded?). Also, was there a noticeable weight difference between the Invidia & stock? How about throttle response...more pep?
Looks nice!


Thread Starter
Registered User
Joined: Aug 2010
Posts: 24
Likes: 1
Thanks for the kind words
Thanks for the comments and for reviving the post. I'm Working in the ICU this month pull'n 100 hours in 6 days a week. So sorry for the delay. The G is now broken in with penzoil platinum lube, the invida, injen short ram, and black Betty grounding kit. Off on saturday.......will post the vids. I am really liking the exhaust. Wifey is happy too. Since it's her car......I can "smell the burn" in the garage and I giggle inside knowing she put the G to work on the drive home.