
DIY: Z1 premium steel braided brake lines


Thread Starter
Registered Member
iTrader: (3)
Joined: Aug 2015
Posts: 1,618
Likes: 323
From: San Antonio, Texas
Z1 premium steel braided brake lines
While mostly the same, this is for cars made 06/2012 and on. The difference before that date can be seen in the front lines which has an additional brass block on the outboard side of the line.
Here's a shot of the Z1 brake lines. They feature a transparent plastic sheath which allows you to inspect the lines and provides some protection to other parts they could come in contact with. Based on the way our lines run, I can't see them ever coming in contact but the protection's there. The Z1 lines route like the OEM lines.
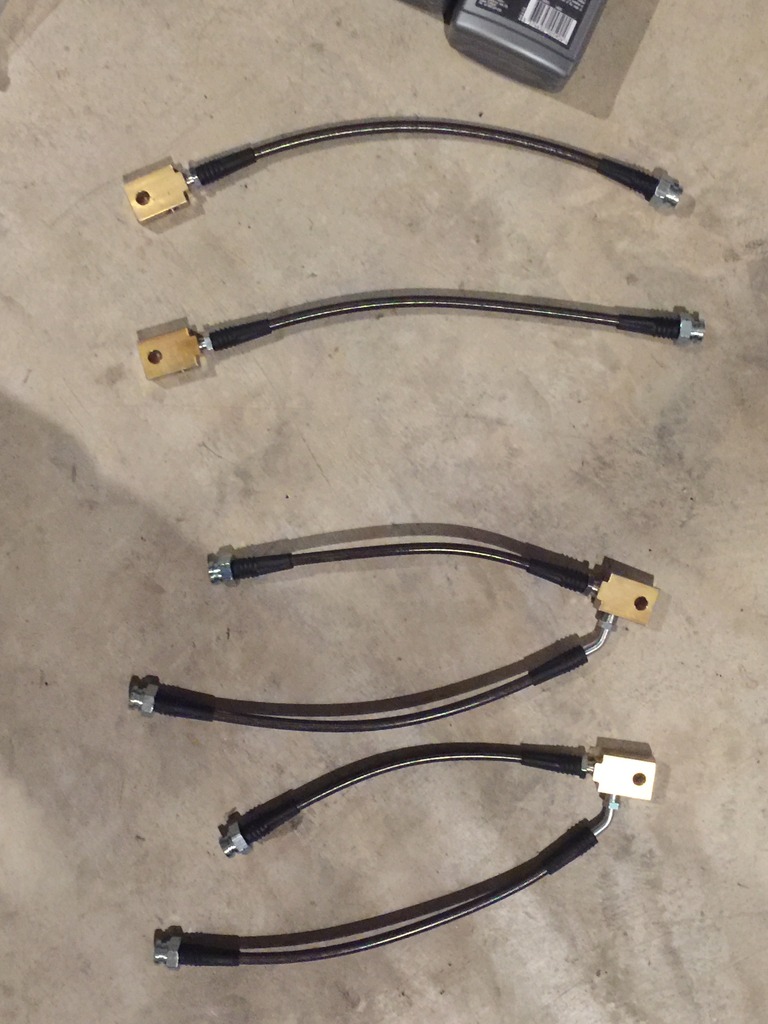
When the lines are shipped, everything is disconnected. You'll have six separate lines. The rear lines look identical to the inboard front lines, except for the length. The rear lines are longer than the inboard side for the front lines (it's two pieces with a brass connection block in the middle). You can figure this out fairly easily just by lining up the new lines next to the stockers while they're still on the car.
I'm going to give the installation difficulty a 7 out of 10 due to the need for proper tools and because you can't get it wrong.
Here's a shot of the tools but there are a few extras I found out that you'll need during the installation process.
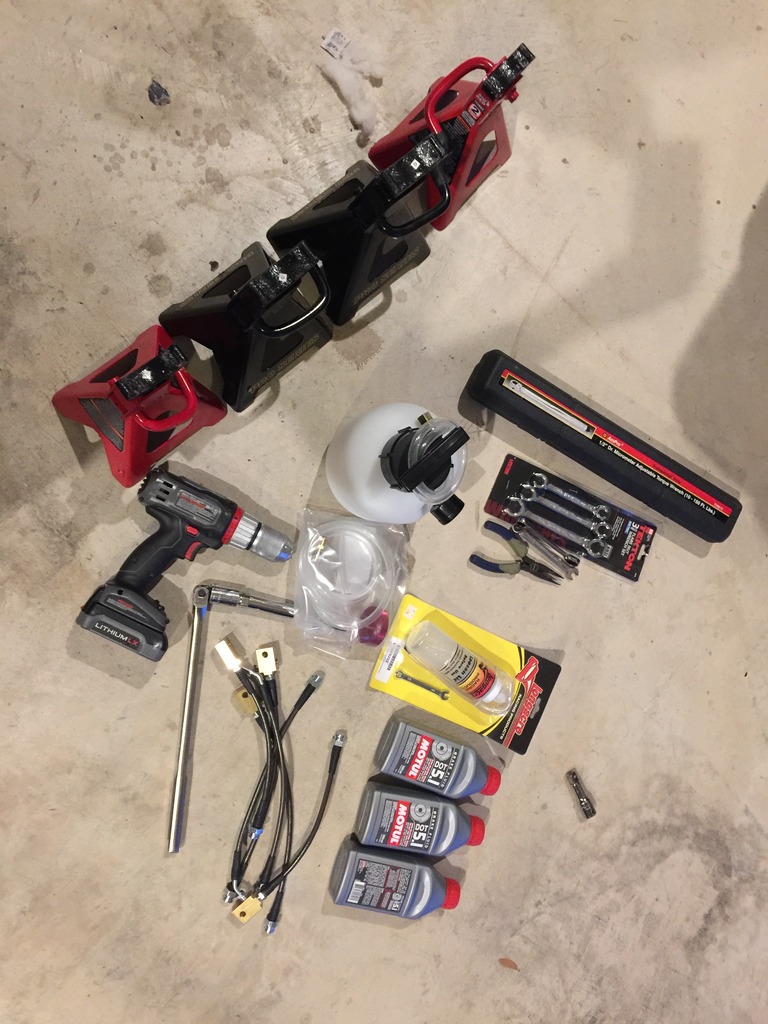
Here's a list:
-10mm flare wrench
-10mm open end wrench
-Pliers, whatever works best for you, these are for the retention clips.
-12mm socket and ratchet
-Torque wrench
-19mm open end wrench (shorty is best)
-7/16th's wrench. This is for one of the fittings on the Z1 line, specifically fittings that attach to the middle brass block on the front lines.
-Longacre 45202 Single Bottle Brake Bleeder Kit
-Motive Products Black Label 0117 power bleeder
-At least three bottles of your favorite brake fluid. I ended up using four but more on that later
-Four jack stands (easier with the entire car up)
One thing that would make everything a bit easier is some sort of plug or nipple to place over the end of the hard metal lines that the new Z1 lines connect to on the inboard side. This will save you a bit of time later on when bleeding the brakes. When you remove the stock lines, fluid will come out of the OEM lines on the inboard side. On the front lines, no matter which side you undo first (inboard or outboard) it'll still lead to brake fluid dripping out. If you have a plug for the front lines, inboard side, you can remove that fitting first, plug the OEM line inboard and then go about your business of installing the new lines, making that last connection on the inboard side and minimizing brake fluid leaking out and introducing lots of air into the system.
In short, for the fronts, remove the inboard soft line first, plug the OEM hard brake line that runs to the master cylinder, then simply remove the rest of the soft lines starting on the outboard side so you can plug that end as well.
In order to do this, you'll need to head to the hardware or auto store and find the appropriate plug/nipple to slide over the end.
Back to the installation...
REAR LINES FIRST
Brake fluid is caustic. I have a big roll of paper towels, brake cleaner and regular cleaner handy to wipe things down as needed. I also put paper towels below all of the brake line separation points, covering suspension bits and what not. Brake fluid will get everywhere so be prepared.
Here's a shot of the rear lines, two fittings, pretty straight forward.
The inboard side has a clip that needs to be removed. I had a pair of short pliers which seemed to work for me. It takes quite a bit of force to get these to come out and they're somewhat of a PITA.
Take your 10mm flare wrench and loosen the nut. I like to put the wrench over the nut and whack it with my fist. It'll break free easier that way .
The outboard connection doesn't have a clip. Just loosen the nut as you did on the inboard side but keep it tight enough that fluid doesn't run out.
Go back to the inboard side, loosen the nut all the way and pull the soft portion of the brake line away. Slide your plug/nipple over the flared end of the inboard hard line.
Go to the brass block on the outboard side and remove the 12mm bolt securing the brass block and stock line to the suspension upright. Once that's off, go ahead and loosen the flare fitting nut all the way and pull the stock line out. Plug the hard metal line running to the caliper.
Installation of the Z1 line is the opposite of removing the stock line.
I like to install the outboard fitting, brass block to OEM flare, first with a finger tightening of the flare fitting nut. I then install the 12mm bolt through the brass block and secure it. It's easier this way and it guarantees you have the hard OEM line going into the brass block straight and you're not cross threading anything.
The inboard side is a bit more difficult due to the retention clip. The Z1 side of the fitting is a 19mm nut and it fits EXACTLY into the bracket opening in a specific way. This allows the fitting to protrude out the top enough that you're able to slide the retaining clip in.
The Z1 fitting does rotate so once you slide it in through the underside of the bracket, rotate it a bit so it's protruding far enough up. Then screw the hard line flare fitting nut in finger tight.
Make sure the Z1 end of the fitting is sticking through the bracket all the way and the nut is oriented in the correct way. Technically, the bracket will keep the Z1 fitting from rotating but I don't find this to be the case in practice. Therefore, before torquing on the flare fitting nut, I like to push the retaining clip in.
Be warned, it's extremely difficult to get that damn clip in. Unless the Z1 (female) end of that fitting is protruding all the way through, it's impossible. They must make a special tool for those clips. I certainly didn't have one and it made it difficult. It's even hard to hammer them in with a rubber or dead blow mallet.
Once the clip is in and you're done cursing, Place the 19mm over the female end (Z1) and the 10mm flare wrench over the flare nut. Tighten. I did not look at factor torque specs, I just made sure they were good and tight. Don't overdo it, you don't want to strip or bend anything.
There's no clip on the rear outboard fitting. I secured the brass block before torquing on the flare nut.
The rears are done!
Here's a shot of the Z1 brake lines. They feature a transparent plastic sheath which allows you to inspect the lines and provides some protection to other parts they could come in contact with. Based on the way our lines run, I can't see them ever coming in contact but the protection's there. The Z1 lines route like the OEM lines.
When the lines are shipped, everything is disconnected. You'll have six separate lines. The rear lines look identical to the inboard front lines, except for the length. The rear lines are longer than the inboard side for the front lines (it's two pieces with a brass connection block in the middle). You can figure this out fairly easily just by lining up the new lines next to the stockers while they're still on the car.
I'm going to give the installation difficulty a 7 out of 10 due to the need for proper tools and because you can't get it wrong.
Here's a shot of the tools but there are a few extras I found out that you'll need during the installation process.
Here's a list:
-10mm flare wrench
-10mm open end wrench
-Pliers, whatever works best for you, these are for the retention clips.
-12mm socket and ratchet
-Torque wrench
-19mm open end wrench (shorty is best)
-7/16th's wrench. This is for one of the fittings on the Z1 line, specifically fittings that attach to the middle brass block on the front lines.
-Longacre 45202 Single Bottle Brake Bleeder Kit
-Motive Products Black Label 0117 power bleeder
-At least three bottles of your favorite brake fluid. I ended up using four but more on that later
-Four jack stands (easier with the entire car up)
One thing that would make everything a bit easier is some sort of plug or nipple to place over the end of the hard metal lines that the new Z1 lines connect to on the inboard side. This will save you a bit of time later on when bleeding the brakes. When you remove the stock lines, fluid will come out of the OEM lines on the inboard side. On the front lines, no matter which side you undo first (inboard or outboard) it'll still lead to brake fluid dripping out. If you have a plug for the front lines, inboard side, you can remove that fitting first, plug the OEM line inboard and then go about your business of installing the new lines, making that last connection on the inboard side and minimizing brake fluid leaking out and introducing lots of air into the system.
In short, for the fronts, remove the inboard soft line first, plug the OEM hard brake line that runs to the master cylinder, then simply remove the rest of the soft lines starting on the outboard side so you can plug that end as well.
In order to do this, you'll need to head to the hardware or auto store and find the appropriate plug/nipple to slide over the end.
Back to the installation...
REAR LINES FIRST
Brake fluid is caustic. I have a big roll of paper towels, brake cleaner and regular cleaner handy to wipe things down as needed. I also put paper towels below all of the brake line separation points, covering suspension bits and what not. Brake fluid will get everywhere so be prepared.
Here's a shot of the rear lines, two fittings, pretty straight forward.
The inboard side has a clip that needs to be removed. I had a pair of short pliers which seemed to work for me. It takes quite a bit of force to get these to come out and they're somewhat of a PITA.
Take your 10mm flare wrench and loosen the nut. I like to put the wrench over the nut and whack it with my fist. It'll break free easier that way .
The outboard connection doesn't have a clip. Just loosen the nut as you did on the inboard side but keep it tight enough that fluid doesn't run out.
Go back to the inboard side, loosen the nut all the way and pull the soft portion of the brake line away. Slide your plug/nipple over the flared end of the inboard hard line.
Go to the brass block on the outboard side and remove the 12mm bolt securing the brass block and stock line to the suspension upright. Once that's off, go ahead and loosen the flare fitting nut all the way and pull the stock line out. Plug the hard metal line running to the caliper.
Installation of the Z1 line is the opposite of removing the stock line.
I like to install the outboard fitting, brass block to OEM flare, first with a finger tightening of the flare fitting nut. I then install the 12mm bolt through the brass block and secure it. It's easier this way and it guarantees you have the hard OEM line going into the brass block straight and you're not cross threading anything.
The inboard side is a bit more difficult due to the retention clip. The Z1 side of the fitting is a 19mm nut and it fits EXACTLY into the bracket opening in a specific way. This allows the fitting to protrude out the top enough that you're able to slide the retaining clip in.
The Z1 fitting does rotate so once you slide it in through the underside of the bracket, rotate it a bit so it's protruding far enough up. Then screw the hard line flare fitting nut in finger tight.
Make sure the Z1 end of the fitting is sticking through the bracket all the way and the nut is oriented in the correct way. Technically, the bracket will keep the Z1 fitting from rotating but I don't find this to be the case in practice. Therefore, before torquing on the flare fitting nut, I like to push the retaining clip in.
Be warned, it's extremely difficult to get that damn clip in. Unless the Z1 (female) end of that fitting is protruding all the way through, it's impossible. They must make a special tool for those clips. I certainly didn't have one and it made it difficult. It's even hard to hammer them in with a rubber or dead blow mallet.
Once the clip is in and you're done cursing, Place the 19mm over the female end (Z1) and the 10mm flare wrench over the flare nut. Tighten. I did not look at factor torque specs, I just made sure they were good and tight. Don't overdo it, you don't want to strip or bend anything.
There's no clip on the rear outboard fitting. I secured the brass block before torquing on the flare nut.
The rears are done!
Thread Starter
Registered Member
iTrader: (3)
Joined: Aug 2015
Posts: 1,618
Likes: 323
From: San Antonio, Texas
FRONT BRAKE LINES
The fronts are a little more difficult. There are two of those damn clips and the lines are separated into two parts.
Pro tip #1. This is where you'll need the 7/16th's open end wrench. Put the Z1 lines together finger tight and examine the angle of the OEM line from the brass block to the outboard side. You'll see the OEM line is slightly angled out. Match the Z1 line up with the angled fitting to the OEM line and tighten with the 7/16th wrench. It's MUCH easier to tighten the fittings going into the brass block BEFORE installing the line onto the car. You can ensure everything is going in square and you can torque them down more easily.
Don't forget to protect anything sitting below the brake line connection points. Paper towels draped over suspension parts do the trick.
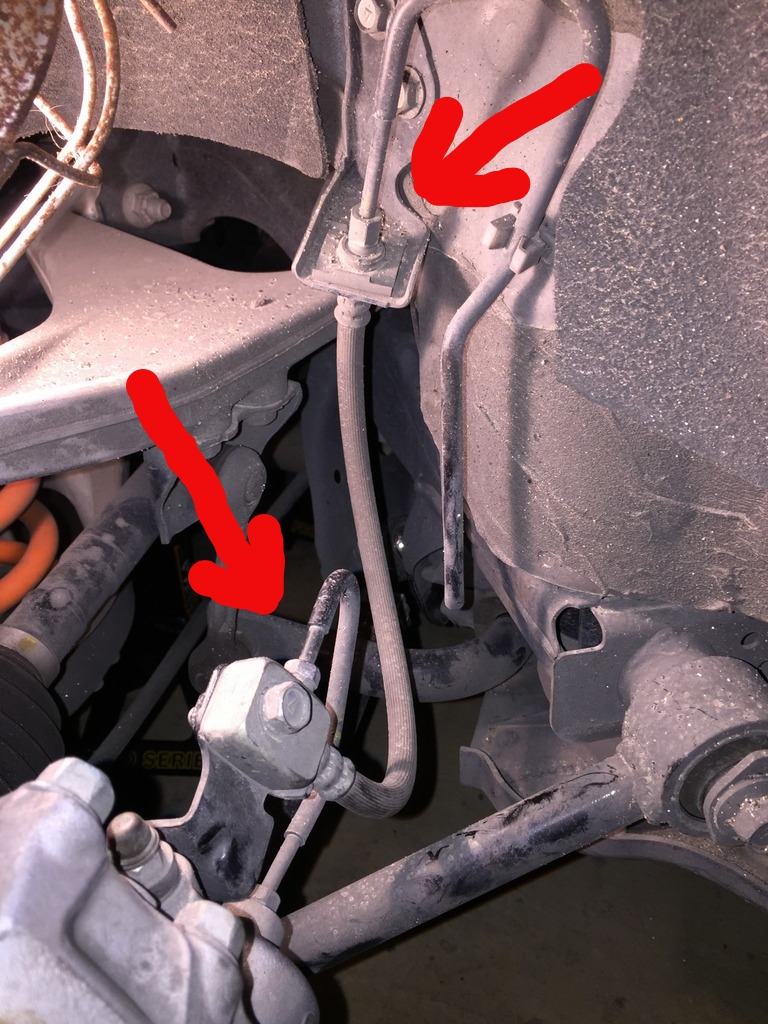
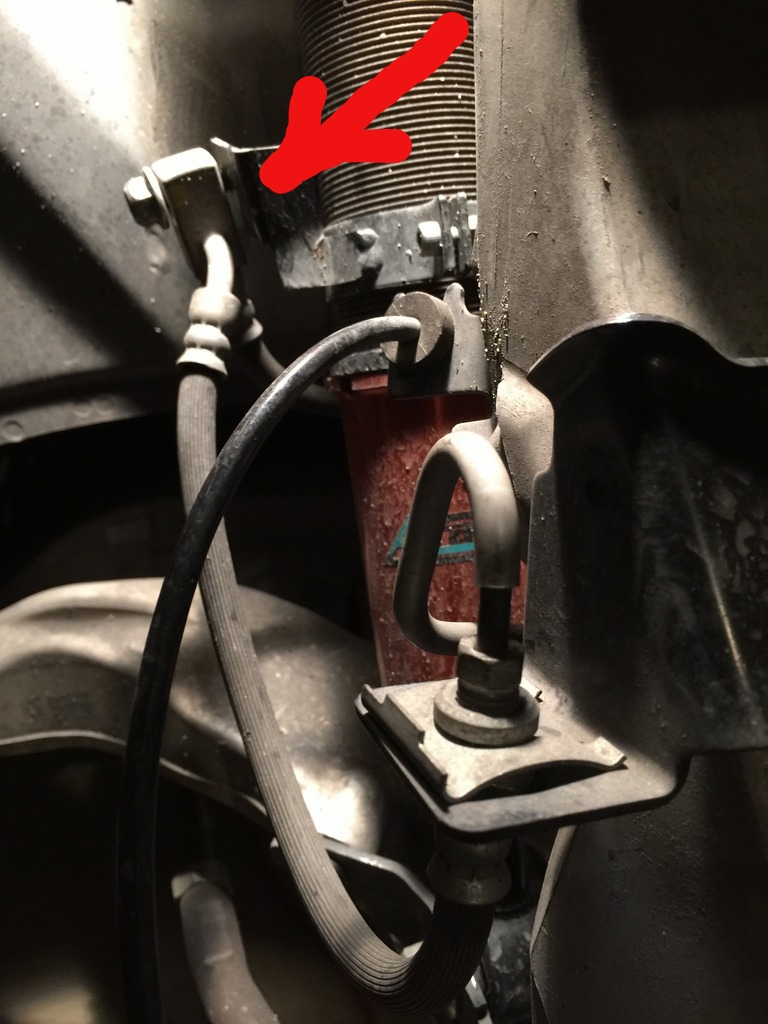
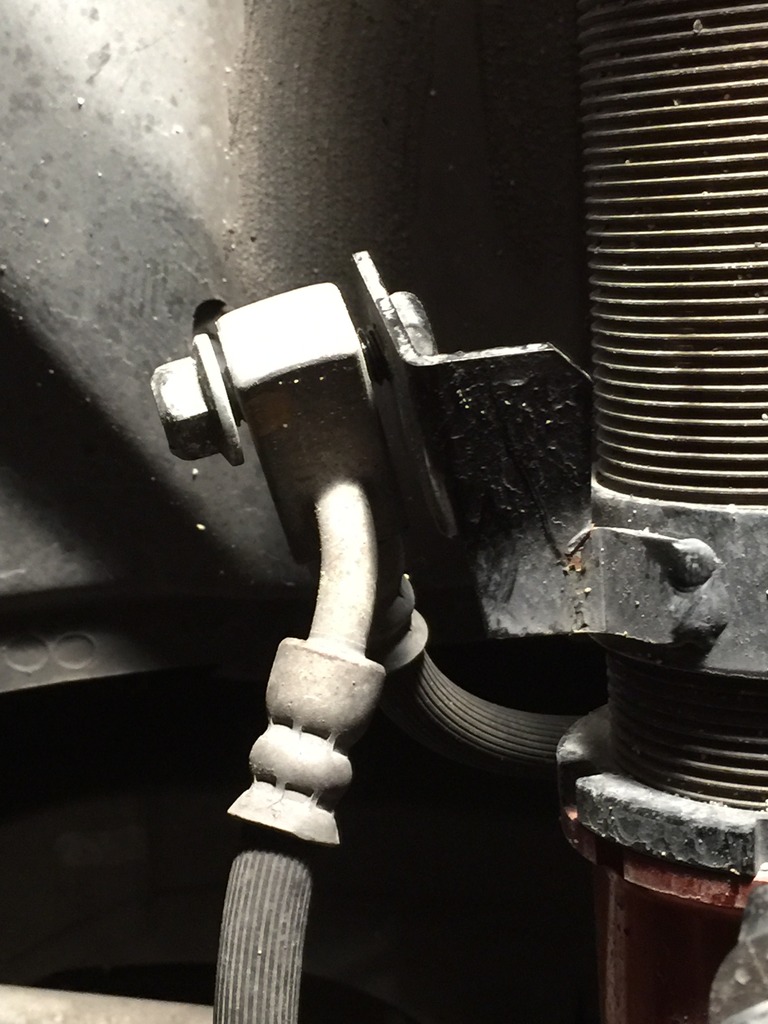
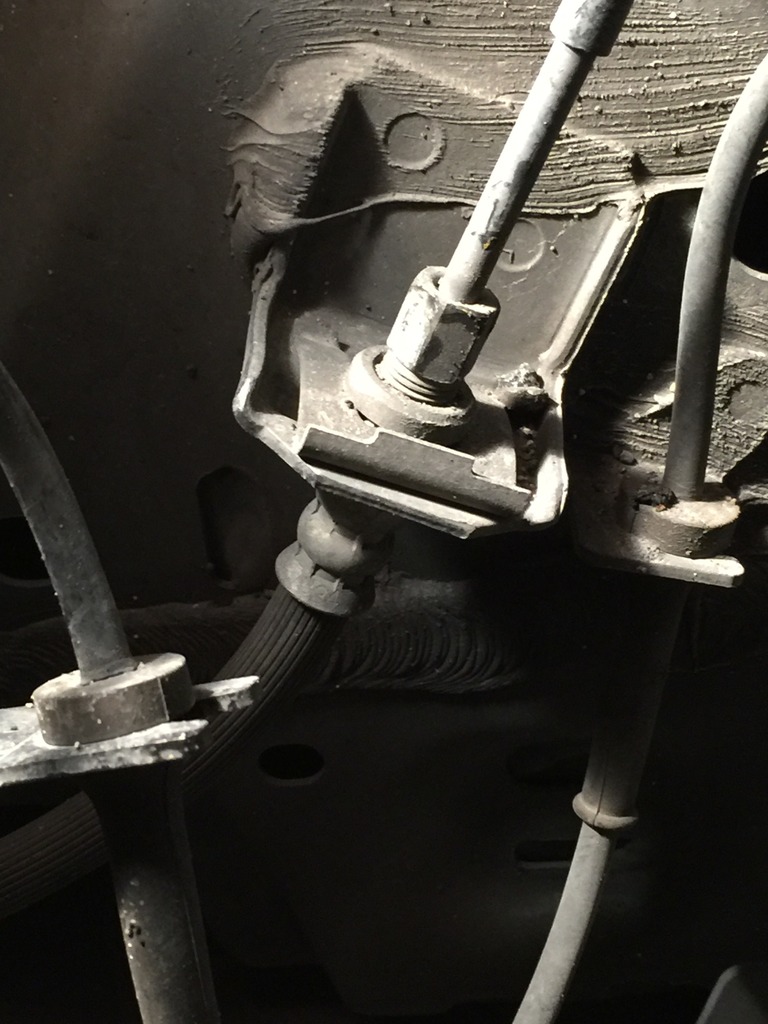
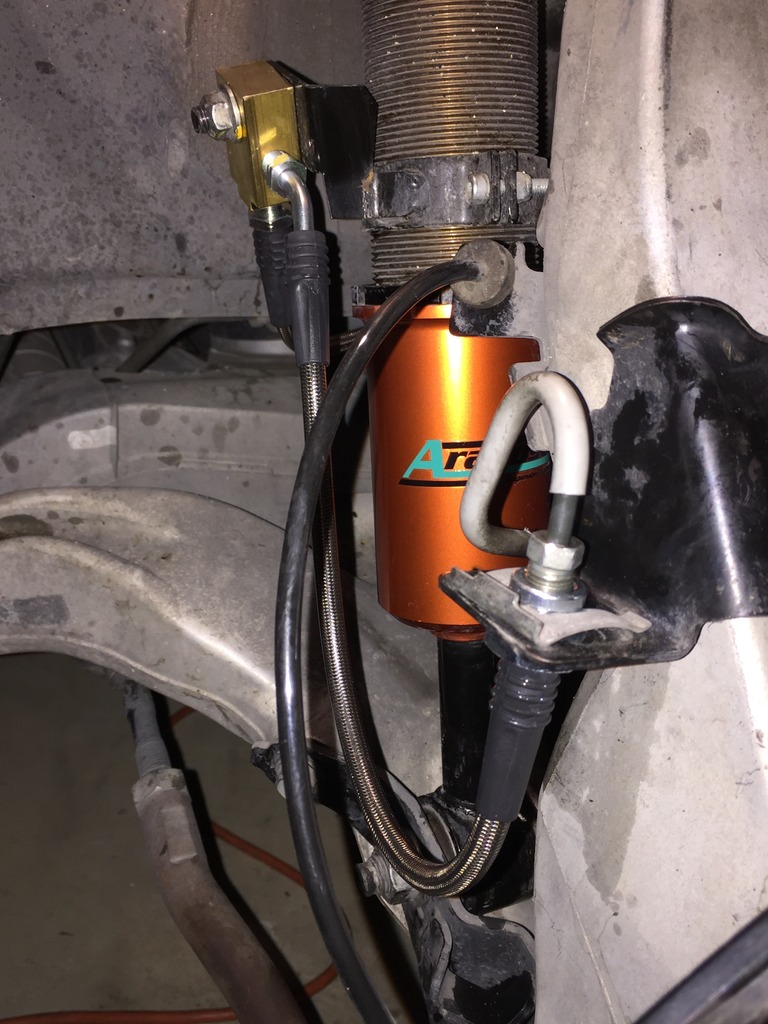
Here's a shot of all three connection points for the OEM lines.
Outboard and middle:
Another shot of the middle:
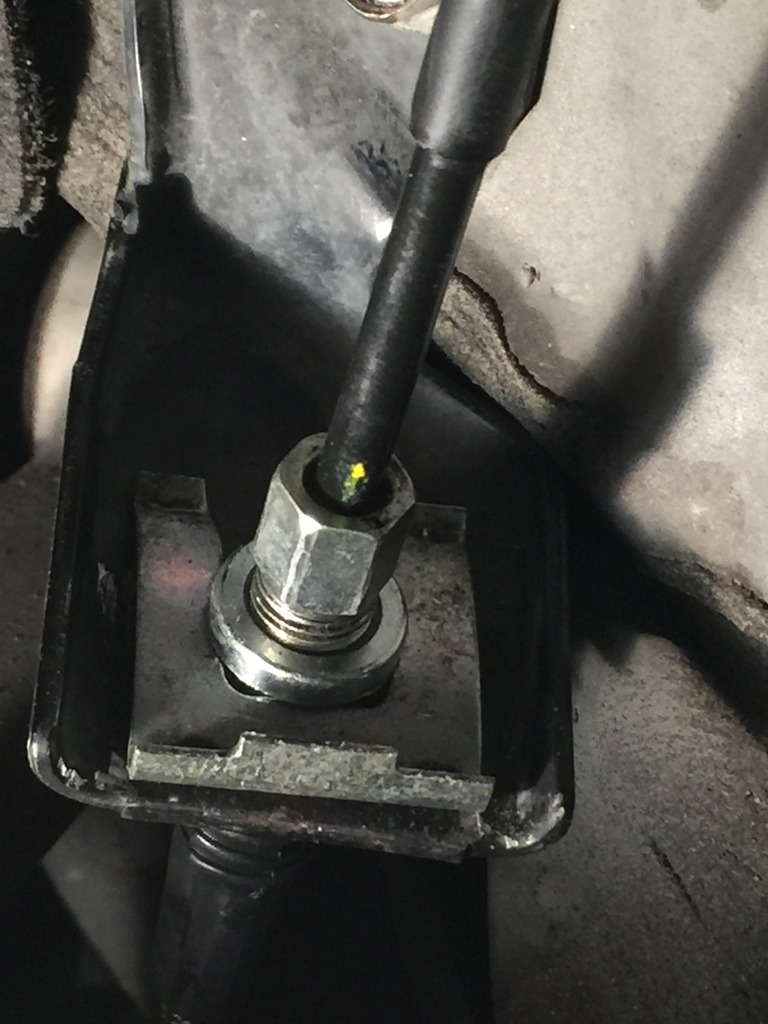
Inboard fitting:
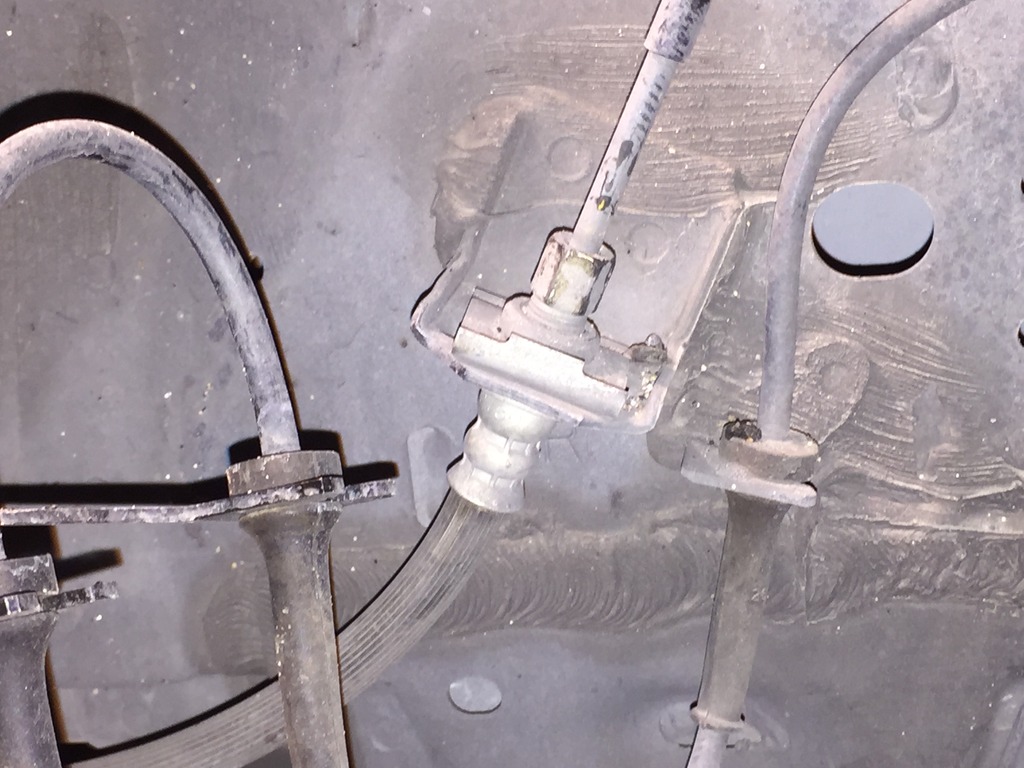
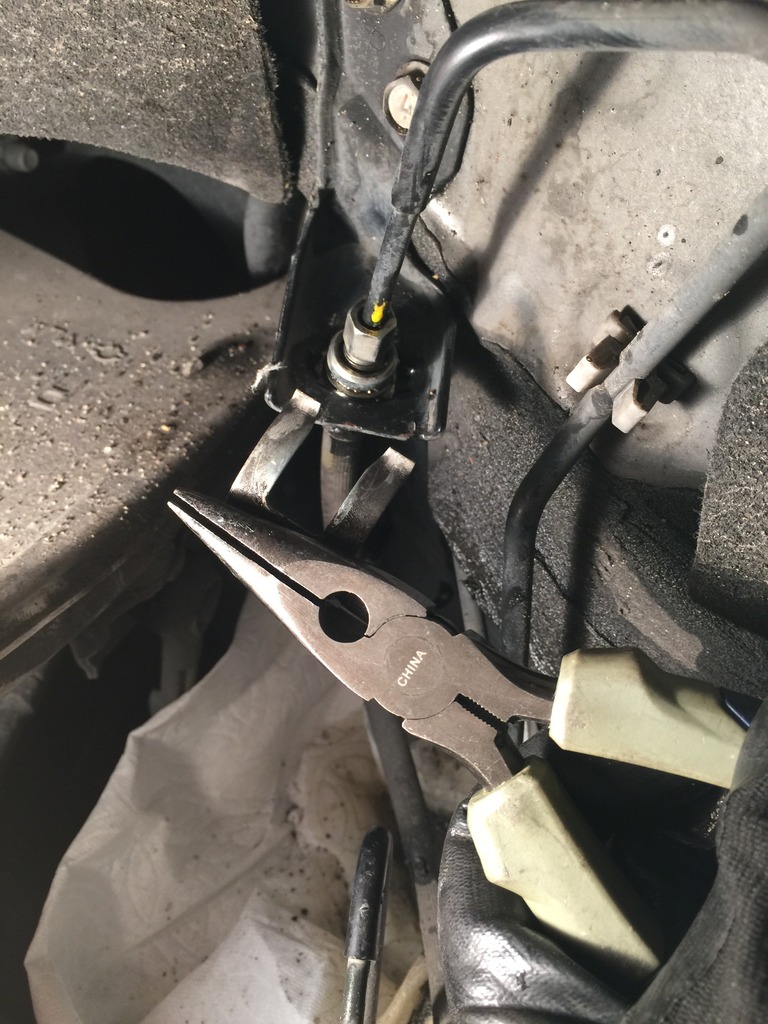
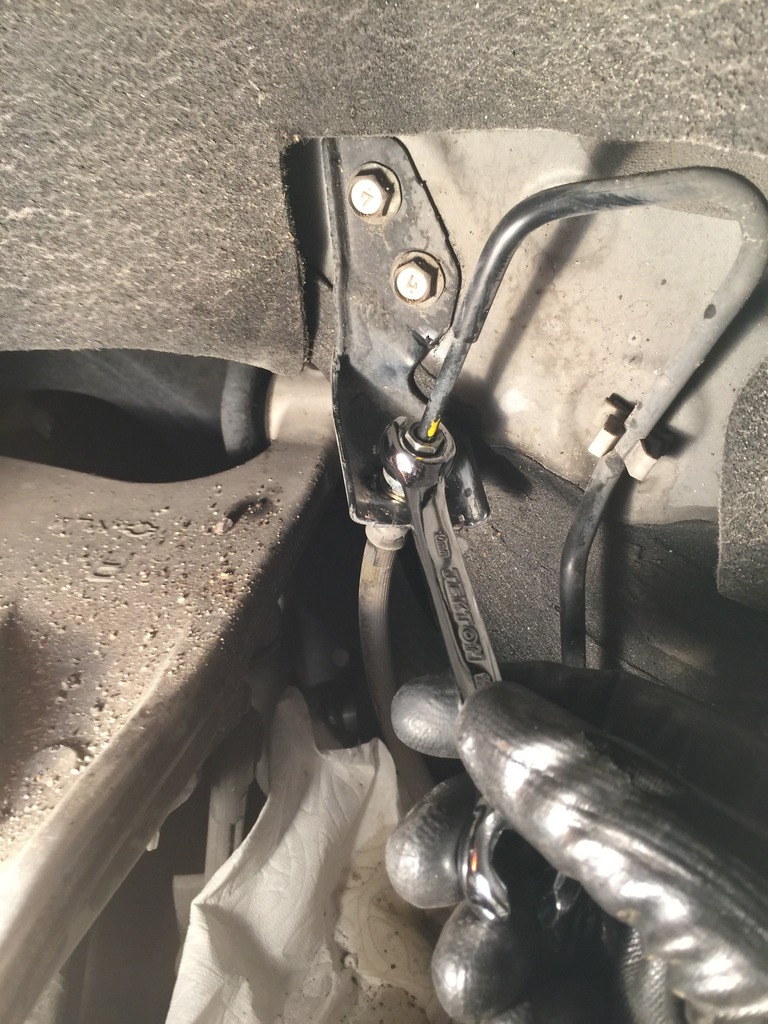
As with the rear lines, start with the most inboard fitting first.
-Loosen the flare nut a bit then lightly tighten back down.
-Remove the clip
-Loosen flare nut all the way and pull the OEM line through the bottom of the bracket
-Plug the inboard hard line.
Fluid will drip out of the OEM line so watch for that.
Move on to the outboard side.
-Slightly loosen the outboard flare nut.
-Remove the retaining clip.
-Loosen the flare nut completely and pull the OEM soft line through the bottom of the bracket, plugging the hard line to keep lots of fluid from running out.
You'll have the middle brass block to remove. It's held on by a 12mm bolt. I have aftermarket shocks and the bracket is not that strong so be sure to support it before torquing on that 12mm bolt otherwise you could bend or even snap it off.
Once the 12mm bolt is removed, you can lift the entire OEM front line out (it's one piece).
Installation is essentially the reverse of removal. I do clean everything before installation including the clips.
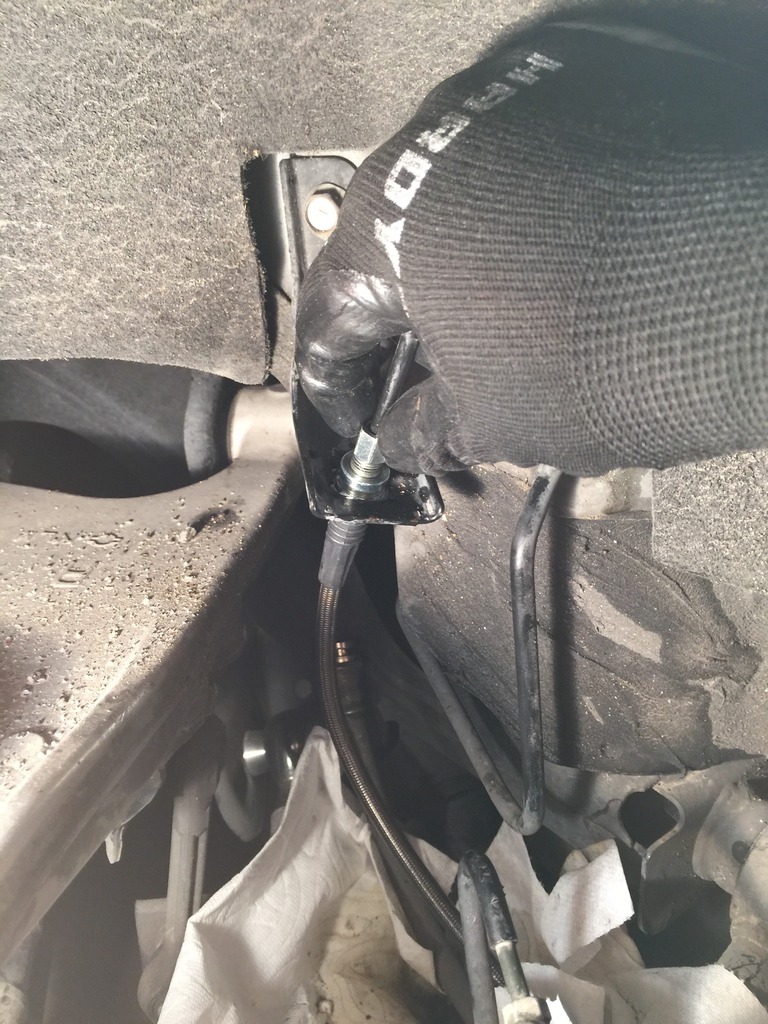
Here's the inboard side installed.
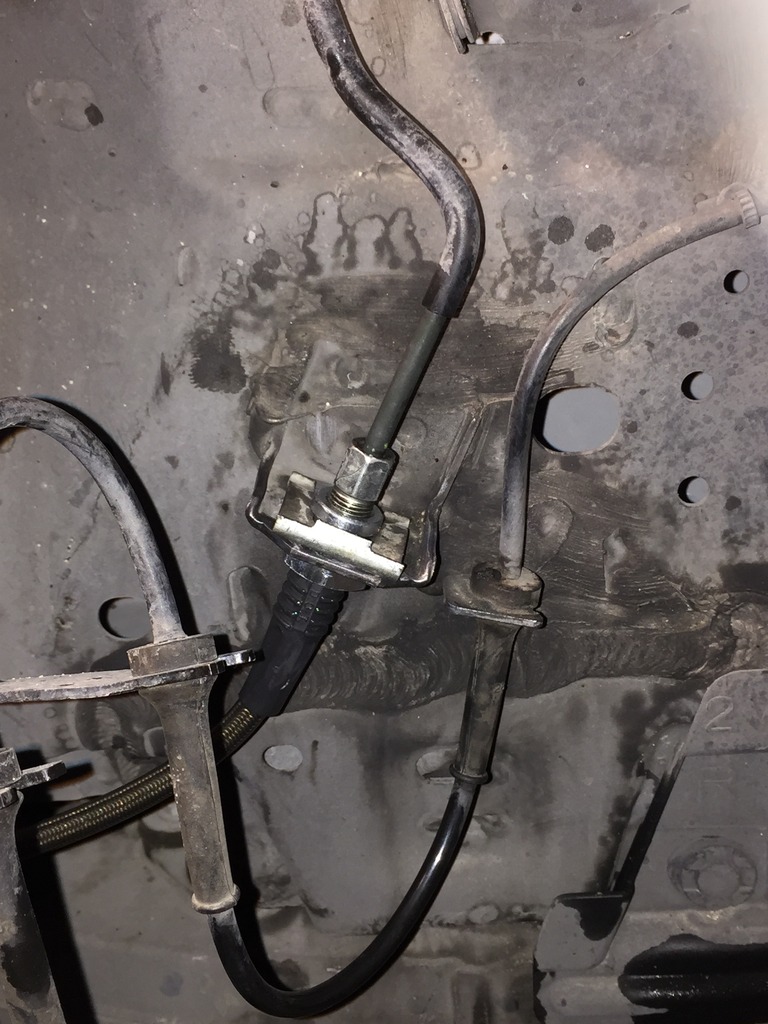
Outboard side
Once all four lines are installed, you'll want to bleed your brakes. Because there are new lines installed, filled with lots of air, I highly recommend the Motive/Longacre combination. I ended up using four bottles due to the new lines and I bled the brakes twice before I was happy with their feel.
I used this as a reference for bleeding the brakes since he uses the Motive/Longacre combo and it's a great guide: How to Bleed Your Brake Fluid Using Motive Power Bleeder 0117 (AK370Z) - Nissan 370Z Forum
I thought I'd done a superb bleed job the first time but it wasn't enough. I did it again today (a week after the brake line installation) and used an LED flashlight to backlight the clear tubes leading to the longacre catch bottle. There was still tons of air in the system. I ended up going through another 1.5 bottles to get the system completely bled. The Motive made it that much easier but it still took some time.
The fronts are a little more difficult. There are two of those damn clips and the lines are separated into two parts.
Pro tip #1. This is where you'll need the 7/16th's open end wrench. Put the Z1 lines together finger tight and examine the angle of the OEM line from the brass block to the outboard side. You'll see the OEM line is slightly angled out. Match the Z1 line up with the angled fitting to the OEM line and tighten with the 7/16th wrench. It's MUCH easier to tighten the fittings going into the brass block BEFORE installing the line onto the car. You can ensure everything is going in square and you can torque them down more easily.
Don't forget to protect anything sitting below the brake line connection points. Paper towels draped over suspension parts do the trick.
Here's a shot of all three connection points for the OEM lines.
Outboard and middle:
Another shot of the middle:
Inboard fitting:
As with the rear lines, start with the most inboard fitting first.
-Loosen the flare nut a bit then lightly tighten back down.
-Remove the clip
-Loosen flare nut all the way and pull the OEM line through the bottom of the bracket
-Plug the inboard hard line.
Fluid will drip out of the OEM line so watch for that.
Move on to the outboard side.
-Slightly loosen the outboard flare nut.
-Remove the retaining clip.
-Loosen the flare nut completely and pull the OEM soft line through the bottom of the bracket, plugging the hard line to keep lots of fluid from running out.
You'll have the middle brass block to remove. It's held on by a 12mm bolt. I have aftermarket shocks and the bracket is not that strong so be sure to support it before torquing on that 12mm bolt otherwise you could bend or even snap it off.
Once the 12mm bolt is removed, you can lift the entire OEM front line out (it's one piece).
Installation is essentially the reverse of removal. I do clean everything before installation including the clips.
Here's the inboard side installed.
Outboard side
Once all four lines are installed, you'll want to bleed your brakes. Because there are new lines installed, filled with lots of air, I highly recommend the Motive/Longacre combination. I ended up using four bottles due to the new lines and I bled the brakes twice before I was happy with their feel.
I used this as a reference for bleeding the brakes since he uses the Motive/Longacre combo and it's a great guide: How to Bleed Your Brake Fluid Using Motive Power Bleeder 0117 (AK370Z) - Nissan 370Z Forum
I thought I'd done a superb bleed job the first time but it wasn't enough. I did it again today (a week after the brake line installation) and used an LED flashlight to backlight the clear tubes leading to the longacre catch bottle. There was still tons of air in the system. I ended up going through another 1.5 bottles to get the system completely bled. The Motive made it that much easier but it still took some time.