
DIY: G37 Sedan Illuminated Door Sill Installation

G37 Sedan Illuminated Door Sill Installation
G37 Sedan Illuminated Door Sill DIY
This is a DIY for installing the Illuminated Door Sills for a G37 Sedan from eBay for $99.00. The seller for these is knacksalesinc. They go fast and most likely aren't in stock; however when you have a set - here is how you can install them.
There is mentioning of a T-harness that normally comes with the OEM kit but it has been determined that these are meant for the M sedan platform. They still fit the G37 door sill no problem, but the installation will NOT be plug and play. You will need to run a few wires and tap two wires on the BCM located on the passenger footwell of the cabin. All will be explained in this DIY. Also, I borrowed some pictures from forum members who posted up some pictures and I took a few from Kevalteam who posted a DIY for the sills using the factory T-harness which will NOT be use din this DIY. Thanks Kevalteam and other members for the pictures I didn't take
Disclaimer:
First and foremost, I'm not responsible for any damage you cause to your vehicle. I am a very comfortable with electrical projects and am very accustomed to completing wiring tasks like this. If you think this job is too difficult or may cause you problems, contact a local member on here who can give you a hand. Another option would be any auto service center or car audio shop - all could complete the job.
First and foremost, make sure you have THIS wire harness. This is the one that will be used with this installation. Now, if you have a different harness, but have similar connections, please post what you have and I will try to identify if there will be any differences during installation.

<insert here="" needed="" tools="" of="" list=""></insert>
<insert here="" needed="" tools="" of="" list=""></insert>
<insert here="" needed="" tools="" of="" list="">Tools Needed:</insert>
Passenger Side Undressing
Passenger kick plate can be removed by using your fingers and getting underneath the bottom and pulling towards the sunroof. Remove the driver side kick plate as well using the same method. While your at each side, go ahead and lift up the weather tripping that runs all around the door frame. You will ONLY need to lift up the bottom portion (the length that runs parallel to the door sill).
Bye Bye Factory Sills!
CAREFULLY remove the plastic sills you will be replacing with the illuminated sills. Take a plastic pry tool, or a plastic putty knife (what I used) to pry up the rear of the sill. When I say "rear of the sill", I mean the side that would be closest to the seat belt. Pry up to pop the first tab, and then pull up and towards the front of the vehicle. If any white clips remain, pop those up as well. Try to pry and use leverage on areas that will be covered by the new sill, and not where the sill meets the rocker panel of the exterior (where the bottom of the door meets the lower body of the car). I borrowed some pictures from Kevalteam since I didn't take these during my install.
It's BCM Time!
The trim piece revealing the BCM can be removed once the black plastic locking screw is removed on the floor board. Remove the two carpet screws and the remove the panel shown below by pulling it towards the center console.
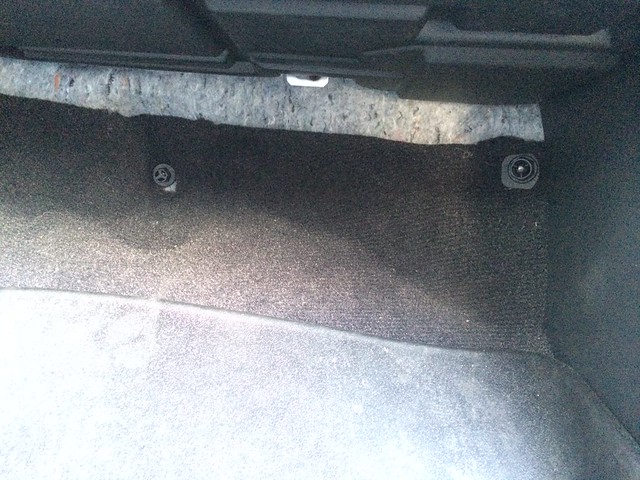
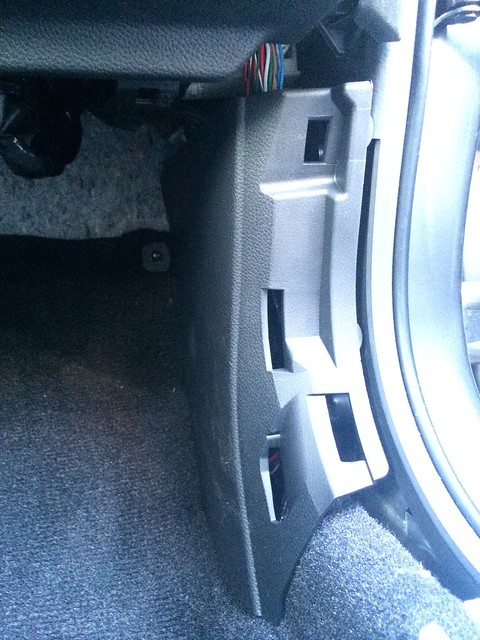
Remove the top-most plug on the BCM. Look for the green plug on the module, and move two white plugs up towards the glovebox. Remove this plug.

Establishing Connectivity
Remove the shielding on the harness to expose the wires
Switch to the illuminated sill harness - take a pair of wire cutters and remove the plug on the end of the harness. Ensure you are cutting the plug off IN FRONT of the inline fuse, and NOT either of the plugs that accept sills themselves.
Use a pair of t-tap wire connectors to connect the RED and WHITE wires from the sill harness to the BCM harness.
WHITE (SILL HARNESS) connects to > SKY BLUE (BCM HARNESS)
RED (SILL HARNESS) connects to > MINT GREEN (BCM HARNESS)
Testing Connectivity
Once your connections are tapped, plug in a sill BEFORE MOUNTING it to the vehicle to ensure your connections have been successfully made. If all works well, ensure your tapped connections are secured. I chose to put heat shrink over mine to prevent them from opening up.
What I did is worked from the passenger side - I had all the doors closed except the front passenger door. I plugged the illuminated sill into the harness and then pressed the sensor button on the door frame near the latch to ensure the illuminated sill powered off when I pressed the door ajar sensor. This sensor is shielded in rubber as is on the body of the car - you can't really miss it.
Once one works, test it on the other end of the harness to ensure the both ends of the harness and both illuminated sills are functional.
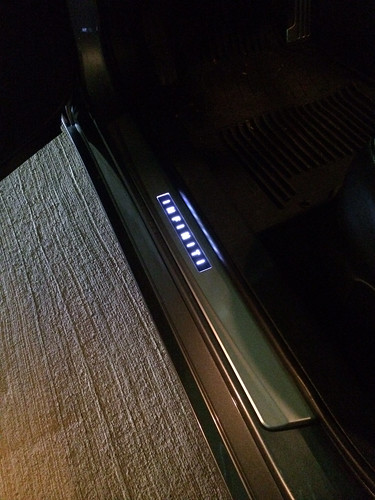
Ohhhh, New Sill for the Passenger Side!
Run the passenger side sill harness (shorter lead of harness) from the BCM connector towards the passenger seatbelt. Run the lead through the white harness clips that are now visible that you have removed the passenger kick plate. The harness and plug should slide right through no problem.
Prep the sill area. I used a bit of Goo Gone to clean up the area, then followed up with 99% rubbing alcohol and a microfiber cloth to remove any remaining remaining dirt, grime and surface residue.
Pop the provided white snap clips into each end of the sill, remove the adhesive tape backing, and STICK IT! Apply firm pressure all around to ensure the adhesive has made contact in all places. You'll hear some snapping and popping - this is just the clips shifting around. Don't press too hard - you're not compacting trash or anything like that. Just apply enough pressure to ensure the sills are stuck on there.
Under Construction:
(I will insert a blurb and a picture of how you should run the wire, and to show how I did mine. - Stand by for this).
Running with <s>Scissors</s>; I mean Wires!
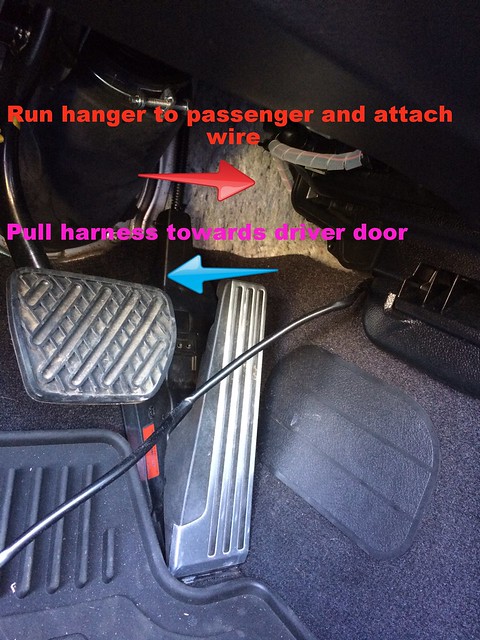
Next, run the wire harness to the driver side of the vehicle. Run this wire under neath the carpet (below the two plastic carpet screws you removed in the beginning of this DIY) and behind the radio console. Use a wire coat hanger in a slightly bent arch to run this wire. I used a fish tape because that's the correct tool for the job. A coat hanger will work just fine. Run the hanger through the gap between between the center console and the carpet, tape the sill harness end onto the end that is on the passenger side, and pull the hanger towards the driver door to get the harness connector to the driver side of the vehicle.
Securing your Runs (not a dirty joke, I swear)
Attach this wire to some other wires up above using some zipties and run it down below the parking brake and into the driver side kick plate area. I used 6 zipties total securing this wire from the center console area, all the way down to the base of the only panel remaining in the footwell of the driver side (the panel you didn't remove on the driver side that you removed on the passenger side exposing the BCM).
Work that harness clip through the large white harness channels as you did on the passenger side. From here, you can complete the same steps as you did on the passenger side.
HOMESTRETCH
Once you've confirmed everything is working, button your interior back up carefully and ensure everything is pieced back together correctly. Sometime when you pull off the panel hiding the BCM, those white snap pegs stay stuck in the car frame. Pry them up and attach them to the plastic panel for reinstalltion. Line up the carpet bolt before snapping this panel down.
Kick panels snap down real easy. I recommend starting from front of vehicle and working your way back.
Enjoy those nice new Illuminated Sills! Sorry for the blurry iPhone pics. You'd like the 5s would be able to shoot a better picture than this
<insert here="" of="" list="" steps=""></insert>
This is a DIY for installing the Illuminated Door Sills for a G37 Sedan from eBay for $99.00. The seller for these is knacksalesinc. They go fast and most likely aren't in stock; however when you have a set - here is how you can install them.
There is mentioning of a T-harness that normally comes with the OEM kit but it has been determined that these are meant for the M sedan platform. They still fit the G37 door sill no problem, but the installation will NOT be plug and play. You will need to run a few wires and tap two wires on the BCM located on the passenger footwell of the cabin. All will be explained in this DIY. Also, I borrowed some pictures from forum members who posted up some pictures and I took a few from Kevalteam who posted a DIY for the sills using the factory T-harness which will NOT be use din this DIY. Thanks Kevalteam and other members for the pictures I didn't take
Disclaimer:
First and foremost, I'm not responsible for any damage you cause to your vehicle. I am a very comfortable with electrical projects and am very accustomed to completing wiring tasks like this. If you think this job is too difficult or may cause you problems, contact a local member on here who can give you a hand. Another option would be any auto service center or car audio shop - all could complete the job.
First and foremost, make sure you have THIS wire harness. This is the one that will be used with this installation. Now, if you have a different harness, but have similar connections, please post what you have and I will try to identify if there will be any differences during installation.
<insert here="" needed="" tools="" of="" list=""></insert>
<insert here="" needed="" tools="" of="" list=""></insert>
<insert here="" needed="" tools="" of="" list="">Tools Needed:</insert>
- Plastic Spreader tool or Plastic Putty Knife
- Flat headed screw driver
- Wire T-Taps (RED 18-22 gauge wire)
- Adhesive remover
- Rubbing Alcohol
- Wire coat hanger or Fish Tape (running wire)
- An alcoholic beverage or alike calming substance/agent
Passenger Side Undressing
Passenger kick plate can be removed by using your fingers and getting underneath the bottom and pulling towards the sunroof. Remove the driver side kick plate as well using the same method. While your at each side, go ahead and lift up the weather tripping that runs all around the door frame. You will ONLY need to lift up the bottom portion (the length that runs parallel to the door sill).
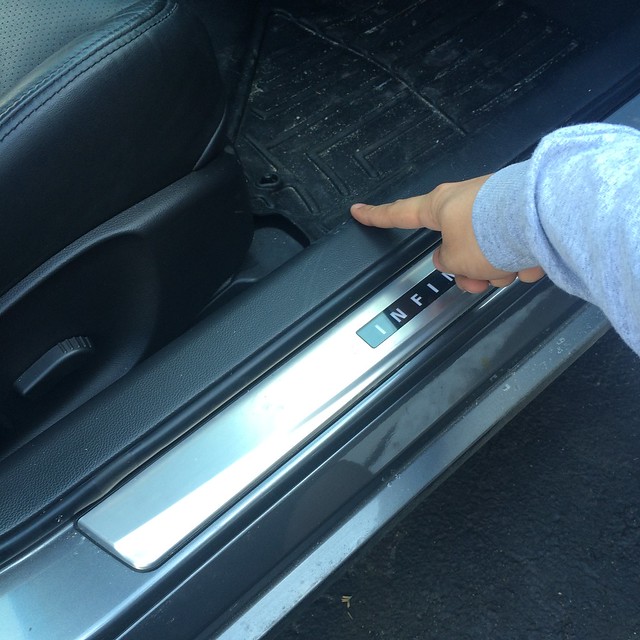
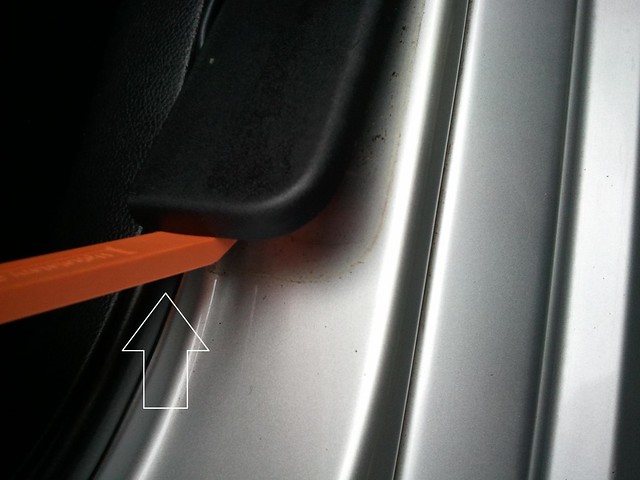
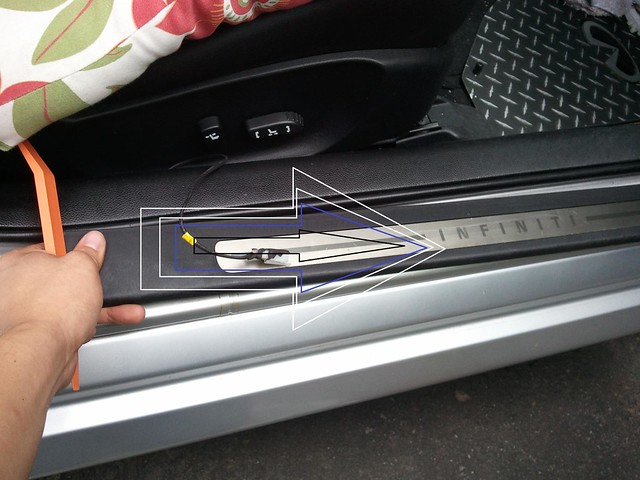
Bye Bye Factory Sills!
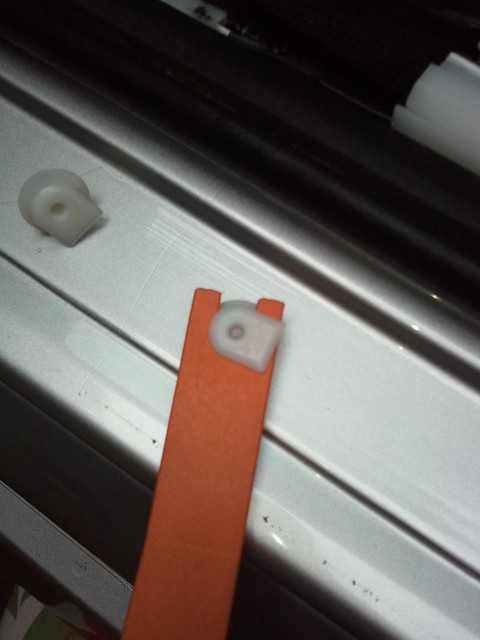
CAREFULLY remove the plastic sills you will be replacing with the illuminated sills. Take a plastic pry tool, or a plastic putty knife (what I used) to pry up the rear of the sill. When I say "rear of the sill", I mean the side that would be closest to the seat belt. Pry up to pop the first tab, and then pull up and towards the front of the vehicle. If any white clips remain, pop those up as well. Try to pry and use leverage on areas that will be covered by the new sill, and not where the sill meets the rocker panel of the exterior (where the bottom of the door meets the lower body of the car). I borrowed some pictures from Kevalteam since I didn't take these during my install.
It's BCM Time!
The trim piece revealing the BCM can be removed once the black plastic locking screw is removed on the floor board. Remove the two carpet screws and the remove the panel shown below by pulling it towards the center console.
Remove the top-most plug on the BCM. Look for the green plug on the module, and move two white plugs up towards the glovebox. Remove this plug.
Establishing Connectivity
Remove the shielding on the harness to expose the wires
Switch to the illuminated sill harness - take a pair of wire cutters and remove the plug on the end of the harness. Ensure you are cutting the plug off IN FRONT of the inline fuse, and NOT either of the plugs that accept sills themselves.
Use a pair of t-tap wire connectors to connect the RED and WHITE wires from the sill harness to the BCM harness.
WHITE (SILL HARNESS) connects to > SKY BLUE (BCM HARNESS)
RED (SILL HARNESS) connects to > MINT GREEN (BCM HARNESS)
Testing Connectivity
Once your connections are tapped, plug in a sill BEFORE MOUNTING it to the vehicle to ensure your connections have been successfully made. If all works well, ensure your tapped connections are secured. I chose to put heat shrink over mine to prevent them from opening up.
What I did is worked from the passenger side - I had all the doors closed except the front passenger door. I plugged the illuminated sill into the harness and then pressed the sensor button on the door frame near the latch to ensure the illuminated sill powered off when I pressed the door ajar sensor. This sensor is shielded in rubber as is on the body of the car - you can't really miss it.
Once one works, test it on the other end of the harness to ensure the both ends of the harness and both illuminated sills are functional.
Ohhhh, New Sill for the Passenger Side!
Run the passenger side sill harness (shorter lead of harness) from the BCM connector towards the passenger seatbelt. Run the lead through the white harness clips that are now visible that you have removed the passenger kick plate. The harness and plug should slide right through no problem.
Prep the sill area. I used a bit of Goo Gone to clean up the area, then followed up with 99% rubbing alcohol and a microfiber cloth to remove any remaining remaining dirt, grime and surface residue.
Pop the provided white snap clips into each end of the sill, remove the adhesive tape backing, and STICK IT! Apply firm pressure all around to ensure the adhesive has made contact in all places. You'll hear some snapping and popping - this is just the clips shifting around. Don't press too hard - you're not compacting trash or anything like that. Just apply enough pressure to ensure the sills are stuck on there.
Under Construction:
(I will insert a blurb and a picture of how you should run the wire, and to show how I did mine. - Stand by for this).
Running with <s>Scissors</s>; I mean Wires!
Next, run the wire harness to the driver side of the vehicle. Run this wire under neath the carpet (below the two plastic carpet screws you removed in the beginning of this DIY) and behind the radio console. Use a wire coat hanger in a slightly bent arch to run this wire. I used a fish tape because that's the correct tool for the job. A coat hanger will work just fine. Run the hanger through the gap between between the center console and the carpet, tape the sill harness end onto the end that is on the passenger side, and pull the hanger towards the driver door to get the harness connector to the driver side of the vehicle.
Securing your Runs (not a dirty joke, I swear)
Attach this wire to some other wires up above using some zipties and run it down below the parking brake and into the driver side kick plate area. I used 6 zipties total securing this wire from the center console area, all the way down to the base of the only panel remaining in the footwell of the driver side (the panel you didn't remove on the driver side that you removed on the passenger side exposing the BCM).
Work that harness clip through the large white harness channels as you did on the passenger side. From here, you can complete the same steps as you did on the passenger side.
- Prep Sill area with Goo Gone & Rubbing Alcohol
- Apply white snap pegs to sill
- Remove adhesive tape backing
- STICK IT REAL GOOD
HOMESTRETCH
Once you've confirmed everything is working, button your interior back up carefully and ensure everything is pieced back together correctly. Sometime when you pull off the panel hiding the BCM, those white snap pegs stay stuck in the car frame. Pry them up and attach them to the plastic panel for reinstalltion. Line up the carpet bolt before snapping this panel down.
Kick panels snap down real easy. I recommend starting from front of vehicle and working your way back.
Enjoy those nice new Illuminated Sills! Sorry for the blurry iPhone pics. You'd like the 5s would be able to shoot a better picture than this
<insert here="" of="" list="" steps=""></insert>


Registered Member
Joined: Jul 2016
Posts: 83
Likes: 9
From: Central Florida
Awesome write up, thank you!!!
I have a question, is the OEM led kick plates plug and play? Or they will also need to have that type of connection?
I read on ebay that they are plug and play, but not sure.
I have a question, is the OEM led kick plates plug and play? Or they will also need to have that type of connection?
I read on ebay that they are plug and play, but not sure.

Registered User
Joined: Oct 2015
Posts: 15
Likes: 2
From: SE PA

Trending Topics


Just popped my kick plates out and removed the factory silver Infiniti plate. I had to drill out a hole to allow the LED strip (and connector) to lay flat underneath the black Infiniti plates I have.
I'll be going to Advance Auto tomorrow to get some wire taps and adhesive. I'll post an update once I complete the install.
I'll be going to Advance Auto tomorrow to get some wire taps and adhesive. I'll post an update once I complete the install.
Well of course this did not work for me. So coming from the 12v inverter (from iCrap's thread https://www.myg37.com/forums/d-i-y-i...oor-sills.html), I have tapped the red wire to the mint/light green wire and the black wire to the light blue wire of the top most white plug of the BCM. The wires appear to be properly crimped and secured.
I tried closing both doors, locking, unlocking, lights on/off but the EL tape would never light up. I am not installing my custom plates from iCrap until I can figure this out. Maybe my EL tape is bad??
Any ideas guys? I'm thinking the easiest/cheapest way to troubleshoot would be to buy some additional EL tape and test them to see if they light up.
Last edited by jpowersjr2; Jan 1, 2019 at 03:43 PM.

Registered Member
Joined: Sep 2015
Posts: 24
Likes: 5
Test
Well of course this did not work for me. So coming from the 12v inverter (from iCrap's thread https://www.myg37.com/forums/d-i-y-i...oor-sills.html), I have tapped the red wire to the mint/light green wire and the black wire to the light blue wire of the top most white plug of the BCM. The wires appear to be properly crimped and secured.
I tried closing both doors, locking, unlocking, lights ont the EL tape would never light up. I am not installing my custom plates from iCrap until I can figure this out. Maybe my EL tape is bad??
Any ideas guys? I'm thinking the easiest/cheapest way
to troubleshoot would be to buy some additional EL tape and test them to see if they light up.
Yeah that's my next step. Just purchased a multimeter (thought I had one) on Amazon, should be here Friday along with an extra EL tape just in case it was bad.
Thanks Str8Gtime!
Thanks Str8Gtime!
I've got everything installed and working more or less. I have a loose connection that I'm dealing with but I got them installed and able to test the lights. They look really good. I'll try and post some pictures later this week once I have everything finalized.