DIY: Painted Engine Cover


Painted Engine Cover
Hey guys (and ladies), Rochester had the great idea to paint his engine cover, but didn't have a DIY in place, so I thought I'd step up and give back a little.
forgive the sketchy pictures, please.
First of all, pop the hood, and use a 10mm socket to remove the bolts that hold on your engine cover. There should be 5, The top two and middle are M6 bolts, the bottom two are acorn nuts.
Your engine cover should just pop off, exposing that beautiful engine block.
Go ahead and button the hood up, you won't be reinstalling it for a few days.
Materials:
Fine and Extra Fine Sandpaper (I used 100 and 220 from Lowes)
Automotive primer (optional, but never a bad idea)
Your color spraypaint (doesn't need to be automotive)
Blue painters tape
Newspaper
Cat treats to distract your pets from running over your freshly painted cover
Patience
Degreaser + paper towels
I'm sure you'd never let your engine cover get dirty, but just in case, you should get some quality degreaser and clean off your engine cover, make sure you get it nice and clean, give it some time to air dry out of the groove around the grey area.
Once you're nice and clean, you can use some fine sandpaper to roughen up the area you want to paint. It doesn't have to be stripped, just a light roughing will work nicely. Don't forget to clean it again after you've sanded it.
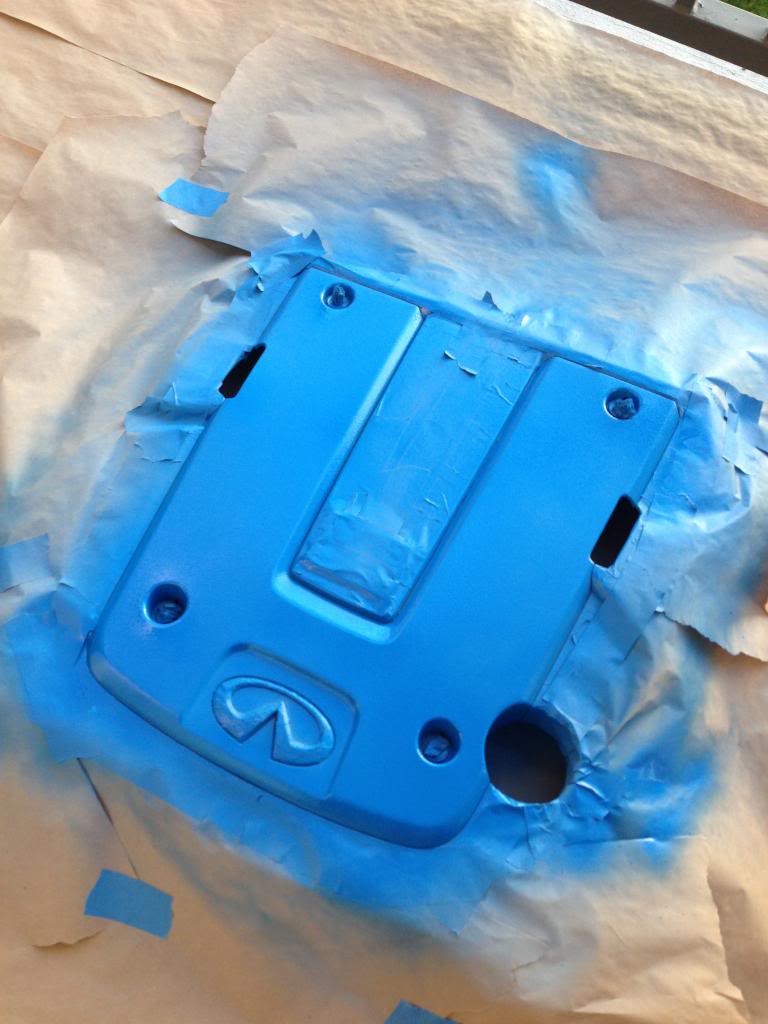
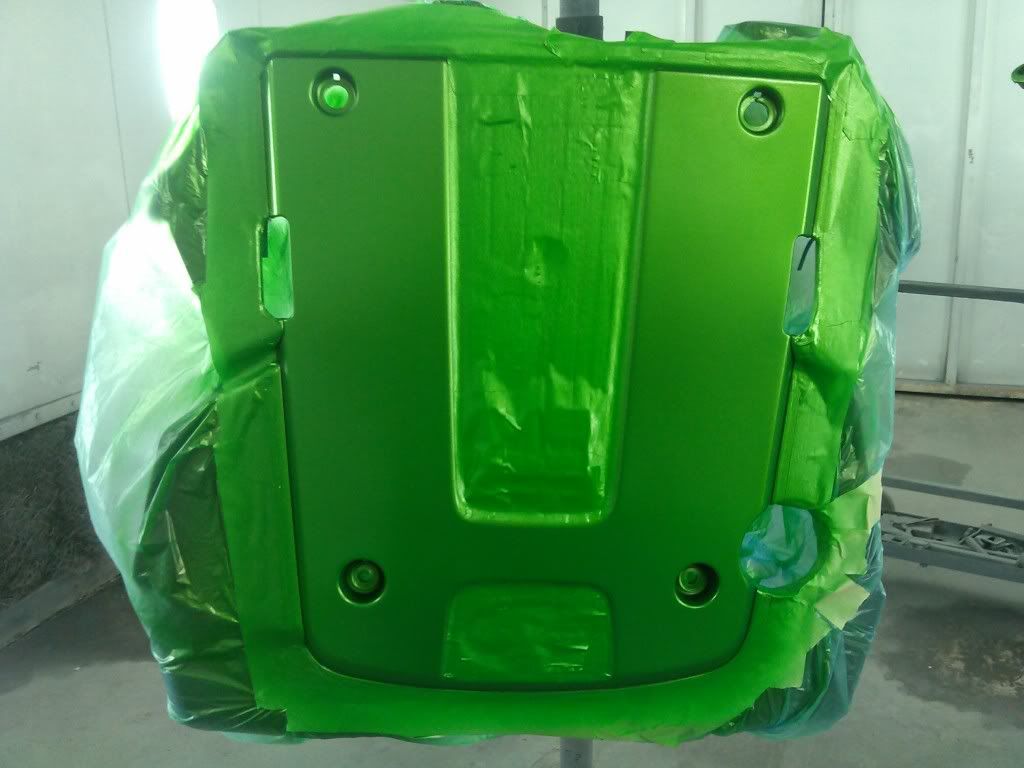
Now is the hard part, make sure you mask it VERY VERY carefully. There are all kinds of grooves, curves, niches, wedges, etc in this. A little patience now goes a long way.
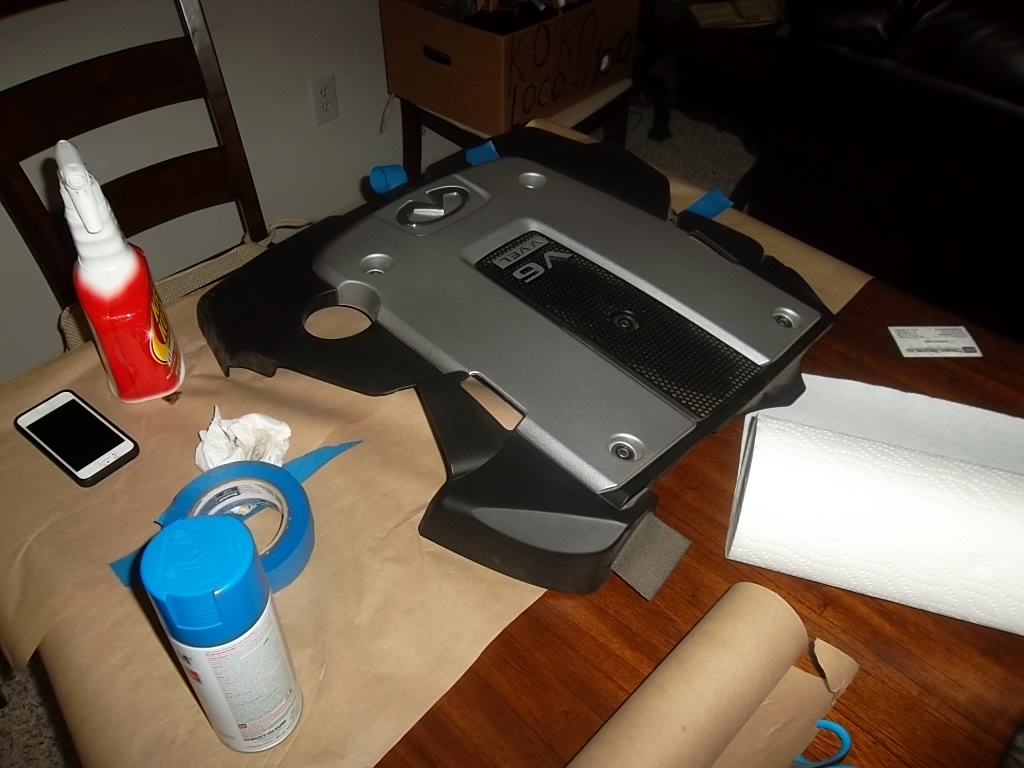
I started by masking off the edges of the area I want to paint. The procedure here is to tear off a small piece of tape, line it up so the edge buts up against the angled piece of the grey part, then fold it down to cover the edge. Rereading that, it sounds stupid.
Basically, just make sure you mask the black area off, including the half of the groove that is black.
Take your time, it's okay to overlap some tape to get around the angles. Make sure you wrap the underside of the cover near the oil cap hole. This will protect from overspray. When you're done with masking, it should look like this.
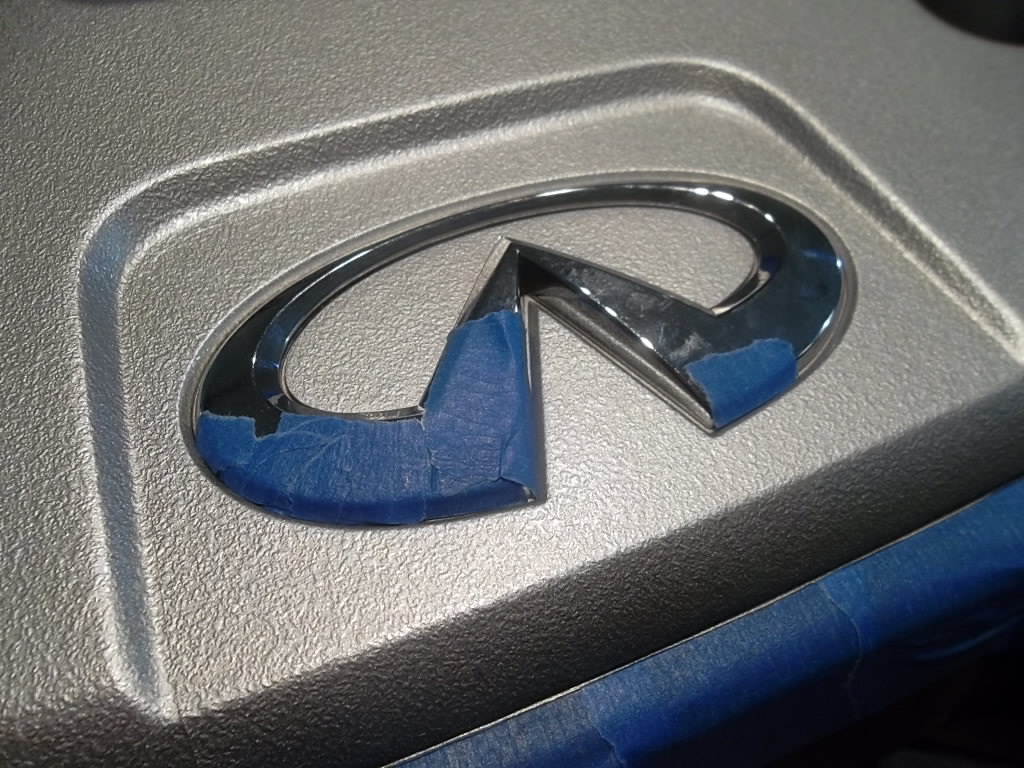
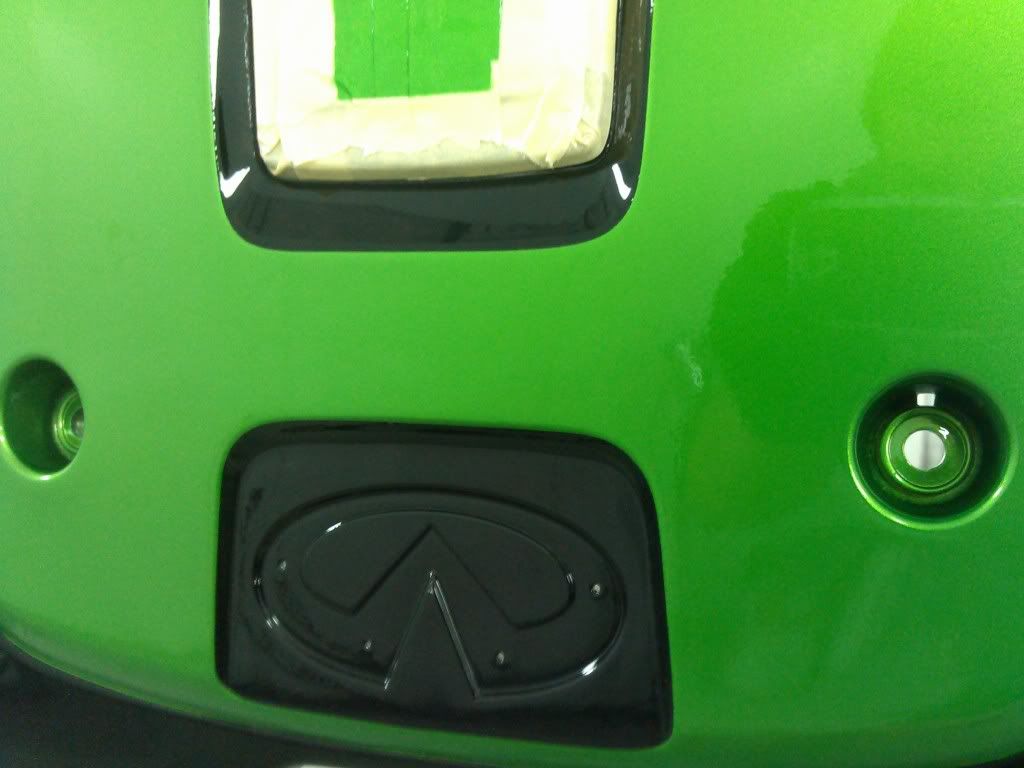
The Infiniti logo is a PITA. The only way I felt comfortable masking that is by tearing ridiculously tiny pieces of masking tape, and covering it bit by tiny bit. There are so many angles and curves in that, I'm getting eyestrain just thinking about it. The only thing I can say is have a nice, well lit area, take your time, and use a business card to fold the tape into the grooves.
The central area is thankfully easy to mask, just use some painters tape, and make sure you get total coverage.
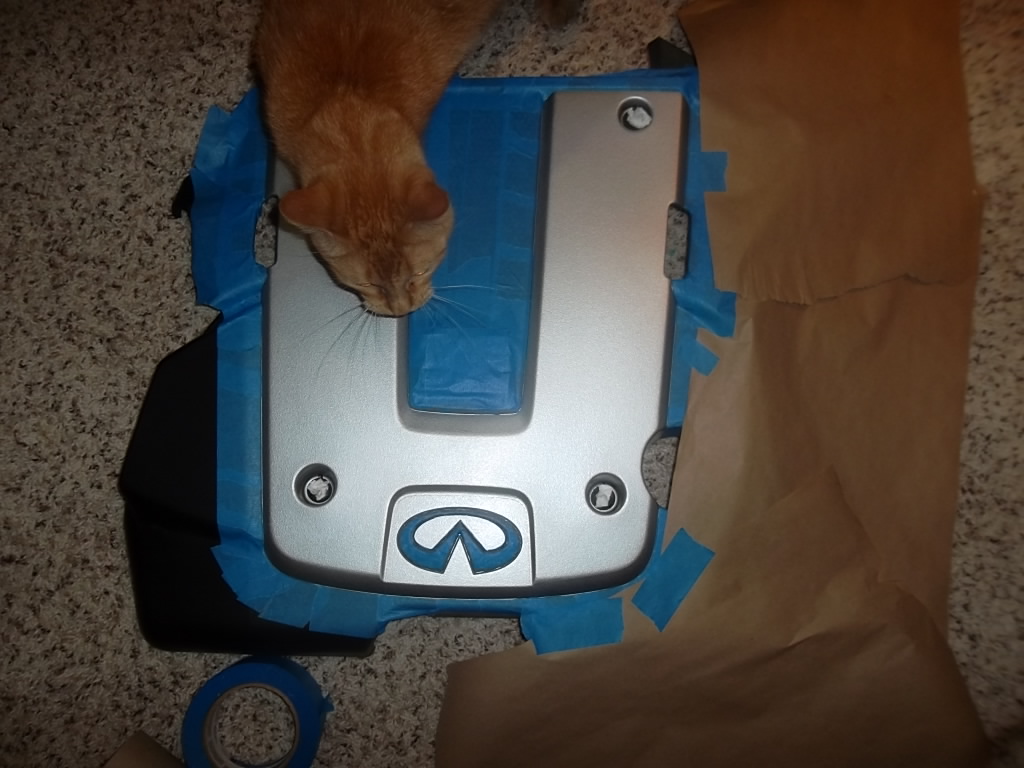
When you're done with that, go ahead and tape some newspaper to cover the lions share of the black area. It should look like this (minus the cat)
Take some paper towel, roll it into a twist, and pull that through your bolt holes. It will mask most of the paint off the o-rings, though if you get a little paint on there, it's not a big deal.
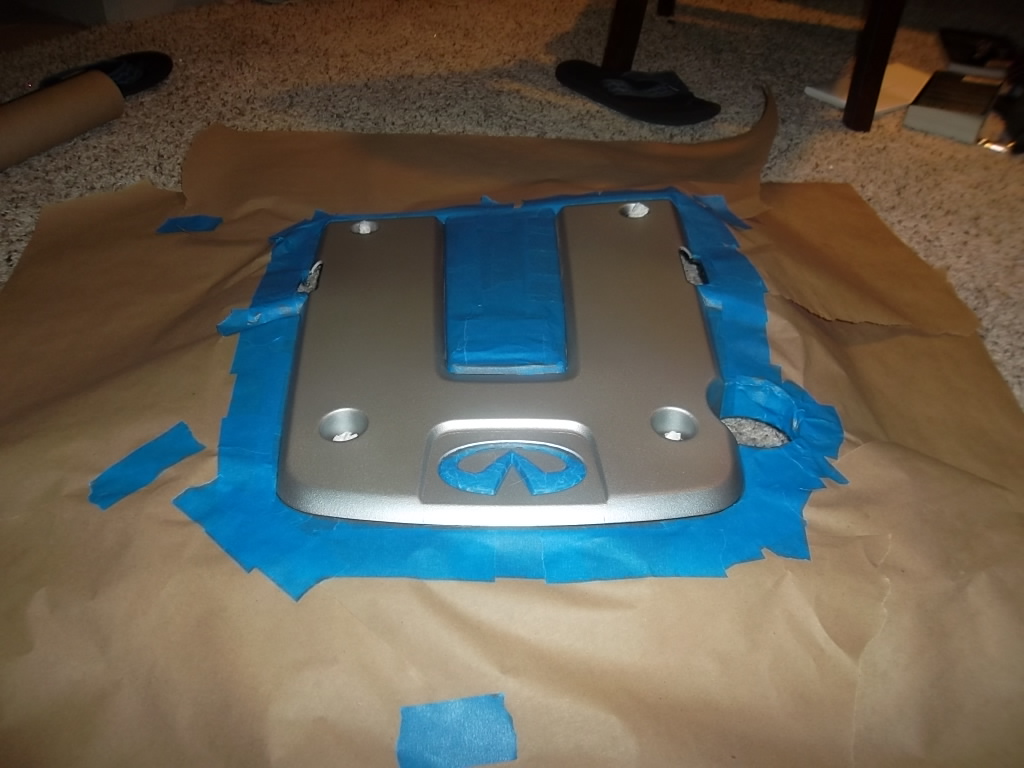
Final masking looks like this.
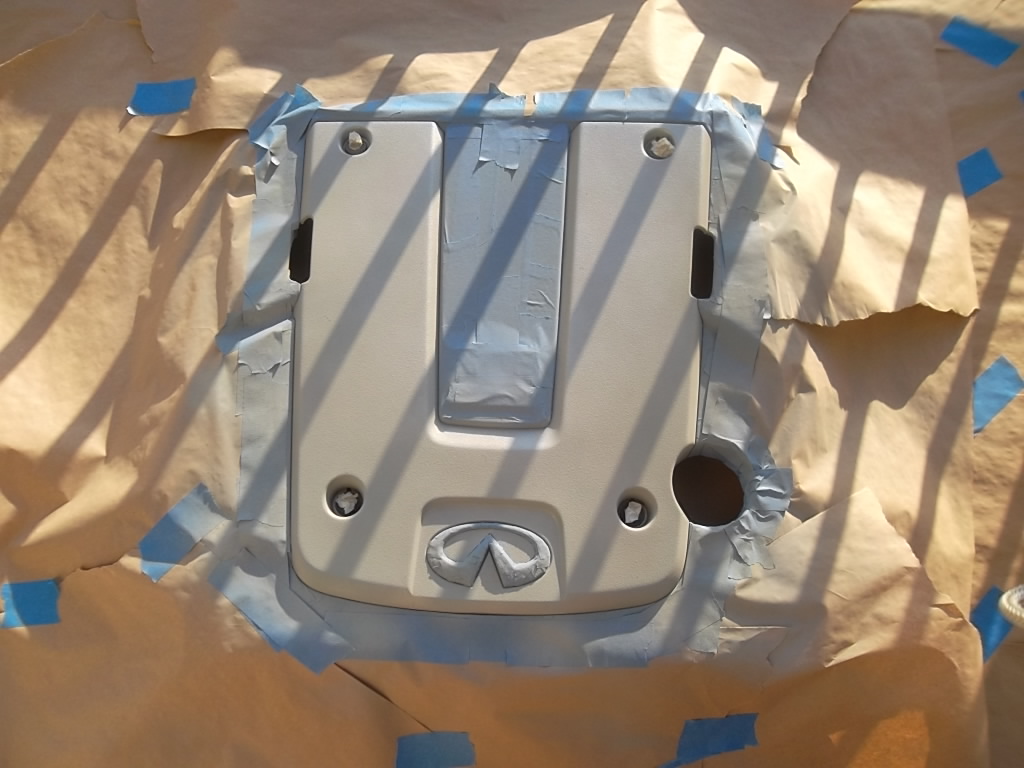
With that, just prime it and let it dry for 10-15 minutes:
I used two coats of primer just to be sure. Make sure you use steady passes and even coats. Warming up the rattle can will help even out your paint stream.
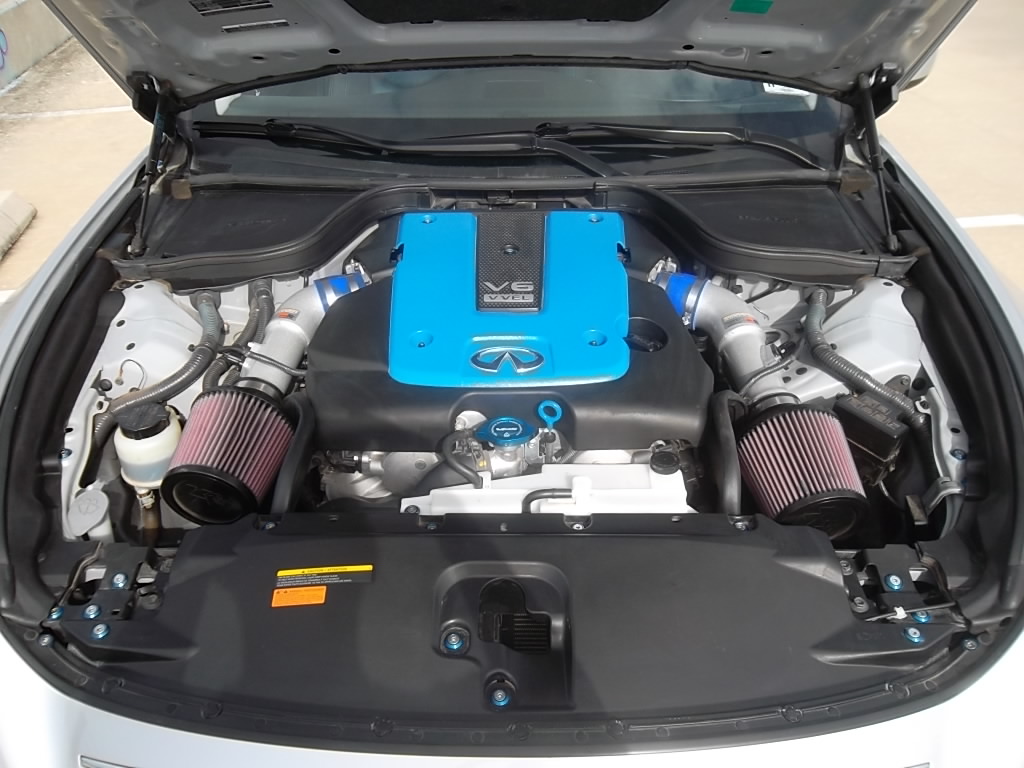
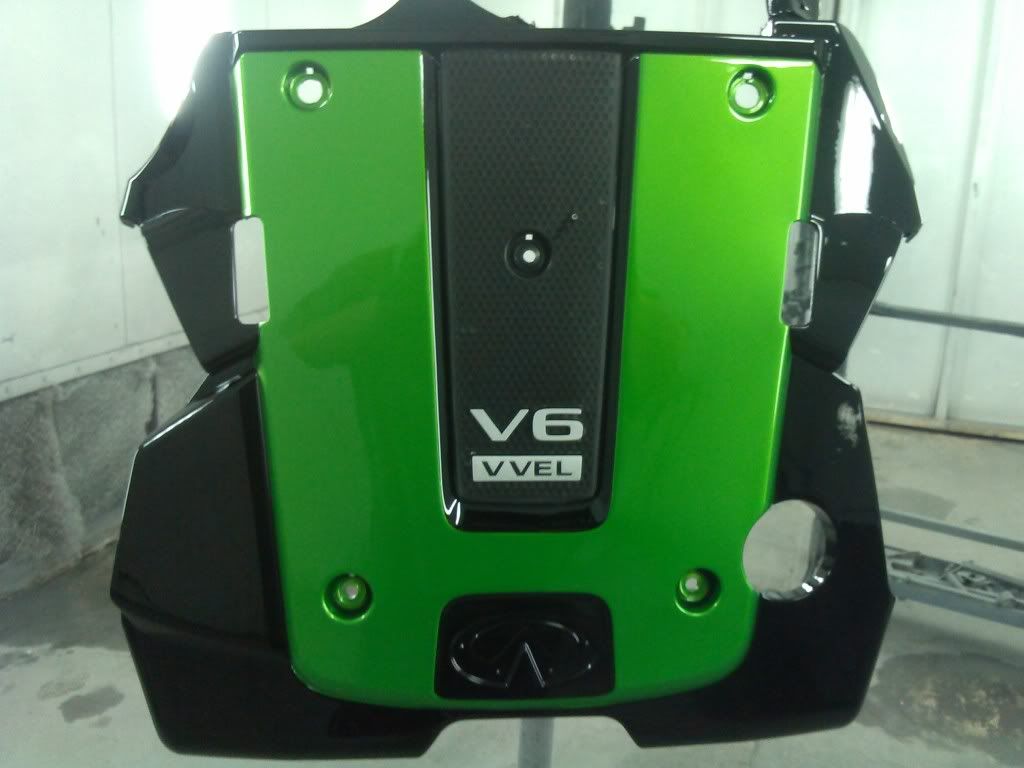
After that dries, apply your color of choice, I used blue.
Take your time with this, let it dry between coats. I put a good three coats on there. I let the whole thing dry for 36-48 hours. There's a noticeable change in hardness if you leave it that long.
After it's nice and dry, you can choose to clearcoat it (I didn't), then go ahead and take off all your masking tape/paper.
Reinstall it with the same hardware, and enjoy!
I hope this helps, let me know if you need anything else.
forgive the sketchy pictures, please.
First of all, pop the hood, and use a 10mm socket to remove the bolts that hold on your engine cover. There should be 5, The top two and middle are M6 bolts, the bottom two are acorn nuts.
Your engine cover should just pop off, exposing that beautiful engine block.
Go ahead and button the hood up, you won't be reinstalling it for a few days.
Materials:
Fine and Extra Fine Sandpaper (I used 100 and 220 from Lowes)
Automotive primer (optional, but never a bad idea)
Your color spraypaint (doesn't need to be automotive)
Blue painters tape
Newspaper
Cat treats to distract your pets from running over your freshly painted cover
Patience
Degreaser + paper towels
I'm sure you'd never let your engine cover get dirty, but just in case, you should get some quality degreaser and clean off your engine cover, make sure you get it nice and clean, give it some time to air dry out of the groove around the grey area.
Once you're nice and clean, you can use some fine sandpaper to roughen up the area you want to paint. It doesn't have to be stripped, just a light roughing will work nicely. Don't forget to clean it again after you've sanded it.
Now is the hard part, make sure you mask it VERY VERY carefully. There are all kinds of grooves, curves, niches, wedges, etc in this. A little patience now goes a long way.

I started by masking off the edges of the area I want to paint. The procedure here is to tear off a small piece of tape, line it up so the edge buts up against the angled piece of the grey part, then fold it down to cover the edge. Rereading that, it sounds stupid.
Basically, just make sure you mask the black area off, including the half of the groove that is black.
Take your time, it's okay to overlap some tape to get around the angles. Make sure you wrap the underside of the cover near the oil cap hole. This will protect from overspray. When you're done with masking, it should look like this.
The Infiniti logo is a PITA. The only way I felt comfortable masking that is by tearing ridiculously tiny pieces of masking tape, and covering it bit by tiny bit. There are so many angles and curves in that, I'm getting eyestrain just thinking about it. The only thing I can say is have a nice, well lit area, take your time, and use a business card to fold the tape into the grooves.

The central area is thankfully easy to mask, just use some painters tape, and make sure you get total coverage.
When you're done with that, go ahead and tape some newspaper to cover the lions share of the black area. It should look like this (minus the cat)

Take some paper towel, roll it into a twist, and pull that through your bolt holes. It will mask most of the paint off the o-rings, though if you get a little paint on there, it's not a big deal.
Final masking looks like this.

With that, just prime it and let it dry for 10-15 minutes:

I used two coats of primer just to be sure. Make sure you use steady passes and even coats. Warming up the rattle can will help even out your paint stream.
After that dries, apply your color of choice, I used blue.

Take your time with this, let it dry between coats. I put a good three coats on there. I let the whole thing dry for 36-48 hours. There's a noticeable change in hardness if you leave it that long.
After it's nice and dry, you can choose to clearcoat it (I didn't), then go ahead and take off all your masking tape/paper.
Reinstall it with the same hardware, and enjoy!

I hope this helps, let me know if you need anything else.


There is a plastic split on the back, I'm always wary about removing it. Taking stuff like that off is easy, getting it back on is usually annoying.
I didn't try though, you may want to explore that option.
I didn't try though, you may want to explore that option.
I'm not sure if that's the technical term, or if you're in the states, so ill explain it as if you weren't.
An acorn is the seed of an oak tree, and has a shape similar to the nut that you tighten to attach the engine cover. The top three bolts screw into threads in the engine block, the bottom two are solid stems, and the nut screws onto that. It's all 10mm anyways, no worries.
An acorn is the seed of an oak tree, and has a shape similar to the nut that you tighten to attach the engine cover. The top three bolts screw into threads in the engine block, the bottom two are solid stems, and the nut screws onto that. It's all 10mm anyways, no worries.
Trending Topics

Nice DIY! I will add to this thread how I painted my friends engine cover for her g37. Mind you I am a painter at a bodyshop and did this all on my own time using automotive grade materials.
This is how you eliminate all the texture on the engine cover and make it glass smooth and shiny.
1. First of all the cover was sanded with 320 grit. Sanded good and roughed up.
Before painting I applied a special plastic parts adhesion promoter to the bare plastic.
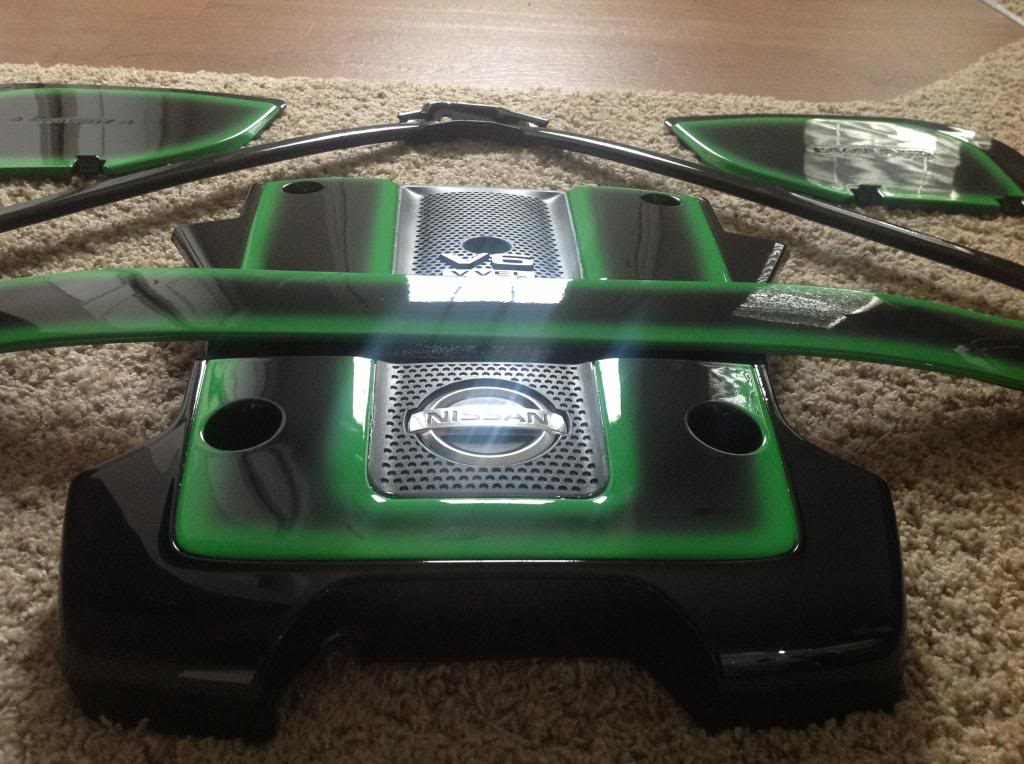
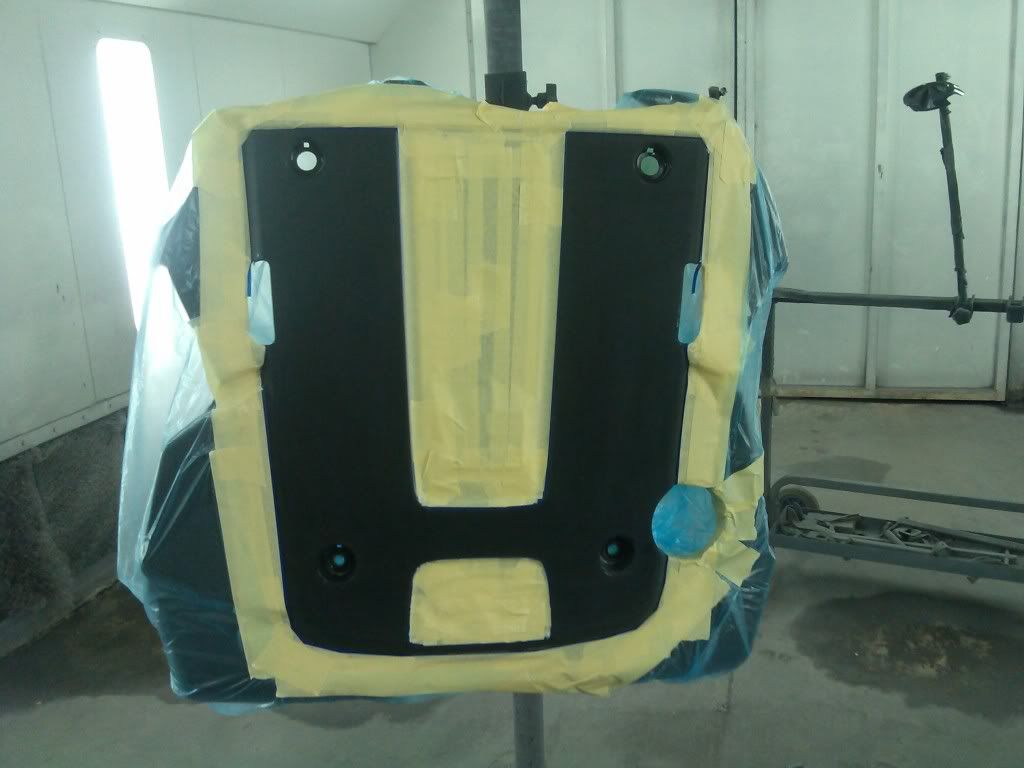
I decided to paint the whole cover black, and put about 3 good coats of clear coat on.... Now mind you... It WILL look like this... Very wavy as the paint and clear merely amplify the texture..
2. After this dries overnight... The next day I wet sanded (EVeRy SQUARe INcH) of this cover with 800 grit sandpaper, until I leveled out the clearcoat essentially "burying" the texture and giving a smooth base.
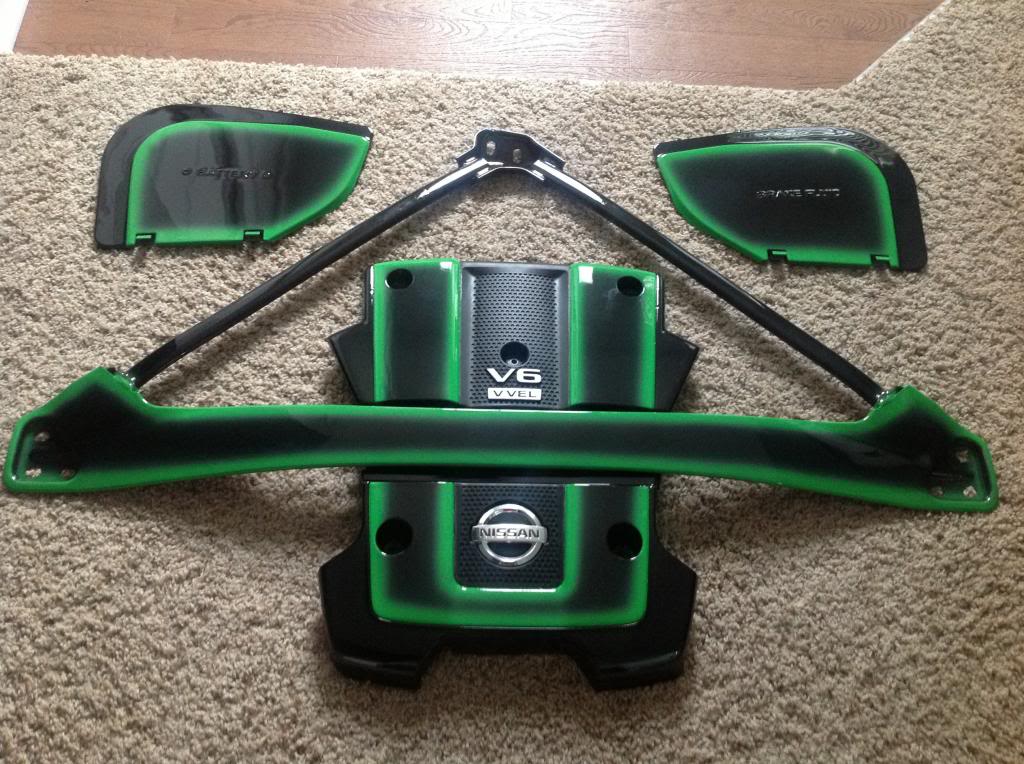
Using fine line tape, regular tape, and plastic to keep overspray particles off the black part I want to keep black, I ended up here.

3. After masking, and cleaned with wax and grease remover I then applied 3 coats of basecoat to the panel.

4. After basecoating is complete, I removed all masking and cleared everything!


Annnd Viola! Hope this helps stir some creativity
This is how you eliminate all the texture on the engine cover and make it glass smooth and shiny.
1. First of all the cover was sanded with 320 grit. Sanded good and roughed up.
Before painting I applied a special plastic parts adhesion promoter to the bare plastic.
I decided to paint the whole cover black, and put about 3 good coats of clear coat on.... Now mind you... It WILL look like this... Very wavy as the paint and clear merely amplify the texture..
2. After this dries overnight... The next day I wet sanded (EVeRy SQUARe INcH) of this cover with 800 grit sandpaper, until I leveled out the clearcoat essentially "burying" the texture and giving a smooth base.
Using fine line tape, regular tape, and plastic to keep overspray particles off the black part I want to keep black, I ended up here.
3. After masking, and cleaned with wax and grease remover I then applied 3 coats of basecoat to the panel.
4. After basecoating is complete, I removed all masking and cleared everything!
Annnd Viola! Hope this helps stir some creativity


Registered User
Joined: Jun 2013
Posts: 28
Likes: 1
Nice DIY! I will add to this thread how I painted my friends engine cover for her g37. Mind you I am a painter at a bodyshop and did this all on my own time using automotive grade materials.
This is how you eliminate all the texture on the engine cover and make it glass smooth and shiny.
1. First of all the cover was sanded with 320 grit. Sanded good and roughed up.
Before painting I applied a special plastic parts adhesion promoter to the bare plastic.
I decided to paint the whole cover black, and put about 3 good coats of clear coat on.... Now mind you... It WILL look like this... Very wavy as the paint and clear merely amplify the texture..

2. After this dries overnight... The next day I wet sanded (EVeRy SQUARe INcH) of this cover with 800 grit sandpaper, until I leveled out the clearcoat essentially "burying" the texture and giving a smooth base.
Using fine line tape, regular tape, and plastic to keep overspray particles off the black part I want to keep black, I ended up here.
3. After masking, and cleaned with wax and grease remover I then applied 3 coats of basecoat to the panel.
4. After basecoating is complete, I removed all masking and cleared everything!
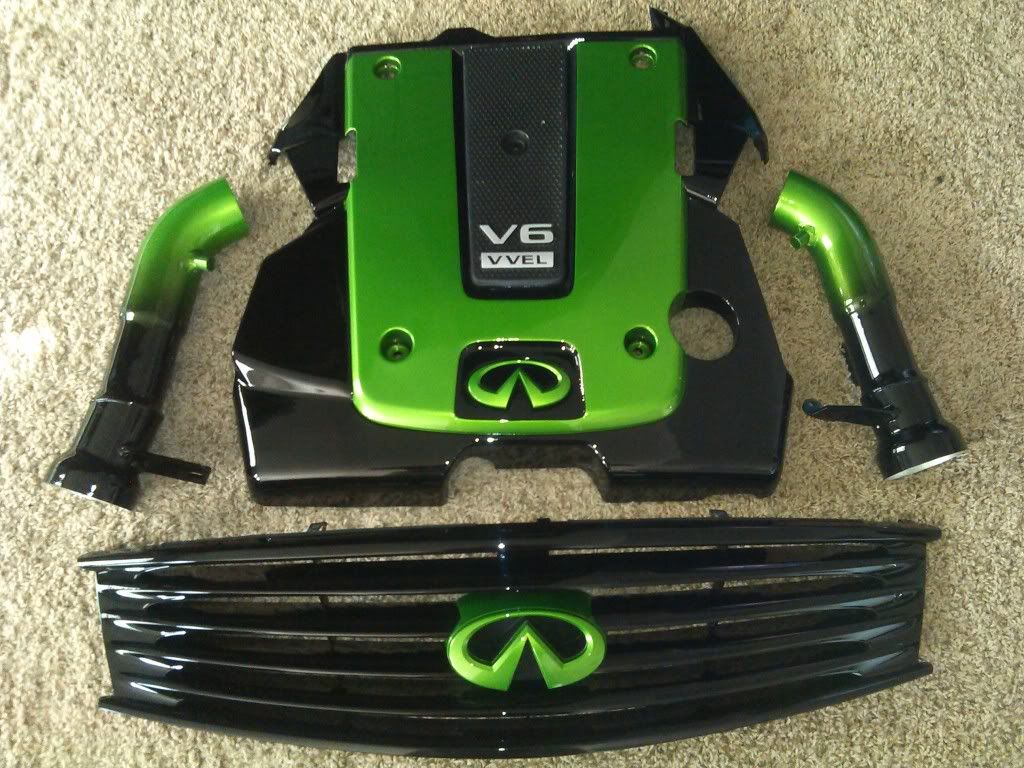
Annnd Viola! Hope this helps stir some creativity
This is how you eliminate all the texture on the engine cover and make it glass smooth and shiny.
1. First of all the cover was sanded with 320 grit. Sanded good and roughed up.
Before painting I applied a special plastic parts adhesion promoter to the bare plastic.
I decided to paint the whole cover black, and put about 3 good coats of clear coat on.... Now mind you... It WILL look like this... Very wavy as the paint and clear merely amplify the texture..
2. After this dries overnight... The next day I wet sanded (EVeRy SQUARe INcH) of this cover with 800 grit sandpaper, until I leveled out the clearcoat essentially "burying" the texture and giving a smooth base.
Using fine line tape, regular tape, and plastic to keep overspray particles off the black part I want to keep black, I ended up here.
3. After masking, and cleaned with wax and grease remover I then applied 3 coats of basecoat to the panel.
4. After basecoating is complete, I removed all masking and cleared everything!
Annnd Viola! Hope this helps stir some creativity
Damn...:0 what automotive paint did you use and did you use the same for the intake- do you have a DIY of that?? And total cost?