D.I.Y. Installations/Modifications Do It Yourself guides and information for the G37. Stickies approved by Administrators and Moderators.

DIY: Replacing front wheel bearings for RWD G37

Old 11-14-2012, 04:17 PM
  #1  
unknowndesi
Registered Member
Thread Starter
 
unknowndesi's Avatar
 
Join Date: Mar 2011
Location: Toronto, On
Posts: 378
Received 42 Likes on 15 Posts
Replacing front wheel bearings for RWD G37

TOOLS NEEDED

❑ Socket Set (22mm,17mm, 12mm, 10mm)

Ratchet

❑ Rubber Hammer

❑ Bungee cord/cable ties

❑ Air tools (optional)

PART NUMBER - TIMKEN Part # HA590376

How to confirm you have a bad wheel bearing

1 - Jack up your vehicle and support it on jack stands.

2 - Without getting under the vehicle, grasp each wheel at the top and bottom and attempt to rock it. There should be minimal movement. Excessive play may indicate that the wheel bearing is worn and needs to be replaced

3 - Put the gearshift in Neutral and rotate the wheel.Listen for any unusual noise and feel for any roughness around the A arm or steering components as the wheel rotates

Replacing front wheel bearings for RWD G37

1 - Jack up both sides of your car, set it safely on jack stands and chock the rear wheels.

2 - Remove the wheel.

Name:  20hMP.jpg
Views: 1180
Size:  32.8 KB

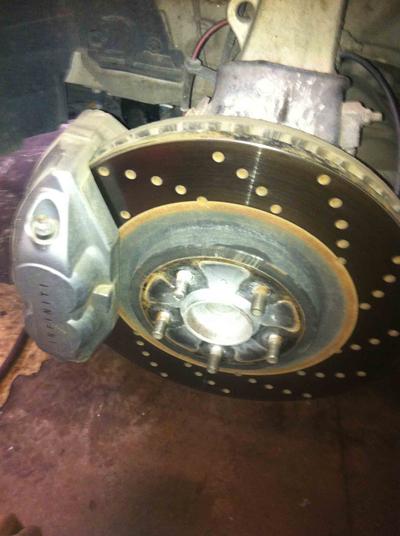
3 - Turn the wheel to the right to clear up some room and remove the caliper and rotors. (you can leave the car on so that the steering does not lock. Since the front of the car is lifted off the ground you can manually move the direction of the wheel assembly without having to touch the steering wheel)

Name:  XjrWT.jpg
Views: 1167
Size:  31.6 KB

4- Remove the brake line clip with a 12mm wrench.

Name:  eZtsN.jpg
Views: 1143
Size:  34.4 KB

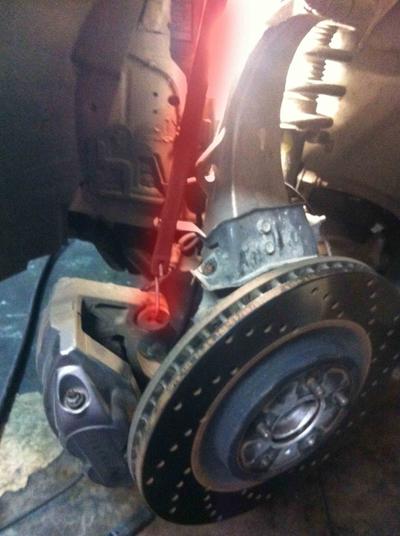
5 - Remove the caliper by removing these two bolts with a 22mm socket.

Name:  f0Inb.jpg
Views: 1144
Size:  28.7 KB

6 - Remove the caliper and rotor. (never hang the caliper from its lines, you can use cable ties or a bungee cord to hold it up)

Name:  cRr7N.jpg
Views: 1148
Size:  32.3 KB

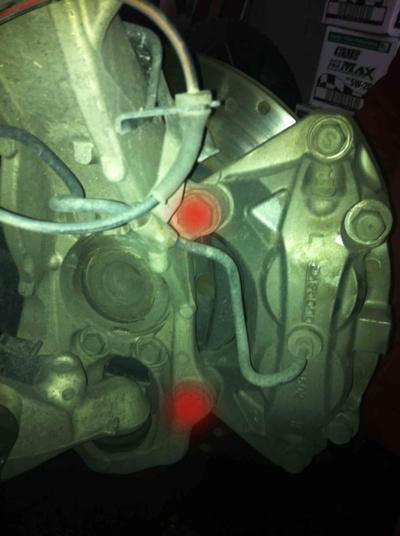
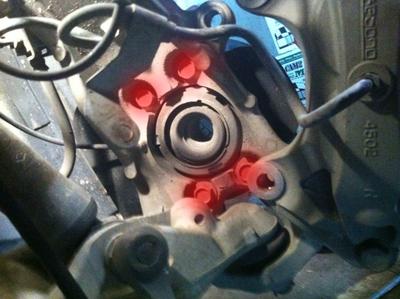
7 - Using your 17mm socket remove the 4 bolts holding the wheel bearing in place.

Name:  8CQgc.jpg
Views: 1138
Size:  25.1 KB

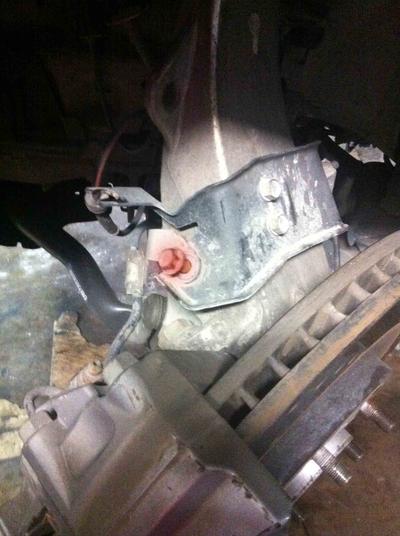
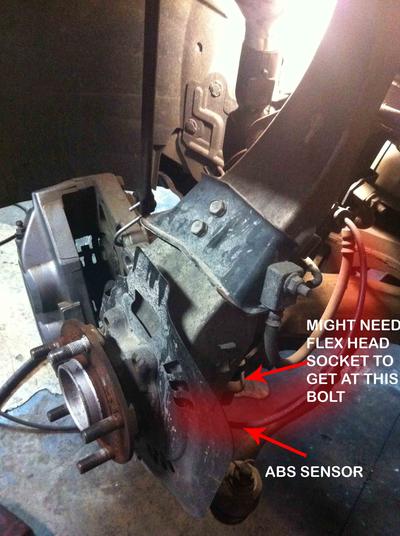
8 - Turn the wheel to the left and remove the hard to get bolt all the way at the bottom corner and remove the ABS sensor(10mm).

Name:  pj2kW.jpg
Views: 1173
Size:  41.0 KB

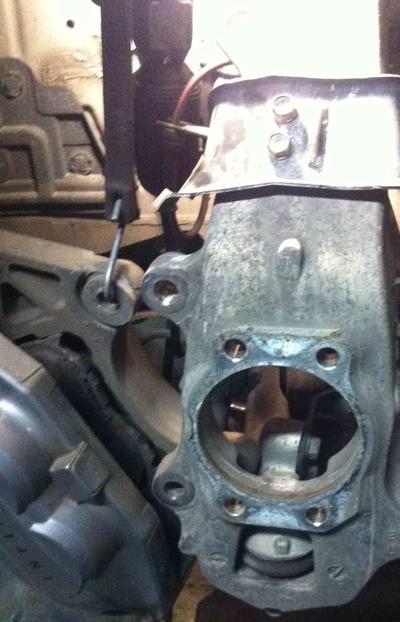
9 - Once all four bolts have been removed you can pull your bearing off, if it is stuck a couple light taps with a rubber hammer will set it loose. Make sure you remember the way the backing plate is mounted, last thing you want to do is re-do the job all over again.

Name:  qPcb0.jpg
Views: 1133
Size:  40.1 KB

10- Now tighten it all up in reverse order.

Torque Settings

Replacing front wheel bearings for RWD G37-odqdd.jpg


The following users liked this post:
Dough1397 (04-24-2016)
Old 11-14-2012, 07:06 PM
  #2  
Alan318
Registered User
iTrader: (7)
 
Alan318's Avatar
 
Join Date: Dec 2011
Location: GTA, ON
Posts: 411
Received 9 Likes on 8 Posts
Great write up. Definately should be stickied.
Old 11-26-2012, 08:16 AM
  #3  
SgtGoldy
Registered User
iTrader: (6)
 
SgtGoldy's Avatar
 
Join Date: Jul 2011
Location: Orange County, CA
Posts: 801
Received 14 Likes on 9 Posts
I might be doing this soon, thanks!
Old 12-03-2012, 04:34 AM
  #4  
SgtGoldy
Registered User
iTrader: (6)
 
SgtGoldy's Avatar
 
Join Date: Jul 2011
Location: Orange County, CA
Posts: 801
Received 14 Likes on 9 Posts
So I changed mine! Used the Timeken Brand. FYI for anyone doing it:

The Timeken has a backplate with a slit in it. You have to line it up to put the ABS sensor through the backplate. I found that after torqueing all bolts to spec
Old 12-03-2012, 04:55 AM
  #5  
G37Sam
Administrator
 
G37Sam's Avatar
 
Join Date: Aug 2008
Location: Doha, Qatar
Posts: 12,184
Received 242 Likes on 192 Posts
Great write up, thread has been "stick'ied"
Old 05-23-2013, 11:21 AM
  #6  
mrgetdown88
Registered User
 
mrgetdown88's Avatar
 
Join Date: May 2011
Posts: 1
Likes: 0
Received 0 Likes on 0 Posts
Is it safe to assume that these instructions also apply to rear wheel bearing replacement?
Old 05-23-2013, 11:56 AM
  #7  
Modme
Registered Member
iTrader: (17)
 
Modme's Avatar
 
Join Date: Jun 2006
Location: So Cal
Posts: 1,585
Likes: 0
Received 80 Likes on 56 Posts
Rear hub replacement is more involved because of the axles and e brake.
Old 03-05-2014, 08:36 PM
  #8  
worldcrafter
Registered User
 
worldcrafter's Avatar
 
Join Date: Feb 2009
Posts: 129
Likes: 0
Received 0 Likes on 0 Posts
Does anyone know if this part will fit a 2008 RWD Infiniti G37?

Beck Arnley 051-6342

You can do a part search for it here: Beck Arnley Online Parts Catalog

It seems to be the cheapest replacement bearing for the car, without sacrificing quality.
Old 04-24-2016, 11:09 AM
  #9  
Dough1397
Registered Member
 
Dough1397's Avatar
 
Join Date: Jul 2011
Location: GTA & K/W, Ontario
Posts: 463
Received 60 Likes on 35 Posts
Great write up Jas, thanks. This job went really smoothly for me and didn't take long. None of the bolts required more than a 2' breaker bar and a reasonable amount of force.

The trickiest part was pulling the hub out. Luckily a slide hammer made quick work of that. I'd recommend not using your lug nuts with the slide hammer.

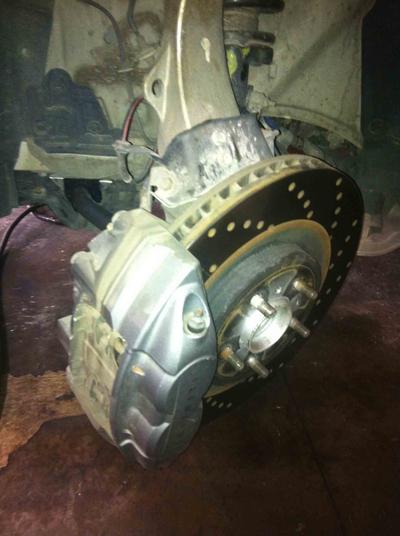
I undid both the front and back brake line mounts and held the caliper up much higher (see picture below). This allowed me to access the 4 bolts that secure the hub to the knuckle much easier.

Old 04-28-2016, 01:59 PM
  #10  
Kris9884
Registered User
iTrader: (3)
 
Kris9884's Avatar
 
Join Date: Feb 2016
Location: MO
Posts: 2,074
Received 202 Likes on 186 Posts
Oh wow, this may be the easiest wheel bearing job ever. I'm going to tackle mine for funzys in this case.
Old 04-28-2016, 02:01 PM
  #11  
ChinkyChoy
Premier Member

iTrader: (2)
 
ChinkyChoy's Avatar
 
Join Date: Feb 2011
Posts: 1,404
Received 216 Likes on 172 Posts
pretty much the same for the AWD except for the axle getting in the way but super easy! you can actually use a hub puller instead of a slide hammer since there is the axle to push against
Old 06-24-2017, 03:51 PM
  #12  
AbeG37vq
Registered Member
 
AbeG37vq's Avatar
 
Join Date: Dec 2015
Posts: 46
Received 0 Likes on 0 Posts
Pressing

Is there any pressing involved when replacing the front wheel bearings? Do these hubs need to be pressed to the spindle or to any other steering components beside tightening the bolts? Great write by the way
Old 06-24-2017, 06:55 PM
  #13  
Baadnewsburr
Super Moderator
iTrader: (3)
 
Baadnewsburr's Avatar
 
Join Date: Oct 2014
Location: Toronto
Posts: 1,784
Received 319 Likes on 276 Posts
Originally Posted by AbeG37vq
Is there any pressing involved when replacing the front wheel bearings? Do these hubs need to be pressed to the spindle or to any other steering components beside tightening the bolts? Great write by the way
no. Theres no pressing. On the first gen G the rear bearings needed to be pressed think, but on all the 2nd gen g's front and rear the hub and bearings come as 1 piece assemblies that just bolt into the spindle arm.
Old 01-08-2019, 10:04 AM
  #14  
tagxtreme
Registered User
 
tagxtreme's Avatar
 
Join Date: Jan 2019
Posts: 4
Likes: 0
Received 0 Likes on 0 Posts
Anyone have issues with the actual wheel bearing coming off? Tried to replace last night and couldn't get it to budge. Any suggestions?
Old 01-29-2019, 01:21 PM
  #15  
seancash
Registered User
 
seancash's Avatar
 
Join Date: Jan 2019
Posts: 1
Likes: 0
Received 1 Like on 1 Post
I haven't done this on my G37 yet, but did it a few times on my old 2006 G35X. The trick there was to back out the 4 bolts holding the hub a little at a time, tapping all of the bolt head lightly, in a criss cross pattern, with a hammer. Loosen the 4 bolts a little more and repeat the tapping. This works the hub assembly forward a little at a time. Keep repeating until the hub assembly is free.

I expect it to be similar for the G37, but I'll find out for sure when I do mine in a few weeks.
The following users liked this post:
deepblue3 (05-13-2019)

Thread Tools
Search this Thread
Quick Reply: DIY: Replacing front wheel bearings for RWD G37


All times are GMT -4. The time now is 11:02 AM.