
DIY - Clutch pedal spring replacement


Thread Starter
Registered User
Joined: Dec 2011
Posts: 58
Likes: 3
From: Georgetown Ontario Canada
DIY - Clutch pedal spring replacement
Finally had a chance to get this modification done. I've had my G37S 6MT for just about 5 weeks - and I'm STILL shifting gears like a newbie. The lurch and guessing game of clutch engagement has driven me nutso. I've driven manual cars for years - and my sport bike keeps me smooth.
So - I gathered up a bunch of tools, cable ties, flashlights, along with some grease and silicone lube - and got to it.
Thanks to member Jsolo I was able to buy the replacement spring and get this done.
A lot of this has been covered - but I wanted to highlight some things that I found, that prior to doing the spring swap had me asking questions.
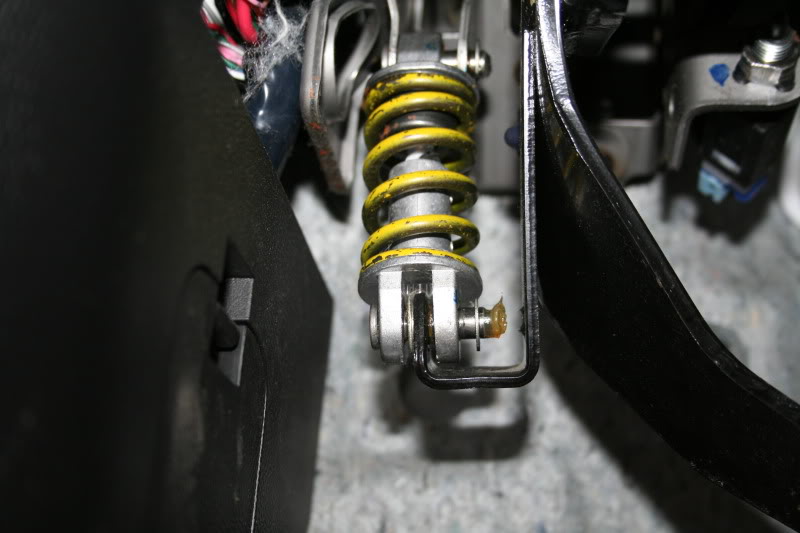
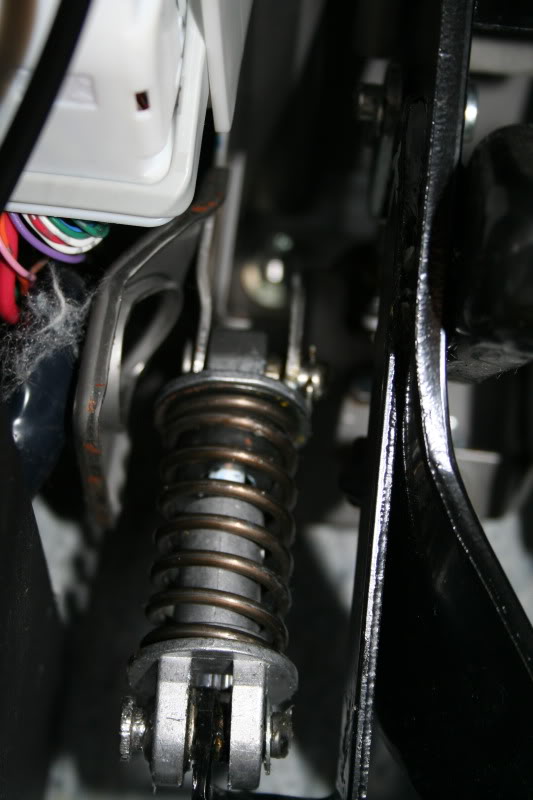
Here is the unaltered spring and assembly:
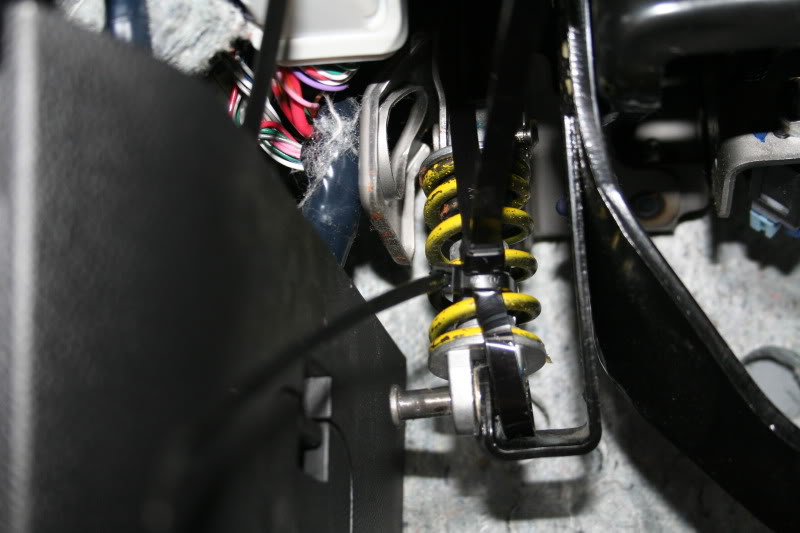
First thing I did was to get a cable tie around the top of the assembly, and the bottom - and cinch it up tight. Then - i added one more cable tie around the assembly - and the first cable tie - to keep the "top to bottom" cable tie in place and not slipping off the touch points.
Next thing I did was to carefully pry off the bottom "C" clip - the "C"clip actually has room for a mall flat screwdriver to slip in - then kind of twist up and around - and the clip comes off. I know others mentioned using two flat screwdrivers to push it off - but I was nervous about the clip flying in behind the firewall as someone had said happened to them. My way worked - so I went with it and did the same on the top clip.
Because the assembly was cable tied, I was able to remove the bottom pin, and then the assembly (with some moving of the clutch pedal back and forth - and side to side) was swinging free from the top pin.
I carefully removed the bottom pin, and then moved the top pin over to the left as far as I needed to without removing it completely - to free the top part of the assembly and out it came. I left the top pin in place on the car portion.
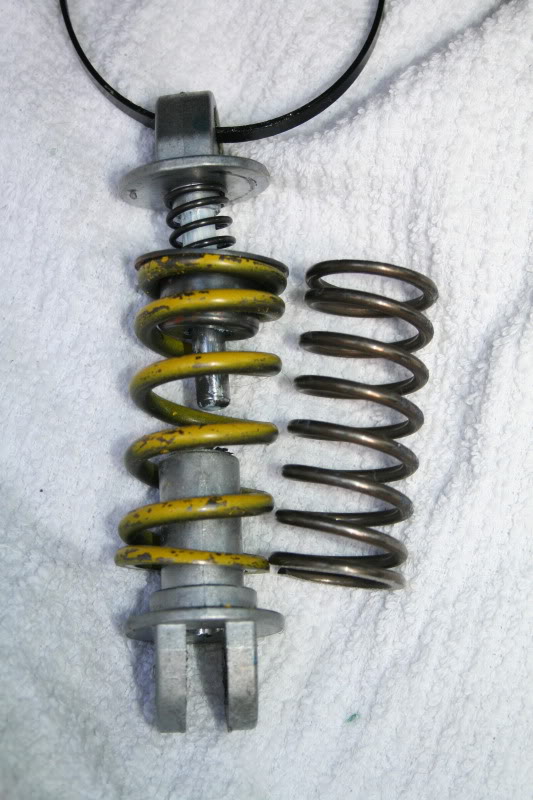
To "explode" the assembly which allows for spring swappinjg - I put the assembly into a towel - and cut the cable tie - but first I took a measurement of the compressed length of the assembly (62mm). The measuring points were the top and bottom flat pieces on the assembly heads.
Here is what the assembly looks like un-compressed and without cable ties, and with the new spring in photo:
Now - simply pay careful attention to the items in the assembly, slip the bottom part off - remove old yellow spring - put new spring in place and get some more cable ties. I also slipped a cable tie into the top eyelet to indicate top and bottom. I attached a new cable tie to the assembly - it was a little fidgity to do - but I got it compressed and got it close to the 62 mm mark of the removed assembly. Again - I put an additional cable tie around the assembly to keep the top to bottom tie in place and keep it from slipping off the touch points.
In hind-site I wish I'd replaced the "new" assembly starting with the bottom pin - but I didn't - I did the top pin first. Reason I say this - is that the bottom pin seems to be more restrictive and has less play.
As I mentioned - I kept the top pin already on the car portion of the mount - and gently slid it to the left as far as I could without it dropping out:
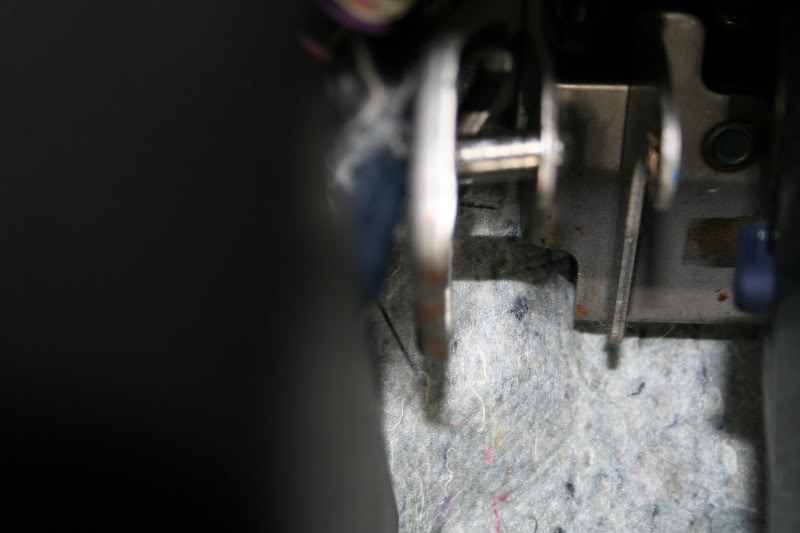
Then I put the assembly back in place and slipped the pin through the mount holes. As was mentioned elsewhere - there are two little 1/8 indent impressions in the assembly - on the top and bottom - here is what I mean:
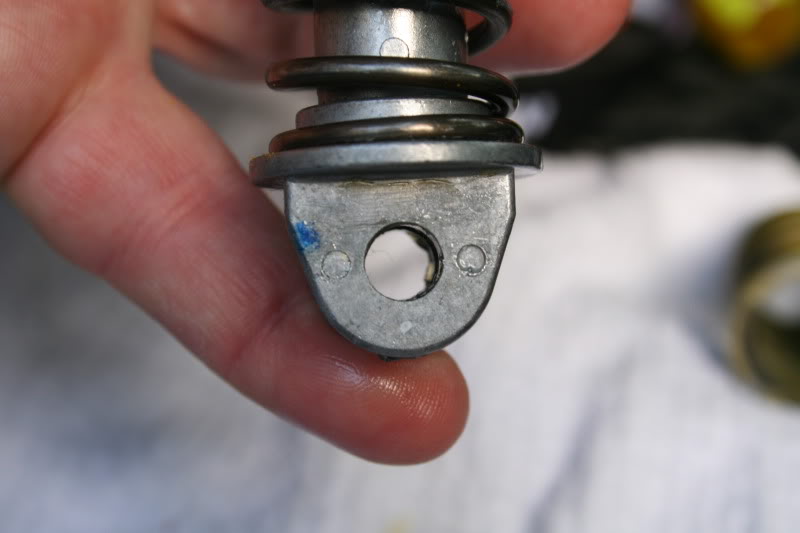
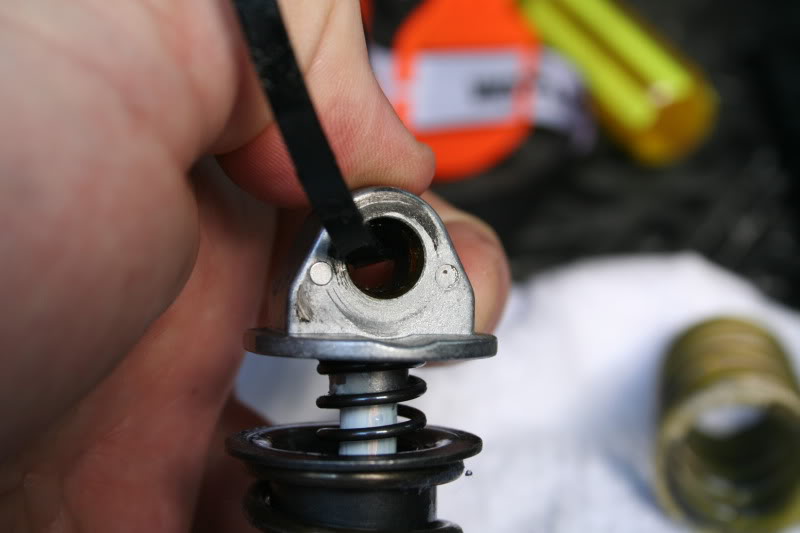
These two little impressions need to go on the right side (closest to the clutch pedal) for re-installation. I didn't know what they were when I read about them - so I'm showing them here.
Before you reinstall the bottom pin - lube the pin up with your favorite snake oil...
The bottom pin is a bugger to get started in the hole - as there is not much room on the left side to simply insert the pin into the car side of the mount. It fits - but just. the clutch pedal has some side to side play - you'll need to gently give it a little push to the right to get the pin started.
Once the pin is started through the first two holes, do yourself a favor and get a pair of channel lock pliers. Use the channel locks to compress the bottom pin into the hole. I tried for a half hour with needle nose pliers - but it was a waste of time. Got the channel locks out - and bam - the pin was in.
Take a pair of needle nose locking pliers and lock in the "C" clip - then you can simply push the clips back on.
DONE!!
Clean up - and go for a ride.
First impressions are very good - I feel like I know how to shift again!!!
Hope this long winded write up helps someone out - the stuff I gleaned from this forum has helped me a lot - time to give back.
Cheers.
Ken
So - I gathered up a bunch of tools, cable ties, flashlights, along with some grease and silicone lube - and got to it.
Thanks to member Jsolo I was able to buy the replacement spring and get this done.
A lot of this has been covered - but I wanted to highlight some things that I found, that prior to doing the spring swap had me asking questions.
Here is the unaltered spring and assembly:
First thing I did was to get a cable tie around the top of the assembly, and the bottom - and cinch it up tight. Then - i added one more cable tie around the assembly - and the first cable tie - to keep the "top to bottom" cable tie in place and not slipping off the touch points.
Next thing I did was to carefully pry off the bottom "C" clip - the "C"clip actually has room for a mall flat screwdriver to slip in - then kind of twist up and around - and the clip comes off. I know others mentioned using two flat screwdrivers to push it off - but I was nervous about the clip flying in behind the firewall as someone had said happened to them. My way worked - so I went with it and did the same on the top clip.
Because the assembly was cable tied, I was able to remove the bottom pin, and then the assembly (with some moving of the clutch pedal back and forth - and side to side) was swinging free from the top pin.
I carefully removed the bottom pin, and then moved the top pin over to the left as far as I needed to without removing it completely - to free the top part of the assembly and out it came. I left the top pin in place on the car portion.
To "explode" the assembly which allows for spring swappinjg - I put the assembly into a towel - and cut the cable tie - but first I took a measurement of the compressed length of the assembly (62mm). The measuring points were the top and bottom flat pieces on the assembly heads.
Here is what the assembly looks like un-compressed and without cable ties, and with the new spring in photo:
Now - simply pay careful attention to the items in the assembly, slip the bottom part off - remove old yellow spring - put new spring in place and get some more cable ties. I also slipped a cable tie into the top eyelet to indicate top and bottom. I attached a new cable tie to the assembly - it was a little fidgity to do - but I got it compressed and got it close to the 62 mm mark of the removed assembly. Again - I put an additional cable tie around the assembly to keep the top to bottom tie in place and keep it from slipping off the touch points.
In hind-site I wish I'd replaced the "new" assembly starting with the bottom pin - but I didn't - I did the top pin first. Reason I say this - is that the bottom pin seems to be more restrictive and has less play.
As I mentioned - I kept the top pin already on the car portion of the mount - and gently slid it to the left as far as I could without it dropping out:
Then I put the assembly back in place and slipped the pin through the mount holes. As was mentioned elsewhere - there are two little 1/8 indent impressions in the assembly - on the top and bottom - here is what I mean:
These two little impressions need to go on the right side (closest to the clutch pedal) for re-installation. I didn't know what they were when I read about them - so I'm showing them here.
Before you reinstall the bottom pin - lube the pin up with your favorite snake oil...
The bottom pin is a bugger to get started in the hole - as there is not much room on the left side to simply insert the pin into the car side of the mount. It fits - but just. the clutch pedal has some side to side play - you'll need to gently give it a little push to the right to get the pin started.
Once the pin is started through the first two holes, do yourself a favor and get a pair of channel lock pliers. Use the channel locks to compress the bottom pin into the hole. I tried for a half hour with needle nose pliers - but it was a waste of time. Got the channel locks out - and bam - the pin was in.
Take a pair of needle nose locking pliers and lock in the "C" clip - then you can simply push the clips back on.
DONE!!
Clean up - and go for a ride.
First impressions are very good - I feel like I know how to shift again!!!
Hope this long winded write up helps someone out - the stuff I gleaned from this forum has helped me a lot - time to give back.
Cheers.
Ken

BTW you can actually get away without taking the entire clutch pedal assemble out from it's housing meaning the top pin. Just remove the lower pin and the lower portion will drop along with the original spring. Just saving y'all some time, would recommend to get help from someone able to depress the clutch pedal if possible!

^^ what he said about the top pin.
Good write up Ken. Huwee and I didn't use extra lube to put mine back in and it was sort of a PITA.
On his car, everything went smoothly. idk why or how
Good write up Ken. Huwee and I didn't use extra lube to put mine back in and it was sort of a PITA.
On his car, everything went smoothly. idk why or how

Registered User
Joined: Sep 2008
Posts: 130
Likes: 0
From: Syracuse, NY
Awesome writeup and great photos. Can you describe how exactly the clutch feel changed?
Is it harder to press the pedal in? Easier? Can you actually feel the engagement taking place now?
Over the course of the past couple years, my left knee has begun bothering me after long drives. Especially stop and go in NYC. I'd really like to lessen the pressure required to press the pedal (If that's even possible).
Thanks


Joined: Oct 2011
Posts: 6,103
Likes: 593
From: People's Republic of IL
The best way to characterize the change is to say it went from linear effort to progressive.
There is somewhat more effort needed to modulate the clutch in the engagement zone, but that's part of the feedback you get too.
If you're looking to LESSEN the effort, this mod will do the exact opposite
Check out *RJM Performance.com - Home, they may have an application for a g37 now. They sell a completely adjustable clutch pedal pivot. One of the benefits is you can adjust the fulcrum which should reduce the effort needed since it's now being spread over a larger duration.
I suppose you could also get a stiffer spring too, that should provide more assist. But do keep in mind, these springs work against the pressure plate force.

this tutorial looks really complicated ...
I did mine from the bottom pin, i took it out and everything slided out, put the new spring and put it right back in, you do have to press the clutch in so its a bit easier to go in.
I can do it again in less than 5 minutes
I did mine from the bottom pin, i took it out and everything slided out, put the new spring and put it right back in, you do have to press the clutch in so its a bit easier to go in.
I can do it again in less than 5 minutes
Care to post a DIY with photos of your method?
Trending Topics


pm Jsolo. He might be still be selling the springs. I bought mine from him a little less than a year ago and it's totally worth it. He's a good guy and will ship to you quick.


Registered User
Joined: Nov 2014
Posts: 22
Likes: 0
From: Raleigh, NC
Another satisfied spring pedal replacement customer
Just installed mine in a car wash stall about 20 mins ago. Took about 10 mins to do, hardest part was getting the pin out. I was actually about to pay someone to do it but said to hell with that when they started quoting me $50-$60 to do it. Its not a major different but its still Best $20 I've spent on this car. The pedal feels a lot better and takes off are smoother.
I still plan to do the RJM Clutch pedal upgrade but this will hold me over for a month or two. This as others were saying is a good band-aid.
I think Infiniti should at the very least do a voluntary recall and install this spring for everyone.
I still plan to do the RJM Clutch pedal upgrade but this will hold me over for a month or two. This as others were saying is a good band-aid.
I think Infiniti should at the very least do a voluntary recall and install this spring for everyone.
Last edited by teefar; Dec 30, 2014 at 03:13 PM.