
G37S - Day Time Running Light Install Guide


Thread Starter
Registered Member
Joined: Nov 2010
Posts: 37
Likes: 0
I finally got around to installing the lights. First off, if you dont have proper tools or are not good with tools like a Dremel, dont bother and let the dealer install. Otherwise, the install is not bad, however it does take a long time. Took me 6 hours so I figure the dealer would take 3-4 hours with a lift and all... Here goes... Sorry for bad drawing on pics... Tired... Oh also, I am sure this applies to the non sport also as only the light design is different. For Coupe with Manual, there are alot more steps and work on the inside as the Park Brake is in the center console.. 
Put your Park Brake on and disconnect battery. Remove your Driver front tire.
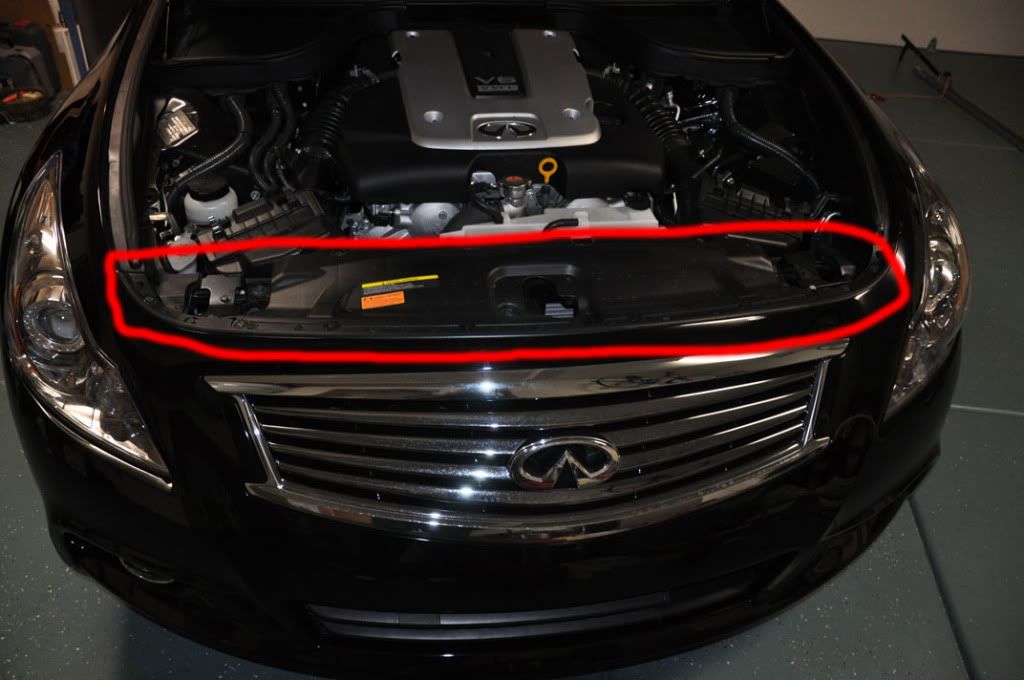
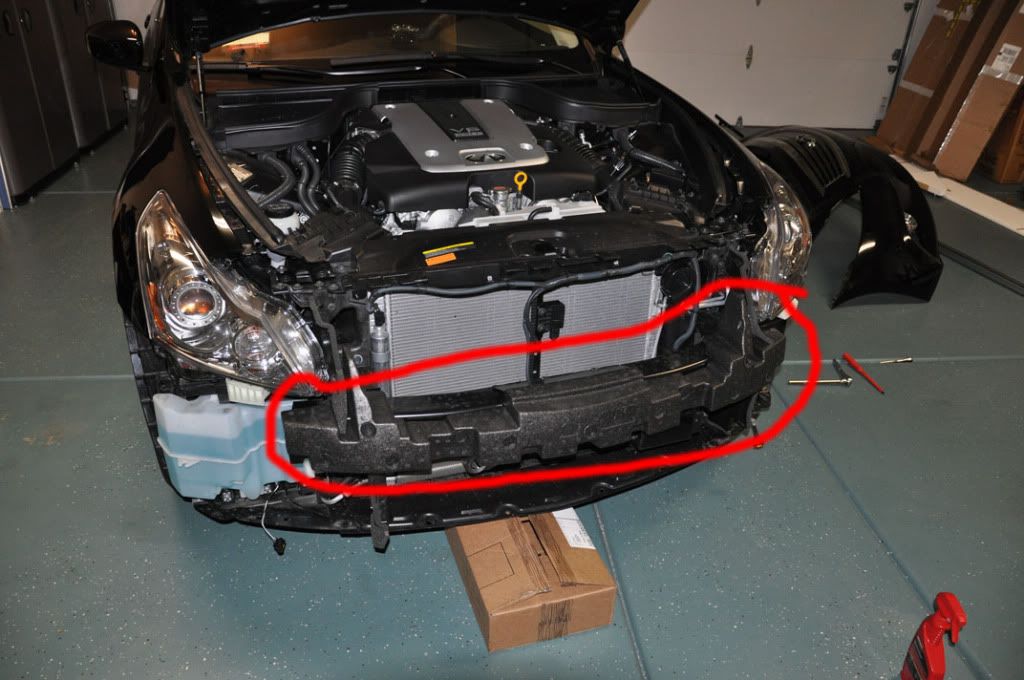
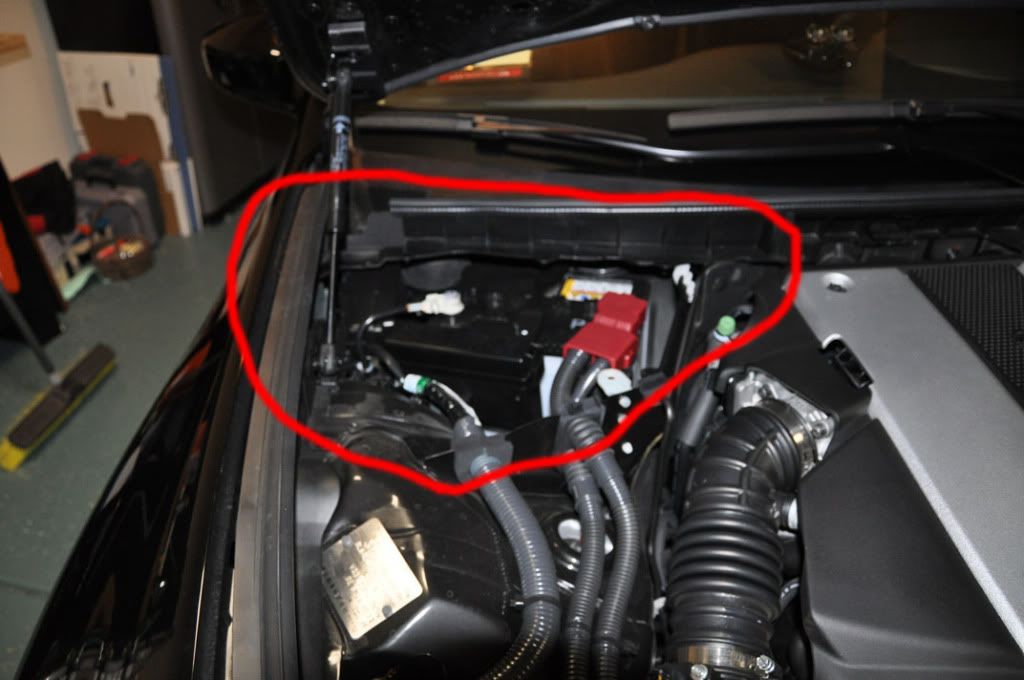
Open the front hood and remove 6 clips on the top of the bumper in the red area below.
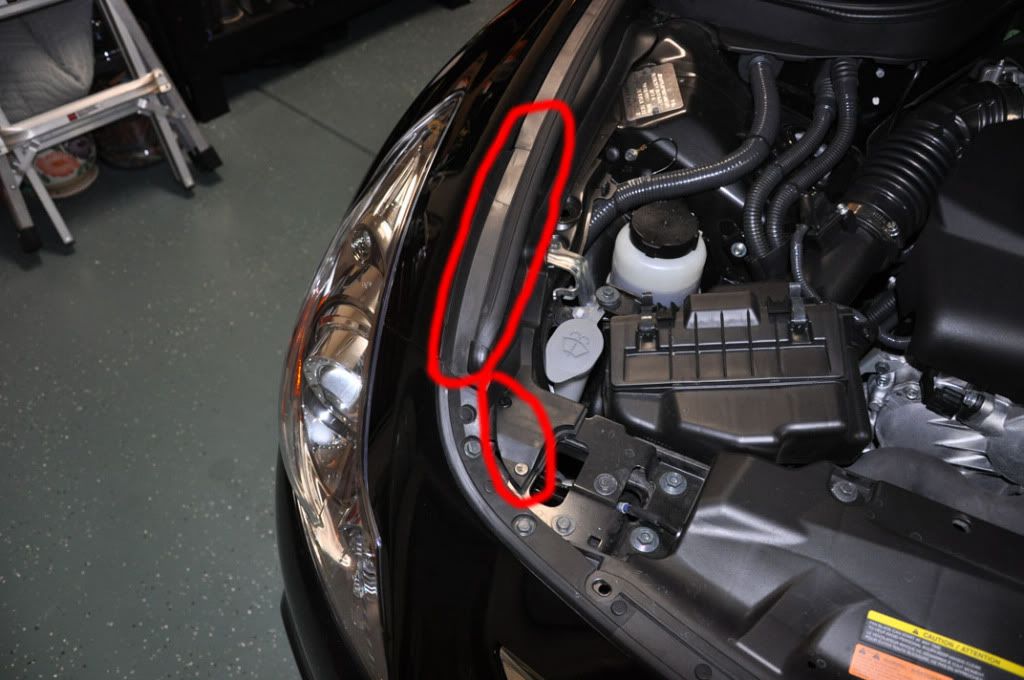
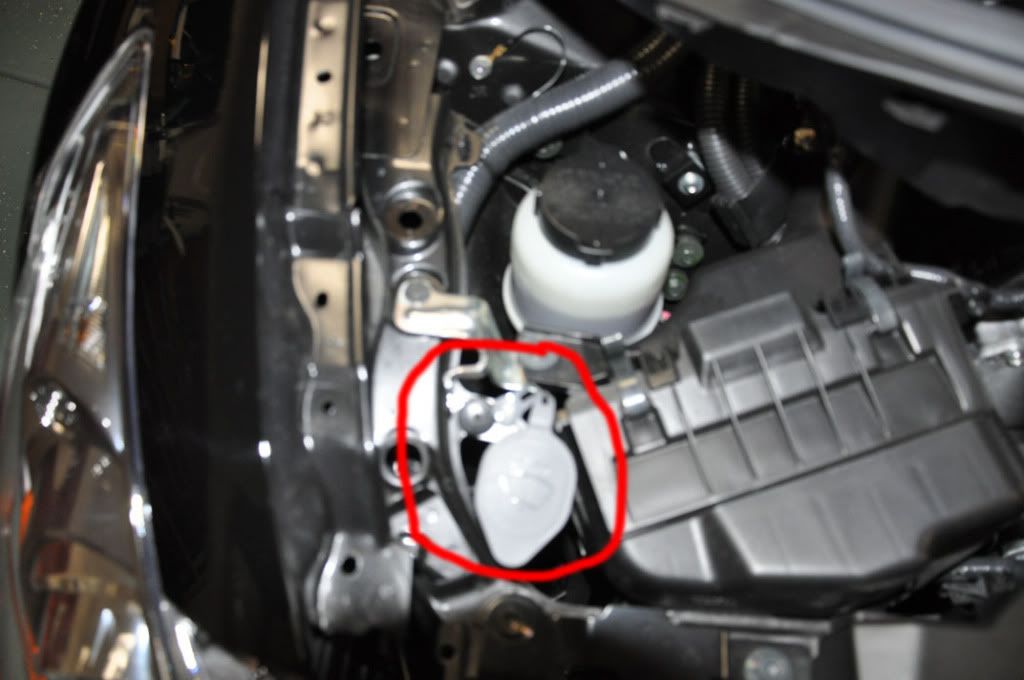
Need to remove the hood liner about half way on the left and right side. Remove the two clips in the small circle. They will most likely break and you will need to replace. Once the 2 clips are out, start pulling on the rubber until half way. There are some smaller clips that are easy to come out under the rubber.
Here you see the rubber removed half way. Do the same for the other side.
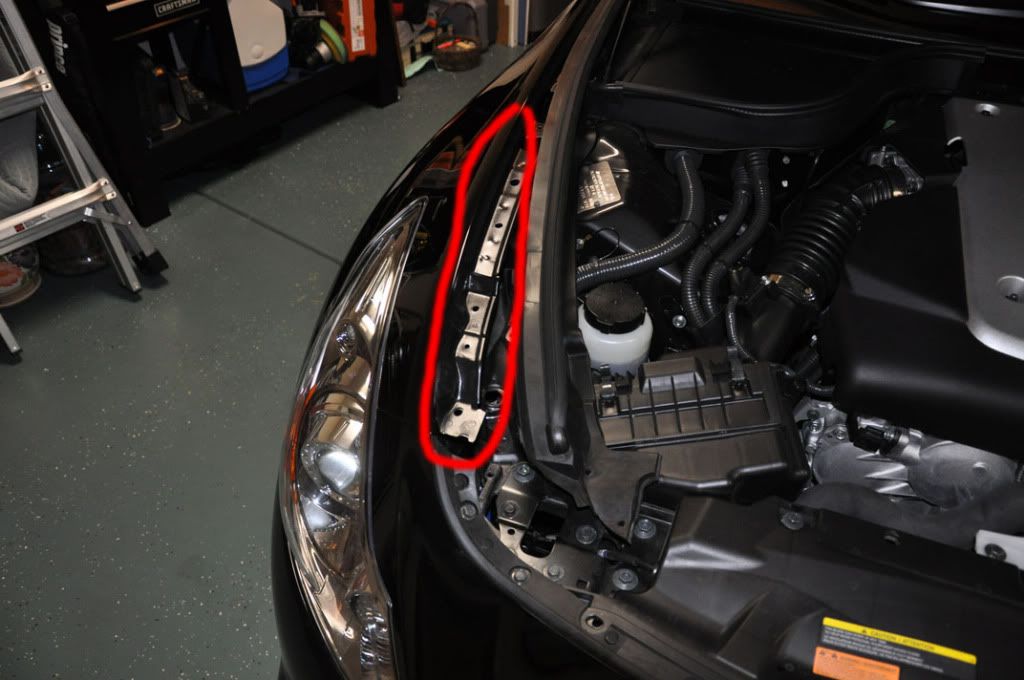
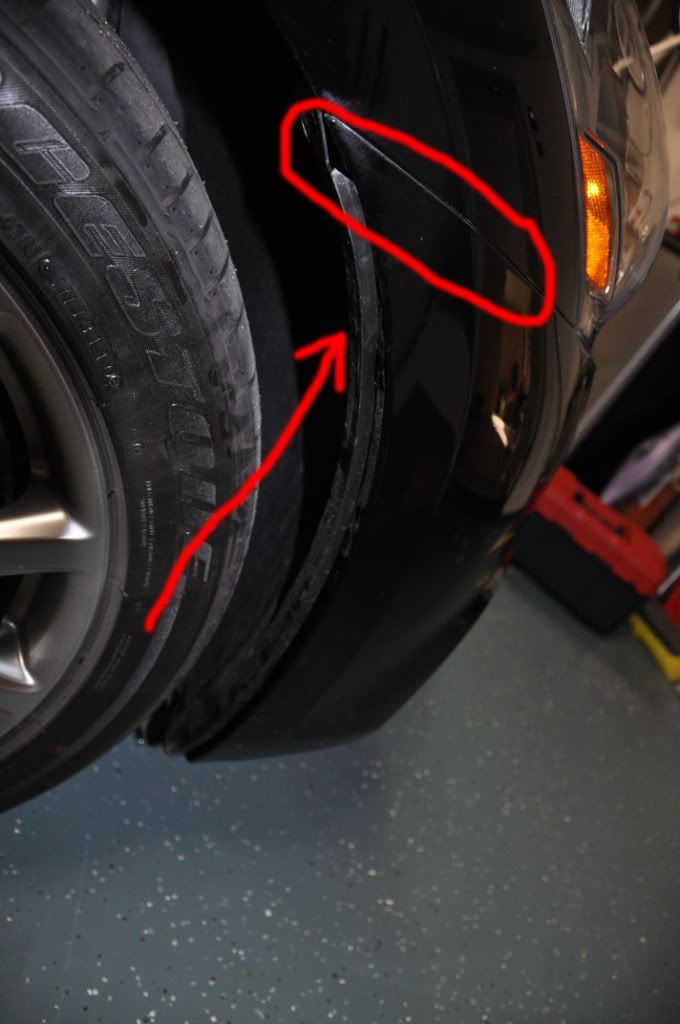
Now that the rubbers are out of the way, there is a single screw in the circle on both side that is holding the bumper to the Fender. Use a 10mm rachet and go behind the metal to get to it as seen by the arrow. Remove from both sides.
Now from the underside of the car, remove all the bolts holding the bumper. About 10 of them.
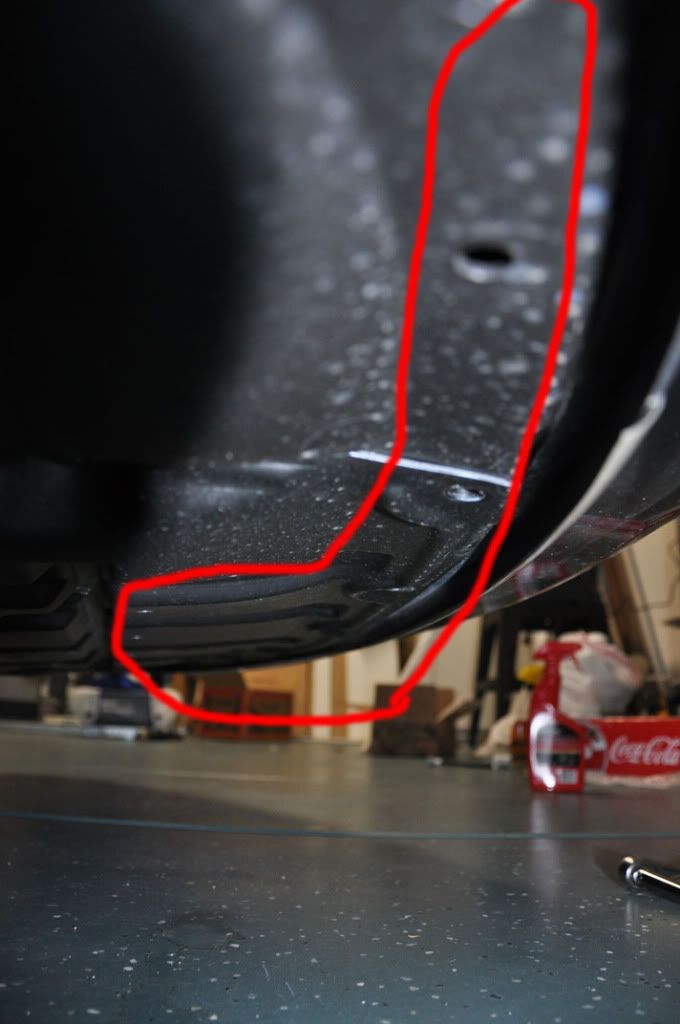
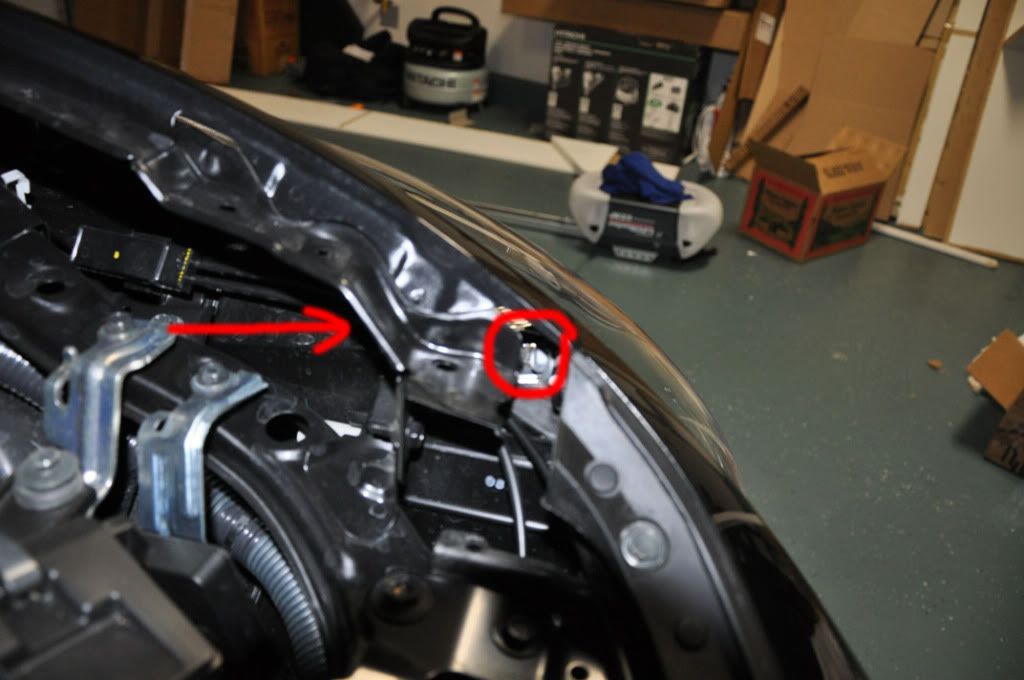
Ok, you may need to take some more of the bolts from the bottom out to allow you to pull away the inner fender enough to get to 2 more bolts. There are 2 bolts / screws in the top (near arrow) holding the bumper to the fender. Remove 2 screws on each side.
Once you do this, get a second person. From the side of each bumper, pull out and up and then pull forward to release the bumper. Remove that second piece as shown below by just pulling on it.
Remove the screw holding the winshield washer filler neck and pull the neck out. Will need this space to run the wires.
Remove entire driver side inner fender covers. Not passenger side..
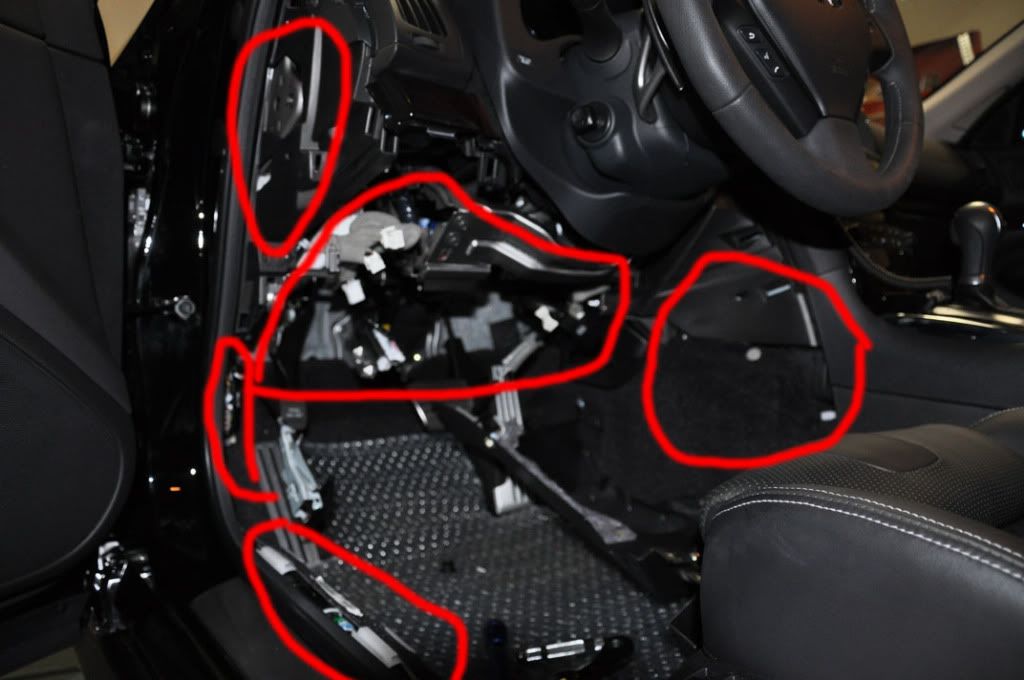
Ok, now go inside the car and remove all the covers as shown in the circles on the driver side. Will need to run one wire inside.
Back to the engine. Remove Battery cover and then remove 5 clips to take out the Battery suround plastic...
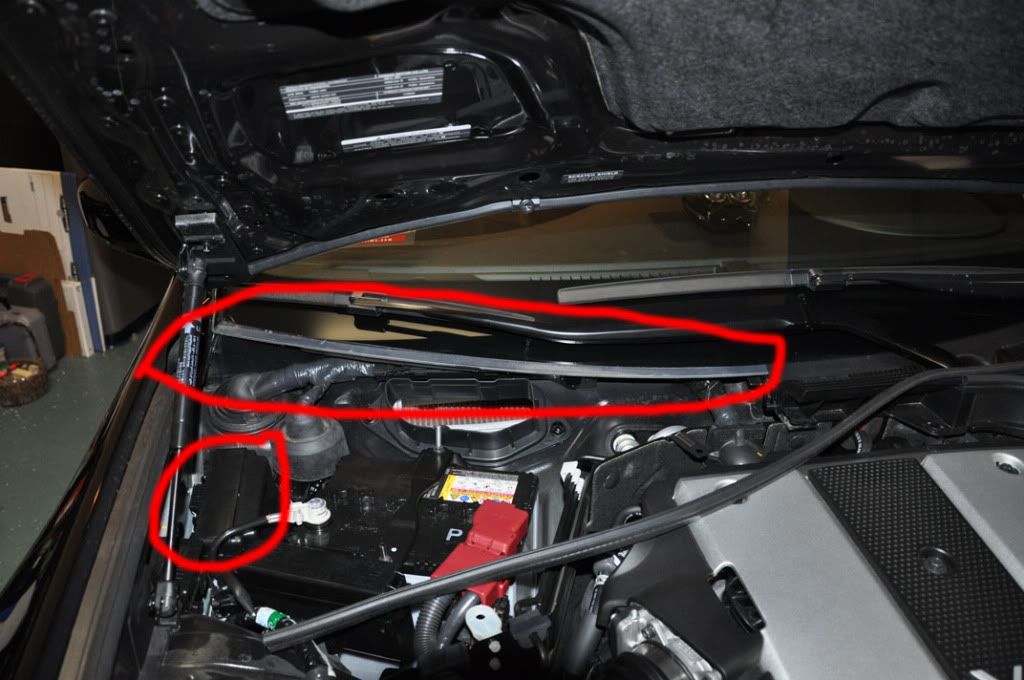
Now remove the rear cover near the winshield. Should be 2 clips and then pull out. There is a tab clip in the center you need to open to separate from the right side. Once that is out, need to pull out the power box in the smaller circle. There are 2 clips on the left and then pull up...
Open the Power Box. 2 Clips on the bottom. From this point, you need to follow the instructions in the manual. You need to remove one plug and then open the pins and insert a new pin from the harness at a specific location. Then you need to remove 2 of the plugs and connect to the new harness. I dont want to mistate that part so leave that to the guide.. Once that is done, close the box and put it back in.

Now route the harness along the harness seen. There is a single ground point. Just open the bolt there and add in the new ground wire.
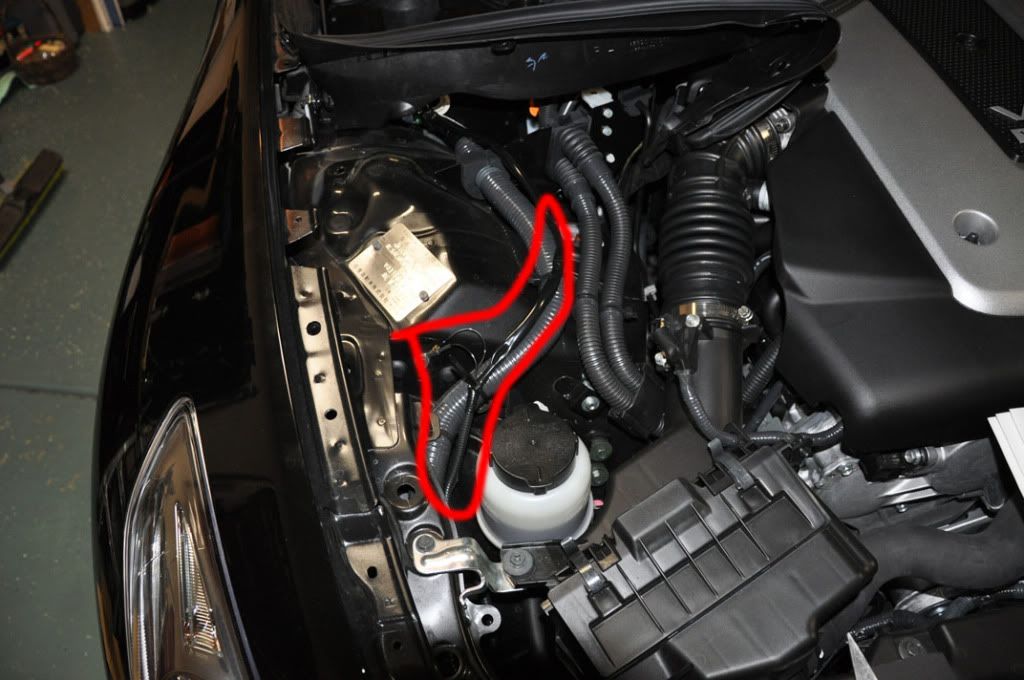
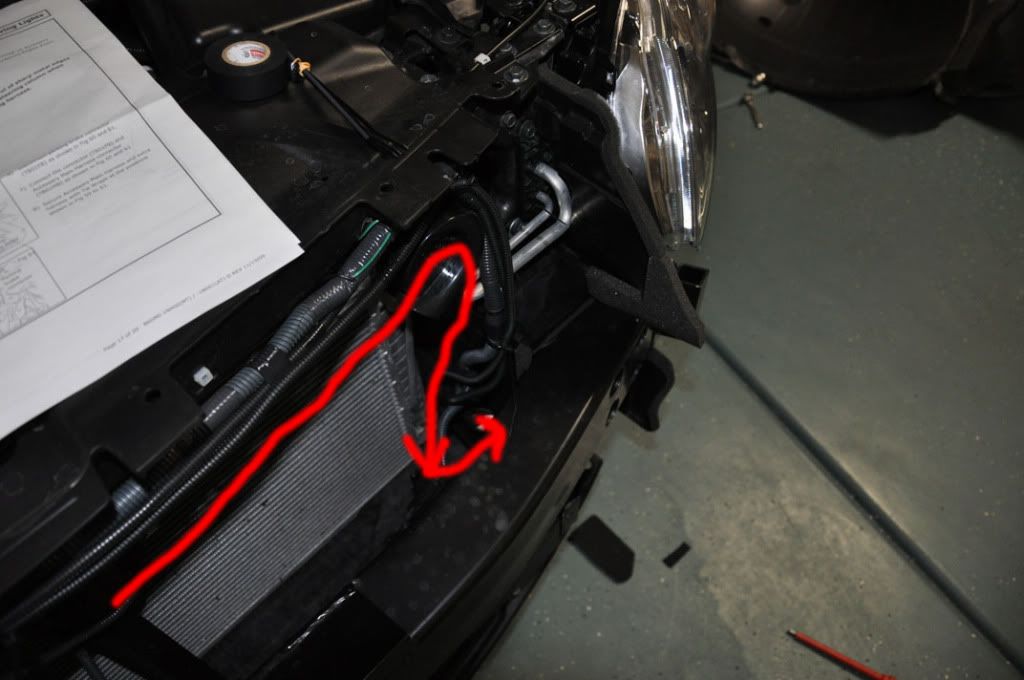
Route it under the bracket and behind the headlight.
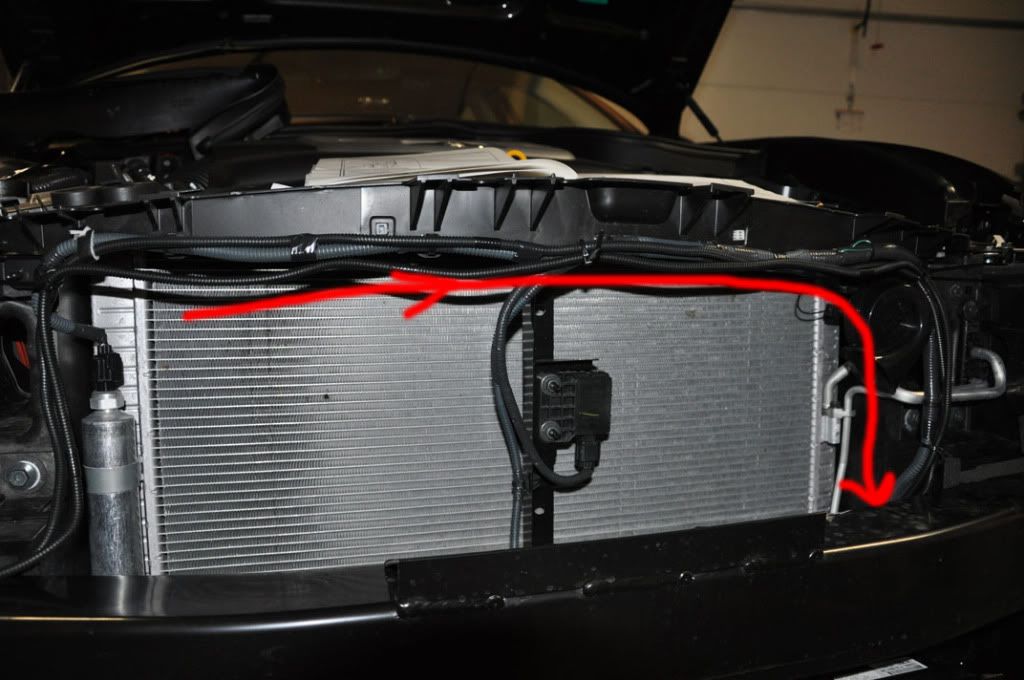
Bring it under the headlight and now route based on the arrow...
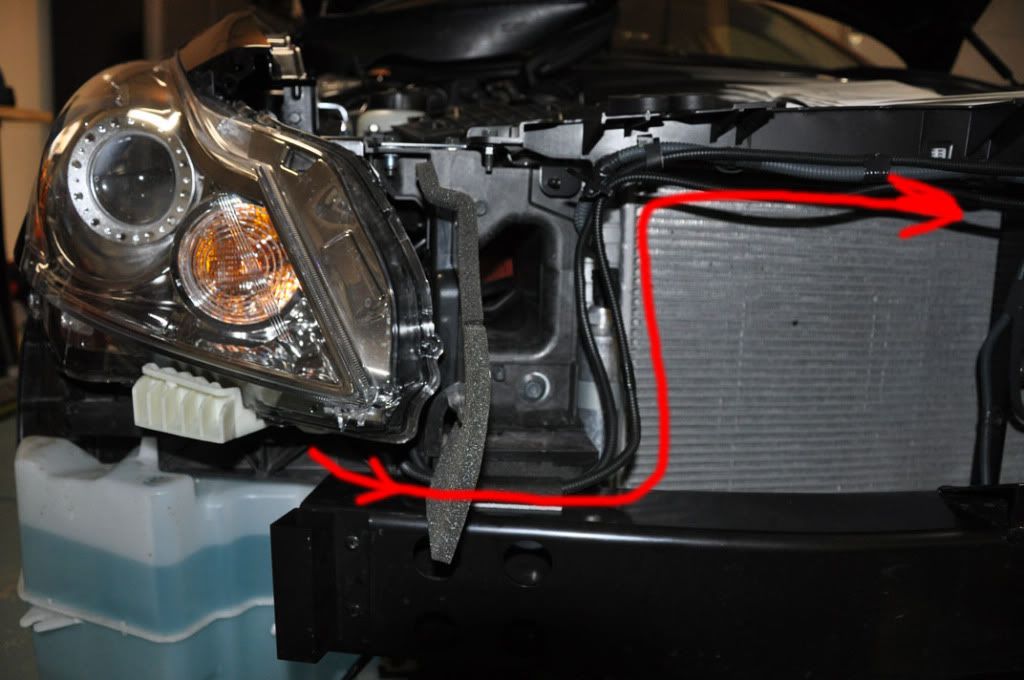
Let the left side light harness connector hang as seen here..
Continue to route per the arrows..
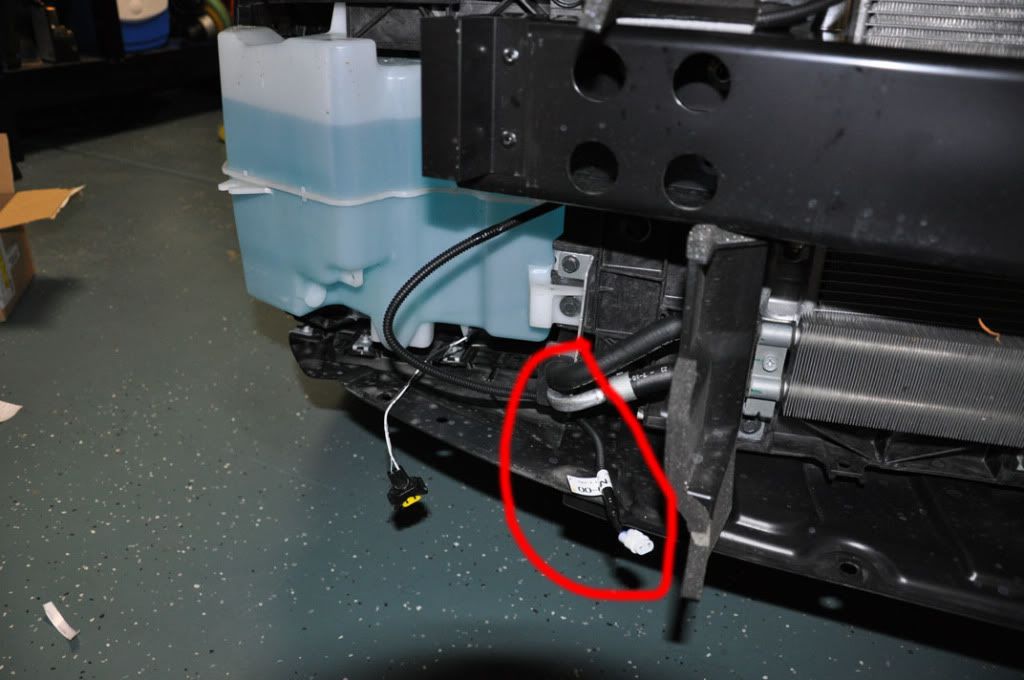
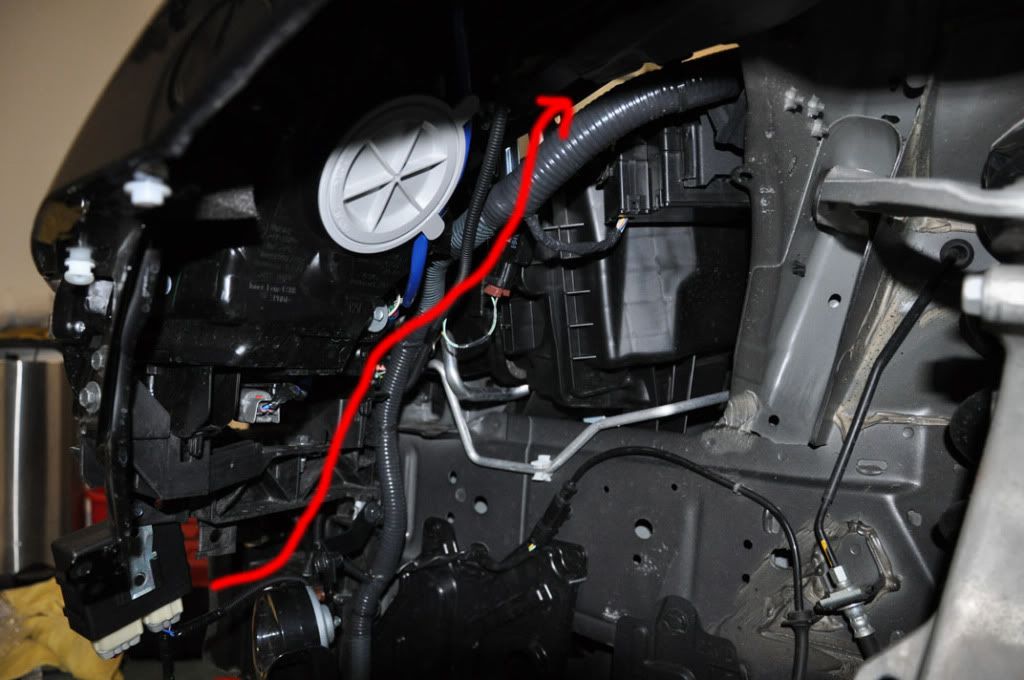
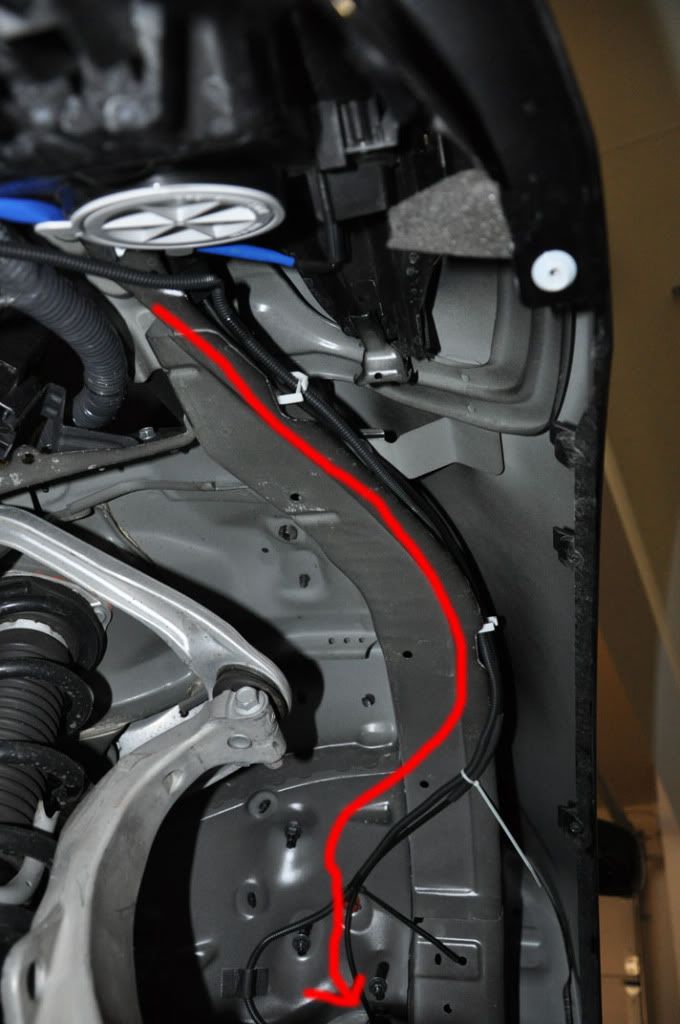
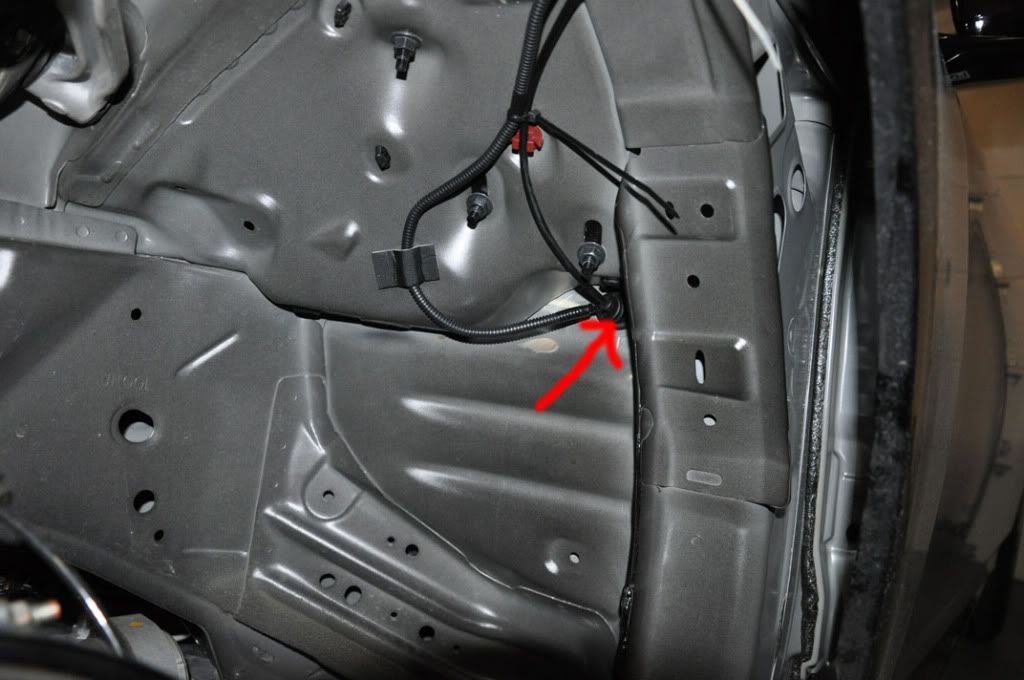
On the driver side, route straight down and then up as seen the next 2 pics.
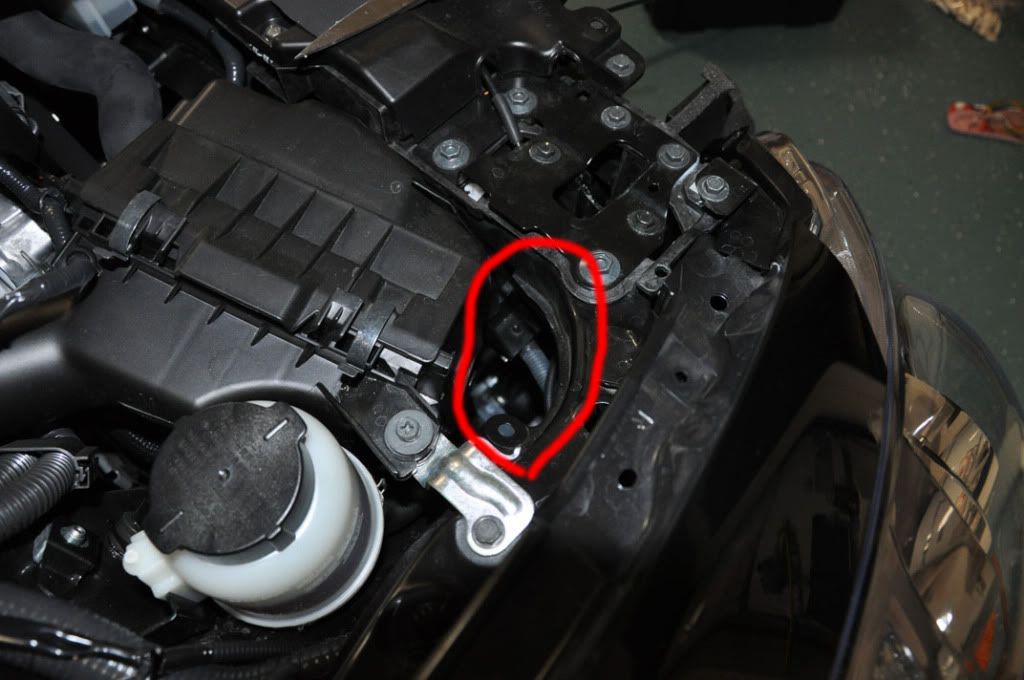
Mount the control module to the existing hole and connect the 2 harness connectors to the module.

The last part of the wire, route it along with the Hood Cable inside the driver fender..
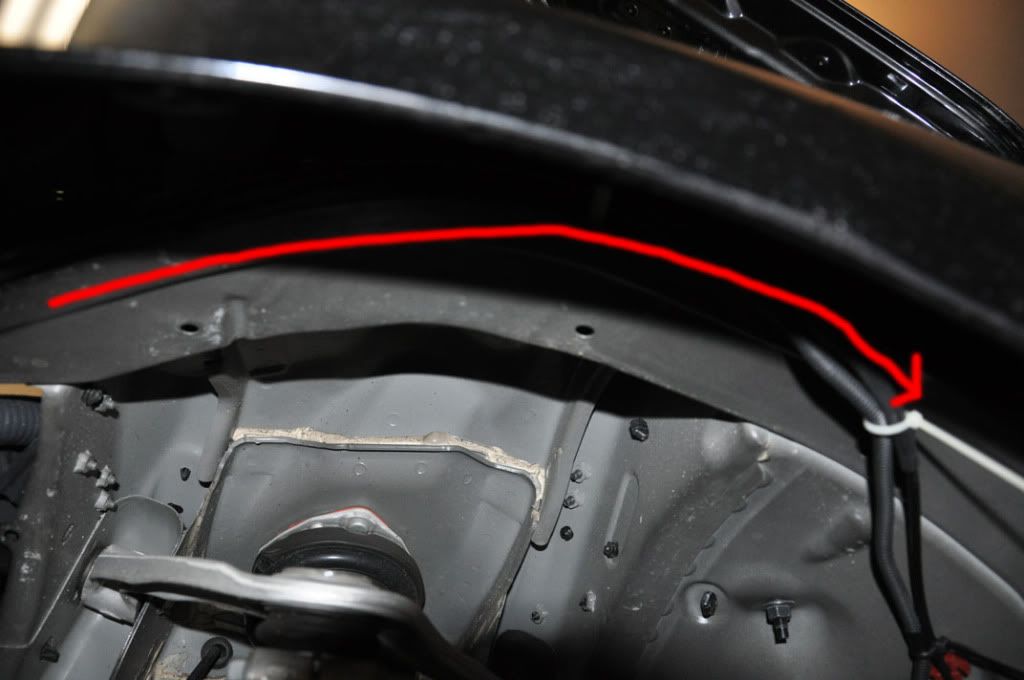
Now you need to create a hole in the boot and pass the wire through with the hood cable...
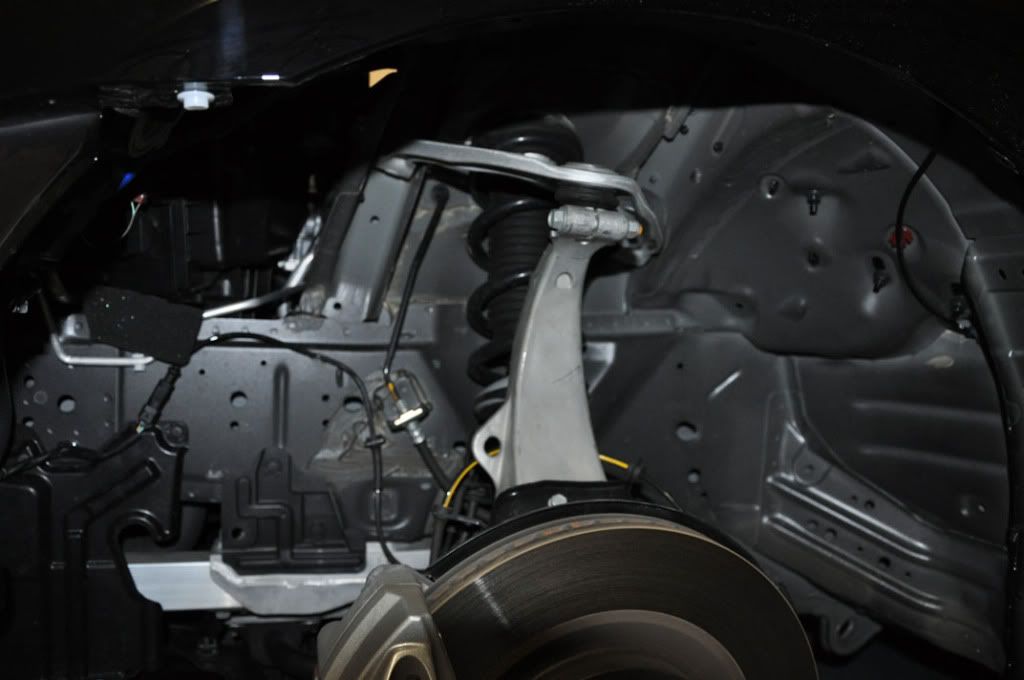
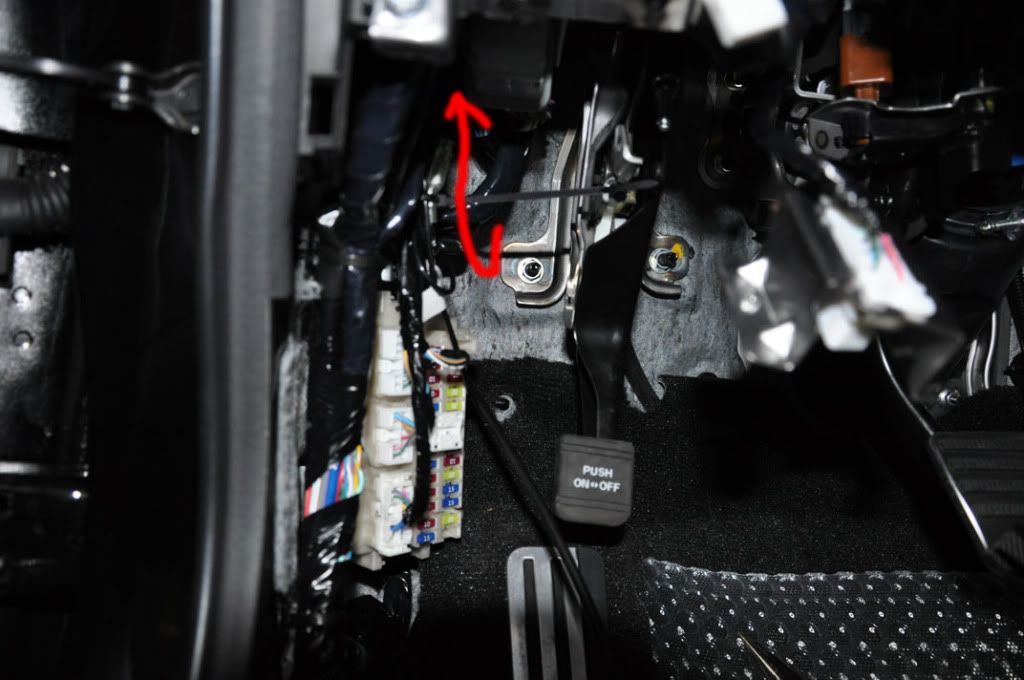
Last step is now grab the wire inside. I could not take a detail pic but essentially go straight up. Disconnect the plug from the Park Break and plug into new harness. Then plug new harness in Park Break. Essentially, this turns the lights off when car is running and Park break is on. Not sure why it matters... This part is tricky as the place to work in is very small and lots of sharp things in the way so be careful.
Wiring is done. As for the light installation, sorry, my battery on my camera died so couldnt get pics. They give you a template to use which requires to you tape to the plastic and drills holes of different sizes to create the correct size hole..
First off, the back of the fog lamp pastic has a template of the cutout already. So just take a Dremel and cut along that. Finally, you will also need to cut a whole in the bumper cover. Put the Fog light plastic back on and then dremel the bumper plastic. Put the light in and screw in the bracket in the back...
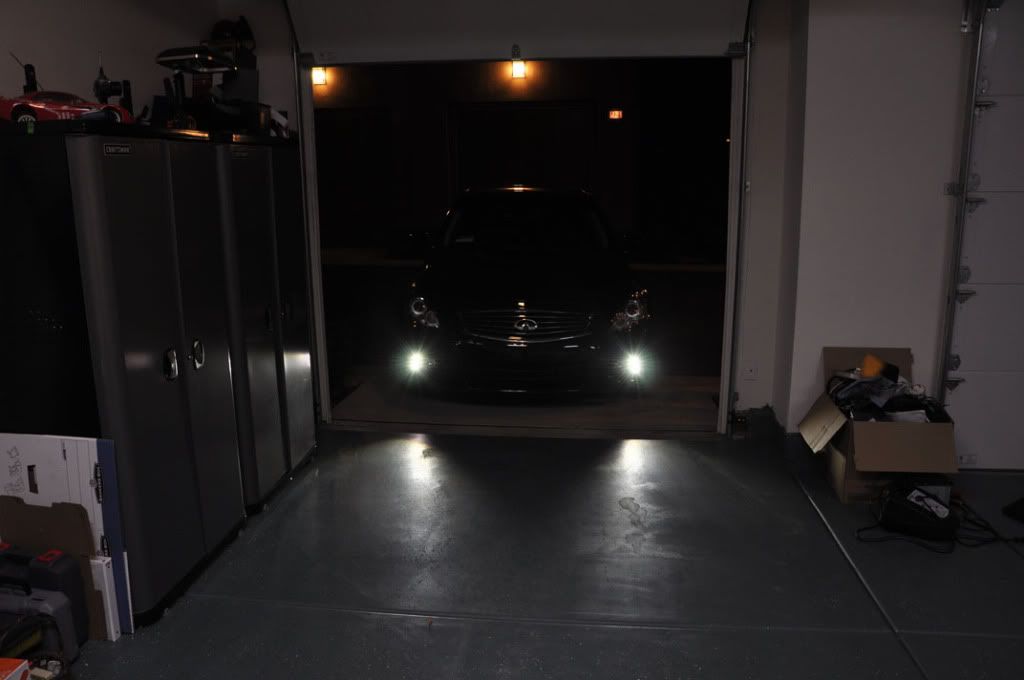
Re-assemble car and done... Hope this help explain at a high level what needs to be done...
Put your Park Brake on and disconnect battery. Remove your Driver front tire.
Open the front hood and remove 6 clips on the top of the bumper in the red area below.
Need to remove the hood liner about half way on the left and right side. Remove the two clips in the small circle. They will most likely break and you will need to replace. Once the 2 clips are out, start pulling on the rubber until half way. There are some smaller clips that are easy to come out under the rubber.
Here you see the rubber removed half way. Do the same for the other side.
Now that the rubbers are out of the way, there is a single screw in the circle on both side that is holding the bumper to the Fender. Use a 10mm rachet and go behind the metal to get to it as seen by the arrow. Remove from both sides.
Now from the underside of the car, remove all the bolts holding the bumper. About 10 of them.
Ok, you may need to take some more of the bolts from the bottom out to allow you to pull away the inner fender enough to get to 2 more bolts. There are 2 bolts / screws in the top (near arrow) holding the bumper to the fender. Remove 2 screws on each side.
Once you do this, get a second person. From the side of each bumper, pull out and up and then pull forward to release the bumper. Remove that second piece as shown below by just pulling on it.
Remove the screw holding the winshield washer filler neck and pull the neck out. Will need this space to run the wires.
Remove entire driver side inner fender covers. Not passenger side..
Ok, now go inside the car and remove all the covers as shown in the circles on the driver side. Will need to run one wire inside.
Back to the engine. Remove Battery cover and then remove 5 clips to take out the Battery suround plastic...
Now remove the rear cover near the winshield. Should be 2 clips and then pull out. There is a tab clip in the center you need to open to separate from the right side. Once that is out, need to pull out the power box in the smaller circle. There are 2 clips on the left and then pull up...
Open the Power Box. 2 Clips on the bottom. From this point, you need to follow the instructions in the manual. You need to remove one plug and then open the pins and insert a new pin from the harness at a specific location. Then you need to remove 2 of the plugs and connect to the new harness. I dont want to mistate that part so leave that to the guide.. Once that is done, close the box and put it back in.
Now route the harness along the harness seen. There is a single ground point. Just open the bolt there and add in the new ground wire.
Route it under the bracket and behind the headlight.
Bring it under the headlight and now route based on the arrow...
Let the left side light harness connector hang as seen here..
Continue to route per the arrows..
On the driver side, route straight down and then up as seen the next 2 pics.
Mount the control module to the existing hole and connect the 2 harness connectors to the module.
The last part of the wire, route it along with the Hood Cable inside the driver fender..
Now you need to create a hole in the boot and pass the wire through with the hood cable...
Last step is now grab the wire inside. I could not take a detail pic but essentially go straight up. Disconnect the plug from the Park Break and plug into new harness. Then plug new harness in Park Break. Essentially, this turns the lights off when car is running and Park break is on. Not sure why it matters... This part is tricky as the place to work in is very small and lots of sharp things in the way so be careful.
Wiring is done. As for the light installation, sorry, my battery on my camera died so couldnt get pics. They give you a template to use which requires to you tape to the plastic and drills holes of different sizes to create the correct size hole..
First off, the back of the fog lamp pastic has a template of the cutout already. So just take a Dremel and cut along that. Finally, you will also need to cut a whole in the bumper cover. Put the Fog light plastic back on and then dremel the bumper plastic. Put the light in and screw in the bracket in the back...
Re-assemble car and done... Hope this help explain at a high level what needs to be done...
Last edited by nishalp; Dec 31, 2010 at 01:55 AM. Reason: Spelling


Registered User
Joined: Dec 2010
Posts: 8
Likes: 0
From: AZ
I have an appointment at the dealership 8am Monday morning to get them installed for 700$ (parts+labor) in phoenix, az. Is there any way to keep them on when you turn on your headlights? or do they already stay on?
Thread Starter
Registered Member
Joined: Nov 2010
Posts: 37
Likes: 0
Wish there was but no.. Headlights go on, DRL go off. Park Brake pressed, DRL go off...


Trending Topics


Registered Member
Joined: May 2011
Posts: 46
Likes: 0
Nice garage floor!
I finally got around to installing the lights. First off, if you dont have proper tools or are not good with tools like a Dremel, dont bother and let the dealer install. Otherwise, the install is not bad, however it does take a long time. Took me 6 hours so I figure the dealer would take 3-4 hours with a lift and all... Here goes... Sorry for bad drawing on pics... Tired... Oh also, I am sure this applies to the non sport also as only the light design is different. For Coupe with Manual, there are alot more steps and work on the inside as the Park Brake is in the center console..
Put your Park Brake on and disconnect battery. Remove your Driver front tire.
Open the front hood and remove 6 clips on the top of the bumper in the red area below.
Need to remove the hood liner about half way on the left and right side. Remove the two clips in the small circle. They will most likely break and you will need to replace. Once the 2 clips are out, start pulling on the rubber until half way. There are some smaller clips that are easy to come out under the rubber.
Here you see the rubber removed half way. Do the same for the other side.
Now that the rubbers are out of the way, there is a single screw in the circle on both side that is holding the bumper to the Fender. Use a 10mm rachet and go behind the metal to get to it as seen by the arrow. Remove from both sides.
Now from the underside of the car, remove all the bolts holding the bumper. About 10 of them.
Ok, you may need to take some more of the bolts from the bottom out to allow you to pull away the inner fender enough to get to 2 more bolts. There are 2 bolts / screws in the top (near arrow) holding the bumper to the fender. Remove 2 screws on each side.
Once you do this, get a second person. From the side of each bumper, pull out and up and then pull forward to release the bumper. Remove that second piece as shown below by just pulling on it.
Remove the screw holding the winshield washer filler neck and pull the neck out. Will need this space to run the wires.
Remove entire driver side inner fender covers. Not passenger side..
Ok, now go inside the car and remove all the covers as shown in the circles on the driver side. Will need to run one wire inside.
Back to the engine. Remove Battery cover and then remove 5 clips to take out the Battery suround plastic...
Now remove the rear cover near the winshield. Should be 2 clips and then pull out. There is a tab clip in the center you need to open to separate from the right side. Once that is out, need to pull out the power box in the smaller circle. There are 2 clips on the left and then pull up...
Open the Power Box. 2 Clips on the bottom. From this point, you need to follow the instructions in the manual. You need to remove one plug and then open the pins and insert a new pin from the harness at a specific location. Then you need to remove 2 of the plugs and connect to the new harness. I dont want to mistate that part so leave that to the guide.. Once that is done, close the box and put it back in.
Now route the harness along the harness seen. There is a single ground point. Just open the bolt there and add in the new ground wire.
Route it under the bracket and behind the headlight.
Bring it under the headlight and now route based on the arrow...
Let the left side light harness connector hang as seen here..
Continue to route per the arrows..
On the driver side, route straight down and then up as seen the next 2 pics.
Mount the control module to the existing hole and connect the 2 harness connectors to the module.
The last part of the wire, route it along with the Hood Cable inside the driver fender..
Now you need to create a hole in the boot and pass the wire through with the hood cable...
Last step is now grab the wire inside. I could not take a detail pic but essentially go straight up. Disconnect the plug from the Park Break and plug into new harness. Then plug new harness in Park Break. Essentially, this turns the lights off when car is running and Park break is on. Not sure why it matters... This part is tricky as the place to work in is very small and lots of sharp things in the way so be careful.
Wiring is done. As for the light installation, sorry, my battery on my camera died so couldnt get pics. They give you a template to use which requires to you tape to the plastic and drills holes of different sizes to create the correct size hole..
First off, the back of the fog lamp pastic has a template of the cutout already. So just take a Dremel and cut along that. Finally, you will also need to cut a whole in the bumper cover. Put the Fog light plastic back on and then dremel the bumper plastic. Put the light in and screw in the bracket in the back...
Re-assemble car and done... Hope this help explain at a high level what needs to be done...


Op do you have any other detailed pic of the parking brake connector? I mistakenly bought the wrong kit for my car (the one made for manual transmission model) and I am trying to figure out if it will still work with my car (automatic transmission).
Thanks
Thanks