
DIY: Front and rear brake pad install


Front and rear brake pad install
Ok guys I decided t change my front and rear brake pads today. Since I wasn't able to find a DIY for it I made one. Ive never made on before so sorry if it isn't that great.
Id say its a 5 out of 10 on the difficult scale. It took me a few hours to do. The fronts take the longest. You do need a little bit of mechanical knowledge.
I'm not responsible for any issues or problems that my arise from following this DIY.
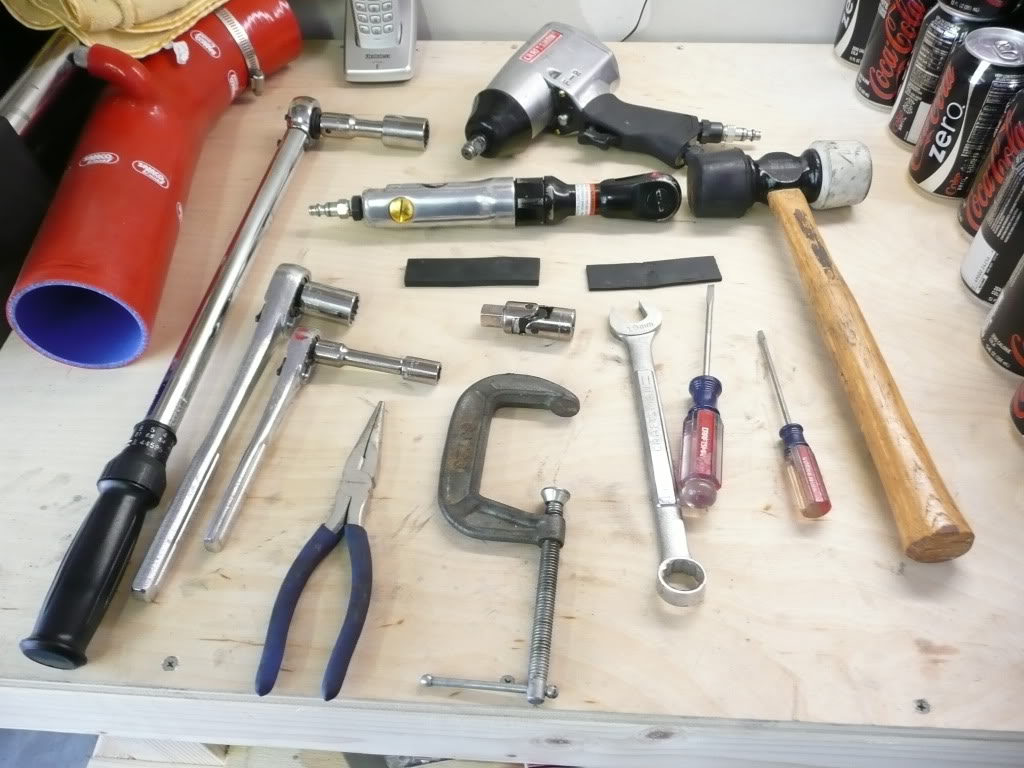
Ok here are the tools that I used
21mm socket for my stock lug nuts
22mm socket
12mm socket
19mm socket
needle nose pliers
19mm open end wrench
torque wrench
2 smaller flat head screw drivers
rubber mallet
1/2 inch and 3/8 inch ratchets
3 inch c clamp
Ill start with the front
Take off the wheel.
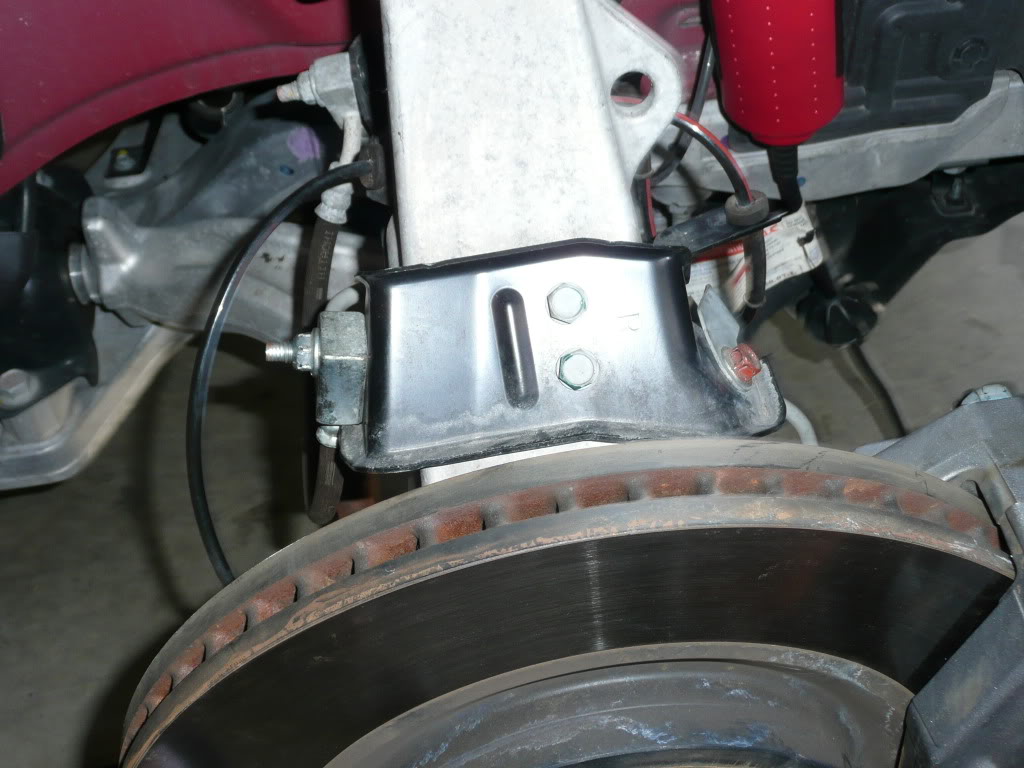
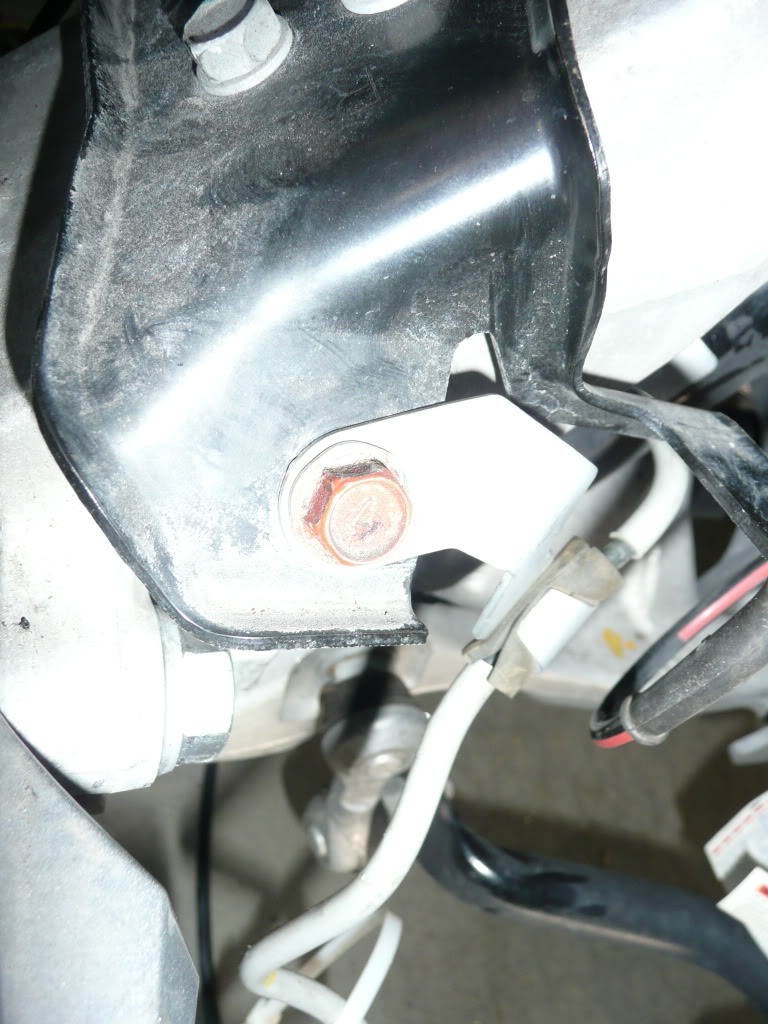
Remove the bolt with the red color on the right and also the nut straight across from it on the left. This is just to loosen the brake line so you can move the caliper around. Just leave the 2 bolts that hold the bracket on alone. Also unclip the hose behind the red bolt so its not in the way.

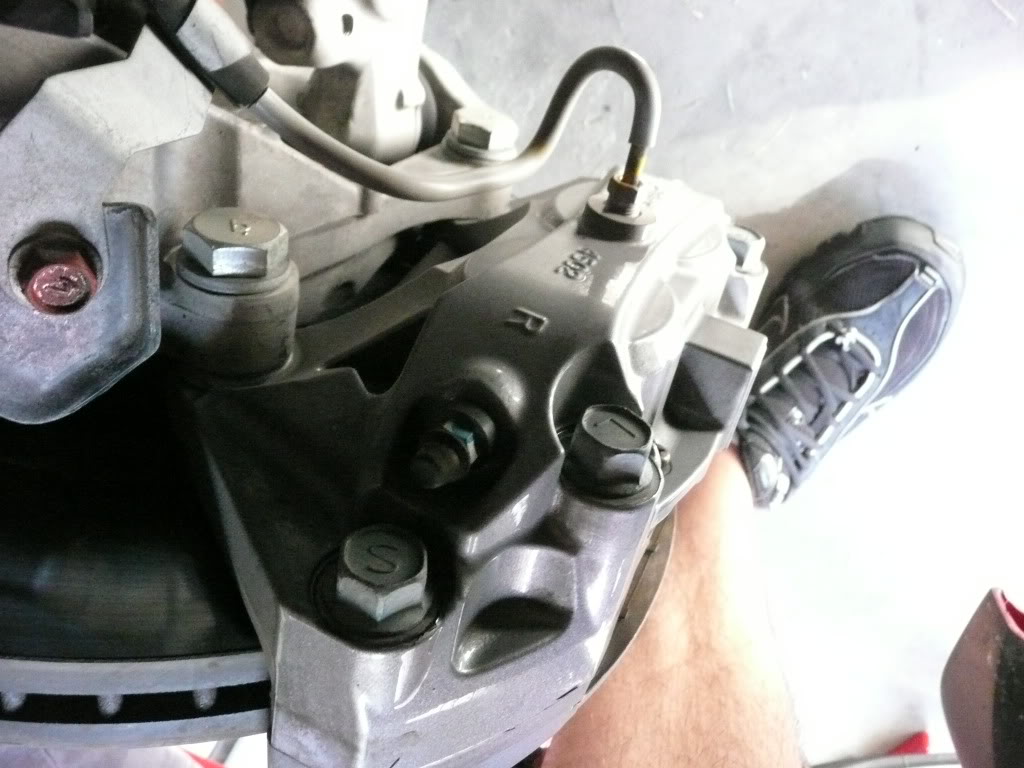
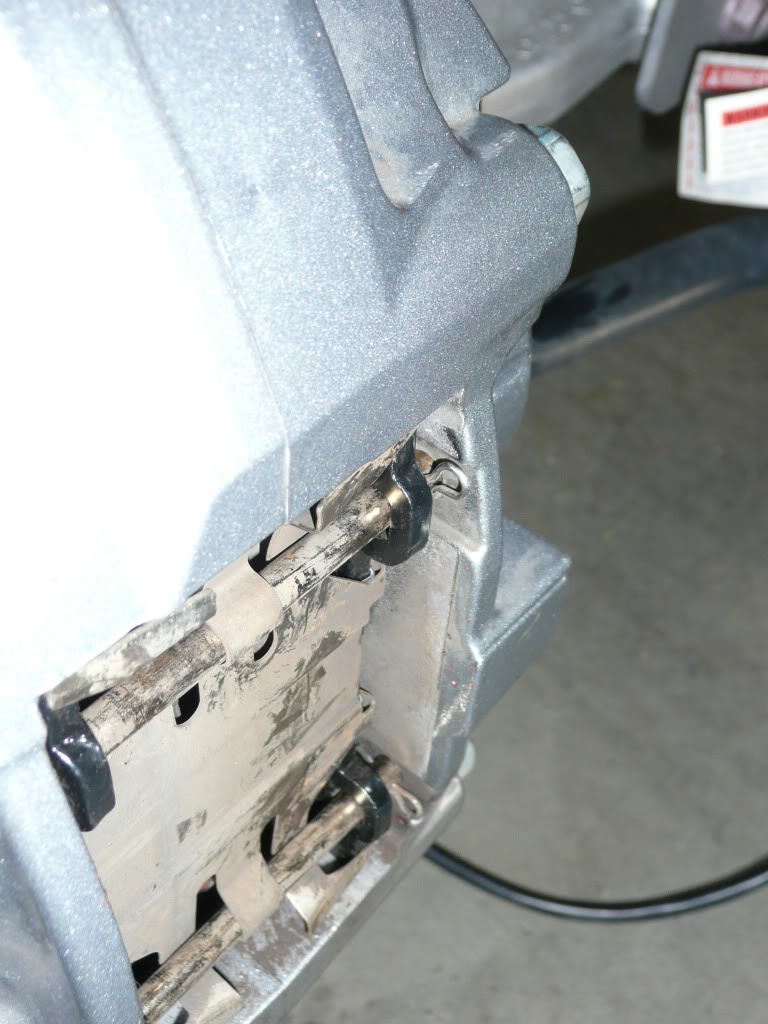
Now loosen up the 2 22mm bolts that are on the rear of the caliper. There is one at the top and bottom. They are very tight and I used a ratchet and rubber mallet to loosen. DO NOT I REPEAT DO NOT LOOSEN UP THE 4 SMALLER BOLTS AT THE TOP ON THE REAR OF THE CALIPER. These bolt the caliper together and will make you loose brake fluid. You can see the 2 of the 4 bolts in my picture they have a L and the other has an S on it. The second pic is one of the 22mm bolts.
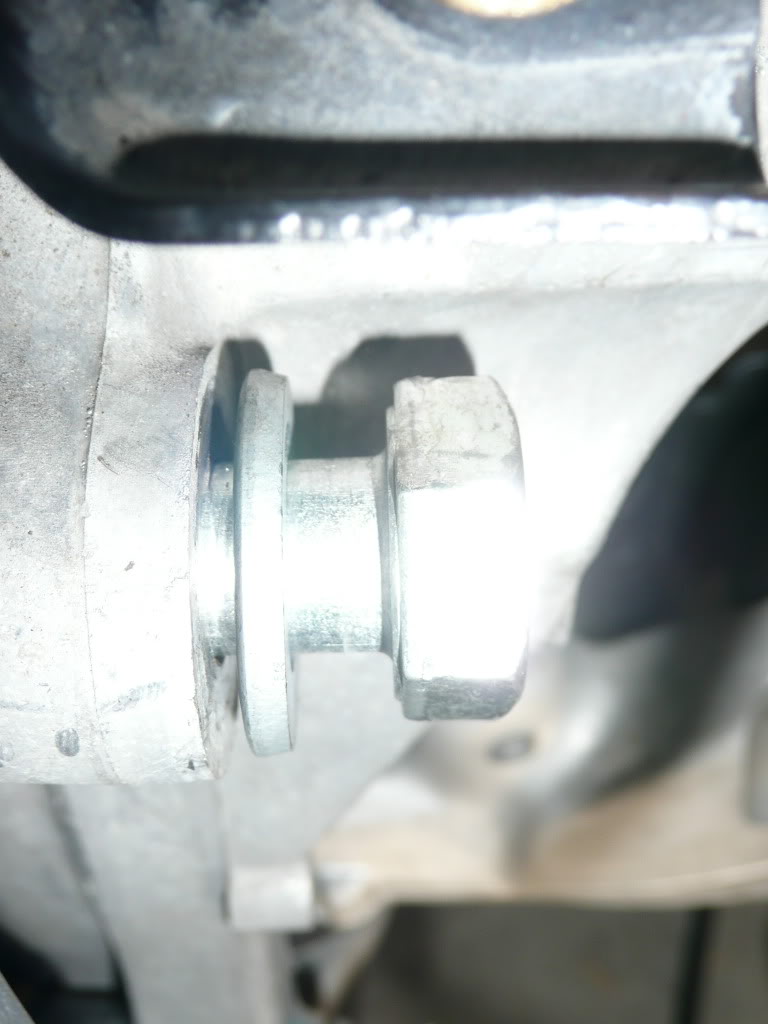
Ok now take the 3 inch C clamp and use it with the old brake pads still in the caliper and compress the pistons in the caliper. I took a piece of rubber and put it on the outside of the caliper so the clamp wouldn't scratch the paint or the Infiniti lettering on the outside of the caliper.
After you get them compressed take out the clips holding the 2 bars on the top of the caliper.
Now pull the pins out and remove the large top piece. I went ahead and put the caliper back on the car but didn't tighten it down. You will have to reattach the square block that the brake line goes to before you reattach the caliper. If you have the pistons compressed all the way down you can install the pads with the caliper back on the car. They will slide in through the top of the caliper. Just make sure you have your shims and brake lube on the back of the brake pad.
Now re tighten the 2 22mm bolts the red bolt and tighten everything back up. Don't forget about the line you unclipped earlier.
Now reinstall the wheel and do the other side.
Rear Brakes
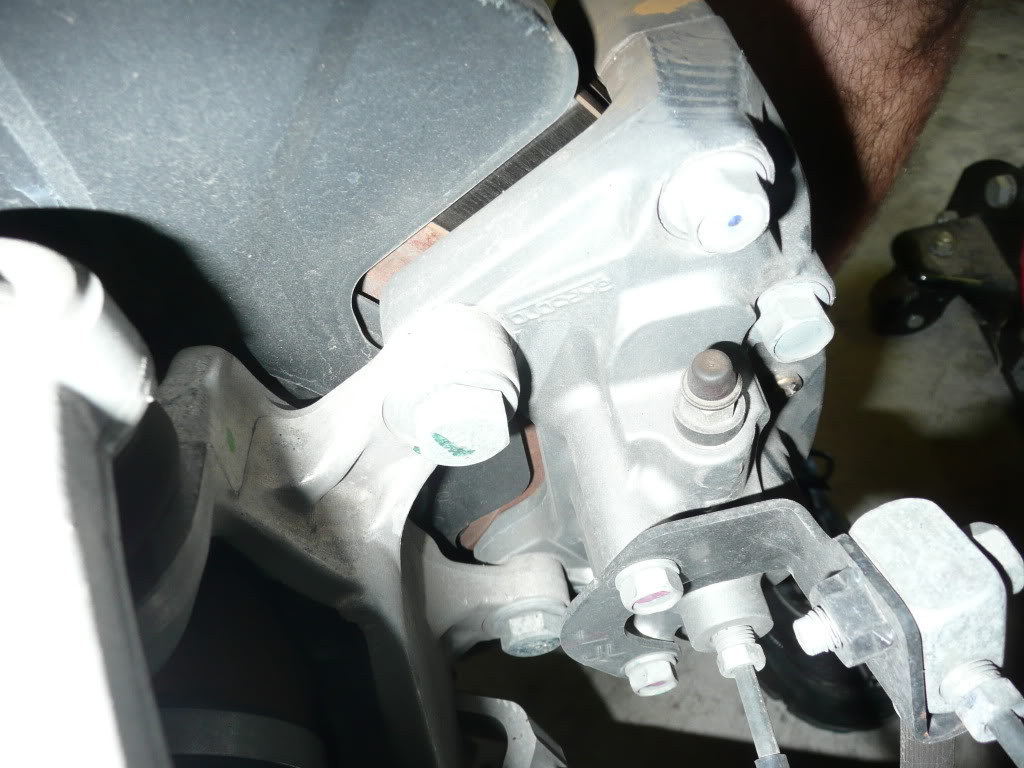
Take off the wheel. Now you have 2 19mm bolts to remove to take off the caliper. The top one in the pic has a green stripe on it. You will need a open ended wrench for the bottom bolt because you cant get a socket on it.
That is all you have to take off on the rear. Now repeat compressing the pistons as you did on the front and reinstall the caliper on the car and install your new brake pads. Tighten ever thing up and reinstall your wheels.
Sorry if i missed anything.
Id say its a 5 out of 10 on the difficult scale. It took me a few hours to do. The fronts take the longest. You do need a little bit of mechanical knowledge.
I'm not responsible for any issues or problems that my arise from following this DIY.
Ok here are the tools that I used
21mm socket for my stock lug nuts
22mm socket
12mm socket
19mm socket
needle nose pliers
19mm open end wrench
torque wrench
2 smaller flat head screw drivers
rubber mallet
1/2 inch and 3/8 inch ratchets
3 inch c clamp
Ill start with the front
Take off the wheel.
Remove the bolt with the red color on the right and also the nut straight across from it on the left. This is just to loosen the brake line so you can move the caliper around. Just leave the 2 bolts that hold the bracket on alone. Also unclip the hose behind the red bolt so its not in the way.
Now loosen up the 2 22mm bolts that are on the rear of the caliper. There is one at the top and bottom. They are very tight and I used a ratchet and rubber mallet to loosen. DO NOT I REPEAT DO NOT LOOSEN UP THE 4 SMALLER BOLTS AT THE TOP ON THE REAR OF THE CALIPER. These bolt the caliper together and will make you loose brake fluid. You can see the 2 of the 4 bolts in my picture they have a L and the other has an S on it. The second pic is one of the 22mm bolts.
Ok now take the 3 inch C clamp and use it with the old brake pads still in the caliper and compress the pistons in the caliper. I took a piece of rubber and put it on the outside of the caliper so the clamp wouldn't scratch the paint or the Infiniti lettering on the outside of the caliper.
After you get them compressed take out the clips holding the 2 bars on the top of the caliper.
Now pull the pins out and remove the large top piece. I went ahead and put the caliper back on the car but didn't tighten it down. You will have to reattach the square block that the brake line goes to before you reattach the caliper. If you have the pistons compressed all the way down you can install the pads with the caliper back on the car. They will slide in through the top of the caliper. Just make sure you have your shims and brake lube on the back of the brake pad.
Now re tighten the 2 22mm bolts the red bolt and tighten everything back up. Don't forget about the line you unclipped earlier.
Now reinstall the wheel and do the other side.
Rear Brakes
Take off the wheel. Now you have 2 19mm bolts to remove to take off the caliper. The top one in the pic has a green stripe on it. You will need a open ended wrench for the bottom bolt because you cant get a socket on it.
That is all you have to take off on the rear. Now repeat compressing the pistons as you did on the front and reinstall the caliper on the car and install your new brake pads. Tighten ever thing up and reinstall your wheels.
Sorry if i missed anything.
Last edited by Buckeye G; Sep 13, 2009 at 09:15 PM.


Registered Member
Joined: Jan 2008
Posts: 503
Likes: 1
From: Murrieta CA

LOL, then you better not put in Project Mu B Streets. They have about 4 times the dusting as the stock Akebono's... of which I thought they didn't dust hardly at all.
Trending Topics
Just replaced rotors and pads after 27k miles..pretty much the stock pads are junk cheap quality and so are the rotors.
A few additions to this DIY would be the use of an open ended 22mm wrench for the top bolt on the front calipers. There is no way to get a socket in there due to the brake lines.
And also it should be stressed that if your rotors are seized on to the hub the front, remove that screw with the long cylinder type washer and the screw it back in with the washer, that way the screw will go all the way in, hit the hub and pop out the rotor. Took me 3hrs to figure that out, I found that on the eclipse forums btw lol.

I replaced my brake pads today with a friend. Replacing the pads are just like any car except us with sport package have 4 pistons  but anyway, all you need are pliers and a flathead screwdriver. Turn the front wheels so you won't have to loosen the calipers and to have a clear view. You don't need to remove anything, no need for big tools or sockets. Just use the pliers to remove the pins (see the pic of the caliper up there). DON'T LOSE THE PINS. Remove the bolt that holds the metal plating and brakepads. If you have a hard time removing the bolt, there are little holes on the side of the caliper you can use the tip of your plier to push the bolt out. After that is all gravy, just remove the bolts (there are two) and the metal plating will come off. Recompress the pistons and then remove your old pads and install your new ones. and yada, you should know. All 4 corners are the same. 2 hours took my time
but anyway, all you need are pliers and a flathead screwdriver. Turn the front wheels so you won't have to loosen the calipers and to have a clear view. You don't need to remove anything, no need for big tools or sockets. Just use the pliers to remove the pins (see the pic of the caliper up there). DON'T LOSE THE PINS. Remove the bolt that holds the metal plating and brakepads. If you have a hard time removing the bolt, there are little holes on the side of the caliper you can use the tip of your plier to push the bolt out. After that is all gravy, just remove the bolts (there are two) and the metal plating will come off. Recompress the pistons and then remove your old pads and install your new ones. and yada, you should know. All 4 corners are the same. 2 hours took my time
Last edited by teedough; Apr 3, 2010 at 11:44 PM.


i just checked my brakes to see how much pad I had left. 30,000 and still good amount left. FYI, when removing the pins for the metal cover, it will shoot out when the last pin is removed. And putting back the metal cover and putting the pins back in was PAIN. many swear words were used 

Registered Member
Joined: Jun 2010
Posts: 24
Likes: 0
From: Atlanta,GA
Great Thread!!
I did this D.I.Y yesterday and it was pretty easy except for the top bolt that holds the caliper, the brake line behind the bolt is a biiiaaaah to get to with a ratchet. Other than that, a breeeeeeeeeze!!!!!
