
Any advice for the first timer?


I am!
My thought process was "Will I do this for $250 if I can pay $80 a person to do it?"
Now, I already spent $80... and I don't think I can get good results for that amount of $$
The big question: being new on this, does anybody think that I can screw up my paint by doing it myself? I'll be buying the porter cable, that's for sure as I heard bad things about the rotatory ones in the hands of a non-expert (like me)
If everybody agrees that I should be able to pull it off, I'm buying the equipment and I'll do it myself. And I paid $80 to learn not to be cheap hahaha
Explaining the Decontamination Process (Part 1) by Zach McGovern
Explaining the Decontamination Process (Part 2) by Zach McGovern
and what do you guys think about this other polisher?
Amazon.com: Griot's Garage 10813STDCRD 6" Random Orbital Polisher with 10' Cord: Automotive
It looks like it comes with the backing plate so I can save some $$
Amazon.com: Griot's Garage 10813STDCRD 6" Random Orbital Polisher with 10' Cord: Automotive
It looks like it comes with the backing plate so I can save some $$

It comes with a 6" backing plate, however I would not recommend using that as I find the 6.5" pads to be a bit too big for this smaller machine, therefore they greatly reduce the overall abilities of the machine. I would purchase a 5" backing plate, 5.5" pads, a 3" backing plate, and some 3" pads. A good starter set would be 2-3 of the orange light cutting pads in each size and 2-3 of the white polishing pads in each size. You may also consider some yellow cutting pads if you believe your paint is in considerably bad shape.
As far as compounds and polishes, I would recommend Meguiar's M100 and Meguiar's M205... or Menznera FG400 and Menzerna SF4000... Either pair will produce great results.
and again, I would highly recommend checking out our thorough Detailing Guide and variety of articles on the Ask-A-Pro Blog for more useful information.
I've included links to all of these items that will take you directly to their product page in our online store. Please let me know if you've got any questions, and I would be happy to help
 While Amazon is certainly a great resource, they can't offer professional detailing guidance/expertise, so please don't hesitate to ask if you have any further questions about products or processes... I'd really like to earn your business.
 Zach McGovern
Detailed Image Ask-A-Pro Blog Author
Attention to Detailing Peoria - Home

Registered Member
Joined: Jan 2015
Posts: 620
Likes: 82
From: California, USA
I will say that the door handle areas are a PIA!!! Just to get to them in order to clean up the scratches will be a pain. But if you decide to invest in some equipment and give yourself a little time to practice, you'll notice how well and easy you can get your car to your own specs. Even getting some M105 and M205 and doing it by hand, you'll be able to tackle specific areas that bug you and probably clean them up considerably. Start small and get the detailing bug

Thread Starter
Registered User
Joined: May 2015
Posts: 47
Likes: 1
I will say that the door handle areas are a PIA!!! Just to get to them in order to clean up the scratches will be a pain. But if you decide to invest in some equipment and give yourself a little time to practice, you'll notice how well and easy you can get your car to your own specs. Even getting some M105 and M205 and doing it by hand, you'll be able to tackle specific areas that bug you and probably clean them up considerably. Start small and get the detailing bug
well, i'll work on it and it's going to look great xD
I've included links to all of these items that will take you directly to their product page in our online store. Please let me know if you've got any questions, and I would be happy to help While Amazon is certainly a great resource, they can't offer professional detailing guidance/expertise, so please don't hesitate to ask if you have any further questions about products or processes... I'd really like to earn your business.
While Amazon is certainly a great resource, they can't offer professional detailing guidance/expertise, so please don't hesitate to ask if you have any further questions about products or processes... I'd really like to earn your business. Now, I'm really trying to save some $$ and I'd love if I can stay below $200, so I was thinking on getting this kit:
DI Packages Porter Cable 7424XP, Meguiar's Polishes & Pads Basic Kit | Free Shipping Available - Detailed Image
+ an extra
Lake Country Yellow Cutting Pad - 4" | Free Shipping Available - Detailed Image
I'll need it in some scratches (well, i guess, not an expert xD)
+ clay
Now, I've been using this to wash my car (i live in a complex and i can't wash it in my garage)
Optimum No Rinse Wash & Shine (ONR) - 32 oz | Free Shipping Available - Detailed Image and it says that if i mix it with water i can use it as a clay lubricant (yeyy!! $ saved xD)
then I was taking a look at the blackfire sealant, but it's $40!
Blackfire Wet Diamond All Finish Paint Protection - 16 oz | Free Shipping Available - Detailed Image
is there any other cheaper (but GOOD) sealant that you can recommend?
Another question: is it REALLY necessary to have more than 1 pad of each? if so, why?
Thanks guys!
and what do you guys think about this other polisher?
Amazon.com: Griot's Garage 10813STDCRD 6" Random Orbital Polisher with 10' Cord: Automotive
It looks like it comes with the backing plate so I can save some $$
Amazon.com: Griot's Garage 10813STDCRD 6" Random Orbital Polisher with 10' Cord: Automotive
It looks like it comes with the backing plate so I can save some $$
https://www.myg37.com/forums/private...=newpm&u=49255
He'll get you a nice deal on a Porter Cable starter set, and as you can see by all his helpful advice he'll be here to help you along the way should you need it.
Just consider the groupon an entry level step, and now you can get just what you need to do it yourself and really take pride in your ride!
You'll be so glad you did.
Zach, you took your time and you really helped me a lot, you earned my business!
Now, I'm really trying to save some $$ and I'd love if I can stay below $200, so I was thinking on getting this kit:
DI Packages Porter Cable 7424XP, Meguiar's Polishes & Pads Basic Kit | Free Shipping Available - Detailed Image
+ an extra
Lake Country Yellow Cutting Pad - 4" | Free Shipping Available - Detailed Image
I'll need it in some scratches (well, i guess, not an expert xD)
+ clay
Now, I've been using this to wash my car (i live in a complex and i can't wash it in my garage)
Optimum No Rinse Wash & Shine (ONR) - 32 oz | Free Shipping Available - Detailed Image and it says that if i mix it with water i can use it as a clay lubricant (yeyy!! $ saved xD)
then I was taking a look at the blackfire sealant, but it's $40!
Blackfire Wet Diamond All Finish Paint Protection - 16 oz | Free Shipping Available - Detailed Image
is there any other cheaper (but GOOD) sealant that you can recommend?
Another question: is it REALLY necessary to have more than 1 pad of each? if so, why?
Thanks guys!
ONR is a great way to quickly and easily wash your car in water restricted areas, and does make a great quick detailer/clay lube when mixed as indicated in the instructions. A definite time and money saver

A good budget sealant would be Meguiar's M21 Synthetic Sealant
Yes, it is very important to have as many pads as you can... I recommend a minimum of 2 of each color, but personally use closer to 6-8 of each type because I have a ridiculous amount of pads and it is easier for me to simply switch pads than to clean them often. Anyway, the reason you want to have several is this..... as you are correcting your paint, you will be removing clear coat. This material, along with polishing compound residue, will build up on the pad face and "gunk up" the pad. This does a couple of things... it makes the pad less effective as the foam is no longer clean and therefore will not have the same cutting ability and therefore will not produce the same results as it did when it was clean, and it will also create a lot more dust while you are working. It is important to use at least two pads, so you can clean one out and begin working with the 2nd one for a while before you go back to the other one. Ideally you would want to grab a clean pad every couple of panels when you are doing heavier cutting.
Hope that helps!
Zach McGovern
Detailed Image Ask-A-Pro Blog Author
Attention to Detailing Peoria - Home
Thread Starter
Registered User
Joined: May 2015
Posts: 47
Likes: 1
Alright, I got the PC + pads + sealant + clay [from Detailed Image here]
It's arriving on Thursday so MAYBE next weekend (the weekend of the 11th) I'll be doing this. Or maybe the following weekend ^_^
I'll keep you posted and more before-after pictures are on the way
DOMO
wish me luck!
It's arriving on Thursday so MAYBE next weekend (the weekend of the 11th) I'll be doing this. Or maybe the following weekend ^_^
I'll keep you posted and more before-after pictures are on the way
DOMO
wish me luck!
Thread Starter
Registered User
Joined: May 2015
Posts: 47
Likes: 1
Thanks!
$259.93:
$03.99 - 3M Automotive Performance Masking Tape - 18 mm
$02.49 - DI Accessories Clay Bar Storage Container - 8 oz
$10.99 - DI Accessories Fine Grade Clay - 100 g
$01.49 - DI Accessories Yellow Foam Applicator Pad
$209.99 - DI Packages PC 7424XP with M105, M205 and 5.5" pads
$07.99 - Lake Country Yellow Cutting Pad - 5.5"
$22.99 - Meguiar's Synthetic Sealant 2.0 M21 - 16 oz
Alright, I got the PC + pads + sealant + clay [from Detailed Image here]
It's arriving on Thursday so MAYBE next weekend (the weekend of the 11th) I'll be doing this. Or maybe the following weekend ^_^
I'll keep you posted and more before-after pictures are on the way
DOMO
wish me luck!
It's arriving on Thursday so MAYBE next weekend (the weekend of the 11th) I'll be doing this. Or maybe the following weekend ^_^
I'll keep you posted and more before-after pictures are on the way
DOMO
wish me luck!
As always - please let me know if you have any questions!
You can always contact me directly via email (link to my site in my signature) if you need something as I don't always have time to get to the forums once or twice a day during the weekends.
Zach McGovern
Detailed Image Ask-A-Pro Blog Author
Attention to Detailing Peoria - Home
You're off to a great start w/ that setup Laguna, and having Zach in your corner is a big WIN! You'll have that G looking sweet in short order, might even want to detail some of your buddies cars once you get the hang of it, you could pay for that kit w/ one side job
Thread Starter
Registered User
Joined: May 2015
Posts: 47
Likes: 1
Thanks guys!
Alright, now a quick question (maybe not that quick xD)
I've been watching videos and reading so when I do it (hopefully this next weekend), I do it right.
Now, I know how to start:
* wash the car
* clay the car
* start polishing xD
5-6 dots on the pad, squirt a little bit of lube on the pad, spread it, then polish. Cable over the shoulder. Everything good. Polish/compound 5-6 passes until the polish is clear
The question:
Now, when I finish the first panel/section, what then? should I clean the pad before continuing? should I only apply 5-6 dots of polisher again?
You know why I ask this, right? Everybody shows how to polish ONE section and then they stop xD so I can only assume on how to continue
Thank you again guys!
5-6 passes may be a bit excessive... if you're using M105, you'll likely only have enough working time to do 2-3 passes (maybe 4-5) before the product dries up. It cuts very quickly, but if you need to do more passes, simply mist a bit of water onto the panel (very little bit), and continue compounding for another couple passes... or add another couple dots of product to your pad.
If you're compounding, you are going to want to clean your pad after each section using a pad cleaner brush or towel to remove paint/ product build up on the pad. If you do not clean often, the pad will become less effective very quickly. You will need to change to a new pad more frequently with compounding than with polishing because you are removing more material.
After you work a section, just brush the pad off, then add a few more dots of product, and proceed to the next section overlapping the previous section slightly.
Zach McGovern
Detailed Image Ask-A-Pro Blog Author
Attention to Detailing Peoria - Home

Registered User
Joined: May 2015
Posts: 39
Likes: 6
From: Oklahoma
Laguna, having gone through this myself as a first-timer last weekend and knowing you want to get this done as quick as possible, I wanted to share some lessons learned.. but Quickett already said exactly what I'd suggest.. just to reiterate the bolded parts:
- Manzerna products have polymers which make them tough to thoroughly remove without a cleaner or the IPA solution. Not sure what your polish is made of; Zach would know if IPA is appropriate. I researched this part of the process on-the-fly and quickly discovered IPA is safe and very effective at removing the compound/polish residue. Plus it costs next to nothing.
- Might need an IPA wipedown after the initial wash to get the rest of the wax off.
- A sloppy tape job (like the one I did) will cost time. Do it right and be as precise as possible.
- Have at least 12 clean small MF towels on hand. Or more.
- I thought I had good lighting in my garage. There's good lighting and then there's lighting sufficient to inspect car paint during/after polishing. I made do with a single-bulb retractable reel work light, but get one of those dual-halogen stands if you can afford it. Will save time.
You will waste a lot of time doing it this way. Your best bet is to: pick a Friday night through Saturday afternoon that you will not need your car.
As soon as you get home friday:
1. -Wash the car with a strong soap, citrus based works well, as you want to ensure all protection is stripped before cladding and polishing. Do not dry the car, just pull into garage wet. 45 min approximately.
2. While it is wet, you can begin claying.(I suggest picking up some ONR, you can use it as clay lube, QD and use it for rinseless washes depending on the dilution ration used) 60 min approximately
3. Get a spray bottle and mix 1:1 distilled water and isopropyl alcohol. IPA wipedown to ensure no clay reside is left. 20 min approximately
4. Start taping(use either auto body tape or painters tape the kind that doesn't leave residue when removed) Trim around sunroof, rear glass where the trunk opens, trim around the windows, the emblems on the trunk, the trim piece on the trunk, etc... DO NOT SKIMP OR RUSH THROUGH THIS! The little extra time you spend will save you much more time later cleaning polish off glass and in between body panels. 60 min approximately
5. Polishing, I personally use Menzerna products on my customers cars and my OB G. I have tried M105 & 205, but they dust a little too much for my liking. Menzerna products which are DAT (diminishing) finish really well with minimal dust. As was previously stated FG400 w/yellow or orange pads followed by SF4000 with a white pad is a combo that will work in a lot of situations (every one is a little different though) 4-8 hours maybe more depending on number of steps and condition of paint.
Depending how late you are willing to work, you could possibly complete the compounding stage before calling it a night. Then complete finish stage in the morning. 2-4 hours approximately
If you have good light in your garage, you might not need it, but a halogen work light from harbor freight is cheap and will help you examine your progress. Between each polishing step you will want to use the IPA wipedown to remove the previous steps polishing oils and abrasives. This helps you see the naked surface, and see if you are satisfied. Do not try to get your paint 100% corrected, more than likely you have some scratches that are just too deep to get to (if your fingernail can catch in the scratch it is too deep to polish out)
6. Glaze/Sealant. You are on the right track with BFWD. The stuff is slightly expensive, but it goes A LONG WAY. I have used it on almost 20 cars and I still haven't finished the bottle. You Wil be amazed at the sickness of your paint after you use it. To apply BFWD you will only need one blue pad. 60 min approximately
If you start after work Friday, you can be finished and by Saturday afternoon. I didn't include all of the other steps, such as engine, wheels, tires, wheel wells, glass, interior because that would be getting into micro level detail that many books have been written about. Meant to be kind of a cliff notes version.
As soon as you get home friday:
1. -Wash the car with a strong soap, citrus based works well, as you want to ensure all protection is stripped before cladding and polishing. Do not dry the car, just pull into garage wet. 45 min approximately.
2. While it is wet, you can begin claying.(I suggest picking up some ONR, you can use it as clay lube, QD and use it for rinseless washes depending on the dilution ration used) 60 min approximately
3. Get a spray bottle and mix 1:1 distilled water and isopropyl alcohol. IPA wipedown to ensure no clay reside is left. 20 min approximately
4. Start taping(use either auto body tape or painters tape the kind that doesn't leave residue when removed) Trim around sunroof, rear glass where the trunk opens, trim around the windows, the emblems on the trunk, the trim piece on the trunk, etc... DO NOT SKIMP OR RUSH THROUGH THIS! The little extra time you spend will save you much more time later cleaning polish off glass and in between body panels. 60 min approximately
5. Polishing, I personally use Menzerna products on my customers cars and my OB G. I have tried M105 & 205, but they dust a little too much for my liking. Menzerna products which are DAT (diminishing) finish really well with minimal dust. As was previously stated FG400 w/yellow or orange pads followed by SF4000 with a white pad is a combo that will work in a lot of situations (every one is a little different though) 4-8 hours maybe more depending on number of steps and condition of paint.
Depending how late you are willing to work, you could possibly complete the compounding stage before calling it a night. Then complete finish stage in the morning. 2-4 hours approximately
If you have good light in your garage, you might not need it, but a halogen work light from harbor freight is cheap and will help you examine your progress. Between each polishing step you will want to use the IPA wipedown to remove the previous steps polishing oils and abrasives. This helps you see the naked surface, and see if you are satisfied. Do not try to get your paint 100% corrected, more than likely you have some scratches that are just too deep to get to (if your fingernail can catch in the scratch it is too deep to polish out)
6. Glaze/Sealant. You are on the right track with BFWD. The stuff is slightly expensive, but it goes A LONG WAY. I have used it on almost 20 cars and I still haven't finished the bottle. You Wil be amazed at the sickness of your paint after you use it. To apply BFWD you will only need one blue pad. 60 min approximately
If you start after work Friday, you can be finished and
by Saturday afternoon. I didn't include all of the other steps, such as engine, wheels, tires, wheel wells, glass, interior because that would be getting into micro level detail that many books have been written about. Meant to be kind of a cliff notes version.- Might need an IPA wipedown after the initial wash to get the rest of the wax off.
- A sloppy tape job (like the one I did) will cost time. Do it right and be as precise as possible.
- Have at least 12 clean small MF towels on hand. Or more.
- I thought I had good lighting in my garage. There's good lighting and then there's lighting sufficient to inspect car paint during/after polishing. I made do with a single-bulb retractable reel work light, but get one of those dual-halogen stands if you can afford it. Will save time.
Thread Starter
Registered User
Joined: May 2015
Posts: 47
Likes: 1
guys, it arrived yesterday
today it's raining (yeah, lucky me) so what i was thinking of doing was using my ONR inside
wash a panel, clay a panel, polish a panel, seal a panel
repeat
Guys, questions for you!
* what should I tape?
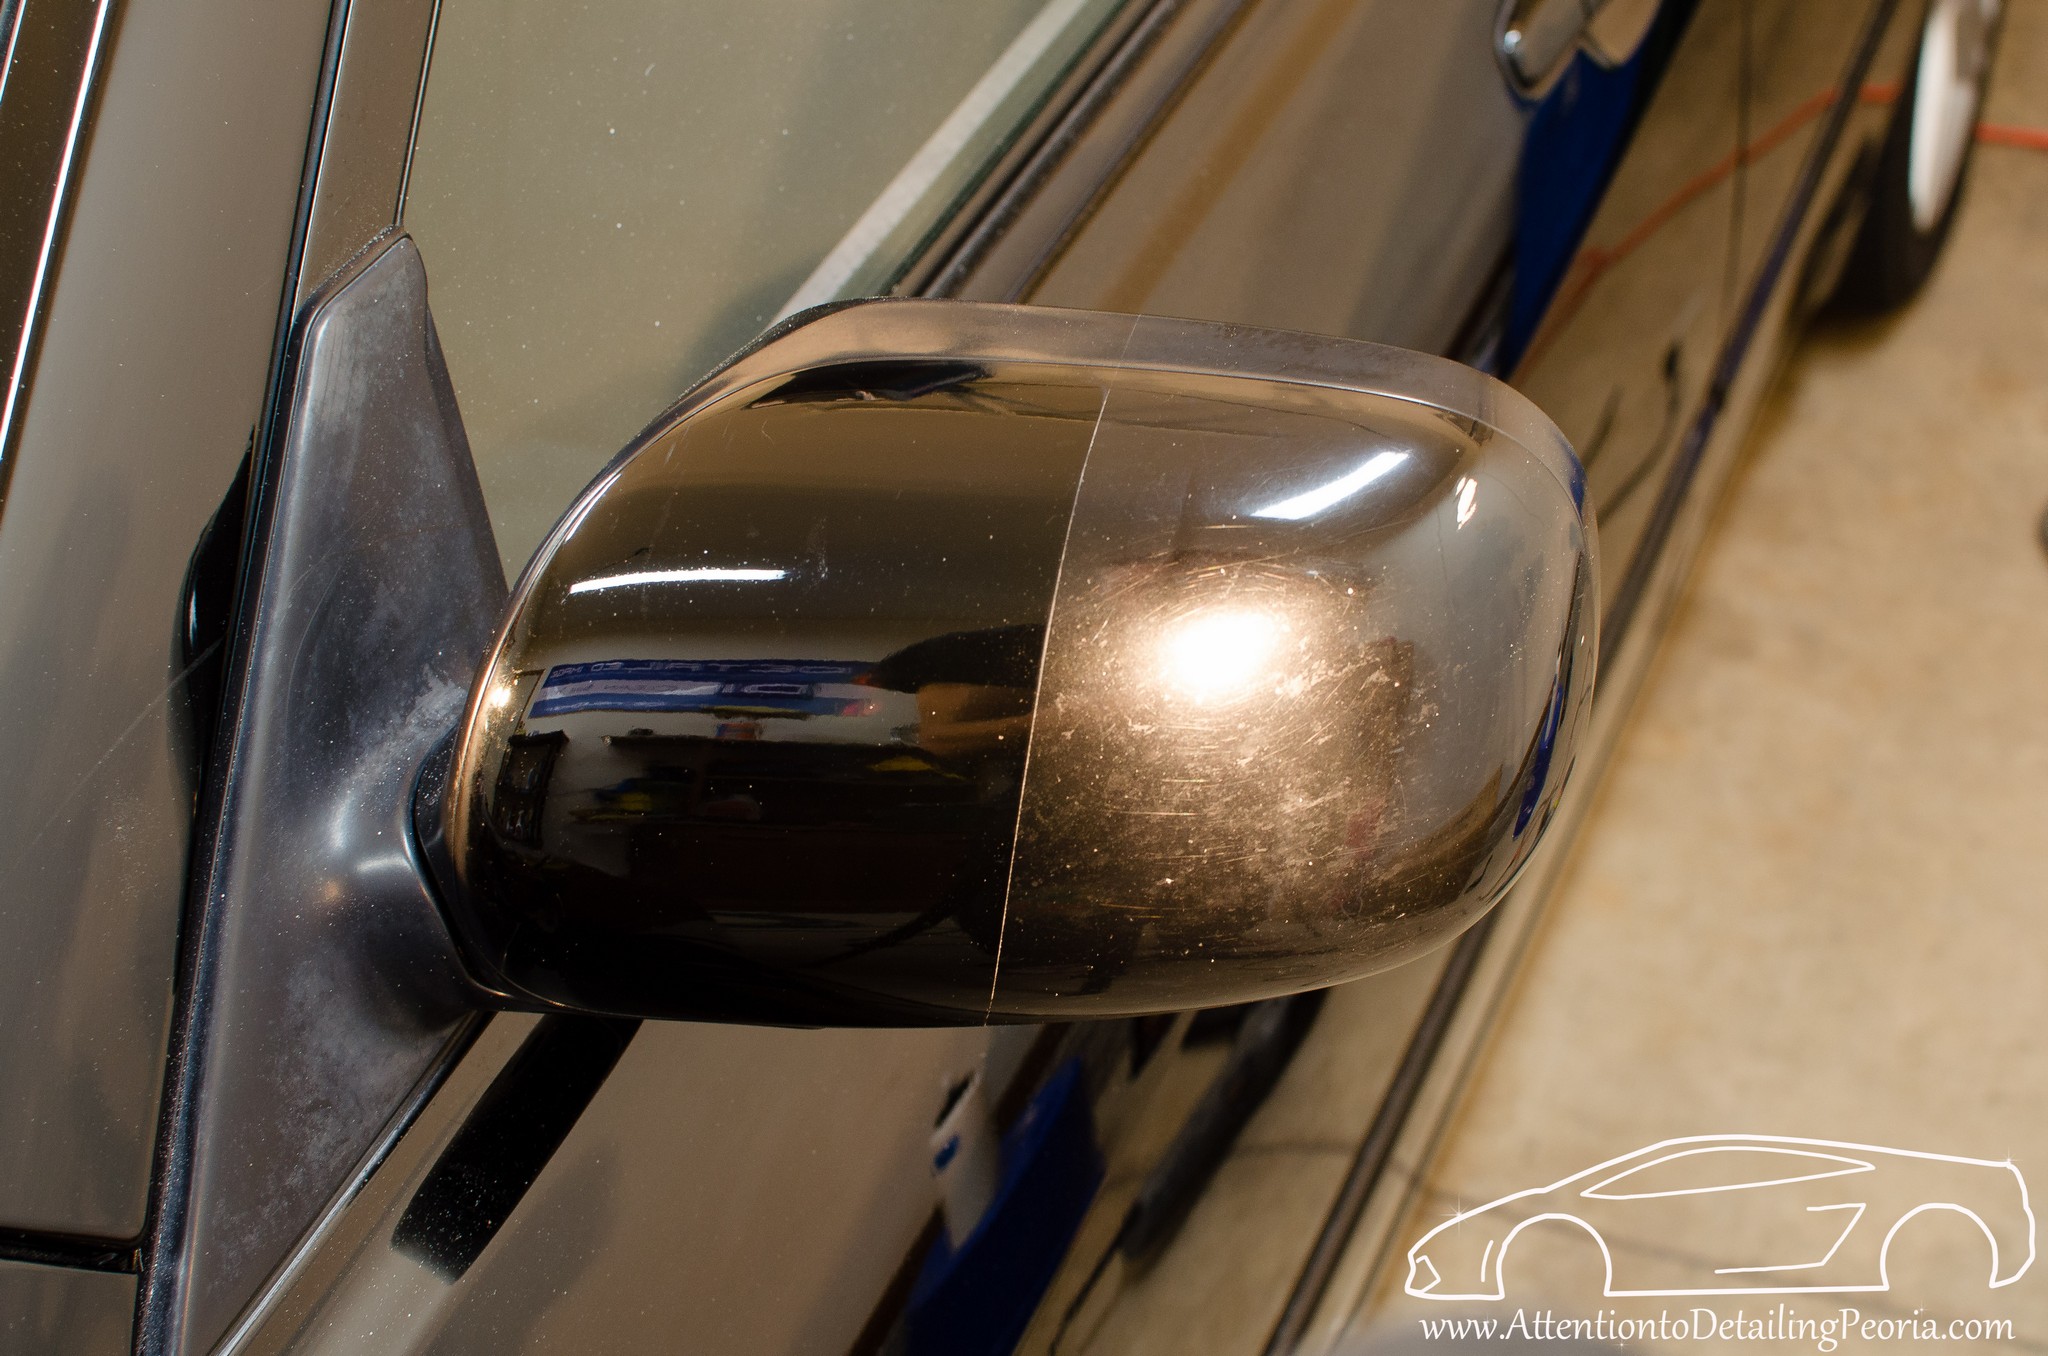
* is anything special about the side mirrors? should I clay/polish the same way?
Thanks guys and i'll update you very soon!
today it's raining (yeah, lucky me) so what i was thinking of doing was using my ONR inside
wash a panel, clay a panel, polish a panel, seal a panel
repeat
Guys, questions for you!
* what should I tape?
* is anything special about the side mirrors? should I clay/polish the same way?
Thanks guys and i'll update you very soon!
guys, it arrived yesterday
today it's raining (yeah, lucky me) so what i was thinking of doing was using my ONR inside
wash a panel, clay a panel, polish a panel, seal a panel
repeat
Guys, questions for you!
* what should I tape?
* is anything special about the side mirrors? should I clay/polish the same way?
Thanks guys and i'll update you very soon!
Wash the entire car. Clay the entire car. Polish the entire car. Seal the entire car. Stare at the entire car

What to Tape on a Car before Polishing Featuring Meguiar’s Professional Masking Tape by Addison Good
How to Tape Plastic Trim – Part 1 by Ivan Rajic
If your side mirrors are painted like the rest of the car, treat them as you would any other painted area. Wash, clay, correct, protect.
Hope that helps!
Zach McGovern
Detailed Image Ask-A-Pro Blog Author
Attention to Detailing Peoria - Home

