
Scratch Removal Advice


Thread Starter
Registered Member
Joined: Mar 2014
Posts: 83
Likes: 2
Scratch Removal Advice
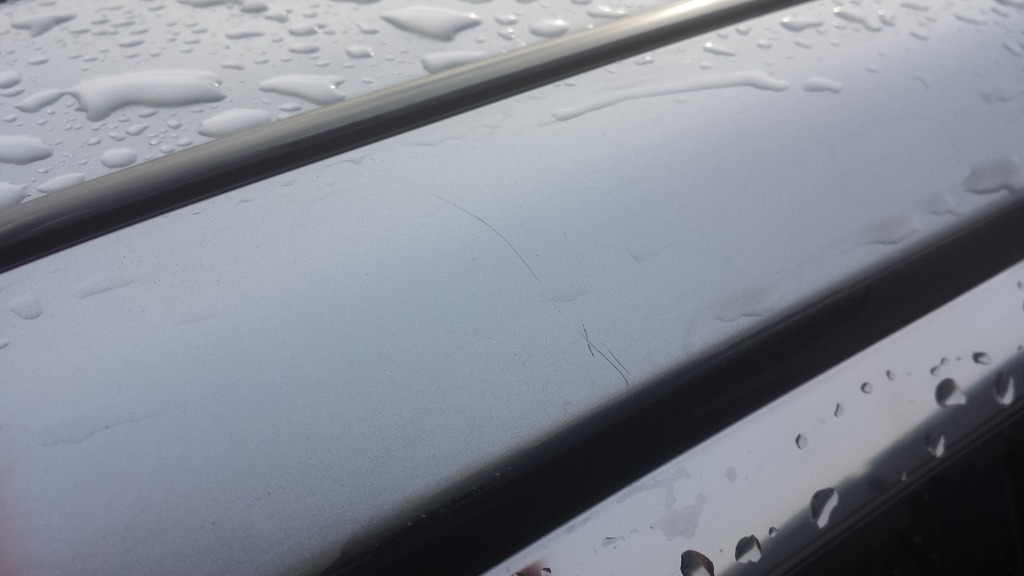
Hi,
I was at a friends party this weekend and someone stumbled onto my door when I was getting out most likely causing all these scratches with fingernails. I ran over them with my nail and I can feel them but my nail doesnt sink into them and stop. It also kind of scrached up the aluminum trim.
Does anyone have advice on removing anything similar? What product should I use? and If no remover is acceptable should I take it in? I already bought the nissan touch up paint for another issue but was hoping to rub this one out.
Not a happy monday - this paint sucks.
Jason

Registered Member
Joined: Jan 2015
Posts: 620
Likes: 82
From: California, USA
A buffer and compound should take that out, especially if it's just in the clear coat. Can do it by hand too, just more elbow grease needed. Then you'll have to use polish to get rid of the haze you'll get from the compound. Then seal and wax. Should be fine after that. Just make sure to ramp up the aggressiveness. Start low and work your way up as necessary so you take away as little clear as needed to fix it.
I use all Meguires, but there are LOTS of great products out there.
The steps I would take...
Meguires M105 to cut
Meguires M205 to polish
Meguires NXT 2.0 to seal
Meguires Ultimate to wax
Last two are very important. Always protect after you fix.
I use all Meguires, but there are LOTS of great products out there.
The steps I would take...
Meguires M105 to cut
Meguires M205 to polish
Meguires NXT 2.0 to seal
Meguires Ultimate to wax
Last two are very important. Always protect after you fix.


Registered Member
Joined: Jan 2015
Posts: 620
Likes: 82
From: California, USA
What do I recommend?
RO buffer and a set of pads (cutting pad and polishing pad at minimum) and microfiber towels.
You can use foam applicators for wax (can get at auto parts store), get 4 or 5 of them and some microfiber towels.
Compound:
Keep steady and even pressure in a circular motion while applying compound. Start relatively light. You can increase some pressure as needed to work the area down. Don't worry about the swirls, the polish will take that out. Wipe with the MF towels in between applications until satisfied with the result.
Polish:
Same as the compound, but you're using this to remove the swirls made by the compounding.
Sealant:
Apply like wax. Once you wipe it off, it usually has to cure for 24 hours before applying wax.
Wax:
Mr. Miagi. Wax on, wax off. Remember, back and forth with the microfiber towel to remove.
Keep an eye on the MF towels. If they get laden with compound or dirt, use a clean one. Last thing you want to do is take time to take out scratches and swirls and then introduce new ones with a dirty towel.
Do not reuse the applicators for the next step unless you plan on washing, rinsing thoroughly, and drying the applicators first.
For the pads, use only the cutting pad for the compound, use the polishing pad(s) for the other steps. If using one polishing pad, wash, rinse, and dry well before switching to the next step.
Don't use terry cloth towels on your paint for anything.
I think that generally covers the steps.
Last edited by Flakman; May 4, 2015 at 01:58 PM. Reason: Corrected Quote
Thread Starter
Registered Member
Joined: Mar 2014
Posts: 83
Likes: 2
Though wet sanding could fix it, I would leave this as a last resort. The fact you are asking these questions leads me to believe you definitely shouldn't start with that.
What do I recommend?
RO buffer and a set of pads (cutting pad and polishing pad at minimum) and microfiber towels.
You can use foam applicators for wax (can get at auto parts store), get 4 or 5 of them and some microfiber towels.
Compound:
Keep steady and even pressure in a circular motion while applying compound. Start relatively light. You can increase some pressure as needed to work the area down. Don't worry about the swirls, the polish will take that out. Wipe with the MF towels in between applications until satisfied with the result.
Polish:
Same as the compound, but you're using this to remove the swirls made by the compounding.
Sealant:
Apply like wax. Once you wipe it off, it usually has to cure for 24 hours before applying wax.
Wax:
Mr. Miagi. Wax on, wax off. Remember, back and forth with the microfiber towel to remove.
Keep an eye on the MF towels. If they get laden with compound or dirt, use a clean one. Last thing you want to do is take time to take out scratches and swirls and then introduce new ones with a dirty towel.
Do not reuse the applicators for the next step unless you plan on washing, rinsing thoroughly, and drying the applicators first.
For the pads, use only the cutting pad for the compound, use the polishing pad(s) for the other steps. If using one polishing pad, wash, rinse, and dry well before switching to the next step.
Don't use terry cloth towels on your paint for anything.
I think that generally covers the steps.
Jason
Registered Member
Joined: Jan 2015
Posts: 620
Likes: 82
From: California, USA
I am not a professional detailer. I do what I see that works with my car for the effort I am willing to put forth. You can gather some further info at:
Auto Detailing Facts, auto detailing Tips, How to detailing Guides, how to polish, how to wax, DIY detailing, do it yourself guides
HOW TO ARTICLES & VIDEOS
https://www.youtube.com/user/AMMONYCdotcom/videos
Good luck and post pics. While this is a learning process for you, it can also help others that end up in the same position. Plus, we all have things to learn, and you may find something that you see helps your situation that we haven't thought of

Trending Topics

Registered Member
Joined: Jan 2015
Posts: 620
Likes: 82
From: California, USA
Definitely not all the same, but IMO I have no problem using the big pack of yellow MF towels from Costco. I know some may look down upon them, but I have not seen any scratching from them at all. I do have one out of the pack that does some strange things against the glass on my car, but I just marked that with an X and use it for engine/exhaust cleaning. If you're looking for something to dry with, you'll need a good waffle weave mf towel since normal mf towels are hydrophobic until wet.
In general, the higher the gsm (grams per square meter) the better, like 300 to 350 gsm. 400+ is a bit soft and starts to not have the coarseness needed to take off the polish or compound. YMMV
In general, the higher the gsm (grams per square meter) the better, like 300 to 350 gsm. 400+ is a bit soft and starts to not have the coarseness needed to take off the polish or compound. YMMV
I'd recommend using a RO with a yellow compounding pad and either a product like Menzerna FG-400 or Wolfgang Uber compound and turn the speed to 5.5 to start. Smear the compound over the paint with the pad and then use light pressure. Give the compound time to work. Apply mild pressure after 60 seconds of compounding. Stop after another 90 secs has passed. That's about what your compounding cycle time should be. You should never need to apply a lot of pressure when compounding with a RO. It will stop if you apply too much anyways. If you ever have a deep scratch and you're looking to cut deep then you need a rotary polisher. Makita makes a really good one for about $199. Anyways after you compound get a good polish Menzerna has a follow up to the FG-400, it's called Final Polish I think FG-2000 or something like that. Megs Ultimate polish is actually really good for the price and can be found OTC so maybe that would be easier. Use a white pad and use the RO at the same speed, time and pressure changes. Some polishes have a longer working time than others as do compounds but the 60/90sec approach works well for me regardless. After you have corrected and polished you have to make a decision. Glaze or not to Glaze? Well if you have time always say yes to this question. Very few products can create that wet glassy look like a glaze can. The issue with glazes is they don't last long at all so you have to seal afterwards. Poor Boy's makes some great glazes for the money. Apply your glaze with a foam applicator. Wipe on a healthy amount but don't go overboard. You will need a solid 3-4 MF towels to take off the glaze. I like sealants as they last longer but can also be topped with a carnuba for that warm glow. Use foam applicator for this step and the next step if you chose to top with a carnuba. If you were to go to this extent I'd do the whole car. Menz fg-400 isn't super aggressive.

Hi,
I was at a friends party this weekend and someone stumbled onto my door when I was getting out most likely causing all these scratches with fingernails. I ran over them with my nail and I can feel them but my nail doesnt sink into them and stop. It also kind of scrached up the aluminum trim.
Does anyone have advice on removing anything similar? What product should I use? and If no remover is acceptable should I take it in? I already bought the nissan touch up paint for another issue but was hoping to rub this one out.
Not a happy monday - this paint sucks.
Jason
I did use dr color chip and works great!

Registered User
Joined: Apr 2015
Posts: 139
Likes: 2
Definitely not all the same, but IMO I have no problem using the big pack of yellow MF towels from Costco. I know some may look down upon them, but I have not seen any scratching from them at all. I do have one out of the pack that does some strange things against the glass on my car, but I just marked that with an X and use it for engine/exhaust cleaning. If you're looking for something to dry with, you'll need a good waffle weave mf towel since normal mf towels are hydrophobic until wet.
In general, the higher the gsm (grams per square meter) the better, like 300 to 350 gsm. 400+ is a bit soft and starts to not have the coarseness needed to take off the polish or compound. YMMV
In general, the higher the gsm (grams per square meter) the better, like 300 to 350 gsm. 400+ is a bit soft and starts to not have the coarseness needed to take off the polish or compound. YMMV
Only part is, you have to be careful about the tag as that can potentially scratch your paint if you are applyin pressure with the tag touching the paint surface