
"Scarlett" - 6MT Sedan True Unicorn in Malbec Black


Registered User
Joined: Nov 2016
Posts: 739
Likes: 71
From: Charlotte, NC from OH thru VA
I love the grey, but I think the burnt copper will bring out some more/different undertones in the Malbec Black. I know this isn't the Burnt Copper, but I do know that color. I say go for it!


so today will start the process and prepping for modding my headlights. For any of those that have done this mod, I'm open ear to any tips, hints, or suggestions. Wish me luck

As far as painting that ribbed section right below the projector lens, most people say to leave it un-touched because it will bubble. If you add in the STI-R lens and leave in a hot climate such as myself...it'll bubble regardless. Ask me how I know

If you got any more small questions, send me a PM. I'm happy to answer.
Buy some butyl tape from the retrofit source to re-seal. Take your time with the headlights and if it's your first time, I would dedicate a weekend towards it depending on how much modification you are doing. Also, if you're opening up the headlights, you should swap in the STi-R lens and mod the shield for a sharp cutoff. My build thread has more details.
As far as painting that ribbed section right below the projector lens, most people say to leave it un-touched because it will bubble. If you add in the STI-R lens and leave in a hot climate such as myself...it'll bubble regardless. Ask me how I know
If you got any more small questions, send me a PM. I'm happy to answer.
Thanks and I guess you haven't been through this thread, but everything you've already mentioned has been purchased and then some and I believe I qualify for a "hot climate" here in Tampa. I may end up painting the whole bezel then if its none for bubbling regardless. But I do appreciate the feedback and I'll hit you up if I have any questions this weekend.
G/L

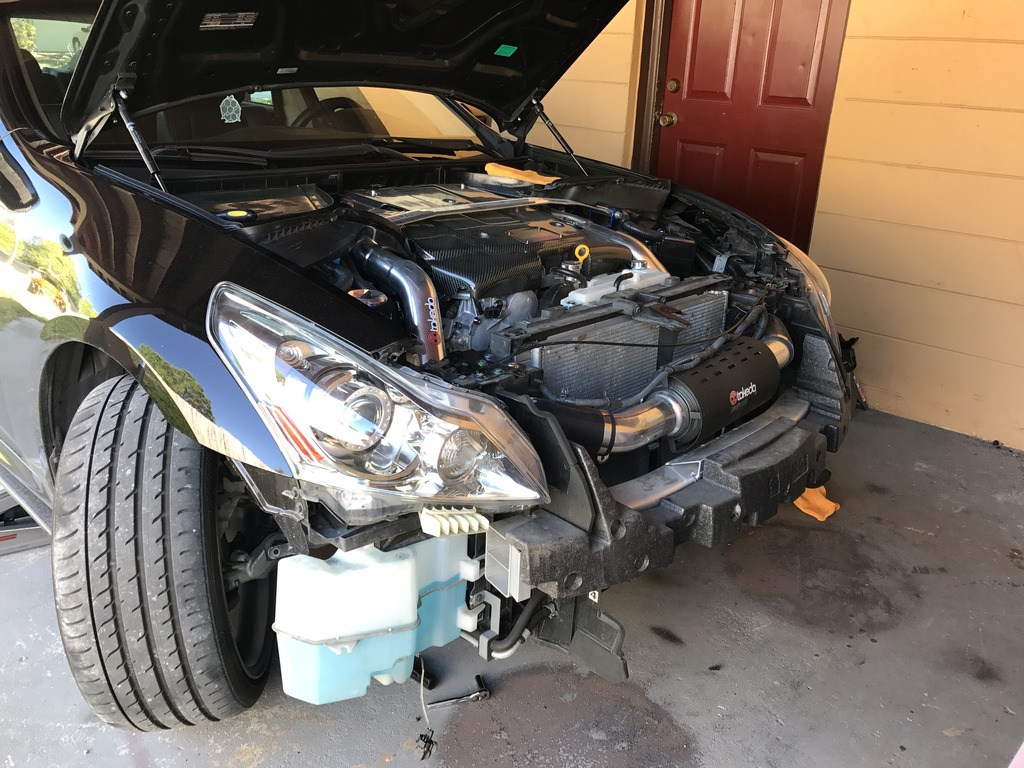
Ok so it did happen and I am not done entirely, everything has been reinstalled...just waiting for my new wiring harness to get here so that I can hook up the wires and truly be done.
So where to start, so first of all, I've never modified headlights before and this was my first time. I did have quite a few mishaps and learned the hard way from them.
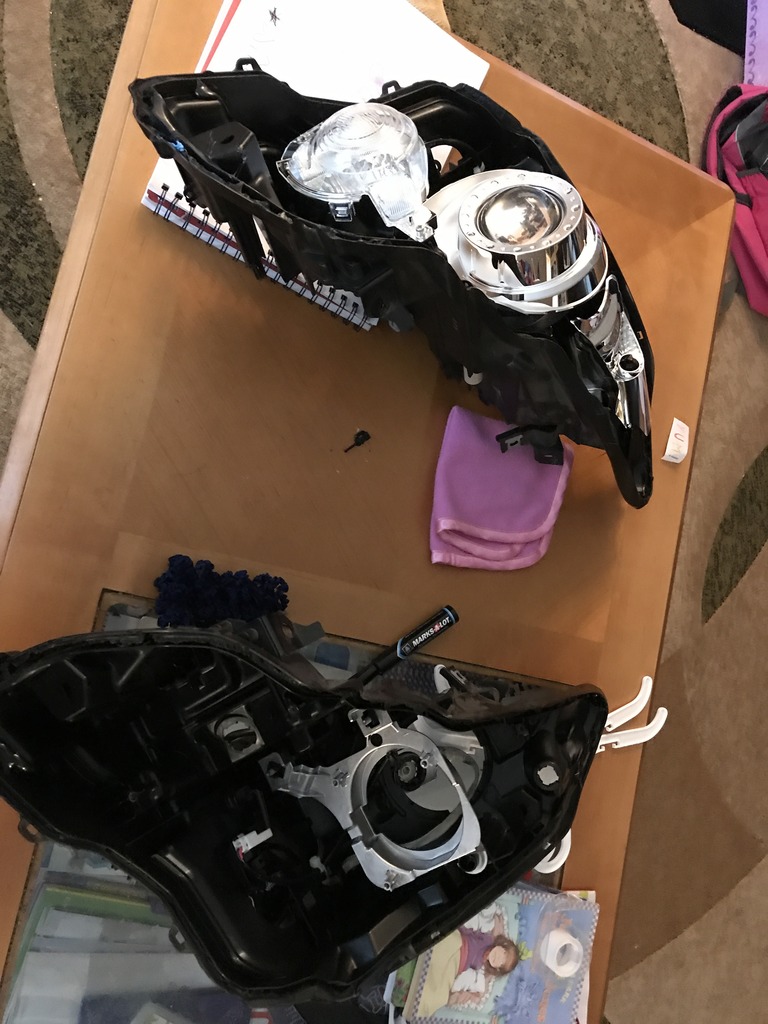
This is what I did to mine, gloss black for every portion of lights. I did not want to mismatch any paint scheme for the sake of having to go back at a later time to repaint. Black goes with everything. STir custom etched lenses, Starry Night quad halos, Diode Dynamic Demon Eyes, custom black side markers (cant remember brand name)
So I've been planning this modification during this 3 day weekend giving myself ample time to go slow and get it done correctly. Thank god I planned this accordingly as I needed every bit of the 3 days. Now this was also including a dam quince Sat afternoon/all evening of my time which didnt help as I had to leave in the middle of working.
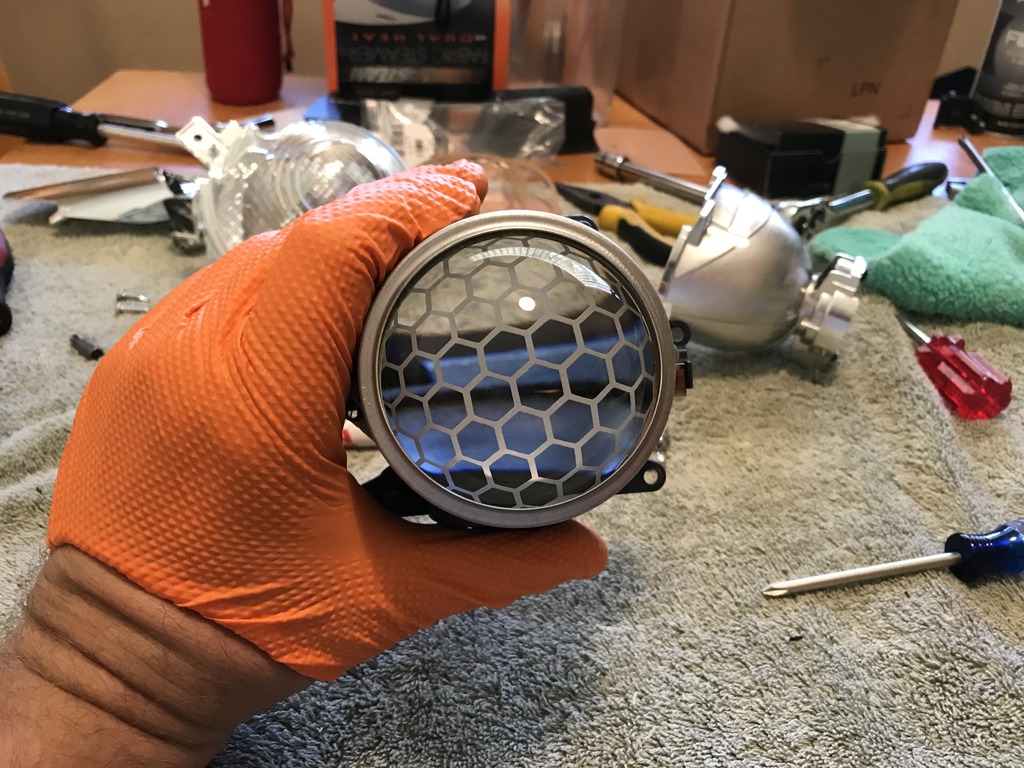
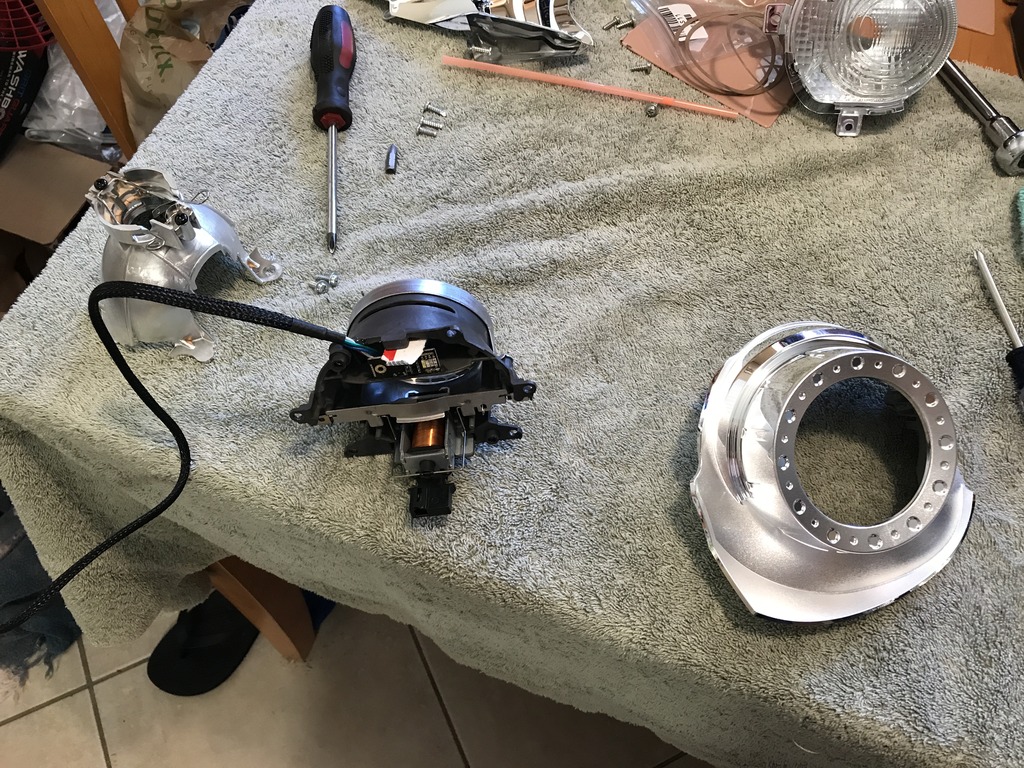
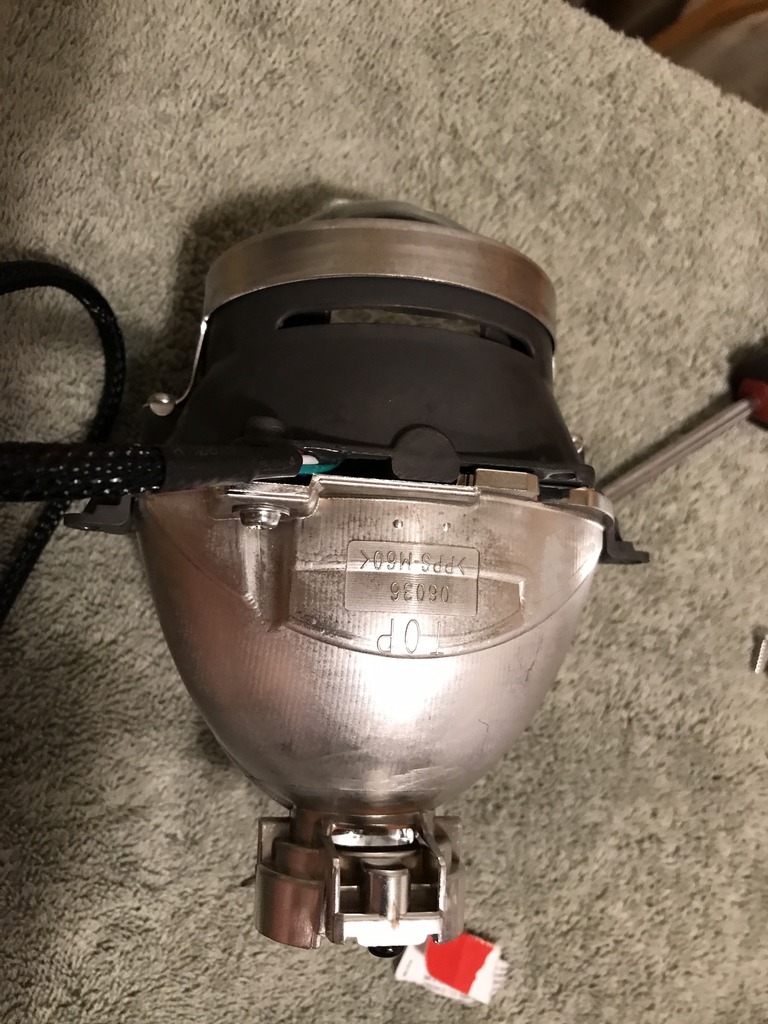
So taking the headlights off turned out to be a challenge at first as my carbon lip was drilled into the bottom of the bumper under the bolt head so when removing I had to take out the whole front portion of the wheel well cover in order to get the bumper off. Had a snag with one of the headlight clips and took awhile to finally get it to come loose. Finally got the lights off the car sat morning and proceeded with the disassembling of the lights. Everything is pretty straight forward and had no issues with any portion of this including the shroud, projector housing, or lenses.
There are a few DIY available and for anyone interested in doing this, i'd recommend the following ones:
https://www.myg37.com/forums/d-i-y-i...emon-eyes.html
https://www.myg37.com/forums/d-i-y-i...al-w-pics.html
https://www.myg37.com/forums/d-i-y-i...s-install.html
So I did take a handful of pictures, but not for every step as most of that has already been done in the threads mentioned above.
This was the bastard clip!!!

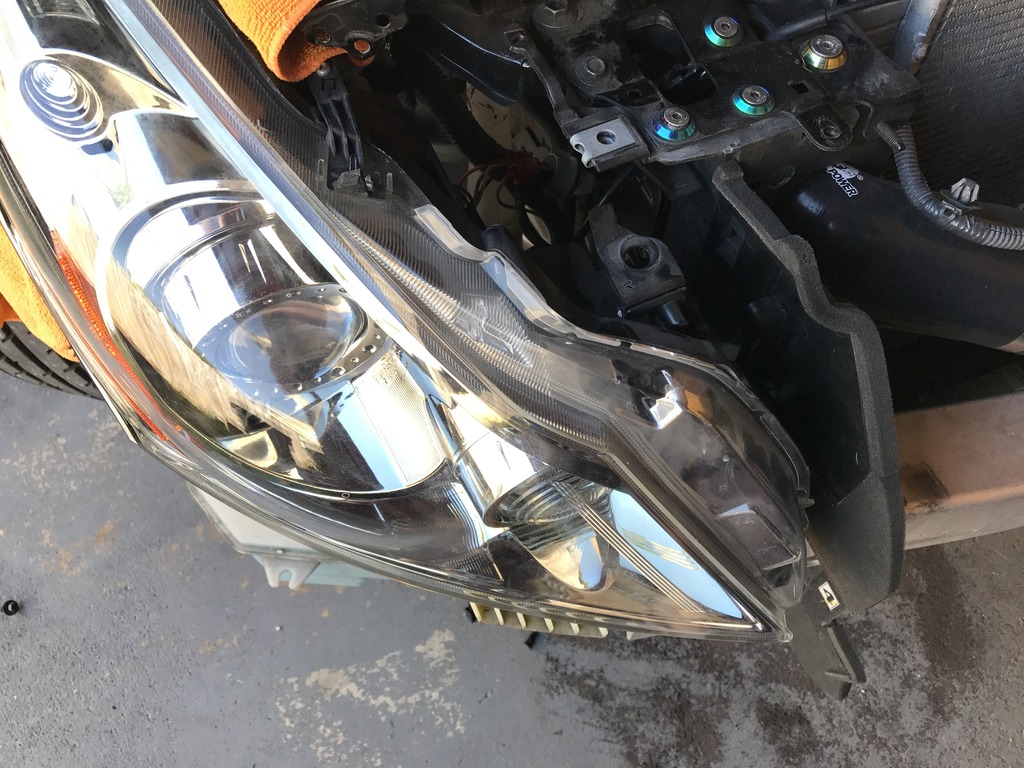
So most people have already mentioned the bubbling of the reflector portion thats on the front of the headlight, most who live in hot climates have had this. This was mine stock and untouched, both headlights have already had this occur which sucks. I tried to sand down best I could and painted over it anyway. I know it will bubble back up, but I personally felt it will hopefully be less noticeable being black vs chrome. Guess time will tell
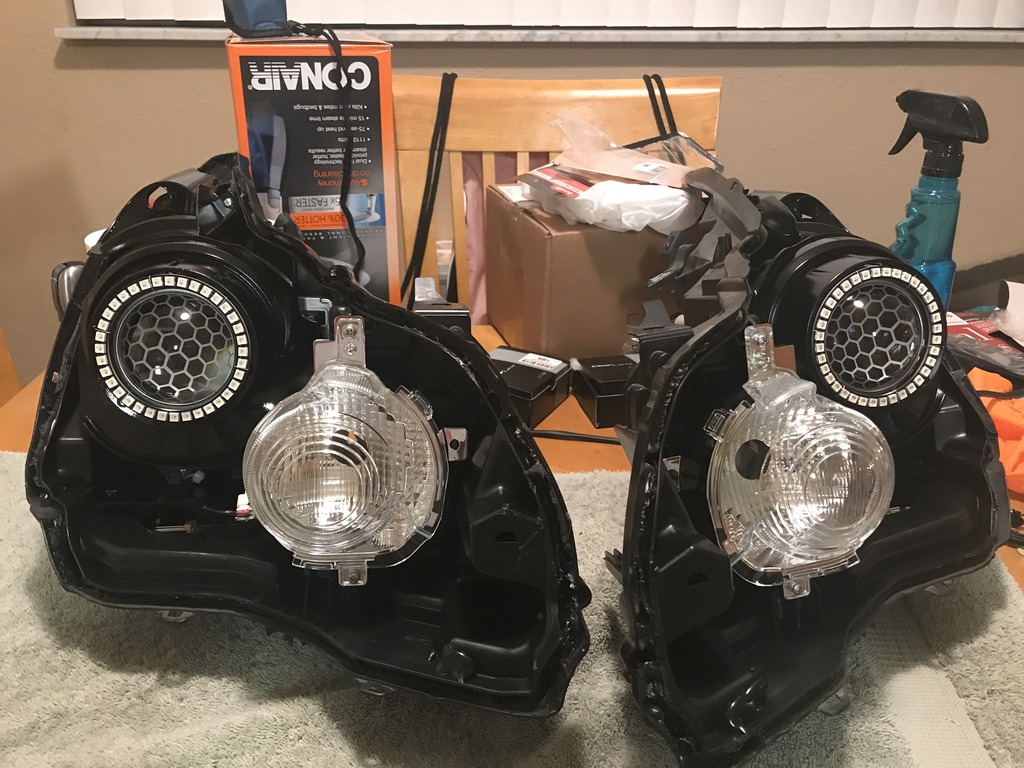
Stock and untouched vs finished modded

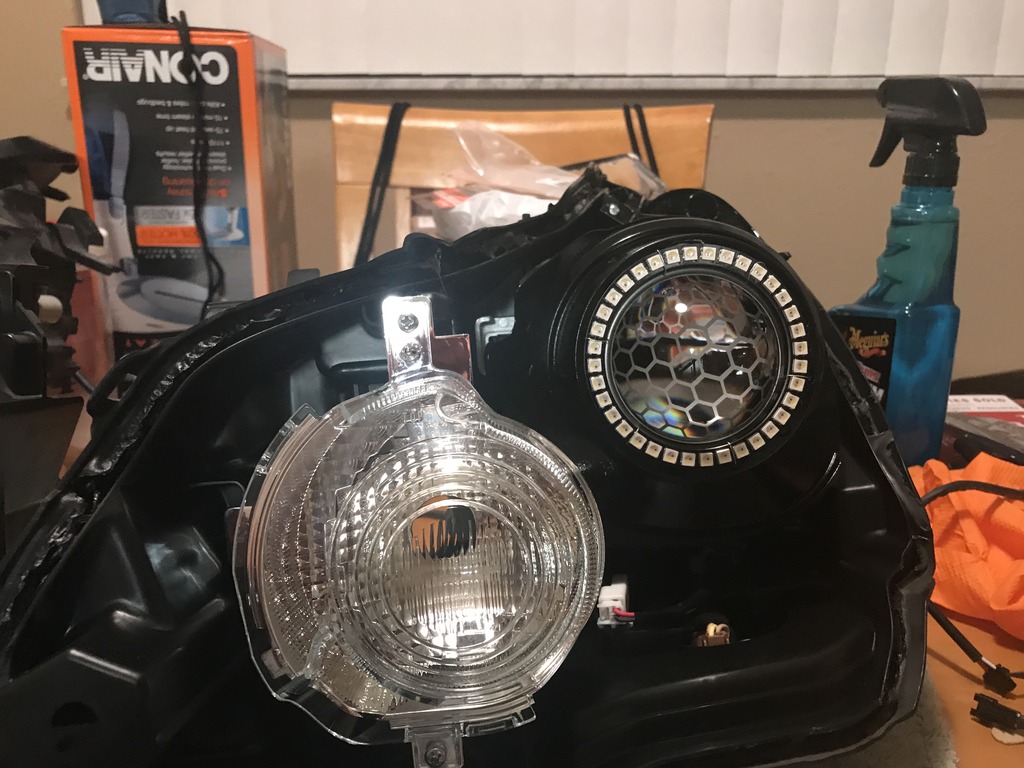
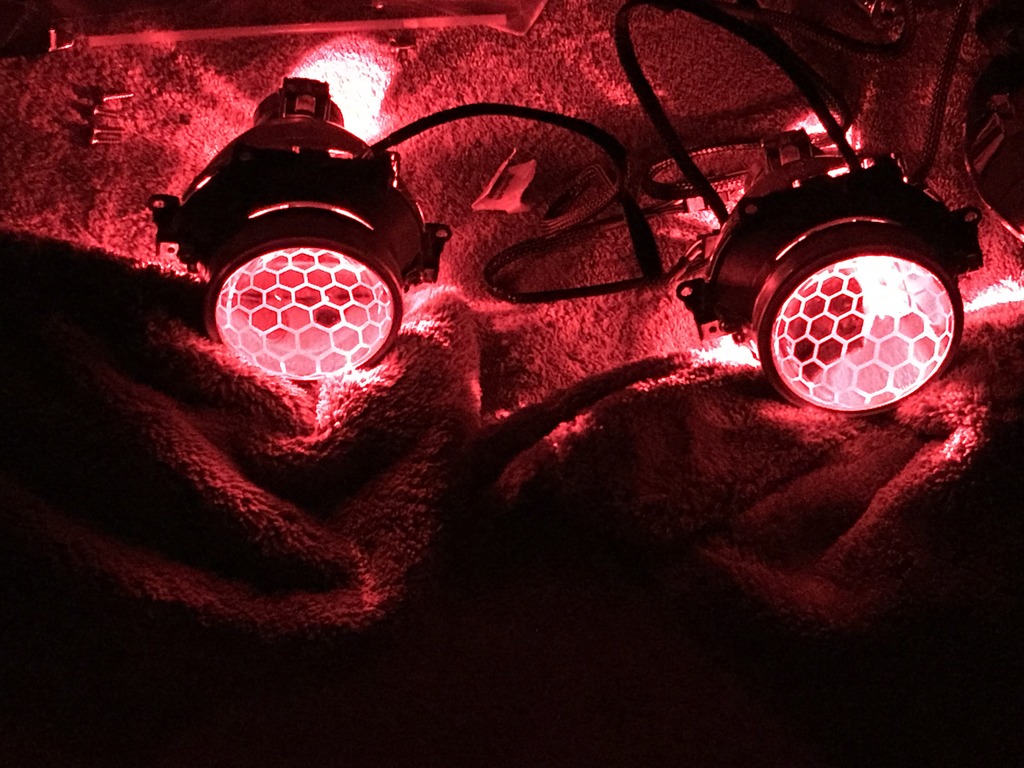
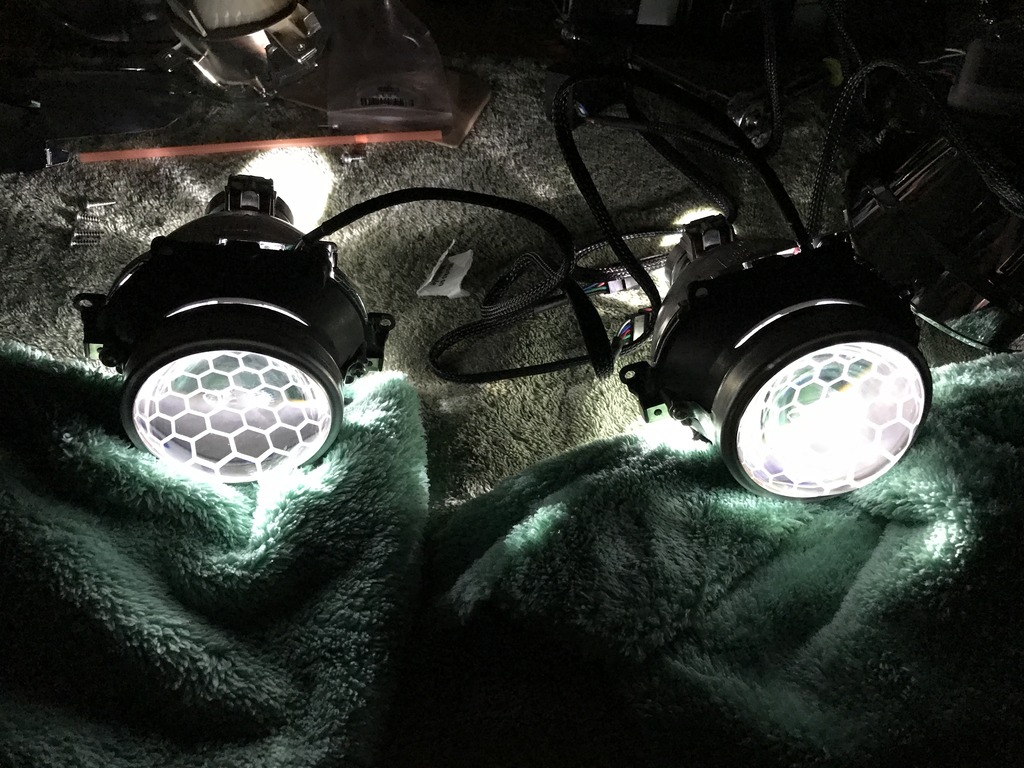
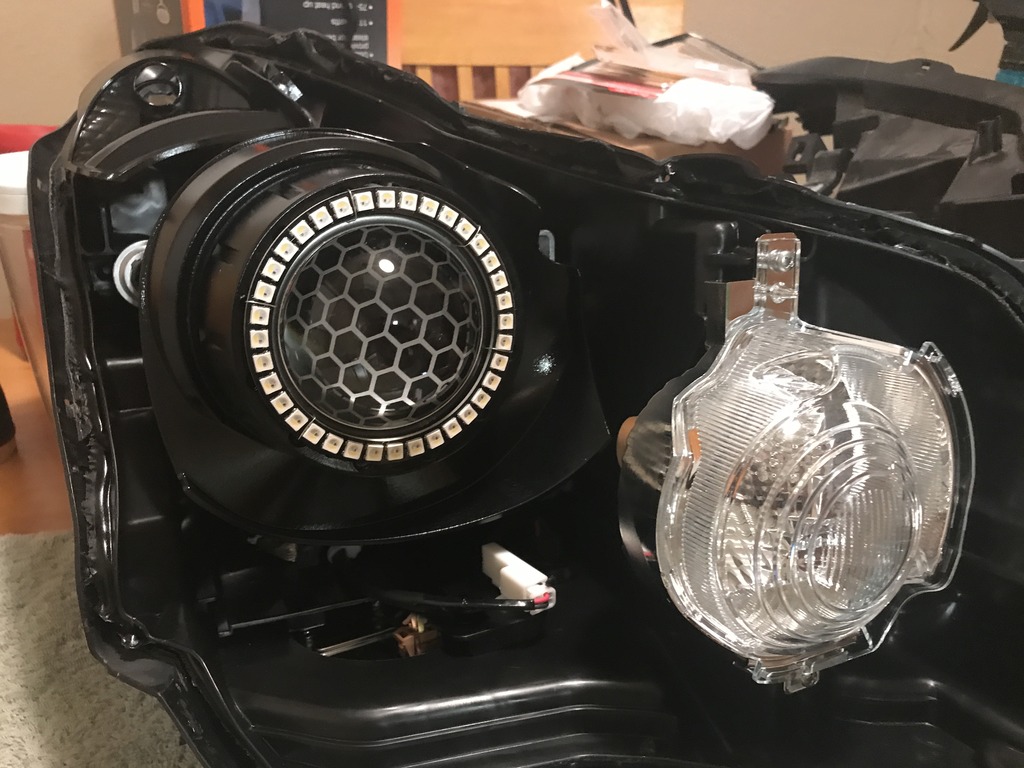
Custom etched honeycomb lenses
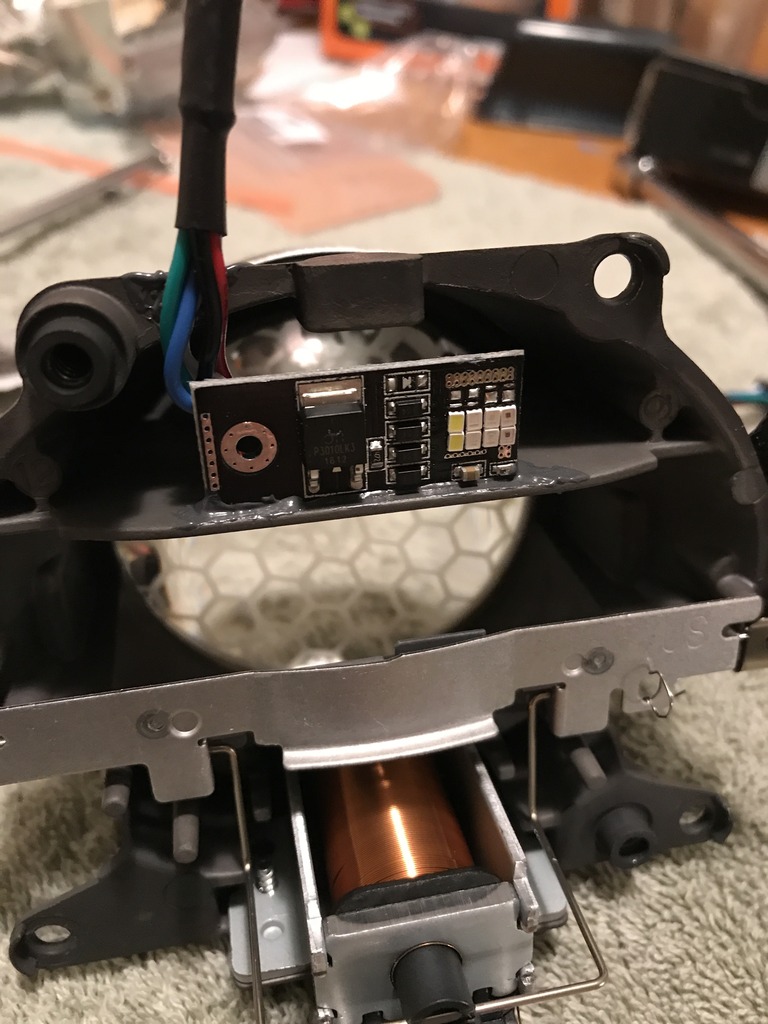
I had some trouble mounting the demon eyes. The kit comes with H1 brackets whihc by no means is anything remotly close to our stock housing. I couldnt even think of a way to modify the bracket without having to drill additional hole and even then I felt could possible construe with the light outpout. So I opted to mount the demon eyes straight on facing the bowl and used some JB Weld to hold both the circut board as well as the wires in hopes of having no rattle or movement. The JB Weld is good for up to 1500 degrees. This gave me a nice clean seal with no obstruction.
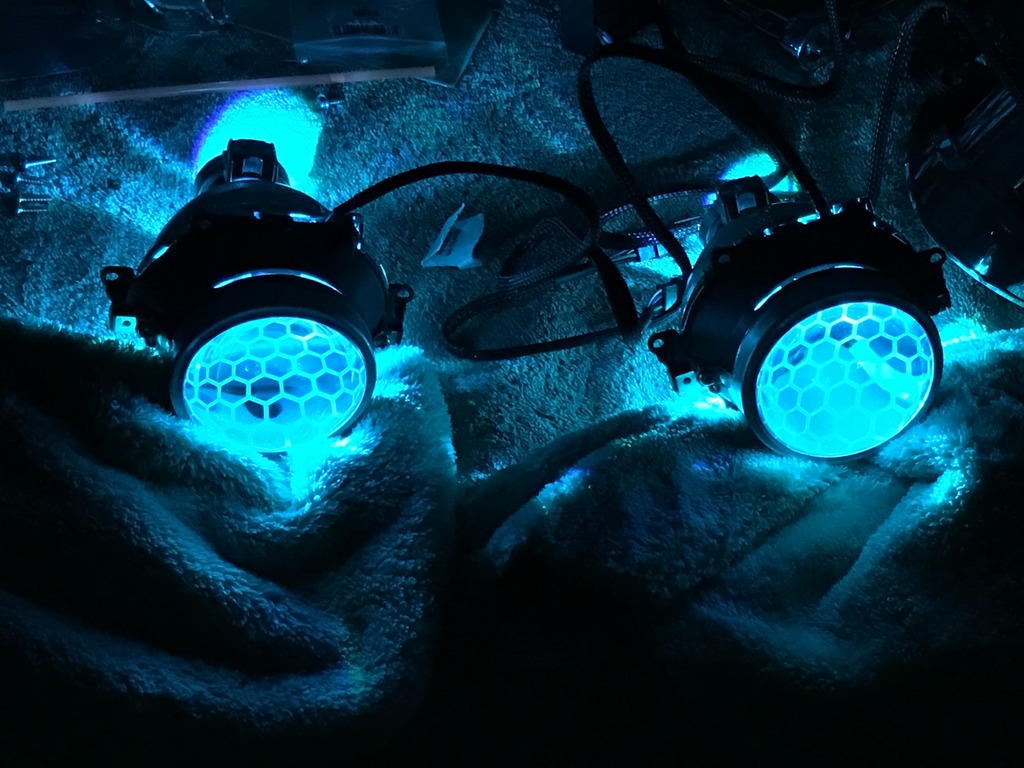
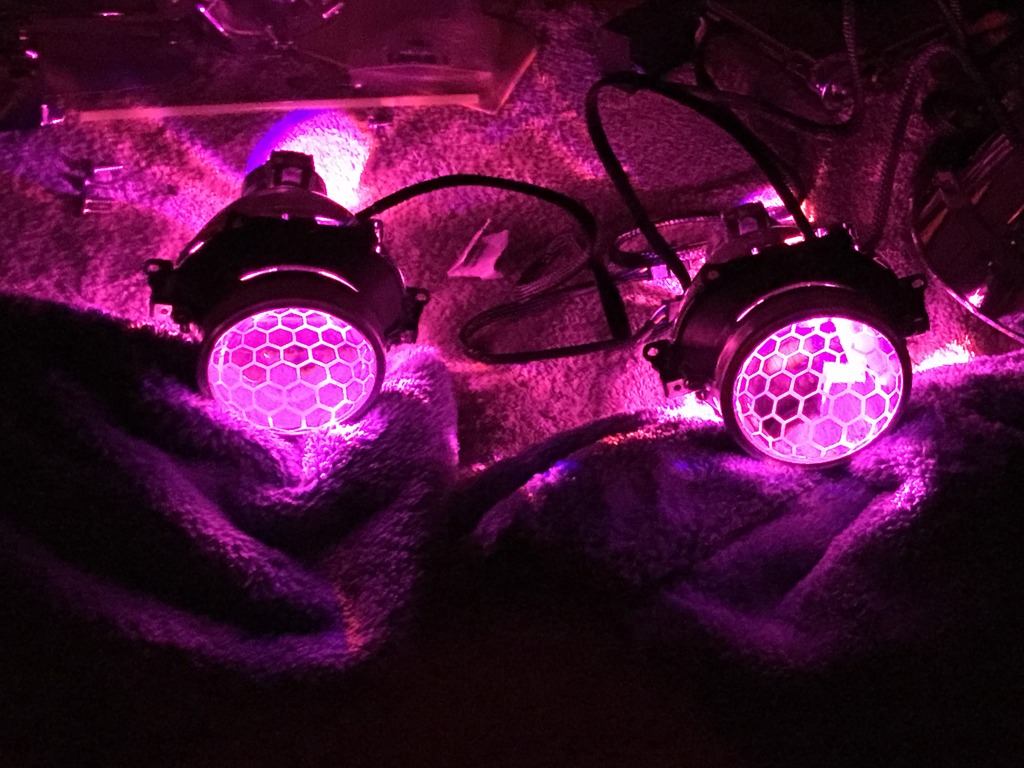
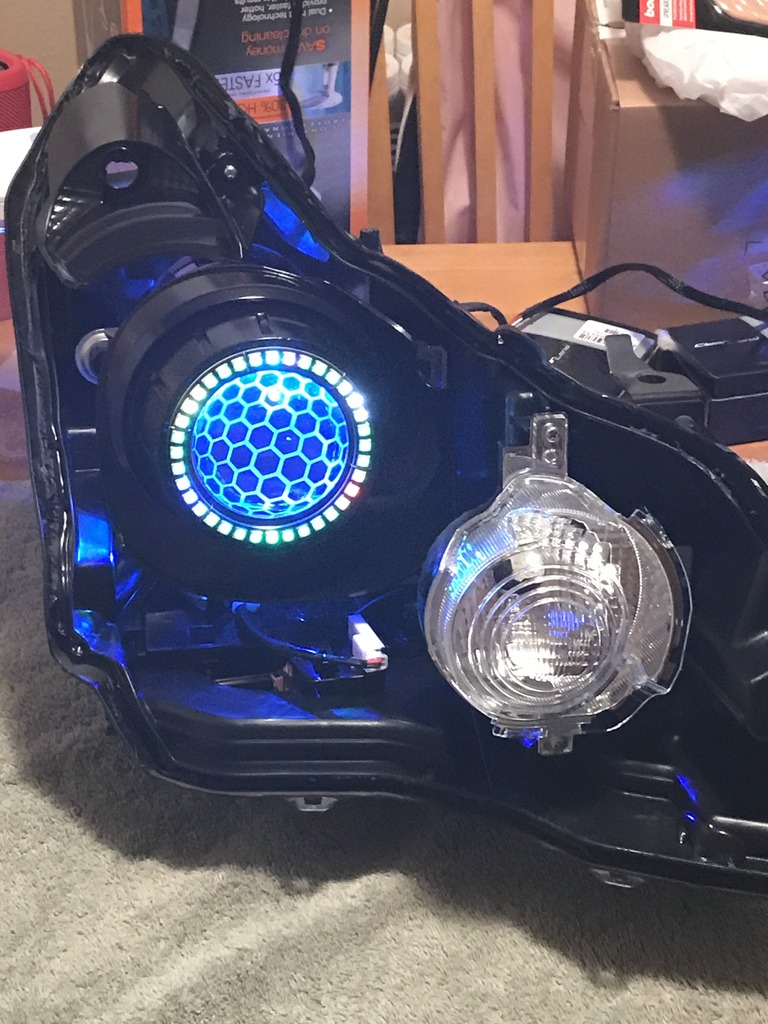
Few pics of the different colors while testing
So where to start, so first of all, I've never modified headlights before and this was my first time. I did have quite a few mishaps and learned the hard way from them.
This is what I did to mine, gloss black for every portion of lights. I did not want to mismatch any paint scheme for the sake of having to go back at a later time to repaint. Black goes with everything. STir custom etched lenses, Starry Night quad halos, Diode Dynamic Demon Eyes, custom black side markers (cant remember brand name)
So I've been planning this modification during this 3 day weekend giving myself ample time to go slow and get it done correctly. Thank god I planned this accordingly as I needed every bit of the 3 days. Now this was also including a dam quince Sat afternoon/all evening of my time which didnt help as I had to leave in the middle of working.
So taking the headlights off turned out to be a challenge at first as my carbon lip was drilled into the bottom of the bumper under the bolt head so when removing I had to take out the whole front portion of the wheel well cover in order to get the bumper off. Had a snag with one of the headlight clips and took awhile to finally get it to come loose. Finally got the lights off the car sat morning and proceeded with the disassembling of the lights. Everything is pretty straight forward and had no issues with any portion of this including the shroud, projector housing, or lenses.
There are a few DIY available and for anyone interested in doing this, i'd recommend the following ones:
https://www.myg37.com/forums/d-i-y-i...emon-eyes.html
https://www.myg37.com/forums/d-i-y-i...al-w-pics.html
https://www.myg37.com/forums/d-i-y-i...s-install.html
So I did take a handful of pictures, but not for every step as most of that has already been done in the threads mentioned above.


This was the bastard clip!!!


So most people have already mentioned the bubbling of the reflector portion thats on the front of the headlight, most who live in hot climates have had this. This was mine stock and untouched, both headlights have already had this occur which sucks. I tried to sand down best I could and painted over it anyway. I know it will bubble back up, but I personally felt it will hopefully be less noticeable being black vs chrome. Guess time will tell

Stock and untouched vs finished modded


Custom etched honeycomb lenses

I had some trouble mounting the demon eyes. The kit comes with H1 brackets whihc by no means is anything remotly close to our stock housing. I couldnt even think of a way to modify the bracket without having to drill additional hole and even then I felt could possible construe with the light outpout. So I opted to mount the demon eyes straight on facing the bowl and used some JB Weld to hold both the circut board as well as the wires in hopes of having no rattle or movement. The JB Weld is good for up to 1500 degrees. This gave me a nice clean seal with no obstruction.


Few pics of the different colors while testing


So on to some of the issues I experienced, I unfortunately do not have the luxury of having a garage. While painting I came up with a make shift paint booth if you will, which consisted of a ladder with a pop up tent. Upon having the majority of my pieces painted and drying I discovered 2 things. 1 is the the tent still allowed air to flow through the top which created dust particals, the second being that the Krylon Clear Gloss for Plastics left more of a white residue/finish. The back of the can stated that this was normal, however I did not want to take the risk of it not curing correctly and god forbid it drying and staying at a white hue. So I wet sanded all pieces down and sprayed a final layer of just the gloss black and I was happy with the look. I actually brought the pieces into the house to allow them to dry, opened the windows so I would get high on fumes....or at least not that much. 
Once everything was dried and cured, I started the reassemble part. Now for most that have already tackled this mod know, but the spaces that are used behind the lenses are just that and go BEHIND the lens. I did not realize this until I took off the 2nd lens and which I had to go back and correct the 1st one. Nothing crazy, but figured its def good information to know as when I opened the lens, the single piece of OEM cardboard fell out and I never saw where it came from. I bought the extra pack of spacers from the retrofitstore in which I used 4 per lens. 1 OEM and 3 from the package per side. I really haven't had a chance to check the cutoff as I just finished yesterday afternoon and did not turn the car on after everything was back together. I was dead after 3 straight days of this. I'll see if I remember tonight to check the cutoff.
Next once I had everything together and went to test halos and demon eyes, only 4 led's lit up around the halo So after checking the hanging wire to ensure it was not interfering with the led's, it appears that a couple of them were. So after some minor tweaking of the wire positions, we have success!!!
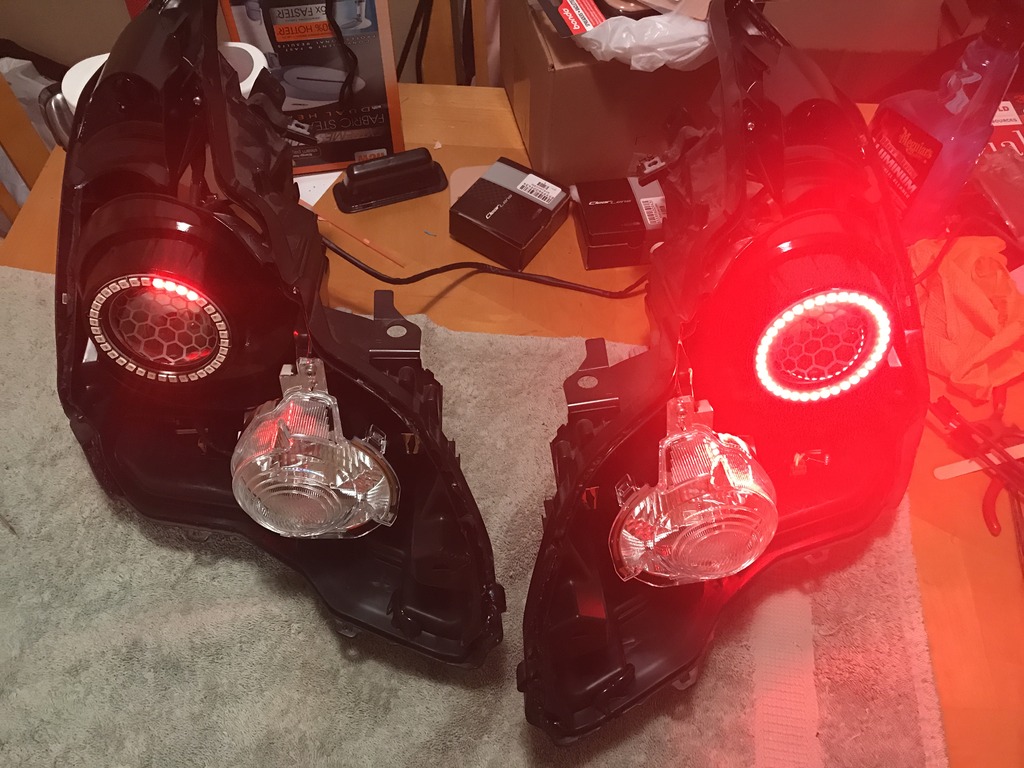
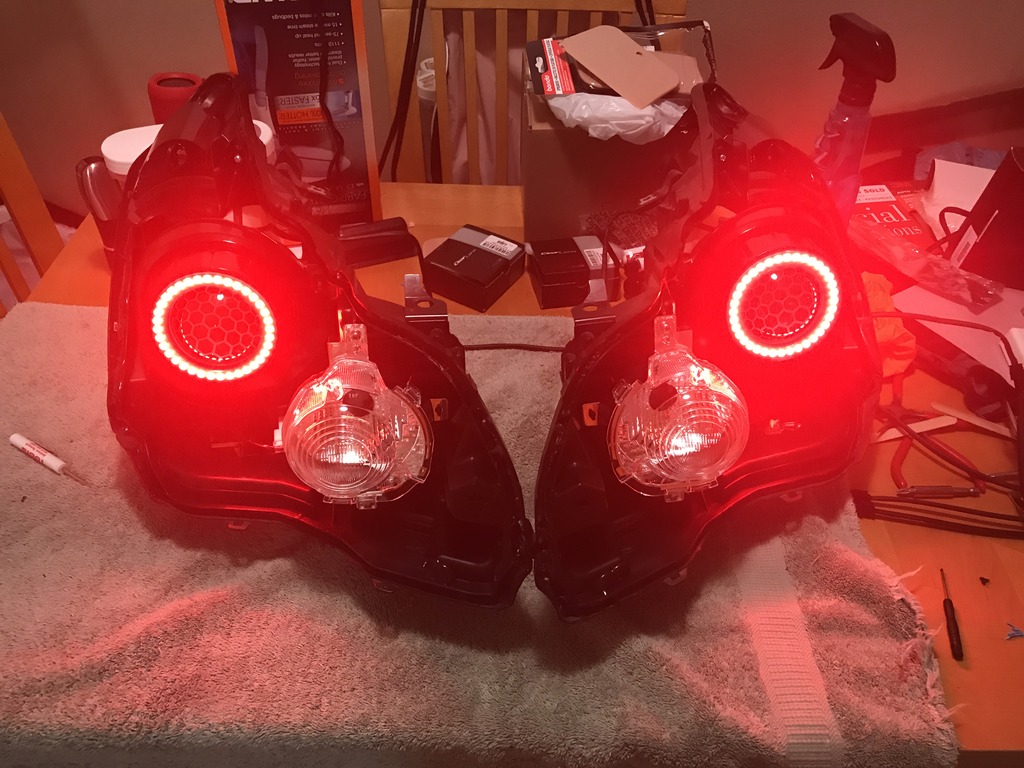
Some pics of the finished product
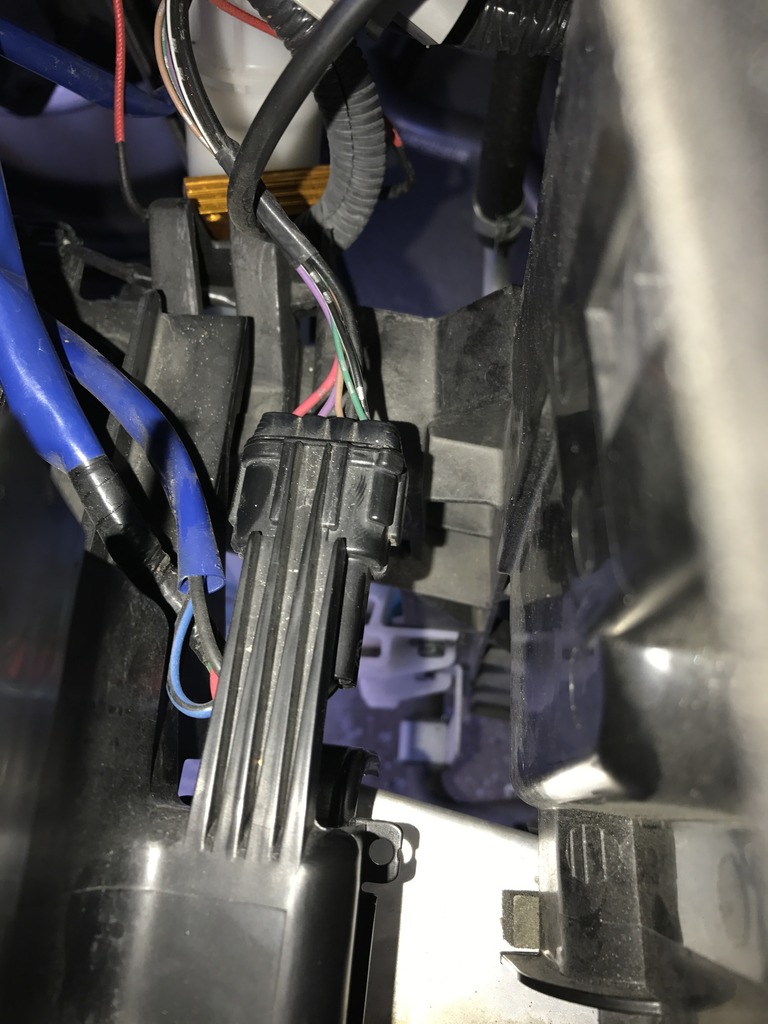
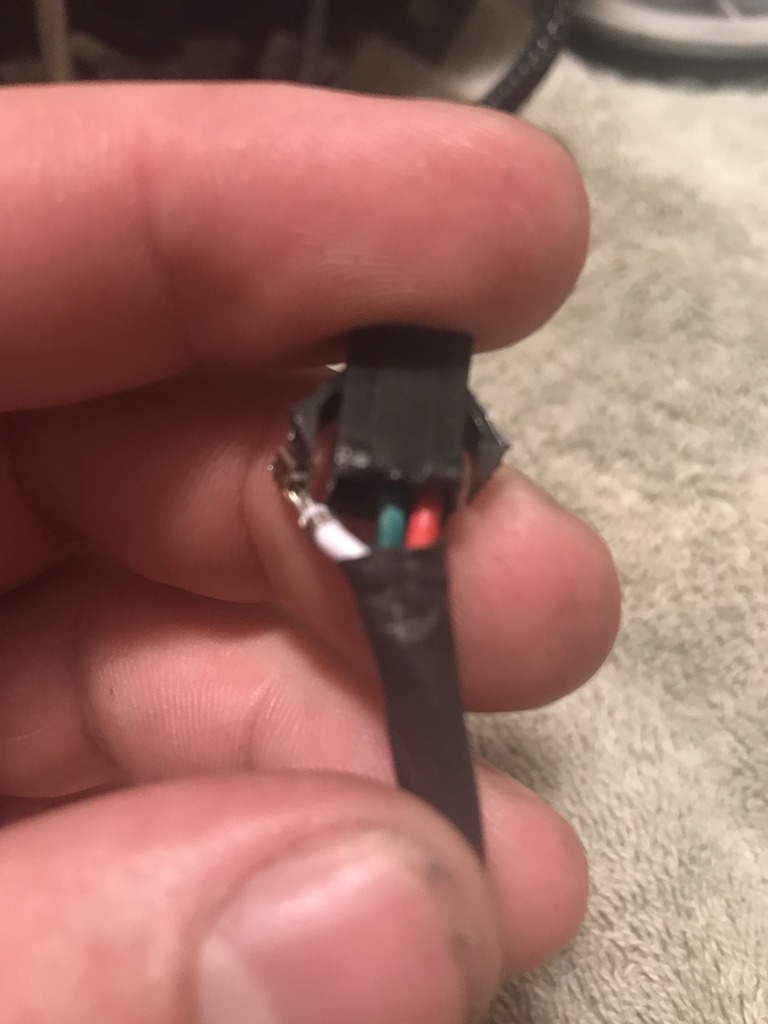
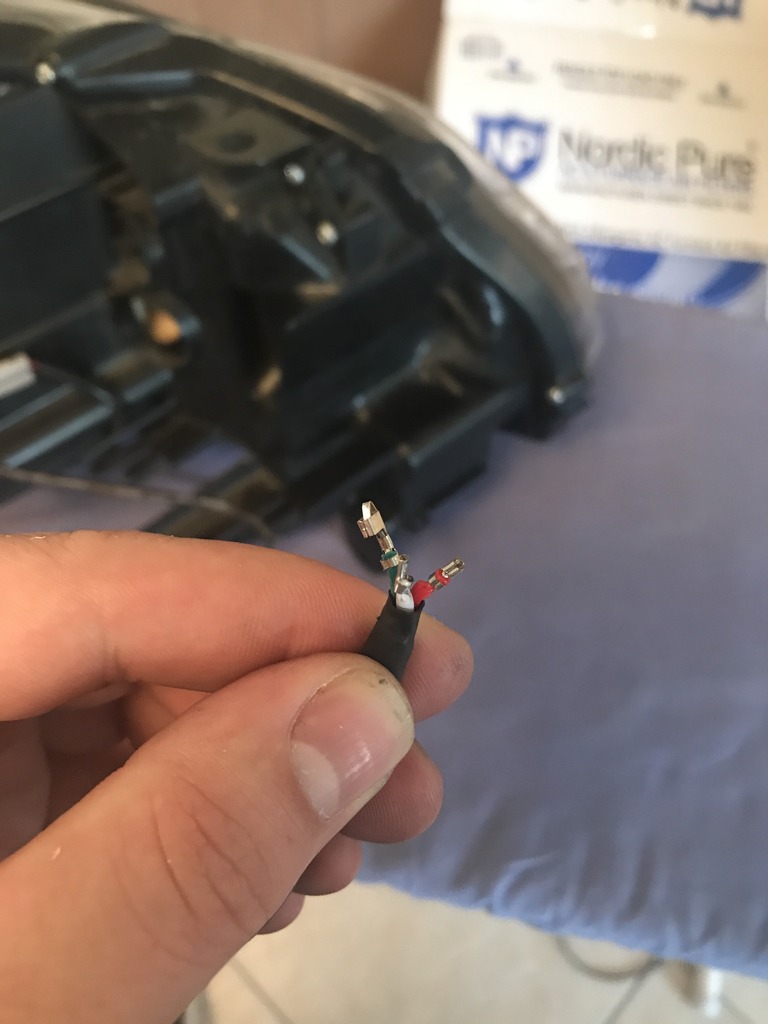
So one of the last issues I had was I was insisting on a very clean install and had purchased a package of cable joints. For those who are not familiar with these, they allow a waterproof seal when dealing with wires. So the problem I ran across with the clip to the wires were to large to fit through the hole. So I decided to attempt to take out the wire harness clips, well I was successful with only 1 of them, the other 2 broke when trying to attempt to dislodge the clips. What I did next what took one of the extensions I bought with my kit and cut the clip off and soldered the wires together. I then almost burned the whole dam thing up as I had a retarded moment and sealed all 3 open wires together and plugged it in and was then wondering why nothing was working. Yea yea I know, absolutely retard!!!! Thank god I caught it very quickly and wrapped all 3 wires correctly.
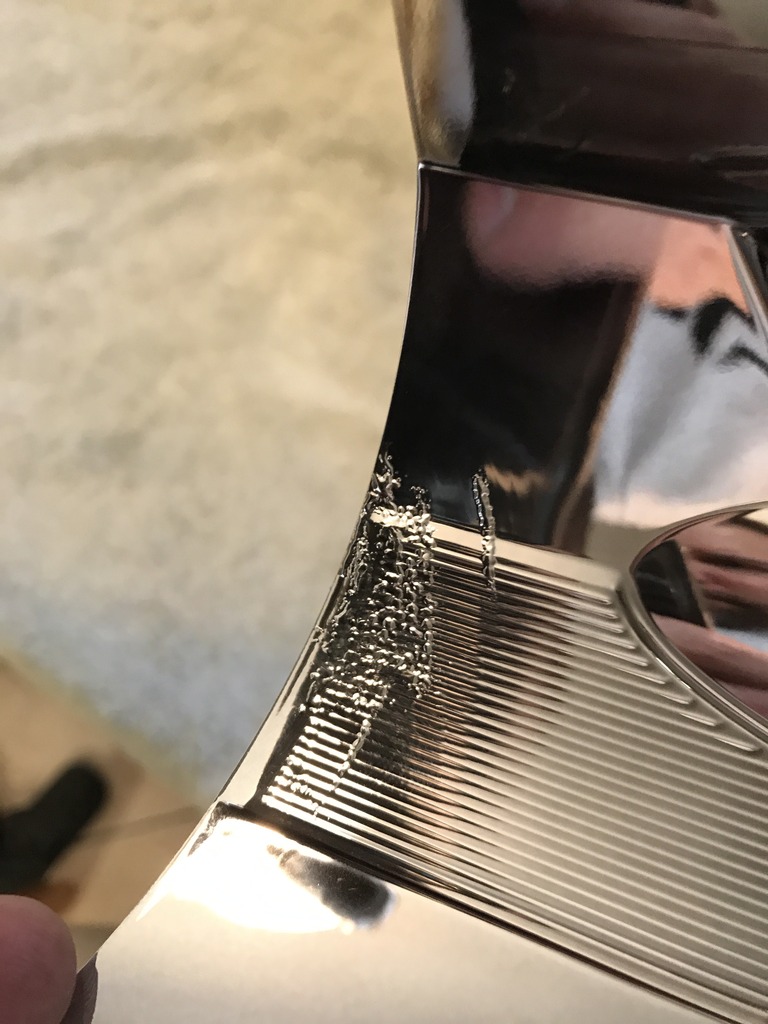
I really wish I had bought a tool ahead of time for that and for whatever reason, it never crossed my mind. So lesson learned. I ended up drilling out a hole through the headlight bulb cover and siliconed the living **** out of it. Not happy with this, but I made do.
So all in all, I saved over 1k give or take for a weekend of my time. I truly do have a new found appreciation for those that do this for a living or on the side. I feel like there was alot more that happened that I'm forgetting to include or rather that my brain will not allow me to relive.
Although I feel if I ever did it again that I have alot more knowledge of what to do and what not to do and would defiantly be faster and hopefully more efficient, however.............I dont ever want to do this again!
Once everything was dried and cured, I started the reassemble part. Now for most that have already tackled this mod know, but the spaces that are used behind the lenses are just that and go BEHIND the lens. I did not realize this until I took off the 2nd lens and which I had to go back and correct the 1st one. Nothing crazy, but figured its def good information to know as when I opened the lens, the single piece of OEM cardboard fell out and I never saw where it came from. I bought the extra pack of spacers from the retrofitstore in which I used 4 per lens. 1 OEM and 3 from the package per side. I really haven't had a chance to check the cutoff as I just finished yesterday afternoon and did not turn the car on after everything was back together. I was dead after 3 straight days of this. I'll see if I remember tonight to check the cutoff.
Next once I had everything together and went to test halos and demon eyes, only 4 led's lit up around the halo
So after checking the hanging wire to ensure it was not interfering with the led's, it appears that a couple of them were. So after some minor tweaking of the wire positions, we have success!!!

Some pics of the finished product


So one of the last issues I had was I was insisting on a very clean install and had purchased a package of cable joints. For those who are not familiar with these, they allow a waterproof seal when dealing with wires. So the problem I ran across with the clip to the wires were to large to fit through the hole. So I decided to attempt to take out the wire harness clips, well I was successful with only 1 of them, the other 2 broke when trying to attempt to dislodge the clips. What I did next what took one of the extensions I bought with my kit and cut the clip off and soldered the wires together. I then almost burned the whole dam thing up as I had a retarded moment and sealed all 3 open wires together and plugged it in and was then wondering why nothing was working. Yea yea I know, absolutely retard!!!! Thank god I caught it very quickly and wrapped all 3 wires correctly.
I really wish I had bought a tool ahead of time for that and for whatever reason, it never crossed my mind. So lesson learned. I ended up drilling out a hole through the headlight bulb cover and siliconed the living **** out of it. Not happy with this, but I made do.


So all in all, I saved over 1k give or take for a weekend of my time. I truly do have a new found appreciation for those that do this for a living or on the side. I feel like there was alot more that happened that I'm forgetting to include or rather that my brain will not allow me to relive.
Although I feel if I ever did it again that I have alot more knowledge of what to do and what not to do and would defiantly be faster and hopefully more efficient, however.............I dont ever want to do this again!


