

Help Interior trim - repairable/replaceable?


Thread Starter
Registered User
Joined: Apr 2013
Posts: 13
Likes: 3
From: Vermont
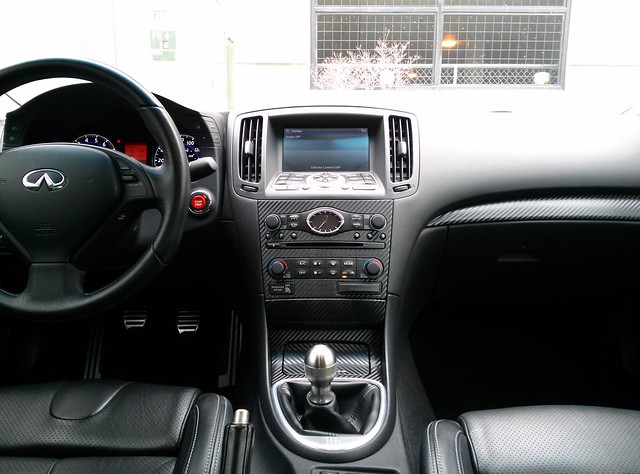
Ok, I'm hating myself for making a home depot trip and boning the aluminum trip above my glovebox with some errant cargo. So the question is, can anything be done to hide the scratches? Something about the finish makes them glaring to the point of driving me nuts.
Or am I better off to replace? Is that possible? It seems almost molded into place. Thanks for any tips.

Or am I better off to replace? Is that possible? It seems almost molded into place. Thanks for any tips.


Registered User
Joined: Apr 2012
Posts: 73
Likes: 9
i did mine too, but painted not vinyl wrap. vinyl does seem to come out pretty nice...
if your going to do this, it's definitely quite a bit of doing. i was able to find what i needed in about 4 separate threads with some good DIY info.
the easiest parts are the door pulls, followed by the trim on the glove box, then the sides on the doors, the center stack, and lastly the hardest (at least for me) is that horrible little piece of trim on the left side of the steering wheel lol.
in a nutshell:
1) door pulls (literately pull right off)
2) trim above glove box (have to take the glovebox out like you do to replace the cabin filter). there is a good DIY on this forum for that and that gets you to the point of taking off this trim (about 4-5 screws).
3) side trim on doors (have to use a trim remover tool or similar) pull door trim off door (secured by plastic tabs). then once you get the door trim pulled from the door but have all the wires still connected, you can take a small phillips and remove about 7 screws along the trim piece. (DIY on this too on here). best thing here is something another member on here suggested to put something to rest the door panel on, for me it was a foot stool, that way you can work on the screws to the trim piece but not have to go through the hassle of disconnecting the power door/window wires. once your done and replace the trim/screws, you just have to line up the door with the plastic tabs and push in place to secure.
4) center stack- pull shifter off (remove pin) and if AT, make sure car is in NEUTRAL w/ parking brake on, otherwise you wont be able to lift the shifter boot part up. then you grab at the edge of the shift boot closest to the back seats and literally pull up and it should become loose. then disconnect wires and remove 2 screws on center stack panel. about 4 wires need to be disconnected before you remove it. once this center stack is removed, you will then need to remove a ton of smaller screws to separate the circuit board and clock form the plastic trim piece. word of advice! when you do this, and reconnect it, the air bag light will flash until you reset it via the simple on/off ignition procedure (DIY on this too, search "reset air bag light for g37").
5)the little trim piece on the left of the steering wheel, i fought with it for a while, have to remove some of the lower steering wheel trim and really try to twist, yank it loose. the DIY on installing paddle shifters is good for this one, just to the point of the trim (steps 1-5 i think), you dont have to take off the steering wheel or anything.
hope this helps if you decide to do this or at least have an idea of what is involved before setting out on this journey
Last edited by ilovemyg37; Apr 30, 2013 at 11:21 PM.

SimCarbon - Carbon Fiber, Matte & Vinyl Wrap Films
Where I got mine from. Quality vinyl. Super easy to work with. Super fast shipping, and good prices.
Check them out.
Where I got mine from. Quality vinyl. Super easy to work with. Super fast shipping, and good prices.
Check them out.

SimCarbon - Carbon Fiber, Matte & Vinyl Wrap Films
Where I got mine from. Quality vinyl. Super easy to work with. Super fast shipping, and good prices.
Check them out.
Where I got mine from. Quality vinyl. Super easy to work with. Super fast shipping, and good prices.
Check them out.
Trending Topics

Registered User
Joined: Dec 2009
Posts: 4
Likes: 0
From: Greenville SC
Trim Wrap
I ended up wrapping mine with matte black 3M vinyl.
I left alone the "Shodo" pieces and just did the crappy coated pieces. I started off by stripping the coating off which is what gets scratched. As you can see it shines up pretty good

On my drivers side handle I had to add a little body filler in a couple of areas because it had a couple of dents after this step. Depending on how much you heat and stretch your vinyl a large scatch will show through.
This stuff is very easy to work with. Some people use a heat gun but I found a hair dryer to be just fine.


I left alone the "Shodo" pieces and just did the crappy coated pieces. I started off by stripping the coating off which is what gets scratched. As you can see it shines up pretty good
On my drivers side handle I had to add a little body filler in a couple of areas because it had a couple of dents after this step. Depending on how much you heat and stretch your vinyl a large scatch will show through.
This stuff is very easy to work with. Some people use a heat gun but I found a hair dryer to be just fine.
Registered User
Joined: Dec 2009
Posts: 4
Likes: 0
From: Greenville SC
I order mine from 3M Vehicle Wrap Vinyl


Registered User
Joined: Feb 2005
Posts: 22
Likes: 0
From: KY
So the entire door panel has to be removed for the long door pieces because they have phillips screws in the back? Is there a DIY on how to remove the door panel with pics?
One of mine is damaged from the previous female owner I just purchased mine from so I plan to replace it.
One of mine is damaged from the previous female owner I just purchased mine from so I plan to replace it.

Registered Member
Joined: Aug 2014
Posts: 81
Likes: 3
From: San Francisco, CA

https://www.myg37.com/forums/d-i-y-i...tallation.html
Last edited by G37zus; Sep 1, 2014 at 10:50 PM. Reason: no space in between links

Thread
Thread Starter
Forum
Replies
Last Post