
Howto: Stealth sub-box design and build-up


Thread Starter
Registered User
Joined: Jan 2008
Posts: 127
Likes: 0
Howto: Stealth sub-box design and build-up
Some of you may have caught my previous work I did early on after I got my G37. My old enclosure I designed and the one I am working on now are designed to replace the spare tire in our cars and drop in to the tire-well and leave 100% of the trunk space useable. The original box was a bit too tall for my liking so I decided to start again. Since I have now put Run Flat tires on my car I am a bit more comfortable with deleting the spare.
I realize there are several prefab options out there that this sort of project may seem fruitless to many; however I get a great amount of enjoyment out of the exercise of designing and building such projects myself. While I could go in any number of other directions, I am building my system to be as stock appearance as possible and am only seeking to design a sub system to augment the original OEM system. So take this post for what it is worth��
The box is designed to be totally stealth and will feature a down firing 10-inch subwoofer with room to flush mount the jack and related tools and even have some storage for the first aid kit. It should fit flush with the trunk floor underneath the OEM carpet and be indistinguishable to anyone who looks in the trunk. I am also hoping to reduce a bit of weight in the car by deleting the spare, but this is not an imperative. I also have an amplifier that should fit under the right plastic trim piece in the trunk which means I no longer need to worry about running multiply wires into the spare tire well, only L/R speaker cables from the amp. Disclaimer:This is a DIY project I am doing for my own car, so don't ask me to recreate it. Do so yourself at your own risk. I take no responsibility for any damage or issues that may develop with you own car and post this for informational purposes only.
The parts I used for this project are below and approximate only. I won't use all 64 oz of resin, or all the mating, or mdf sheet. Exact figure would be probably about $15 less if you could buy exact quantities of material
(x2) 32 oz containers of Fiberglass resin $35 ea
(x2) packets of Fiberglass Cloth $5 ea
(x4) packs of Fiberglass mat material $5 ea
(x5) peices of Foam board $1ea
(X5) cheap paint brushes $1ea
(x1) 10 pack of rubber gloves $2
(x1) 2'x4' peice of 3/4 thick mdf wood $7
miscellaneous hardware $25
estimated total $145
Building the box: Step 1
To start with I removed the spare and related equipment and added a bunch of sound deadening to the floor of the car. (As a side-note the spare, jack and all the related equipment weigh about 33 lbs. I have added back in about 7 lbs of sound deadening so far in the trunk and will continue to monitor the weight of the rest of the components as they go in to see if I can actually save some weight with this design.
The first step after the sound deadening is to protect the finish of the car; both external and in the trunk from dripping resin or scratches. I tape off the bumper and rear quarters with masking tape and newspaper and remove all the trunk trim carpet. I cut several pieces of card board and placed them up against the walls of the tire well. This will create a small gap between the enclosure and the sides of the tire-well so that I will have room for the carpet that will cover the box when it is done.
I taped off the area outside the car with plastic and masking tape and protected the plastic trim panels inside the trunk with aluminum foil and masking tape. (More on why aluminum foil later).
After layering the entire tire-well with foil and taping everything off I prepared my resin and laid a full sheet of fiberglass weave over the trunk. To get a good fit I used two full sheets and ran tape along the edges to hold it in place. I trimmed any excess so that it wouldn�t fold over into the resign while it was drying and create any odd shapes, etc.
Using latex gloves to keep the resin off my hands, and a cheap .94$ paint brush I painted on the resin mixture over the matting. I let it tack-up for about 2 minutes then places the MDF trim ring that will serve as the starting point to build up the actual box. This first step is that of creating a fiberglass tube which will hold everything in place.
After this first coat of mat dried, I then added a layer of resin and thicker mat pieces to strengthen the walls and floor of the enclosure. I then let it cure over night (36 hours actually) before moving on to the next step.
Below are some pictures of the first stage.... it an't very pretty at this point, but just wait.

Here is the fiberglass tub while it is drying with trim ring for down firing sub mounted in place.

Here you can see that the walls of the tub, come flush with the top of the trunk floor.

The trim ring will eventually have another one on top and then a mounting ring which is slightly smaller in diameter will have the sub mounted to it. The goal here is to have the sub mounted 1.5� about the trunk so its cone will have proper excursion space to produce sound. Secret here is a shallow mount subwoofer.[/SIZE]
I realize there are several prefab options out there that this sort of project may seem fruitless to many; however I get a great amount of enjoyment out of the exercise of designing and building such projects myself. While I could go in any number of other directions, I am building my system to be as stock appearance as possible and am only seeking to design a sub system to augment the original OEM system. So take this post for what it is worth��
The box is designed to be totally stealth and will feature a down firing 10-inch subwoofer with room to flush mount the jack and related tools and even have some storage for the first aid kit. It should fit flush with the trunk floor underneath the OEM carpet and be indistinguishable to anyone who looks in the trunk. I am also hoping to reduce a bit of weight in the car by deleting the spare, but this is not an imperative. I also have an amplifier that should fit under the right plastic trim piece in the trunk which means I no longer need to worry about running multiply wires into the spare tire well, only L/R speaker cables from the amp. Disclaimer:This is a DIY project I am doing for my own car, so don't ask me to recreate it. Do so yourself at your own risk. I take no responsibility for any damage or issues that may develop with you own car and post this for informational purposes only.
The parts I used for this project are below and approximate only. I won't use all 64 oz of resin, or all the mating, or mdf sheet. Exact figure would be probably about $15 less if you could buy exact quantities of material
(x2) 32 oz containers of Fiberglass resin $35 ea
(x2) packets of Fiberglass Cloth $5 ea
(x4) packs of Fiberglass mat material $5 ea
(x5) peices of Foam board $1ea
(X5) cheap paint brushes $1ea
(x1) 10 pack of rubber gloves $2
(x1) 2'x4' peice of 3/4 thick mdf wood $7
miscellaneous hardware $25
estimated total $145
Building the box: Step 1
To start with I removed the spare and related equipment and added a bunch of sound deadening to the floor of the car. (As a side-note the spare, jack and all the related equipment weigh about 33 lbs. I have added back in about 7 lbs of sound deadening so far in the trunk and will continue to monitor the weight of the rest of the components as they go in to see if I can actually save some weight with this design.
The first step after the sound deadening is to protect the finish of the car; both external and in the trunk from dripping resin or scratches. I tape off the bumper and rear quarters with masking tape and newspaper and remove all the trunk trim carpet. I cut several pieces of card board and placed them up against the walls of the tire well. This will create a small gap between the enclosure and the sides of the tire-well so that I will have room for the carpet that will cover the box when it is done.
I taped off the area outside the car with plastic and masking tape and protected the plastic trim panels inside the trunk with aluminum foil and masking tape. (More on why aluminum foil later).
After layering the entire tire-well with foil and taping everything off I prepared my resin and laid a full sheet of fiberglass weave over the trunk. To get a good fit I used two full sheets and ran tape along the edges to hold it in place. I trimmed any excess so that it wouldn�t fold over into the resign while it was drying and create any odd shapes, etc.
Using latex gloves to keep the resin off my hands, and a cheap .94$ paint brush I painted on the resin mixture over the matting. I let it tack-up for about 2 minutes then places the MDF trim ring that will serve as the starting point to build up the actual box. This first step is that of creating a fiberglass tube which will hold everything in place.
After this first coat of mat dried, I then added a layer of resin and thicker mat pieces to strengthen the walls and floor of the enclosure. I then let it cure over night (36 hours actually) before moving on to the next step.
Below are some pictures of the first stage.... it an't very pretty at this point, but just wait.
Here is the fiberglass tub while it is drying with trim ring for down firing sub mounted in place.
Here you can see that the walls of the tub, come flush with the top of the trunk floor.
The trim ring will eventually have another one on top and then a mounting ring which is slightly smaller in diameter will have the sub mounted to it. The goal here is to have the sub mounted 1.5� about the trunk so its cone will have proper excursion space to produce sound. Secret here is a shallow mount subwoofer.[/SIZE]
Last edited by quart; Mar 28, 2008 at 11:05 AM.

Thread Starter
Registered User
Joined: Jan 2008
Posts: 127
Likes: 0
Working with fiberglass can become addicting and that isn;t b/c of the smell. You would be amazed at the shapes you can create by using certain methods. I'll use a couple later and you will see.
My goal for this project to to make something that looks like something you might order out of a JDM Nissan catalog for the Skyline, or something you might get from your Infiniti dealer. I am actually even looking online for a cool Nissan badge or logo peice to put someplace on there.
As for any up dates on the project for today. My camera is at my shop.. I just got home for the day, but spent a few minutes on the project out of the car. The box lifted right out b/c I used the aluminum foil. The foil keeps everythig from sticking to the car, the glass sticks to it though, so when everything is dry you simply left out the tub and the whole thing comes out as one peice.
I am trying something new to make the interior panels of the box. Since I want to make this thing light weight. I built the divider walls for the inside of the enclosure out of foam board and fiberglassed them into place. Tomorrow I will 'glas over them and make them solid peices. I usually use MDF board which is heavy. If this works (basically two peices of paper over a foam core sealed with fiberglas mat) it should be extreme light weight. The secret will be to get things sealed up nice and tight (air tight) to get things to work properly.
"Stay tuned"

Thread Starter
Registered User
Joined: Jan 2008
Posts: 127
Likes: 0
I updated the original post with my estimated expenses. Keeping in mind I am kind of making this up as I go and may have left some things off. The resin and mat can be bought at any auto parts store, Wal-mart , or other place. But Home Depot is the only place I have found locally to carry the big 32 oz containers.
I also ordered off ebay some 4" thick open cell foam (like what you find in a gun or camera case) so I can cut in my tools and the jack. I will also have probably $100 in wire and connectors not included for my amp, etc.
As far as the project goes.......
I had a few minutes yestarday to do a little more work.
Stage 2 I guess is building up the various comparments inside the enclosure. I normally use MDF, but it is heavy so am trying something new. I cut peices of foam board to shape and then will wrap them in fiberglass matting to make them solid and airtight later. Below are a few photos of what I have so far. As you can see I built a square area towards the rear of the tube which will house my tools and first aid kit, etc. Then I extended the area of the enclosure to either side of that which should give me an estimated .9 cubic feet of airspace.
I am using a JL Audio 10w1v2 4 ohm driver which has a very shallow mounting depth and should work good. The woofer is test fitted in one of the photos and looks to fit below the line of the trunk very well. But we will see after I get the top built.
I still need to cut out the forward most area of the enclosure so the output of the woofer can vent into the car. As it stands now the woofer is firing into the floor of the trunk which would be very muffled at best. Hopefully today I can get that done and finish the compartments inside and even things out.
Thinks still look really rough at this point so try and have some imagination...
Trending Topics
Thread Starter
Registered User
Joined: Jan 2008
Posts: 127
Likes: 0
Thread Starter
Registered User
Joined: Jan 2008
Posts: 127
Likes: 0
Howto: Stealth sub-box design and build-up
Ok, I spent part of the day on Sunday working on the box, or tub as I am calling it.
After making sure everything fit in the car, I pulled the tub back out then took a can of rubberized automotive undercoating and sprayed the entire inside of the box. Someone who was really good with fiberglass and who was certain that the box up to this point was airtight could skip this stage but the undercoating helps seal any small holes and it also helps you to be able to see any imperfections in the enclosure up to this point.

After I let the undercoating dry, I lined the woofer cavity with sound deadening material. This again will help ensure an airtight enclosure, plus due to the thickness, or thinness of the fiberglass walls. The sound deadening material will help make the enclosure a bit more rigid and prevent any acoustic anomalies due to the walls of the enclosure flexing or anything like that.

Next I mount the woofer from the bottom of the enclosure. Since the next step will be to make the top part of the enclosure I wrap more aluminum foil around the magnet and cone of the woofer to protect it from any dripping fiberglass resin. Then using about a yard and a half of cheap fleece (purchased from the fabric department at Wal-Mart for $2 per yard) and a hot glue gun, I cover the top of the enclosure with the fleece, making sure the material is pulled extremely tight.

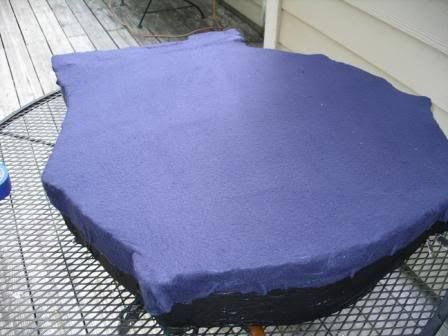
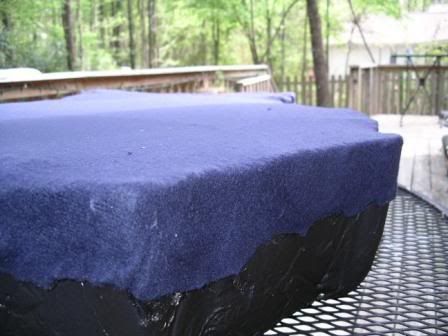
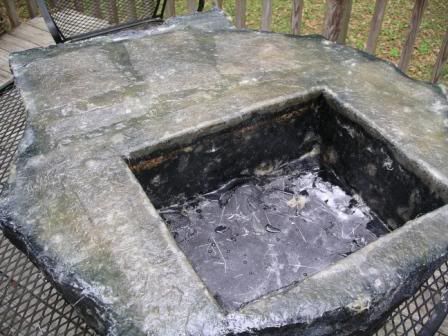
One the fleece is in place. I go to �glassing the surface with a heavy coat of resin. Then while the fleece layer is still tacky I do another layer of fiberglass mat on top. I follow-up later with two more layers of mat on the top of the enclosure to ensure a nice rigid area, since the enclosure will serve as the load floor in the trunk, I want to make sure it is as sturdy as can be.
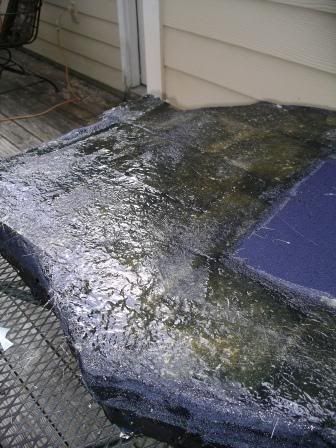
Now I have the rough shape of my enclosure. All that is left is a layer or two of body filler to smooth out any rough spots and to get a more uniformed shape. Once the ideal shape is attained, all that is left is carpet and to wire things up.
After making sure everything fit in the car, I pulled the tub back out then took a can of rubberized automotive undercoating and sprayed the entire inside of the box. Someone who was really good with fiberglass and who was certain that the box up to this point was airtight could skip this stage but the undercoating helps seal any small holes and it also helps you to be able to see any imperfections in the enclosure up to this point.
After I let the undercoating dry, I lined the woofer cavity with sound deadening material. This again will help ensure an airtight enclosure, plus due to the thickness, or thinness of the fiberglass walls. The sound deadening material will help make the enclosure a bit more rigid and prevent any acoustic anomalies due to the walls of the enclosure flexing or anything like that.
Next I mount the woofer from the bottom of the enclosure. Since the next step will be to make the top part of the enclosure I wrap more aluminum foil around the magnet and cone of the woofer to protect it from any dripping fiberglass resin. Then using about a yard and a half of cheap fleece (purchased from the fabric department at Wal-Mart for $2 per yard) and a hot glue gun, I cover the top of the enclosure with the fleece, making sure the material is pulled extremely tight.
One the fleece is in place. I go to �glassing the surface with a heavy coat of resin. Then while the fleece layer is still tacky I do another layer of fiberglass mat on top. I follow-up later with two more layers of mat on the top of the enclosure to ensure a nice rigid area, since the enclosure will serve as the load floor in the trunk, I want to make sure it is as sturdy as can be.
Now I have the rough shape of my enclosure. All that is left is a layer or two of body filler to smooth out any rough spots and to get a more uniformed shape. Once the ideal shape is attained, all that is left is carpet and to wire things up.


Thread Starter
Registered User
Joined: Jan 2008
Posts: 127
Likes: 0
Bad news..... Some body stole my enclosure this past weekend. I left it out to air dry over night prior to finishing it up and forgot about it when I left town. When I returned Sunday, it was gone..... I have a lot of teenagers in my neighborhood and thanks to a closed circuit video system think I know who it was, but unfortunatly all that work was for not.
I have spent the last couple days reworking it (sort of a rush job) and am back to where I was when I last posted my progress and will finish my write up in a day or so.
The only difference was that I reworked the setup so that the woofer fires up instead of into the sparetire well. Since I wanted to simply get thie project done the extra steps I had taken to make sure there was adequate sound venting when down firing the woofer, would have taken to much time to replicate.
What's this world coming too......