When you click on links to various merchants on this site and make a purchase, this can result in this site earning a commission. Affiliate programs and affiliations include, but are not limited to, the eBay Partner Network.
So a couple people asked for a DIY on how I made my DIY illuminated sills.
What you'll need: 1. Electroluminescent Tape (EL Tape) - Approx 1" x 23" (can find on amazon or eBay) 2. EL Inverter. You must get the 12v version. 3. Heatgun / Hairdryer (You will need this to remove the original sill without damaging it) 4. Laser cut pieces (File will be attached at the bottom of this post, OR you can order them from me, PM me) 5. Spray adhesive or double sided tape 6. Some extra wiring.
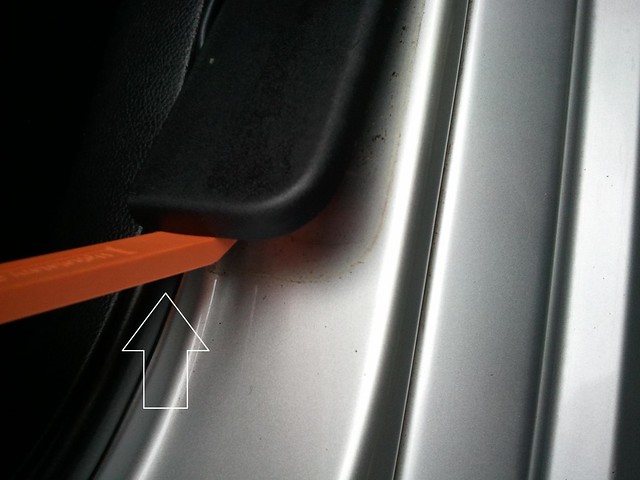
Steps: 1. First thing, remove the original sill pieces from your car. It's held in by 4 clips. Grab and pull straight up. A trim removal tool helps, or a screwdriver wrapped in a cloth.
2. Next you'll want to remove the original metal sill pieces from your original sill holder. It's held on by some strong 2 sided tape.
If you don't care about saving them then you could probably just rip them right off, but I heated them up with my heatgun and they just popped right off without damage.
After that, clean all the remaining junk off your sill holder. This is important otherwise your new sill won't stick.
3. Next you attach the EL tape to the back of your laser cut piece, I don't have a photo of this specifically but here is an example from one of my previous projects.
Attach the EL with a strong adhesive, either a tape or a spray adhesive.
4. Next you will need to attach the new sill & EL onto the factory sill holder. Put your spray adhesive or 2 sided tape on the original sill holder, and route the wires for the EL strip through one of the existing holes. You may need to enlarge the hole to fit the wires through.
Line it up, and push it to stick it down. Use some good adhesive so it won't come apart over time.
The finished product should look like this...
5. Last thing is to go install it into your car. Installation is just the reverse of when you removed them. As far as wiring it'll be the same as the OE door sill kit. Wire it to the BCM pins. Or tap into your door lights.
It's BCM Time!
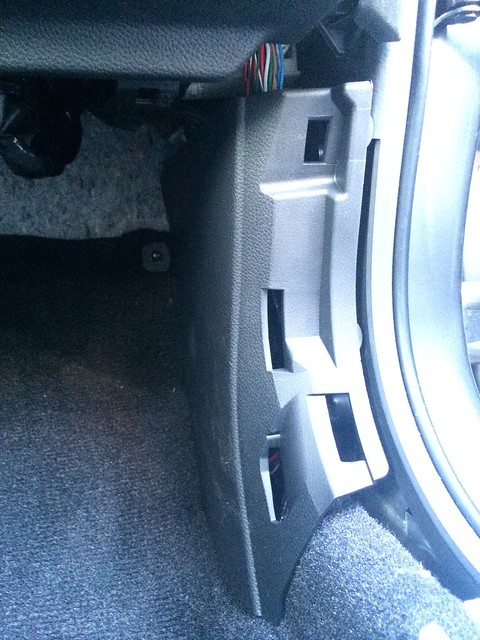
The trim piece revealing the BCM can be removed once the black plastic locking screw is removed on the floor board. Remove the two carpet screws and the remove the panel shown below by pulling it towards the center console.
Remove the top-most plug on the BCM. Look for the green plug on the module, and move two white plugs up towards the glovebox. Remove this plug.
Establishing Connectivity
Remove the shielding on the harness to expose the wires
Switch to the illuminated sill harness - take a pair of wire cutters and remove the plug on the end of the harness. Ensure you are cutting the plug off IN FRONT of the inline fuse, and NOT either of the plugs that accept sills themselves.
Use a pair of t-tap wire connectors to connect the RED and WHITE wires from the sill harness to the BCM harness.
WHITE (SILL HARNESS) connects to > SKY BLUE (BCM HARNESS)
RED (SILL HARNESS) connects to > MINT GREEN (BCM HARNESS)
Testing Connectivity
Once your connections are tapped, plug in a sill BEFORE MOUNTING it to the vehicle to ensure your connections have been successfully made. If all works well, ensure your tapped connections are secured. I chose to put heat shrink over mine to prevent them from opening up.
What I did is worked from the passenger side - I had all the doors closed except the front passenger door. I plugged the illuminated sill into the harness and then pressed the sensor button on the door frame near the latch to ensure the illuminated sill powered off when I pressed the door ajar sensor. This sensor is shielded in rubber as is on the body of the car - you can't really miss it.
Once one works, test it on the other end of the harness to ensure the both ends of the harness and both illuminated sills are functional.
Ohhhh, New Sill for the Passenger Side!
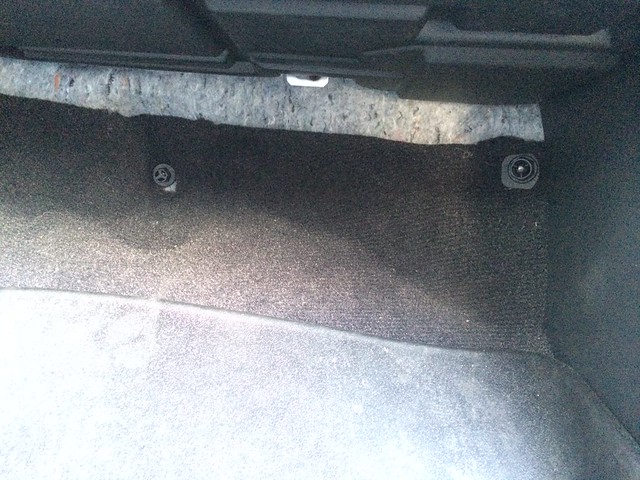
Run the passenger side sill harness (shorter lead of harness) from the BCM connector towards the passenger seatbelt. Run the lead through the white harness clips that are now visible that you have removed the passenger kick plate. The harness and plug should slide right through no problem.
Prep the sill area. I used a bit of Goo Gone to clean up the area, then followed up with 99% rubbing alcohol and a microfiber cloth to remove any remaining remaining dirt, grime and surface residue.
Pop the provided white snap clips into each end of the sill, remove the adhesive tape backing, and STICK IT! Apply firm pressure all around to ensure the adhesive has made contact in all places. You'll hear some snapping and popping - this is just the clips shifting around. Don't press too hard - you're not compacting trash or anything like that. Just apply enough pressure to ensure the sills are stuck on there.
Under Construction: (I will insert a blurb and a picture of how you should run the wire, and to show how I did mine. - Stand by for this).
Running with <s>Scissors</s>; I mean Wires!
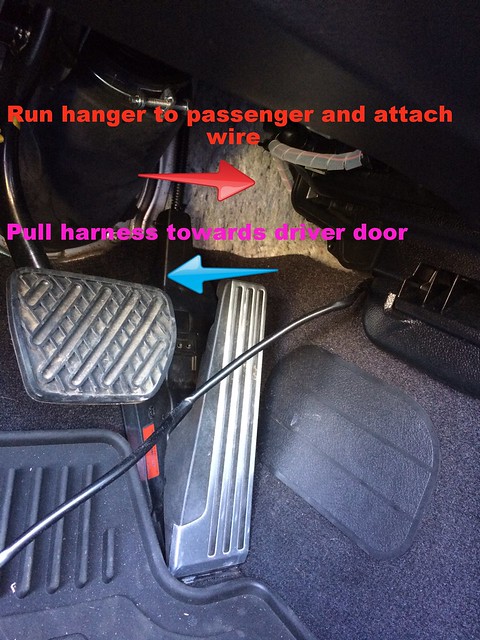
Next, run the wire harness to the driver side of the vehicle. Run this wire under neath the carpet (below the two plastic carpet screws you removed in the beginning of this DIY) and behind the radio console. Use a wire coat hanger in a slightly bent arch to run this wire. I used a fish tape because that's the correct tool for the job. A coat hanger will work just fine. Run the hanger through the gap between between the center console and the carpet, tape the sill harness end onto the end that is on the passenger side, and pull the hanger towards the driver door to get the harness connector to the driver side of the vehicle.
Last edited by iCrap; 03-31-2021 at 12:14 PM.
Reason: Edited for clarity.
Well I already had the EL from a previous project so I just had to pay for the laser cutting. Overall the project is under ~$175. And a few hours of work.
Well I already had the EL from a previous project so I just had to pay for the laser cutting. That was $50. Overall the project is under $100. And a few hours of work.
Since you have the laser cutting connection and the experience putting it together you should make a run of them for a little side money. I'd think there would be some interested folks.
Since you have the laser cutting connection and the experience putting it together you should make a run of them for a little side money. I'd think there would be some interested folks.
Actually yeah I have already considered this and talked with my laser cutting guy. I guess i need to make a post or poll or something to see who would be interested. It'd be no problem for me to get a bunch of these made.
Personally i think these are way cooler than the $300 ones infiniti sells with just that tiny little area lit up.
So it seems from some of the pics that there are hot spots on some of the letters and that the brightness isn't uniform. That seems odd for EL, so is that just in the pictures, or are there some differences in brightness across the panel?
So it seems from some of the pics that there are hot spots on some of the letters and that the brightness isn't uniform. That seems odd for EL, so is that just in the pictures, or are there some differences in brightness across the panel?
No it's just the photos. That's the reason i went with EL. The lighting is totally uniform.
Some of those pics were taken with my camera phone, the final install photos are on the DSLR.
Actually yeah I have already considered this and talked with my laser cutting guy. I guess i need to make a post or poll or something to see who would be interested. It'd be no problem for me to get a bunch of these made.
Personally i think these are way cooler than the $300 ones infiniti sells with just that tiny little area lit up.
That would be cool, especially if you could get the price point low with lots of interest and a bulk order. I'd definitely be interested, as the oem ones don't have much value at 300 bucks, like you mentioned.
Originally Posted by iCrap
No it's just the photos. That's the reason i went with EL. The lighting is totally uniform.
Some of those pics were taken with my camera phone, the final install photos are on the DSLR.
I figured it had to be something like that, as every other EL application I've seen was dead uniform.
 01-15-2016, 12:29 AM