
g37 non bose sub install


Registered User
Joined: Feb 2011
Posts: 35
Likes: 4
From: Singapore

Registered User
Joined: Feb 2011
Posts: 35
Likes: 4
From: Singapore
Hi Racer_X,
No I don't. I doubt it would be an interesting read. Are you looking to swap your front stage yourself?
I don't mean to get the thread off topic, but I'd be happy to answer any questions on specifics regarding the sedan. let me know which point to elaborate on. I did the whole setup diy including the below points:
1a) selection of differential balanced amp with speaker level inputs, no rca (Alpine MRP F300) (amp selection is going to decide the rest of the setup)
1b) tap signal from non-bose head unit (hu) using Metra 70-7552 and 71-7552 (no cutting of wires)
1c) tap amp remote on signal from hu, and lay 18ga remote wire to trunk (I was not successful to find one)
1d) route 16ga signal wires through center console -> rear seats -> trunk
2a) swap of front door speakers with 6.5" components (MBQuart fsb216), reusing oem speaker bracket and 3/4" wood spacer (cutting of oem speaker wire)
2b) placement of tweeters in triangular door sails (cutting of plastic door sail involved)
3a) route power from battery to amp via 8ga cable inclusive of inline fuse
3b) selection of grounding point
4) sub on rear deck
There were 2 informative G35 threads that got me started. I still bookmark "diy-speaker-install-g35-sedan-non-bose" and "upgrading-sound-system-keeping-stock-hu". Between those and the fsm, I had all I needed and believe me, I am no installer
It is interesting to note that I found an abundance of articles of folks who have upgraded from bose (including one going on right now in the DIY section), but very few tutorials on how to upgrade the non-bose. Perhaps non-bose owners are more easily satisfied

Thread Starter
Registered User
Joined: Dec 2010
Posts: 104
Likes: 4
From: Cleveland, OHIO
Ikoh, when you installed the door speakers, how did you get the wire through the door into the car? You said you used a metra harness but when running to your amp you need to use a loc or if your amp can accept line level input.. Or did you just use stock door wiring, if so where did you tap from?
Registered User
Joined: Feb 2011
Posts: 35
Likes: 4
From: Singapore
Non Bose audio install part1.1 - amp selection
ok this is getting more involved now... here we go... 
There may be changes from 2009, but likely your stock non-bose head unit outputs differential balanced, speaker level signals
Selection of the amp will determine the rest of the setup
CHECKLIST:
1) Does your amp accept Differential balanced signal?
YES � go to 2)
NO - Need LOC to convert signal from differential balanced to single ended. Go to 2)
2) Does your amp accept speaker level inputs?
YES � go to 3)
NO � your amp uses line level inputs. You need some sort of �speaker level� to �pre-amp level� converter (LOC)
3) Does your amp physically accept speaker wire?
YES - use Metra 70-7552 and 71-7552 with no cutting of wires required
NO - Either use Metra 70-7553 (which is the 70-7552 with RCA outputs), OR splice into RCA cables, OR use a LOC, OR purchase one of those wire-rca cables. There is a thread in the DIY section (aptly titled"Sub and Amp Install DIY") that touches on this
In my specific case, I used an Alpine MRP F300 amp. It accepted differential balanced, speaker level signals
Your choice may differ depending on your budget and taste. Adding $$ for a LOC, will allow you to make your favorite amp work even if it is not differential balanced.
I came up with this list which was accurate as of 2 years ago:
************************************************** ******
list of amps accepting differential balanced
JL Audio (all)
Xtant (all)
Alpine PDX (all)
alpine V12 MRD-M301
Alpine MRP-F300
Alpine MRV-F545
Alpine MRP-F450
Alpine MRP-M450
Zapco (most)
JBL (older amps)
SoundStream (most older amps)
McIntosh (all)
HiFonics (some)
Crossfire (some)
Autotek (some)
most new and old Xtant amps
-older JBL amps with universal interface (on high level input)
-all Audiocontrol products
Hope this helps.
Last edited by lkoh; Dec 21, 2011 at 05:28 AM.
Registered User
Joined: Feb 2011
Posts: 35
Likes: 4
From: Singapore
Non Bose audio install part1.2 - tap signal from non-bose head unit
This here's how I did my wiring.
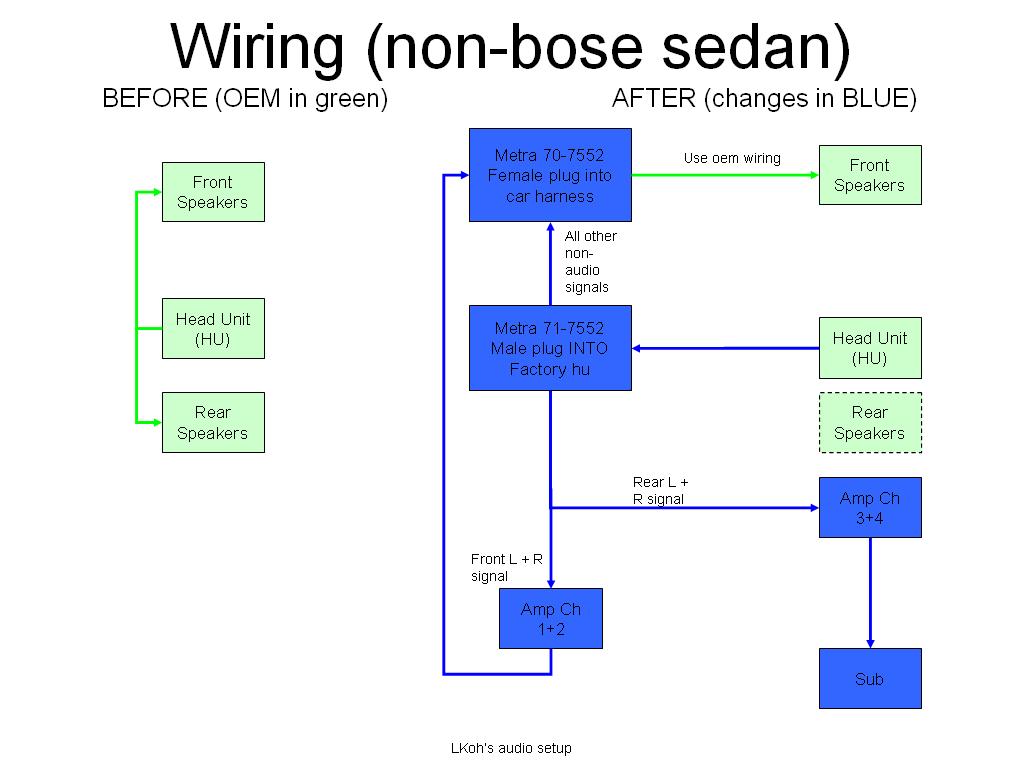
You will need to break the link between the head unit and the speakers somehow. I used the metra so that I didn't need to cut the oem harness
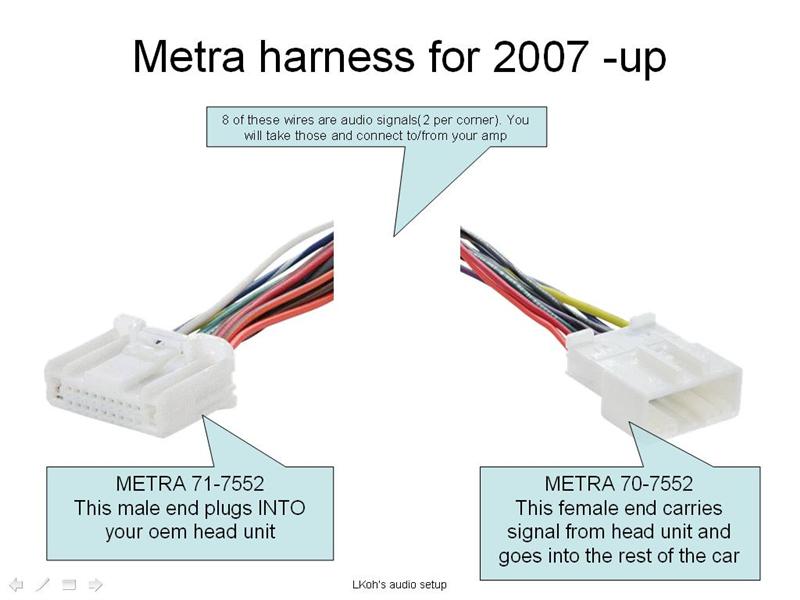
The Metra 71-7552 goes into the oem head unit, and the 70-7552 goes to the car. If you mate the two metras together, you've sorta created an extension. There are 15 or so wires. You will take 8 of those (carrying the signal) and connect them to the amp instead.

Hope this helps
You will need to break the link between the head unit and the speakers somehow. I used the metra so that I didn't need to cut the oem harness
The Metra 71-7552 goes into the oem head unit, and the 70-7552 goes to the car. If you mate the two metras together, you've sorta created an extension. There are 15 or so wires. You will take 8 of those (carrying the signal) and connect them to the amp instead.
Hope this helps
Last edited by lkoh; Dec 22, 2011 at 10:30 PM. Reason: female plug label changed from Metra 71-7552 (wrong) to Metra 70-7552
Registered User
Joined: Feb 2011
Posts: 35
Likes: 4
From: Singapore
Non Bose audio install part1.3 - remote turn on
Your amp needs a signal to turn it on.
Some amps (Kicker, Kenwood) are signal sensing, and turn on automatically when your hu is on
Those which are not signal sensing need a "turn on" signal
This is where I got stuck: I have not been successful to find a remote signal. Ideally, we should have one that turns on when the hu is on, and turns off when the hu is off.
I eventually used pin#8 (power antenna) which was linked to "accessory" mode. i.e. the amp will turn on the moment you put the car to "accessory mode", even if your hu is off. Not the best of choices.
Registered User
Joined: Feb 2011
Posts: 35
Likes: 4
From: Singapore
Non Bose audio install part 2 - amp power and signal wire routing
There is some debate on the net about the negative effects of crossing the power and speaker lines. I decided to go with the trend and keep them seperate.
by the way I'm RHD, so the battery is on the left for me
This first pic is from the inside of the cabin, with the rear seat removed
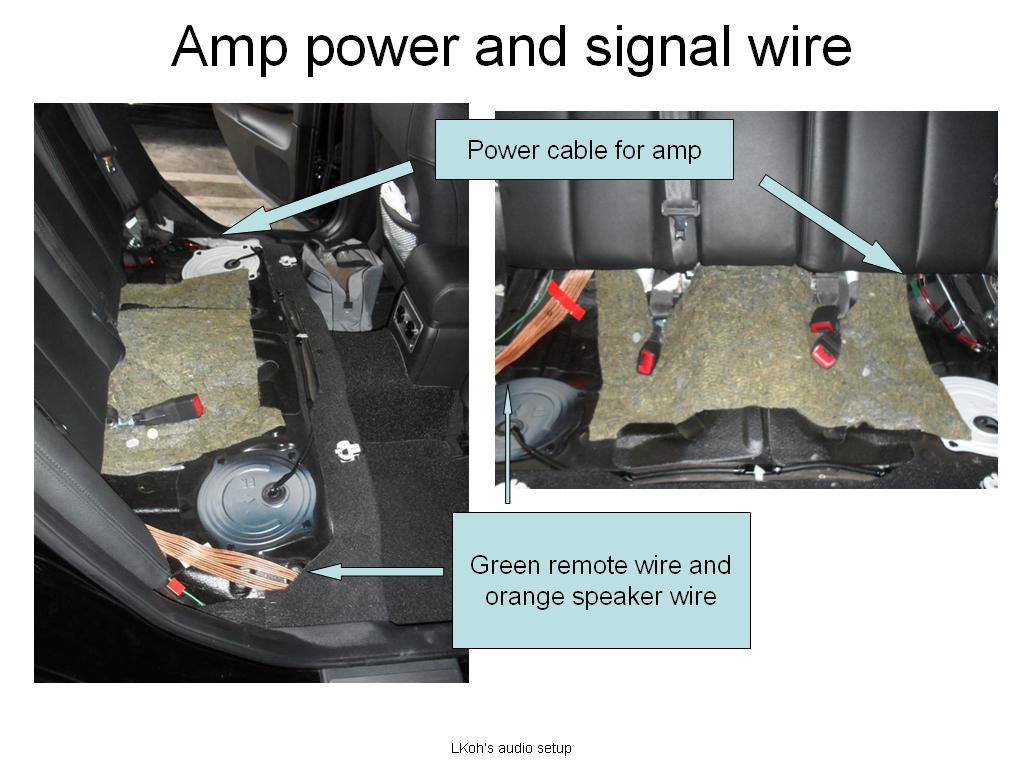
I will post another pic from the boot shortly
by the way I'm RHD, so the battery is on the left for me
This first pic is from the inside of the cabin, with the rear seat removed
I will post another pic from the boot shortly
Last edited by lkoh; Dec 21, 2011 at 08:30 AM.
Registered User
Joined: Feb 2011
Posts: 35
Likes: 4
From: Singapore
Non Bose audio install part 3.1 - Front door speakers
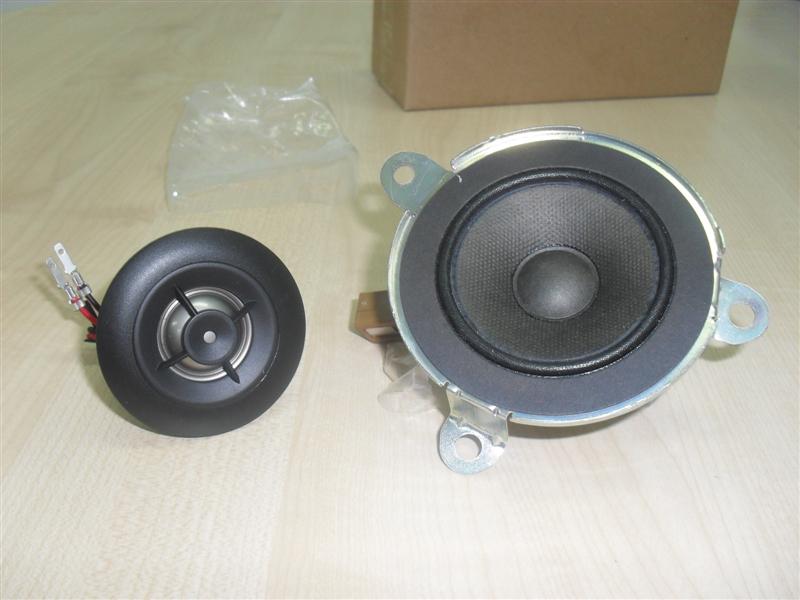
Self explanatory pictures follow. I did not run any wires through the door, just used the oem wiring. If you are the audiophile sort you will change the wires. The OEM wiring was skinny (maybe 18ga). But the wires that came with my crossovers were equally puny.
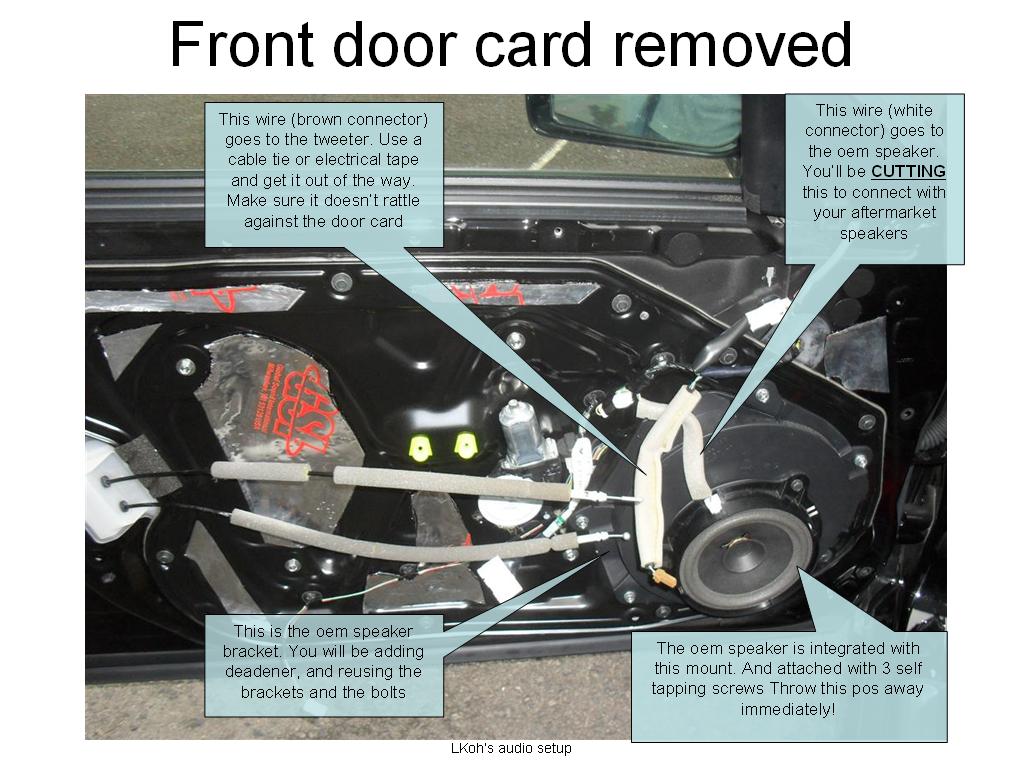
This is the reason why we can't mount big speakers on our cars. There is a metal shield at the rear that stops you from smashing up your windows when they roll down.
Moisture *will* get into this portion somehow. You could put some baffles to protect your speakers and muffle your sound. Or not. I spent way too much time reading all the debates and I can say that there was no definite conclusion.
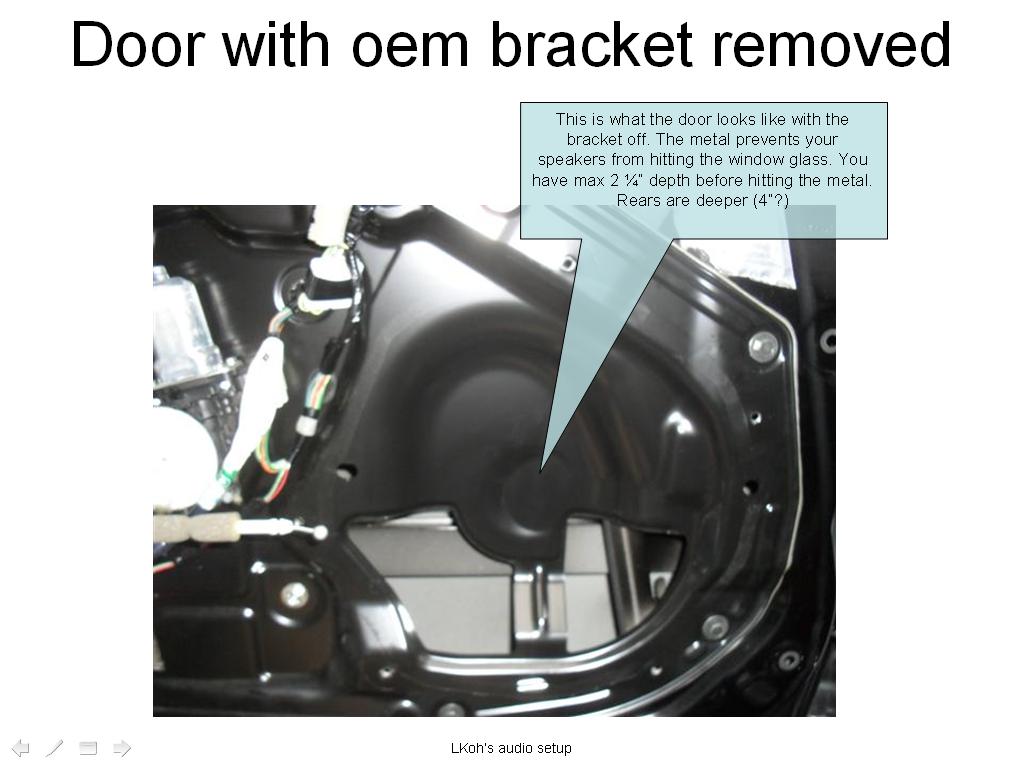
I reused the oem Speaker bracket. It allows you to mount a 2 dimensional speaker on a 3 dimensional door. To do otherwise would need fabrication skills which I did not have

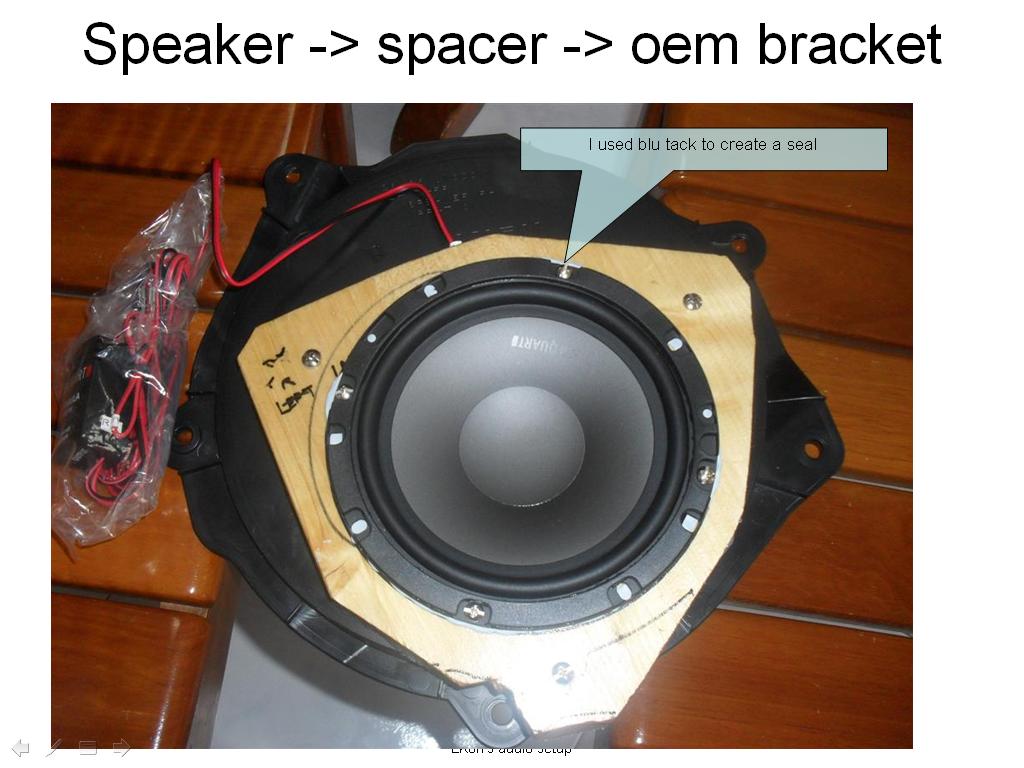
You still need a sort of spacer to put the speaker on the bracket. Without a spacer, you only have 2 1/4" of clearance for the fronts

This is the speaker, mounted on the spacer and then the bracket. You need to create some sort of seal. Blu Tack works well
Post on tweeters to follow
This is the reason why we can't mount big speakers on our cars. There is a metal shield at the rear that stops you from smashing up your windows when they roll down.
Moisture *will* get into this portion somehow. You could put some baffles to protect your speakers and muffle your sound. Or not. I spent way too much time reading all the debates and I can say that there was no definite conclusion.
I reused the oem Speaker bracket. It allows you to mount a 2 dimensional speaker on a 3 dimensional door. To do otherwise would need fabrication skills which I did not have
You still need a sort of spacer to put the speaker on the bracket. Without a spacer, you only have 2 1/4" of clearance for the fronts
This is the speaker, mounted on the spacer and then the bracket. You need to create some sort of seal. Blu Tack works well
Post on tweeters to follow
Registered User
Joined: Feb 2011
Posts: 35
Likes: 4
From: Singapore
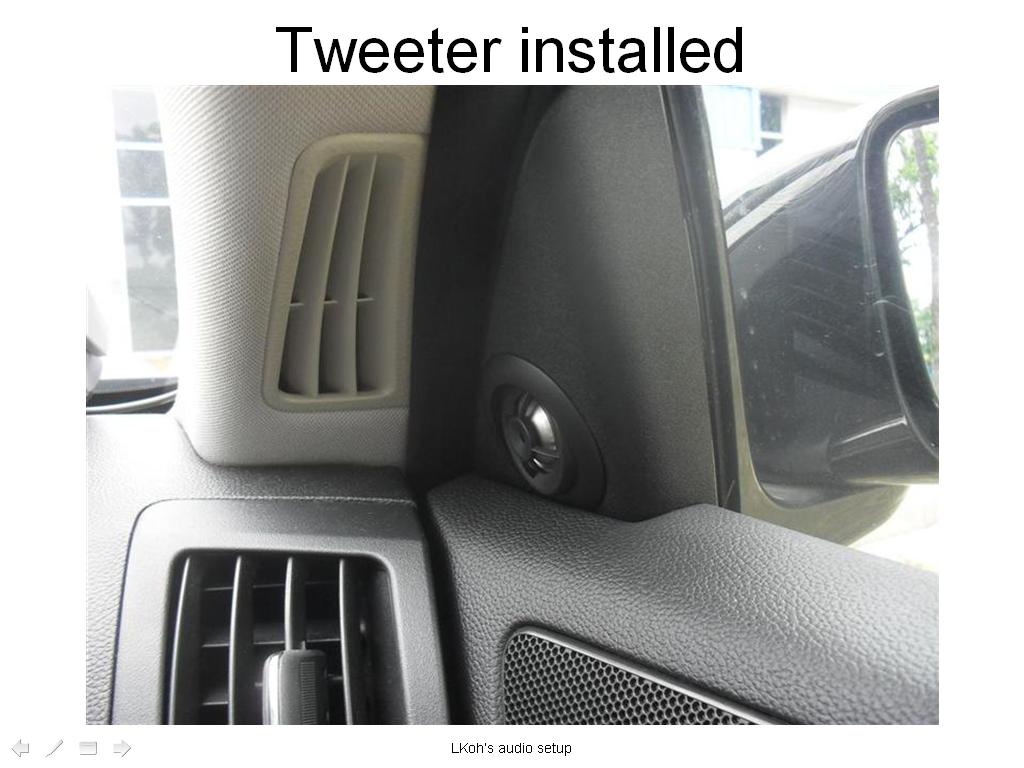
Non Bose audio install part 3.2 - Tweeters
The stock tweeters are stuck to the brackets. If you want to mount the tweeters on the oem location, you will have to fabricate something new.
Personally, I felt that tweeters were the most sensitive to obstructions (grills etc) so I opted to place them in the sails
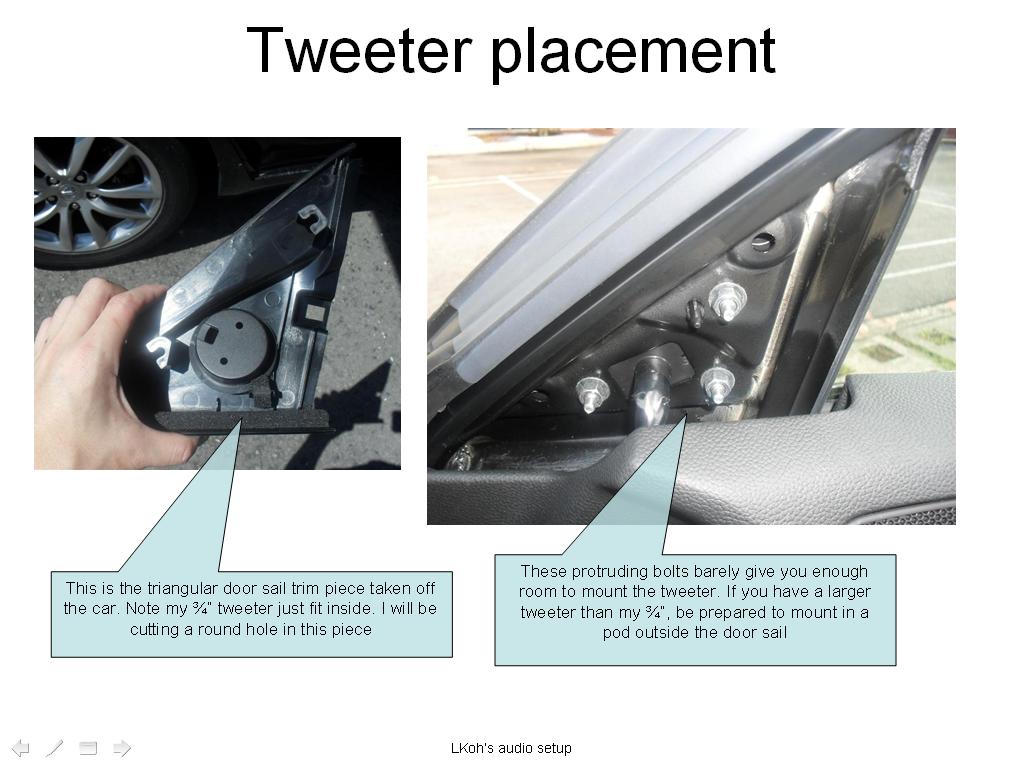
This is the door sail with the hole cut in it. I used sensor safe silicone to seal it. Some silicone are "non-sensor safe", and have (acidic?) vapors that supposedly loosen the seal o the speaker surround. I played safe.
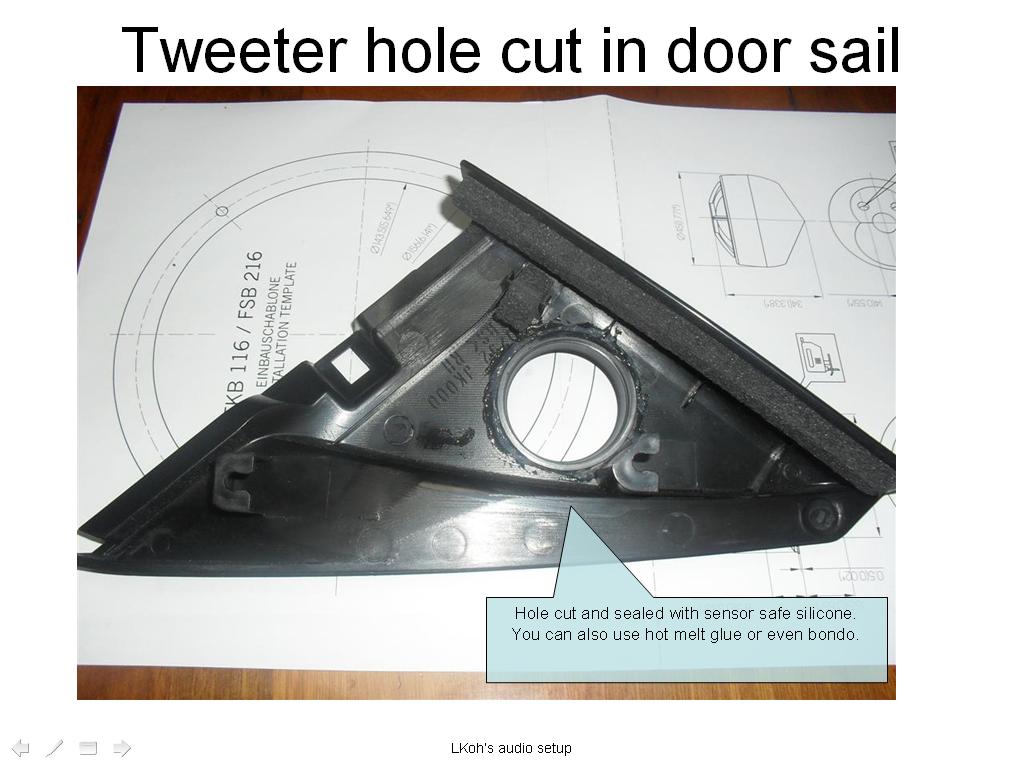
The finished product
Personally, I felt that tweeters were the most sensitive to obstructions (grills etc) so I opted to place them in the sails
This is the door sail with the hole cut in it. I used sensor safe silicone to seal it. Some silicone are "non-sensor safe", and have (acidic?) vapors that supposedly loosen the seal o the speaker surround. I played safe.
The finished product
Last edited by lkoh; Dec 21, 2011 at 08:27 AM.

Registered User
Joined: Nov 2011
Posts: 72
Likes: 0
Hi Racer_X,
No I don't. I doubt it would be an interesting read. Are you looking to swap your front stage yourself?
I don't mean to get the thread off topic, but I'd be happy to answer any questions on specifics regarding the sedan. let me know which point to elaborate on. I did the whole setup diy including the below points:
1a) selection of differential balanced amp with speaker level inputs, no rca (Alpine MRP F300) (amp selection is going to decide the rest of the setup)
1b) tap signal from non-bose head unit (hu) using Metra 70-7552 and 71-7552 (no cutting of wires)
1c) tap amp remote on signal from hu, and lay 18ga remote wire to trunk (I was not successful to find one)
1d) route 16ga signal wires through center console -> rear seats -> trunk
2a) swap of front door speakers with 6.5" components (MBQuart fsb216), reusing oem speaker bracket and 3/4" wood spacer (cutting of oem speaker wire)
2b) placement of tweeters in triangular door sails (cutting of plastic door sail involved)
3a) route power from battery to amp via 8ga cable inclusive of inline fuse
3b) selection of grounding point
4) sub on rear deck
There were 2 informative G35 threads that got me started. I still bookmark "diy-speaker-install-g35-sedan-non-bose" and "upgrading-sound-system-keeping-stock-hu". Between those and the fsm, I had all I needed and believe me, I am no installer
It is interesting to note that I found an abundance of articles of folks who have upgraded from bose (including one going on right now in the DIY section), but very few tutorials on how to upgrade the non-bose. Perhaps non-bose owners are more easily satisfied
I was really just curious on taking the door apart, and applying some dynamat. I have the Bose system, but am also an audio enthusiast. At some point I will start doing some small upgrades, but honestly, the stock staging is quite good, but starts changing its tone when you start to push the amp since it's underpowered. A sub will probably be the first addition, but I just got this car like a month ago, and a 2008 with 20k on it...she's still a baby 
*edit*
And thank you SO much for the detailed overview and pics! **favorited**
Last edited by Racer_X; Dec 21, 2011 at 08:26 AM.

Registered User
Joined: Nov 2011
Posts: 47
Likes: 0
Ikoh,
You're a genius... I love the twitter install will definitely keep this in mind.
But I've got the mother load of all questions. Get Ready.
We have the same JDM 250GT, Did you learn Japanese or were you able to change the language on the Nav Radio A/V unit?
The guys in Australia had a fix going but it was for only 04-05 350GTs and have since given up. Interested in knowing what you did, if anything.
Good work again.

