
G37 Sedan Paddle Shifters


mikejg,
No real part number for the screws. Just as I listed above: 2 6mm nuts, 2 6mm screws (about 1/4 inch in length), and 2 12mm screws (also 1/4 inch in length). The length of the screws truly dont matter as they end up in open space (it will make sense once you screw them in).
If you want to know which screw goes where: in the post above by DocJohn with the picture, look at the screws highlighted yellow. Those would be the 12mm screws. The 6mm screws go in back of paddle shifter on the sides (and are not pictured in the diagram)


Registered User
Joined: Oct 2010
Posts: 439
Likes: 1
From: Las Vegas
It is a super easy job. All you need is to be careful when taking the cover off. Everything else is common sense. I've never had done any technical jobs done before and I installed mine in 20mins.

Registered User
Joined: May 2011
Posts: 155
Likes: 1
Thanks, buff. Yeah I know where they go b/c I had the other hardware just not for that one spot. I just didn't want to make 3 trips Lowe's. Haha.
FWIW, the bottom piece feels pretty solid without those screws, I just want to get them for peace of mind.
FWIW, the bottom piece feels pretty solid without those screws, I just want to get them for peace of mind.
G-DOG
iTrader: (3)
Joined: Oct 2006
Posts: 278
Likes: 4
From: Louisville, KY (relocated from Brooklyn, NY)
 It took about an hour.
 The two new screws I used were #10 x 3/4" trim screws. I got them from Autozone. Actually, any pan head or flat head #10 x 3/4" sheet metal screw would work just fine.
I'll post some tips later today that might make the job a little easier.
G-DOG
iTrader: (3)
Joined: Oct 2006
Posts: 278
Likes: 4
From: Louisville, KY (relocated from Brooklyn, NY)
I wanted to take some pics while I did my paddle shifter installation today, but it was just too hot and I wanted to get this job done as quickly as possible.
Also, there are already some excellent pics of the installation posted in DIY: Installing Sport paddles - G35Driver by Lemodular, (but he removed his air bag and steering wheel which is really not necessary) so I decided to use the diagrams in the service manual to illustrate my installation tips.
1. Raise the steering wheel all the way up and all the way out.

2. Under the steering column, locate the column cover (part #1 in the above diagram). Grab the center of the plastic column cover and pull downward towards the floor to remove it. (Its held in by 2 tabs on right and left sides of this part). Next, remove the 2 screws holding in the metal brace (part #2 above). Note the position of this metal brace so you can be sure you re-install it correctly later.

3. The diagram above shows the upper (part #4) and lower (part #7) steering column covers, Remove one screw (highlighted above in blue) from the bottom of the lower cover (its located inside of a deep, round inset, off-center and slightly to the right, and is very hard to see).
4. Turn the steering wheel 90 degrees to the right of center (3 o’clock position) and you will see the right trim screw cover (part #3 above). Use a thin blade screwdriver or small pocket knife blade to pry off the trim screw cover. (Insert the blade in the vertical gap between the trim screw cover and the upper steering column cover that is closest to the center line of the wheel and it should pry out fairly easily). Now remove the screw that it was covering.
5. Turn the wheel 90 degrees to the left of center (9 o’clock position) and repeat step 4 for the left side.
6. You should now be able to slightly separate the upper and lower steering column covers. I found that there is no need to completely remove the upper column cover. There is no difference in this part with or without the paddle shifters, but you can only order all 4 column covers (right, left, upper, lower) for the paddle shifters together and not as separate pieces, so you will have a new upper column cover that you don't need to use.
Now comes the hardest part... removing the lower steering column cover. Don’t worry if you scratch or damage the lower column cover because you won’t use it again... unless you decide you ever want to remove the paddle shifters. My best advice is to turn the steering wheel upside-down (180 degrees off-center, 6 o’clock position) and try to free up the right side first. The will give you enough room to reach your hand inside of the lower cover in order to disconnect the electrical connector that plugs into the steering wheel tilt/telescope control switch. There is a release tab on the electrical connector that you need to press while you pull it out.
EDIT: Warp37 recommends that instead of removing the right side of the lower column cover first, that you remove the front part -- the part closest to you as you sit in the driver's seat -- first by pulling down/out while holding the back part in place. Then the whole thing comes right off. Now, push the tilt control switch out of the housing and then disconnect it from the wiring.
7. Once you have the lower column cover removed, you should remove the steering wheel tilt/telescope control switch. From the inside of the column cover, locate the 2 tabs that retain the switch in the cover. Press down on them with a screwdriver blade and you will then be able to push the switch out of the cover from the inside outward.
8. Turn the steering wheel 90 degrees to the right of center (3 o’clock position) and locate the electrical connector for the right paddle shifter. It will be taped up with some other wires. Cut the tape and free up the connector.
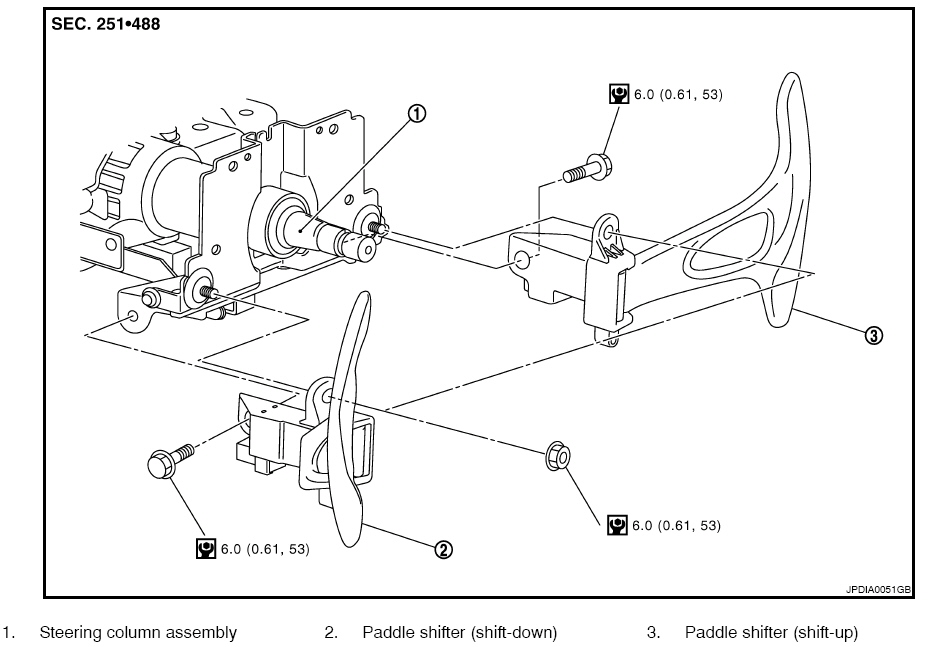
9. Plug the electrical connector into the right paddle shifter (the right shifter is the “+” [up-shift] one). Install the right paddle shifter using the diagram above. (Of course your steering wheel is still there, but you get the idea). Use the M6 bolt and nut that came with the paddle shifter kit. You will need a 10mm socket or nut driver to tighten the bolt and nut. (If you are a real perfectionist, the correct torque spec is 53 inch-pounds).
10. Turn the wheel 90 degrees to the left of center (9 o’clock position). Repeat step 9 and install the left (“-“ or down-shift) paddle shifter.

11. Turn the wheel 180 degrees off-center (6 o’clock position) and install the NEW lower steering column cover (part #7 above). Once you have it in the correct position, fasten it in place by replacing the bottom trim screw (highlighted in blue in the above diagram). Next, install two NEW #10 x 3/4" trim screws (highlighted in yellow in the above diagram). (You can buy these at Autozone... you can also use two #10 x 3/4" pan head or flat head sheet metal screws. These two screws are not critical, and if you leave them out the lower column cover it still seems to be secure enough).
12. Turn the steering wheel 90 degrees to the right of center (3 o’clock position) and install the right steering column cover (part #5 above) into the correct position and alignment with the upper and lower steering column covers. Don’t install the trim screw here yet.
13. Turn the steering wheel 90 degrees to the left of center (9 o’clock position). Route the electrical connector for the steering wheel tilt/telescope control switch through the hole in the left column cover (part #6 above) and plug it into the control switch. Now, snap the control switch into place in the left column cover... don’t forget to re-align the index tab on the control switch with the index notch in the hole in the left column cover before you try to snap in back in place.
Finish installing the left steering column cover into the correct position and alignment with the upper and lower steering column covers.
14. Check and make certain that all 4 steering column covers (parts #4, #5, #6 and #7) are correctly installed and aligned with no major gaps.
15. Install the left upper column trim screw and snap the trim screw cover (part #3) back in place.
16. Turn the steering wheel 90 degrees to the right of center (3 o’clock position) and repeat step 15 for the right side.
17. Replace the metal brace and two screws you removed back in step 2 and snap the center lower cover back in place.
18. Take your G for a test drive and enjoy your new paddle shifters!
Also, there are already some excellent pics of the installation posted in DIY: Installing Sport paddles - G35Driver by Lemodular, (but he removed his air bag and steering wheel which is really not necessary) so I decided to use the diagrams in the service manual to illustrate my installation tips.
1. Raise the steering wheel all the way up and all the way out.
2. Under the steering column, locate the column cover (part #1 in the above diagram). Grab the center of the plastic column cover and pull downward towards the floor to remove it. (Its held in by 2 tabs on right and left sides of this part). Next, remove the 2 screws holding in the metal brace (part #2 above). Note the position of this metal brace so you can be sure you re-install it correctly later.
3. The diagram above shows the upper (part #4) and lower (part #7) steering column covers, Remove one screw (highlighted above in blue) from the bottom of the lower cover (its located inside of a deep, round inset, off-center and slightly to the right, and is very hard to see).
4. Turn the steering wheel 90 degrees to the right of center (3 o’clock position) and you will see the right trim screw cover (part #3 above). Use a thin blade screwdriver or small pocket knife blade to pry off the trim screw cover. (Insert the blade in the vertical gap between the trim screw cover and the upper steering column cover that is closest to the center line of the wheel and it should pry out fairly easily). Now remove the screw that it was covering.
5. Turn the wheel 90 degrees to the left of center (9 o’clock position) and repeat step 4 for the left side.
6. You should now be able to slightly separate the upper and lower steering column covers. I found that there is no need to completely remove the upper column cover. There is no difference in this part with or without the paddle shifters, but you can only order all 4 column covers (right, left, upper, lower) for the paddle shifters together and not as separate pieces, so you will have a new upper column cover that you don't need to use.
Now comes the hardest part... removing the lower steering column cover. Don’t worry if you scratch or damage the lower column cover because you won’t use it again... unless you decide you ever want to remove the paddle shifters. My best advice is to turn the steering wheel upside-down (180 degrees off-center, 6 o’clock position) and try to free up the right side first. The will give you enough room to reach your hand inside of the lower cover in order to disconnect the electrical connector that plugs into the steering wheel tilt/telescope control switch. There is a release tab on the electrical connector that you need to press while you pull it out.
EDIT: Warp37 recommends that instead of removing the right side of the lower column cover first, that you remove the front part -- the part closest to you as you sit in the driver's seat -- first by pulling down/out while holding the back part in place. Then the whole thing comes right off. Now, push the tilt control switch out of the housing and then disconnect it from the wiring.
7. Once you have the lower column cover removed, you should remove the steering wheel tilt/telescope control switch. From the inside of the column cover, locate the 2 tabs that retain the switch in the cover. Press down on them with a screwdriver blade and you will then be able to push the switch out of the cover from the inside outward.
8. Turn the steering wheel 90 degrees to the right of center (3 o’clock position) and locate the electrical connector for the right paddle shifter. It will be taped up with some other wires. Cut the tape and free up the connector.
9. Plug the electrical connector into the right paddle shifter (the right shifter is the “+” [up-shift] one). Install the right paddle shifter using the diagram above. (Of course your steering wheel is still there, but you get the idea). Use the M6 bolt and nut that came with the paddle shifter kit. You will need a 10mm socket or nut driver to tighten the bolt and nut. (If you are a real perfectionist, the correct torque spec is 53 inch-pounds).
10. Turn the wheel 90 degrees to the left of center (9 o’clock position). Repeat step 9 and install the left (“-“ or down-shift) paddle shifter.
11. Turn the wheel 180 degrees off-center (6 o’clock position) and install the NEW lower steering column cover (part #7 above). Once you have it in the correct position, fasten it in place by replacing the bottom trim screw (highlighted in blue in the above diagram). Next, install two NEW #10 x 3/4" trim screws (highlighted in yellow in the above diagram). (You can buy these at Autozone... you can also use two #10 x 3/4" pan head or flat head sheet metal screws. These two screws are not critical, and if you leave them out the lower column cover it still seems to be secure enough).
12. Turn the steering wheel 90 degrees to the right of center (3 o’clock position) and install the right steering column cover (part #5 above) into the correct position and alignment with the upper and lower steering column covers. Don’t install the trim screw here yet.
13. Turn the steering wheel 90 degrees to the left of center (9 o’clock position). Route the electrical connector for the steering wheel tilt/telescope control switch through the hole in the left column cover (part #6 above) and plug it into the control switch. Now, snap the control switch into place in the left column cover... don’t forget to re-align the index tab on the control switch with the index notch in the hole in the left column cover before you try to snap in back in place.
Finish installing the left steering column cover into the correct position and alignment with the upper and lower steering column covers.
14. Check and make certain that all 4 steering column covers (parts #4, #5, #6 and #7) are correctly installed and aligned with no major gaps.
15. Install the left upper column trim screw and snap the trim screw cover (part #3) back in place.
16. Turn the steering wheel 90 degrees to the right of center (3 o’clock position) and repeat step 15 for the right side.
17. Replace the metal brace and two screws you removed back in step 2 and snap the center lower cover back in place.
18. Take your G for a test drive and enjoy your new paddle shifters!
Last edited by DocJohn; Aug 19, 2011 at 09:03 AM.

Registered User
Joined: Jul 2010
Posts: 66
Likes: 0
I'm fixin' to order. The only set available on ebay / oc infiniti is tan (i.e., grey, which is what I need) but it says "2dr" -- for the coupe. Does it make any difference? Can one install it on the sedan?
Besides OC Infiniti, does anyone know of any other sellers?
Thanks!
Besides OC Infiniti, does anyone know of any other sellers?
Thanks!
G-DOG
iTrader: (3)
Joined: Oct 2006
Posts: 278
Likes: 4
From: Louisville, KY (relocated from Brooklyn, NY)
I'm fixin' to order. The only set available on ebay / oc infiniti is tan (i.e., grey, which is what I need) but it says "2dr" -- for the coupe. Does it make any difference? Can one install it on the sedan?
Besides OC Infiniti, does anyone know of any other sellers?
Thanks!
Besides OC Infiniti, does anyone know of any other sellers?
Thanks!
Registered User
Joined: May 2011
Posts: 155
Likes: 1
Great write-up, Doc!! I didn't remove that metal brace when I installed mine the other day, so I don't think it's critical to remove that???
Other than that anyone should be able to follow that step-by-step for easy install.
Other than that anyone should be able to follow that step-by-step for easy install.
G-DOG
iTrader: (3)
Joined: Oct 2006
Posts: 278
Likes: 4
From: Louisville, KY (relocated from Brooklyn, NY)
You're correct, you don't have to remove the metal brace. I think it just helped make it a little easier for me to remove the lower column cover.

Registered User
Joined: Oct 2010
Posts: 139
Likes: 2
From: NJ
Is this the right part?
Infiniti Parts USA - Your #1 Source for Factory Infiniti Parts & Accessories
Infiniti Parts USA - Your #1 Source for Factory Infiniti Parts & Accessories