
DIY: G37 all headlight bulb replacement


Thread Starter
Registered User
Joined: May 2008
Posts: 1,170
Likes: 11
From: Jacksonville, FL/ Carmel, NY
G37 all headlight bulb replacement
For everyone who has had a hard time or is confused about changing their headlight bulbs this is for you.
Today I wanted to check if I could remove my fog lights so I could change the bulbs. (the answer is yes) While I was at it I took so pictures and circled what is what.
These are the sizes needed:
HID: D2S
Fog: H1
Parking: 194
Here we go:
1. Loosen lug nuts on a front tire (I started with the left front one)
2. Jack car up and remove lug nuts and tire
3. pop out the three plastic clips on the wheel well so it can be folded behind the brake. after that you will see this once you look in their
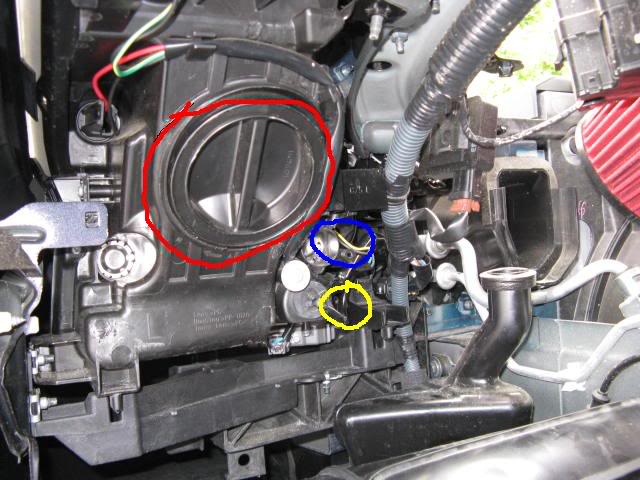
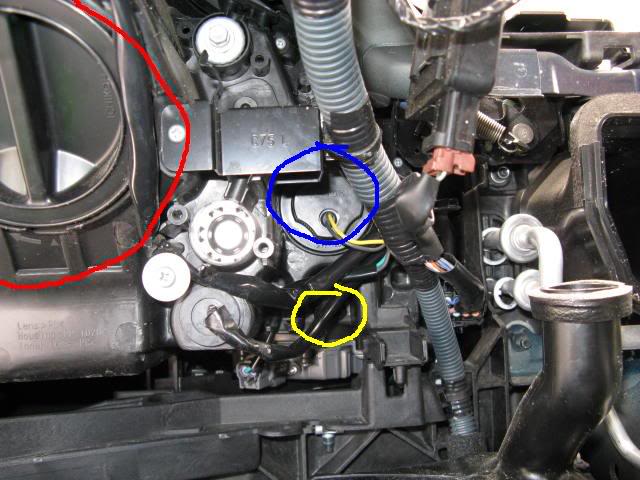
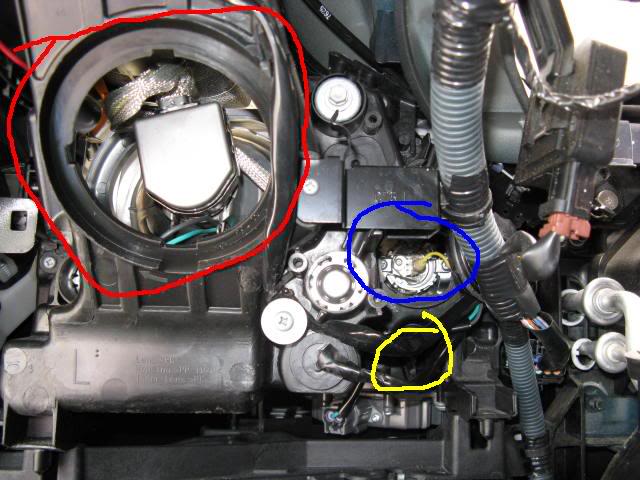
Circled in red is the HID, Blue is the fog light, and Yellow is your parking lights
4. next step is to removed the covers of the HID's and the fogs, just twist left and they should pop off and will look like this
Note: carefully with the fog cover because wires run through it, so don't rip them out.
Now for each of the three bulbs its a little different:
HID's
- twist HID connection to the left (circled in purple)
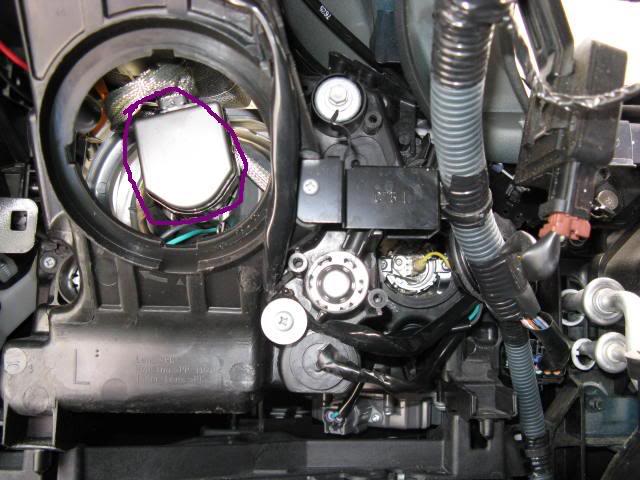
After this you will need to remove the screw using a small phillipshead. After that the light should come out easily.
Note: Be careful because the oil from your fingers will damage the bulb, so don't touch it :tut
Then insert new bulb and do the steps in reverse
Fogs:
- Unscrew the 2 screws using a small phillipshead. Bulb should easily come out. You can leave the wiring connected so it won't be a pain to reconnect the wire after you put it back in. (fogs are circled in blue)
Note: Be careful because the oil from your fingers will damage the bulb, so don't touch it :tut
Insert new bulb then reverse the steps
Parking:
-This is the toughest to get to because the area is so tight. A long black plastic piece sticks out, so take that and twist to the left. Your bulb and will come out with it. (The area is circled in yellow)
Now insert new bulb and do the steps in reverse.
There you go everyone! Hope this makes things easier and if you have questions e-mail me. CYO44Baseball32@aol.com
Please sticky this!!!
Insert new bulb :ninja2
Today I wanted to check if I could remove my fog lights so I could change the bulbs. (the answer is yes) While I was at it I took so pictures and circled what is what.
These are the sizes needed:
HID: D2S
Fog: H1
Parking: 194
Here we go:
1. Loosen lug nuts on a front tire (I started with the left front one)
2. Jack car up and remove lug nuts and tire
3. pop out the three plastic clips on the wheel well so it can be folded behind the brake. after that you will see this once you look in their
Circled in red is the HID, Blue is the fog light, and Yellow is your parking lights
4. next step is to removed the covers of the HID's and the fogs, just twist left and they should pop off and will look like this
Note: carefully with the fog cover because wires run through it, so don't rip them out.
Now for each of the three bulbs its a little different:
HID's
- twist HID connection to the left (circled in purple)
After this you will need to remove the screw using a small phillipshead. After that the light should come out easily.
Note: Be careful because the oil from your fingers will damage the bulb, so don't touch it :tut
Then insert new bulb and do the steps in reverse
Fogs:
- Unscrew the 2 screws using a small phillipshead. Bulb should easily come out. You can leave the wiring connected so it won't be a pain to reconnect the wire after you put it back in. (fogs are circled in blue)
Note: Be careful because the oil from your fingers will damage the bulb, so don't touch it :tut
Insert new bulb then reverse the steps
Parking:
-This is the toughest to get to because the area is so tight. A long black plastic piece sticks out, so take that and twist to the left. Your bulb and will come out with it. (The area is circled in yellow)
Now insert new bulb and do the steps in reverse.
There you go everyone! Hope this makes things easier and if you have questions e-mail me. CYO44Baseball32@aol.com
Please sticky this!!!
Insert new bulb :ninja2
Last edited by DiamondGCoupe; Mar 4, 2009 at 03:08 PM.


Trending Topics


Thread Starter
Registered User
Joined: May 2008
Posts: 1,170
Likes: 11
From: Jacksonville, FL/ Carmel, NY
I dont got a pic of that right now, but if you remove the wheel you'll see those plastic pop clips. One is on top looking straight up other is right in front of you looking right at it, and the other is to your left looking straight at it.
Registered Member
Joined: Sep 2004
Posts: 229
Likes: 0
From: Miami, FL
holy junk!!!! that was hard as hell!! i dont have the huge hands and it was very difficult to get the fog lights out, especially on the passenger side.
Enough venting, cant wait to see what they look like at night.
thanks
Enough venting, cant wait to see what they look like at night.
thanks
