When you click on links to various merchants on this site and make a purchase, this can result in this site earning a commission. Affiliate programs and affiliations include, but are not limited to, the eBay Partner Network.
Did this mod about a week ago, week ago, and I think it's time to do a review.
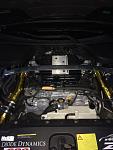
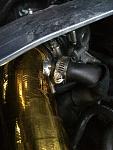
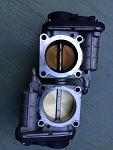
This is before.
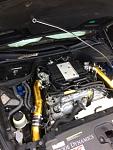
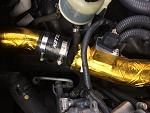
This is after.
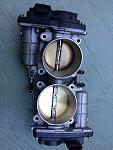
Looks the same right? Yeah I said the same thing too. From factory, the throttle bodies are 58mm and SYNOLIMIT gets it bored out to 63mm. And those 5mm x2 makes a difference.
I opted to send my core throttle bodies after (which I advise anyone to do) so i got them in the mail and sent them out two days later.
Install difficulty- 2 on a scale of 1-10. 1 being easy and 10 being hard.
Synolimit is best reached via email. Quicker responses that way, however, he does reply to PMs on here.
Order of operation:
payment to Synolimit
Throttle bodies in stock are shipped to Florida to be bored out.
Big bore Throttle bodies shipped to you few days later.
Core throttle bodies shipped to Synolimit after install.
Package the core throttle bodies well! Overdose on packing paper, peanuts and saran wrap or else you won't get a refund for your core.
Synolimit does the upper intake manifold as well as the lower intake manifold in house whereas the TB's are shipped out. The TB's can stay in Florida for 3-5 days depending on work load (one reason why I sent my cores after).
Now on to getting dirty ..... sort've.
Tools used:
Flat head
Needle noise Vice grip
10mm socket
8mm socket
Ratchet
Allen key
Clean cloth.
First disconnect negative terminal on battery.
Remove strut bar. I just removed one bolt and leaned it up.
Next unplug maf sensor.
Next remove intake mid pipe from the throttle body, vent tube, and middle coupler.
Remove throttle body with Allen key.
Out with the old and in with the new. Old ones are the filthy ones. Go figure.
Now. The TPS housings on the TB's can get messed up during shipment. They are a bit delicate (second reason to send core after). So at this point, I would say screw the trial and error run to see if Synolimit housings are good when you know for a fact that yours are working perfect. Swap those bad boys out.
While working on the housing, I held the TB's with a clean cloth so no oil or dirt gets on it. The screws are of a safety screw so I used a needle nose vice grip to take them out. Fairly easy. Take your time taking off the housing. The connectors for the housing may get stuck inside. I was there for about 10 minutes before I got a small flat head and wedged them out. I did it after because the idle relearn wasn't working with me and I was getting a p0507 code. (Too much air). But for you guys, I advise doing it first before reinstalling.
Reverse steps. Then move on over to next side and installation done! Simple enough. I did the tps housing swap during my lunch hour. Now the relearn process. Each have to be done in order and correct for the relearn to work.
Fyi, here is the TB reset procedure.
How to reset your ECU and perform the Throttle Pedal Release and Idle Air Volume Learning procedures on an Infiniti G35 and the Nissan 350Z.
Before attempting any of the following procedures, it is advisable that you read through the instructions thoroughly and familiarize yourself with them.
A stop watch or an analog clock with a second’s needle will be useful.
**a quick reset can be accomplished by disconnecting the negative battery terminal, and depressing the brake a few times.
ECU Resetting Procedures
Timing is extremely critical. If it is NOT DONE within the specify time, the ECU will not reset and the Check Engine Light (CEL) will continue to remain ON.
Operations Procedures
1. Confirm that accelerator pedal is fully released, turn ignition switch “ON” and wait 3 seconds.
2. Repeat the following steps (2a and 2b) procedures quickly five times within 5 seconds.
2a. Fully depress the accelerator pedal (HARD).
2b. Fully release the accelerator pedal.
3. Wait 7 seconds, fully depress the accelerator pedal and keep it for approx. 10 seconds until the CEL starts blinking.
4. Fully release the accelerator pedal (while the CEL is still blinking)
5. Wait about 10 second.
6. Fully depress the accelerator pedal and keep it for more than 10 seconds.
7. Fully release the accelerator pedal (The CEL light will continue to blink).
8. Turn ignition switch to “OFF” position and now you can start the car. The CEL light should be gone.
If the CEL light continues to remain ON, repeat the above steps. Timing is EXTREMELY critical to resetting the ECU.
Accelerator Pedal Release Position Learning
Operation Procedure
1. Make sure that the accelerator pedal is fully released.
2. Turn ignition switch “ON” and wait at least 2 seconds.
3. Turn ignition switch “OFF” wait at least 10 seconds.
4. Turn ignition switch “ON” and wait at least 2 seconds.
5. Turn ignition switch “OFF” wait at least 10 seconds.
Throttle Valve Closed Position Learning
Operation Procedures
1. Make sure that accelerator pedal is fully released.
2. Turn ignition switch to “ON”.
3. Turn ignition switch to “OFF” wait at least 10 seconds.
Make sure that the throttle valve moves during above 10 seconds by confirming the operating sound.
Idle Air Volume Learning (Throttle Position Learning)
It is better to count the time accurately with a clock.
1. Perform “Accelerator Pedal Released Position Learning”.
2. Perform “Throttle Valve Closed Position Learning”.
3. Start engine and warm it up to normal operating temperature.
4. Turn ignition switch “OFF” and wait at least 10 seconds.
5. Confirm that the accelerator pedal is fully released, then turn ignition switch “ON” and wait 3 seconds.
6. Repeat the following (steps 7a, 7b) procedures quickly five times within 5 seconds.
7a. Fully depress the accelerator pedal (HARD)
7b. Fully release the accelerator pedal.
8. Wait 7 seconds, fully depress the accelerator pedal and keep it for approx. 20 seconds until the Check Engine Light (CEL) stops blinking and turned ON.
9. Fully release the accelerator pedal within 3 seconds after the CEL is ON.
10. Start engine and let it idle.
11. Wait 20 seconds.
12. Rev up the engine two or three times and make sure the idle speed and ignition timing are within the specifications.
DONE! Differences that I noticed is that ob cold start up, it goes to about 2k rpm before dropping down, warms up faster and I can break traction easier.
There's only one dyno shop in the Virgin Islands and it is on another island that's a 6 hour sail away by barge. I'm on st. Thomas and the dyno shop is on st. Croix. I'm hoping the homie Alfredopr follows thru with this mod to provide the dyno service.
I just did this Christmas eve. There were a few hiccups, but it was late and there was some sauce involved, so some things were forgotten...that, and I didn't have the procedure for it, internet was down b/c of a T storm, so I winged it.
Not too difficult an install, and overall, I'm in agreement with PongSanity. I can't break traction as easy though, still base map and 235/255 tires for more grip.
So like PongSanity, the whole process went pretty much as said. I paid for the TBs, received them a lil less than 2 weeks later, and installed them. I have yet to send the OEM ones back for the core refund, but that'll happen Monday when I'm off work.
SO. I don't have any definite numbers, so this is strictly a quality assessment w/o numbers.
Key problems that I ran into:
-drinking
-late Christmas Eve...as in 2am late lol
-no internet. crazy a*@ thunderstorm knocked it out earlier. so playing by ear lol
-swapping TPS housing from my TB to the new one.
-drinking
-forgetting little things, i.e. plugging the TB back into the harness when starting it back up.
NOW. With those mentioned, my write up isn't as detailed as PongSanity's, but I went ahead and bypassed the coolant lines leading to the TB's. Other than that, it went pretty much the same.
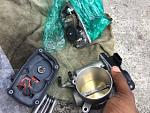
SN so you know it's me. Sry for the s*@&tty pic quality...my phone broke earlier that day, so all photos were taken with the front camera of an ipod. the struggle....
Here's a side by side of the two together. You can notice the slimmer profiling of the butterfly shaft, as well as the razor lip of the ported TB (right) vs stock (left). I thought that the port was done off center, because a portion of the outer lip was razor thin as comapared to the lip on the other side of the rim. The difference in thickness is due to a lip on the outside...the lip only covers a portion of the outer rim (for clearance purposes in the engine bay).
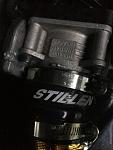
When swapping the TPS housing on the rear, you should be careful. It takes a T20 security bit to get it open, one with a hole in the center. Or you can use needle nose pliers and man grip strength. Either way, once you have the screws off, use a small profile flathead to CAREFULLY lift the TPS cover evenly on all sides. There are two electric prongs which send the control signal to the motor actuator; you want to be careful because of them. When swapping, I had forgotten to swap over the interim gear between the actuator and the butterfly valve gear (black, plastic gear). It was a PITA to disassemble once I had put it all back together the first time around.
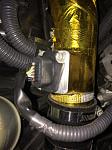
With the TB removed from the upper plenum, I placed a towel underneath to catch any coolant that came out of the lines when disconnected from the TB.
Lines disconnected from the OEM TB. Cut the shielding around the coolant lines to get it to bend the way you want, then re-route them back to the return.
The coolant line is bypassed in this pic, it's located directly adjacent to the lower left of the 90 deg short piece you see in this photo.
Use the short line you removed, trim to size, and then just plug the coolant ports of your TB with them. Cheap and easy...or you can go buy some plug covers for them.
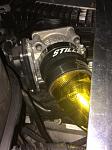
Here is the passenger side installed, no flash
Passenger side installed, w/ flash
PROS: There's a noticeable bump in torque. There's really no...I guess the best word to use would be "drastic" droop in pull all the way to redline, even up through 6th. Throttle response is definitely quicker and more defined, slightly faster. However, I'm still untuned, so I can literally feel it going rich to compensate when it's WOT. There's NO NEED to mess with the idle screw. When initially fired back up, idle will run high, but you just need to perform the necessary reset procedures (accelerator pedal release, ecu reset, idle reset) and it'll return to normal. When started, car will warm up faster, bout 2/3 the time it'd normally take to warm up. The power in the car pretty much leads you now, I can lead off the clutch in 2nd/3rd if the ground is level.
CONS: I don't have a tune, so I'm not getting what I know I can out of it. I recently went with thicker tires (235/45/19 front, 255/40/19 rear) so there seems to be a "power loss" which I'm pretty sure went mostly to the extra rotational mass added.
I've only had about 2 days of drivetime on it (12 shift work the weekend after Christmas), and I really can't tell you anything else concrete on it, not until I can get a tune w/ numbers and parameters.
I can't advertise for these, but if interested, pm me and I'll point you in the direction I found them.
Just installed today. Took me about an hr to do it. Very pleased with results. To me worth the money for sure. I was due to clean them anyways so why not just upgrade them why they are off lol.
(Scott)Synolimit is the man. I've already done so much to make my g breathe better. My intake is 2.5 so my not get the tb as close to 2.5 inch as possible?
I just installed the R2C, the TB (from Synolimit) and the Z1 upper intake. The car feels much smoother also the revs almost move in parallel with the speedometer. It will take a while to get to used to the new setup.
Next will be Kinetix HFC and a tuning from Z1 (I am about 30 miles away from them)