When you click on links to various merchants on this site and make a purchase, this can result in this site earning a commission. Affiliate programs and affiliations include, but are not limited to, the eBay Partner Network.
23. Put the crank bolt in with a big nut so you don�t crack the crank. Put the motor at dtc(dead top center) or what ever it�s called as follows. I just got it close but secondary chains are the important ones to get to dtc, the primary chain you�re going to remove anyways and install based on the marks, but keep chain on over night or leaving work place because the cams might jump
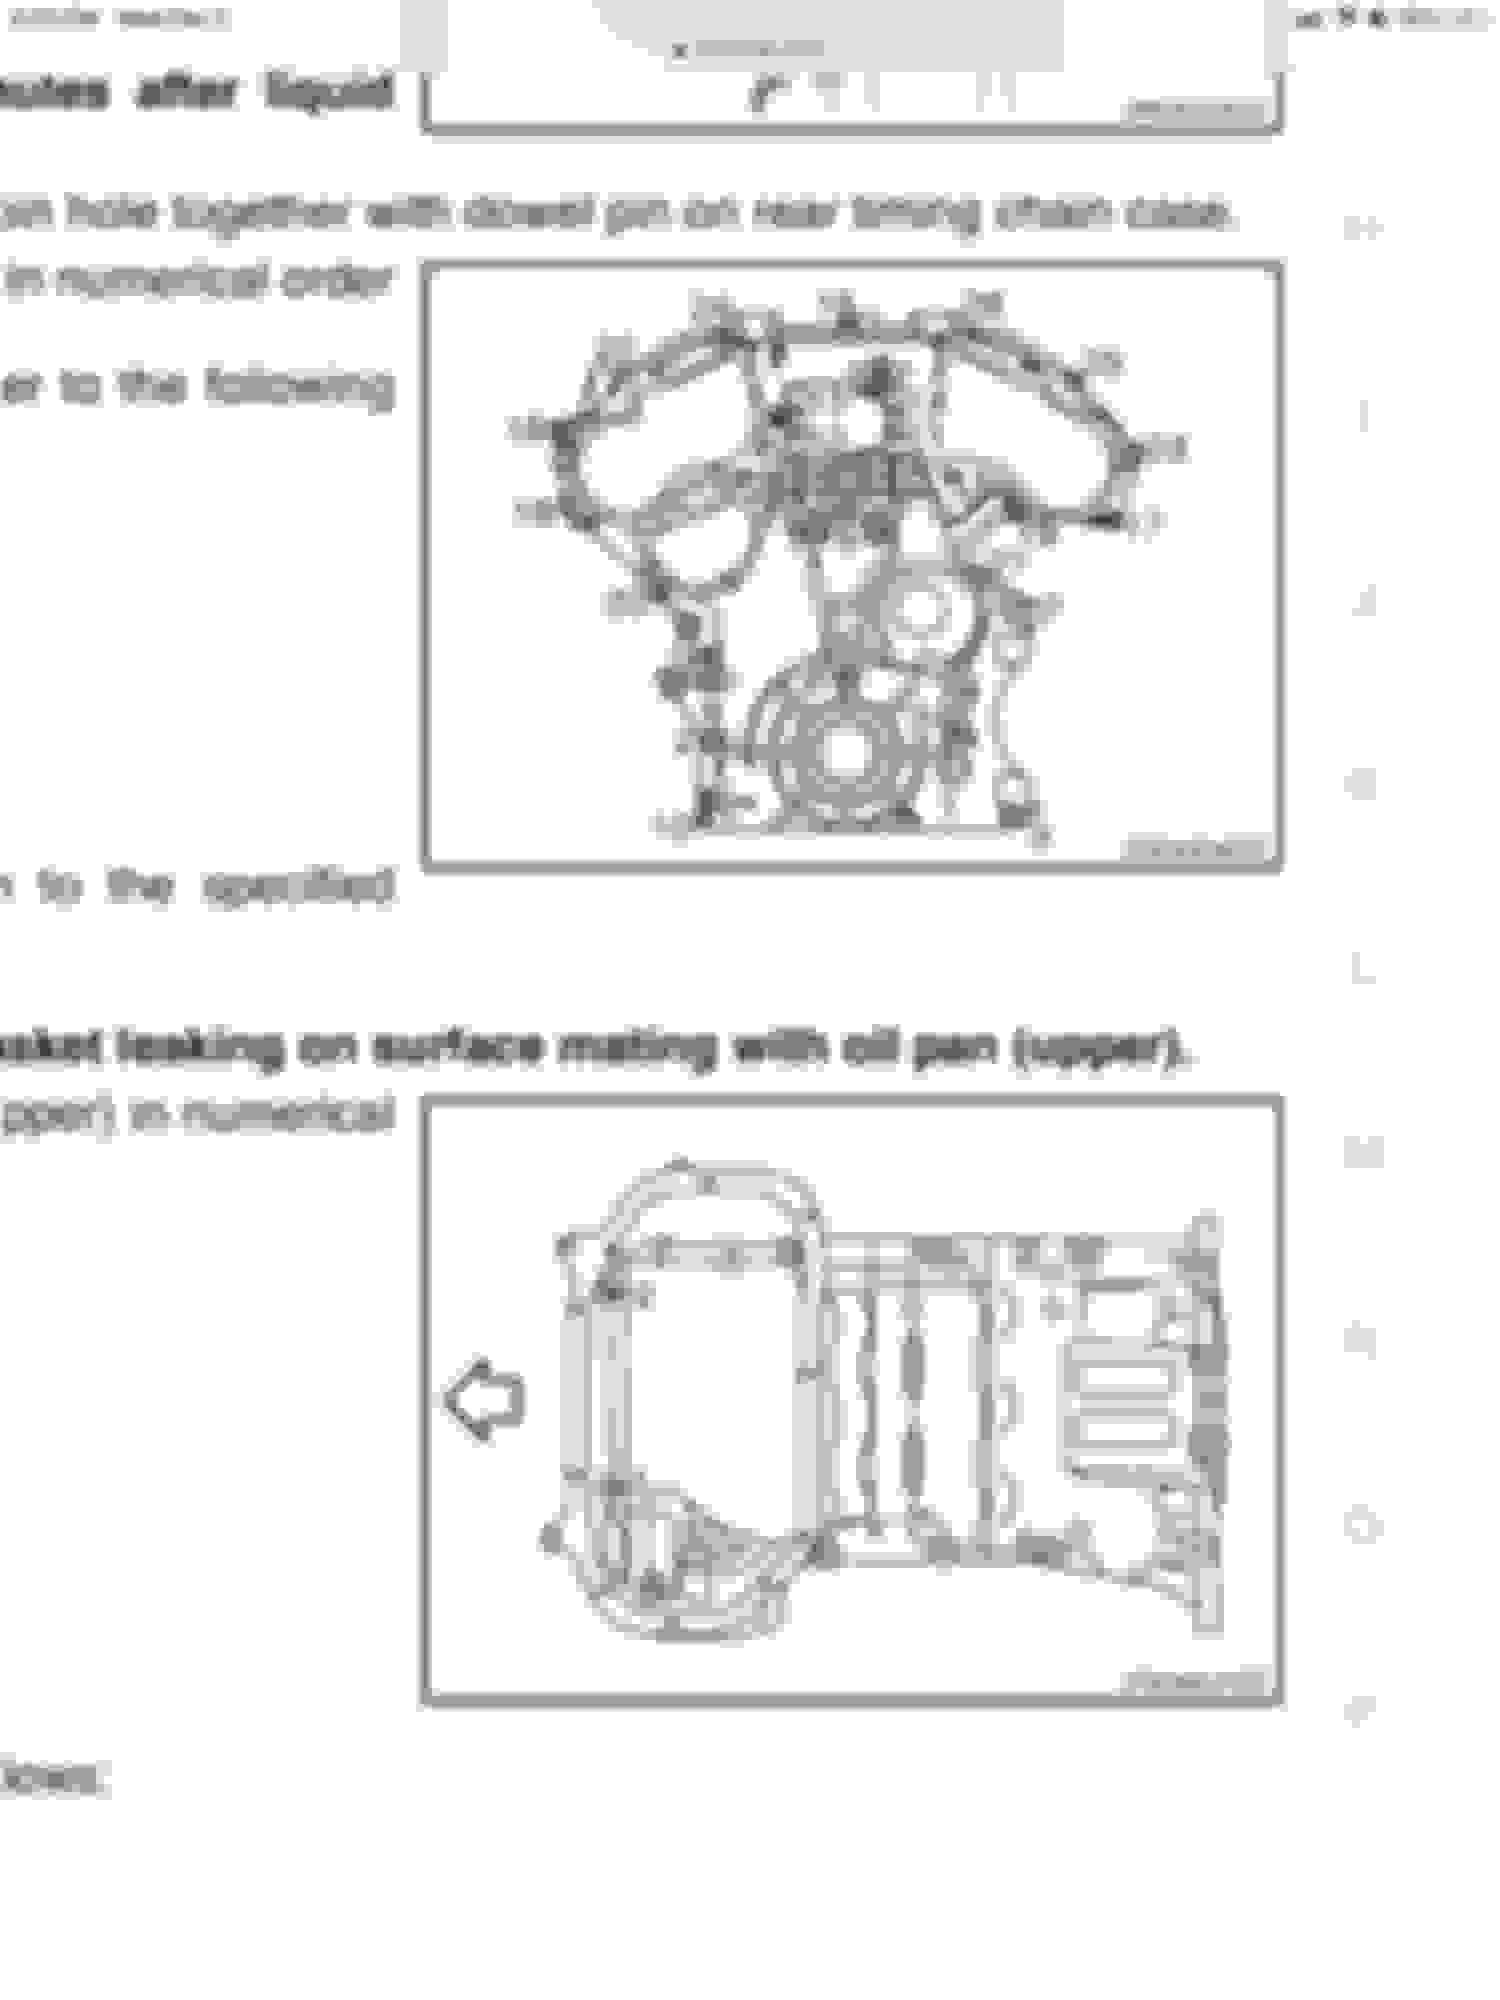
24. Loosen tensioner top bolt and remove bottom and remove tensioner, remove top chain rail and loosen small right rail and remove chain and tensioner rail. Careful not to drop the gear if you�re taking it out
25. Bam wasn�t that easy but time consuming now if you�re doing the water pump just do the oil galley bc mine didn�t show any problems but I found that it was about to go. Oil galley screw make sure you use a big enough Phillips otherwise you�ll regret it for you can�t order the screws oem, after market with Z1, I used a small flat head to get the screw out behind cam after I broke it loose. And water pump has to come straight out so don�t go crazy on one end
26. Now remove old gasket off oil galley some sort of gasket killer helps big time and you can never be too clean and reinstall with blue thread lock
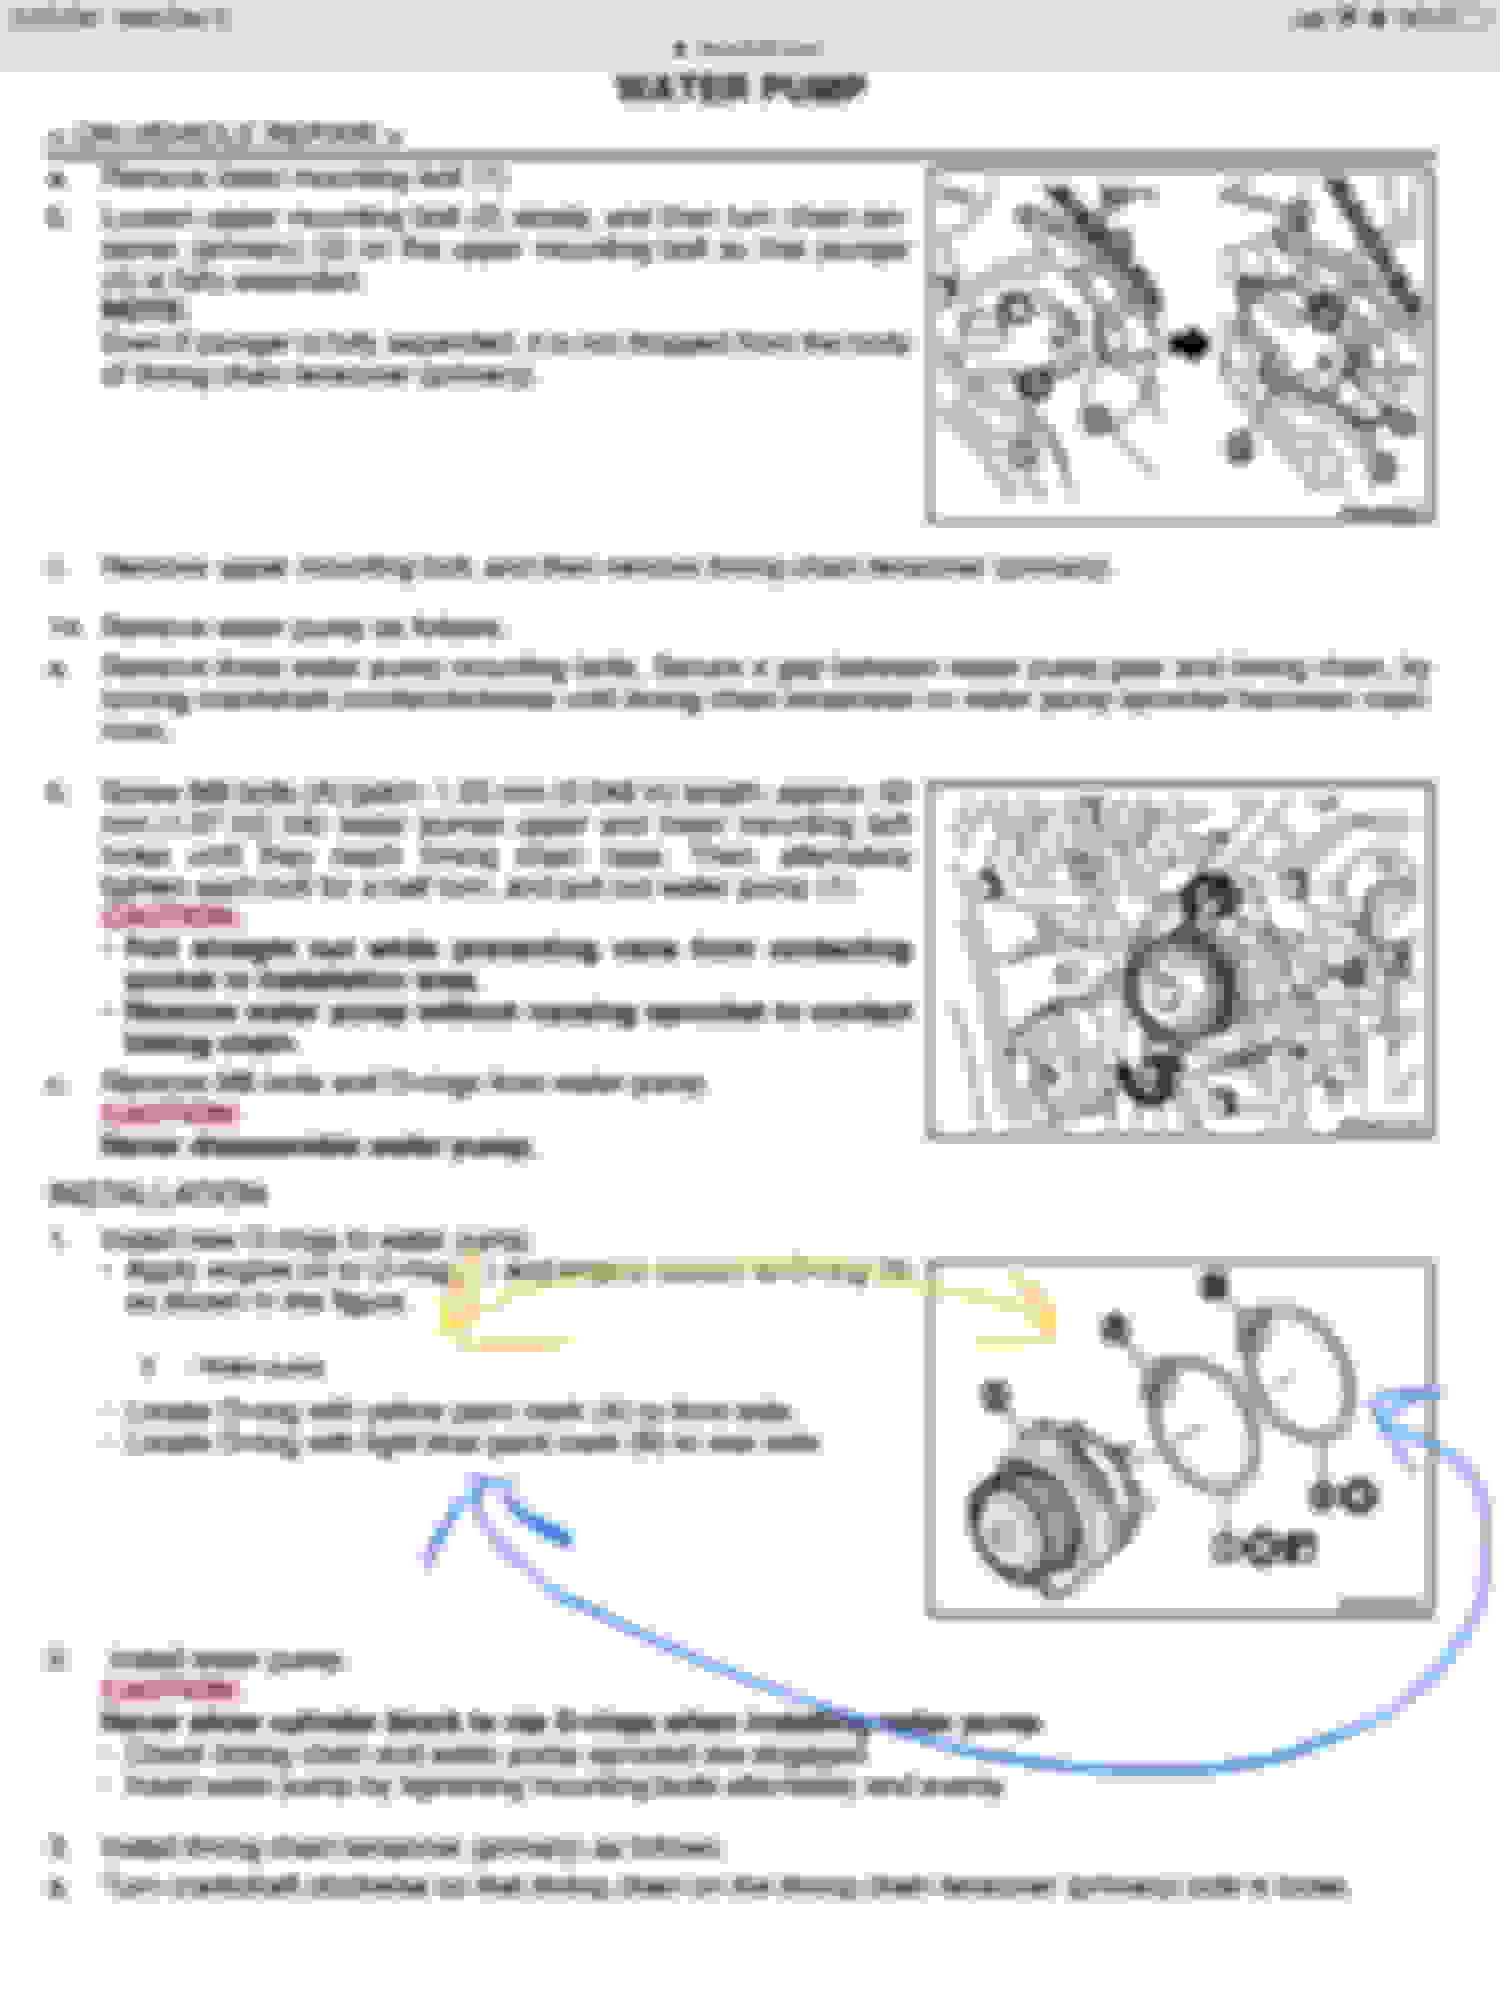
Reinstall water pump and use new o rings as they colored water pump torque 85in pounds if you cant do math sucks to suck lol ask google inches to feet
27. Once that�s all in reinstall chain in reverse order make sure it�s correctly timed, it may jumped a little, that�s ok bc you�re gonna reinstall the chain in its respected marks, just grab a rag and move the cam into position. Top rail 72in pounds, side right rail 16ft pounds and Tensioner rail Allen 12ft pounds ask google inches to feet
28. For tensioner reinstallation, hold the tab open then you can close it with a vise but not all the way because you want the lever to line up with the hole closed, you�ll understand once you get to this step. Put a strong pin to hold tensioner, use your brain paper clip might break in the tensioner 72in pounds torque
29. Clean timing cover and replace gaskets you want to replace and to lay rtv use your brain, I made sure the corner of the upper oil pan and cover had rtv shoved in it so wouldn�t leak and rtv on the inner sides of bolt holes or all the way around if your paranoid like me, light snug in order then torque in order you drew 9ft pounds on small bolts and 41ft pounds big bolts and 13ft pounds inside of pan to cover.
Oil pan torque 61in pounds
Cam cover torque 8ft pounds
30. Install everything in reverse order, the manual says oil and put 33ft pound on crank pulley bolt but I just shot mine bc I didnt feel comfortable bc my 1/4 impact can shoot it back off lol so pick your poison
31. Once you have everything in start car WITHOUT FUEL FUSE to prime chain tensioner, very important
I did this completely stoned so you can do it too! Lol
Some honorable mention: Don�t forget to tighten oil pan drain or radiator drain or to change your oil filter. coolant has two bleeder valves, one on driver side upper radiator and a random hose with an Allen key on driver side by throttle body. Dip stick holder clean it very well and clean all the corrosion on timing cover hole and use silicone lubricant otherwise you�re gonna be replacing that new o ring that you we�re bragging to your neighbor about your new o ring. Clean and silicon lubricant every oring. You�re more than likely going to replace the o rings by the ac compressor for the lines. If you have to drive to go get your ac evap and recharge, keep your ac off, it will be lit up if you have it on the ac button. If you got new o rings for your oil galley, make sure they dont fall down when seal the cover. I hope you read this entirely first before you started, bc you might have forgotten your vvt filters sitting in oil lol
Good luck!!!!
Last edited by Jamie Nguyen; Dec 5, 2018 at 08:36 PM.
Thanks a bunch for taking the time w/ all the details & photos. This needs to be a sticky in the DIY folder for sure!
What was the total cost of all the parts (ballpark cost) if you don't mind.
From a couple other DIYs I've read getting the timing cover RTV cleaned off and the new RTV put on is a pretty time consuming part of this beast.
yea I used a razor blade to get all the big stuff off then brake cleaner and that body filler scoop I bought to scrape it clean then took the cover and some carpet to the self wash or you can sit there for three days with a rag and break cleaner lol but only the mating surface is important though and that doesn�t really take that long, I just treated the job like one of my show cars but new rtv you only have a 5 minute window per manual
yea I�ll check my email when I get to work, I bought a bunch of stuff that really didn�t matter but I wanted new seals for the entire job like galley o rings looked brand new in the motor but I insisted and vvt o rings too but I insisted
, its the same tool called for in the FSM. Its basically a blade with a heavy metal block and a tiny handle attached to it so you can hit it with a ball peen ... I'm not sure if its actually faster (but I think it is) but its really good for preventing marring the metal surfaces and lets you get the parts apart without having to "peel" them and potentially warp them
question though, what are the arrows you put on the picture with the cam chains lining up with where the orange chain links are? ...I dont see any marking on the rear cover on those sides? Am i missing something (i'm sure its in the FSM but real pics like the ones you posted are so much easier to work off)
also, what silicone lube did you use on the o rings?
Thanks a bunch for taking the time w/ all the details & photos. This needs to be a sticky in the DIY folder for sure!
What was the total cost of all the parts (ballpark cost) if you don't mind.
From a couple other DIYs I've read getting the timing cover RTV cleaned off and the new RTV put on is a pretty time consuming part of this beast.
.Part Number. Part Name. Price. Quantity. Total
B1010-JK20A. Water Pump. $67.69. 1. $67.69
21200-4W000. Thermostat. $19.96. 1. $19.96
13050-31U00. Thermostat Gasket. $3.80. 1. $3.80
11026-JA00A. Lower Oil Pan Drain Washer $0.17. 10. $1.70
15066-4W000. Guide Tube O-Ring. $0.49. 1. $0.49
15066-JA10A. Seal - O Ring. $6.98 2. $13.96
21049-AE000. Connector Pipe O-Ring. $2.61. 2. $5.22
13042-3HD0A. Seal - Oil - Camshaft. $5.81. 6. $34.86
13510-31U10. Seal. $10.05. 1. $10.05
23797-EY01A. Cover Gasket. $5.39. 1. $5.39
23797-JA10B. Cover Gasket. $4.28. 1. $4.28
999MP-1217HP. Threebond 1217H Gasket Maker - 75 Grams. $11.75. 1. $11.75
13533-JK21A. Gasket Oil Gallery. $28.42. 1. $28.42.
13533-JK21B. Gasket - Front Cover - Left-Hand. $5.77. 1. $5.77
Plus shipping from discountinfinti.com
get two blue coolant from Nissan local so you don’t pay too much on shipping like 12 ea
i tried to space them out but it won’t let me and it added period at the end of everything bc autocorrect
5 quart jug of mobile one full synthetic 5w 30 cost $24 at Walmart but I they randomly have sales for $22 buy six if you can but you need 6qt there’s no point of buying a 5qt and a one quart you’ll lose your savings
i buy Honda S2000/Nsx engine oil filters bc I get them cheap and they’re high flow but I think they’re 9-14 ish
Last edited by Jamie Nguyen; Dec 6, 2018 at 04:26 PM.
question though, what are the arrows you put on the picture with the cam chains lining up with where the orange chain links are? ...I dont see any marking on the rear cover on those sides? Am i missing something (i'm sure its in the FSM but real pics like the ones you posted are so much easier to work off)
also, what silicone lube did you use on the o rings?
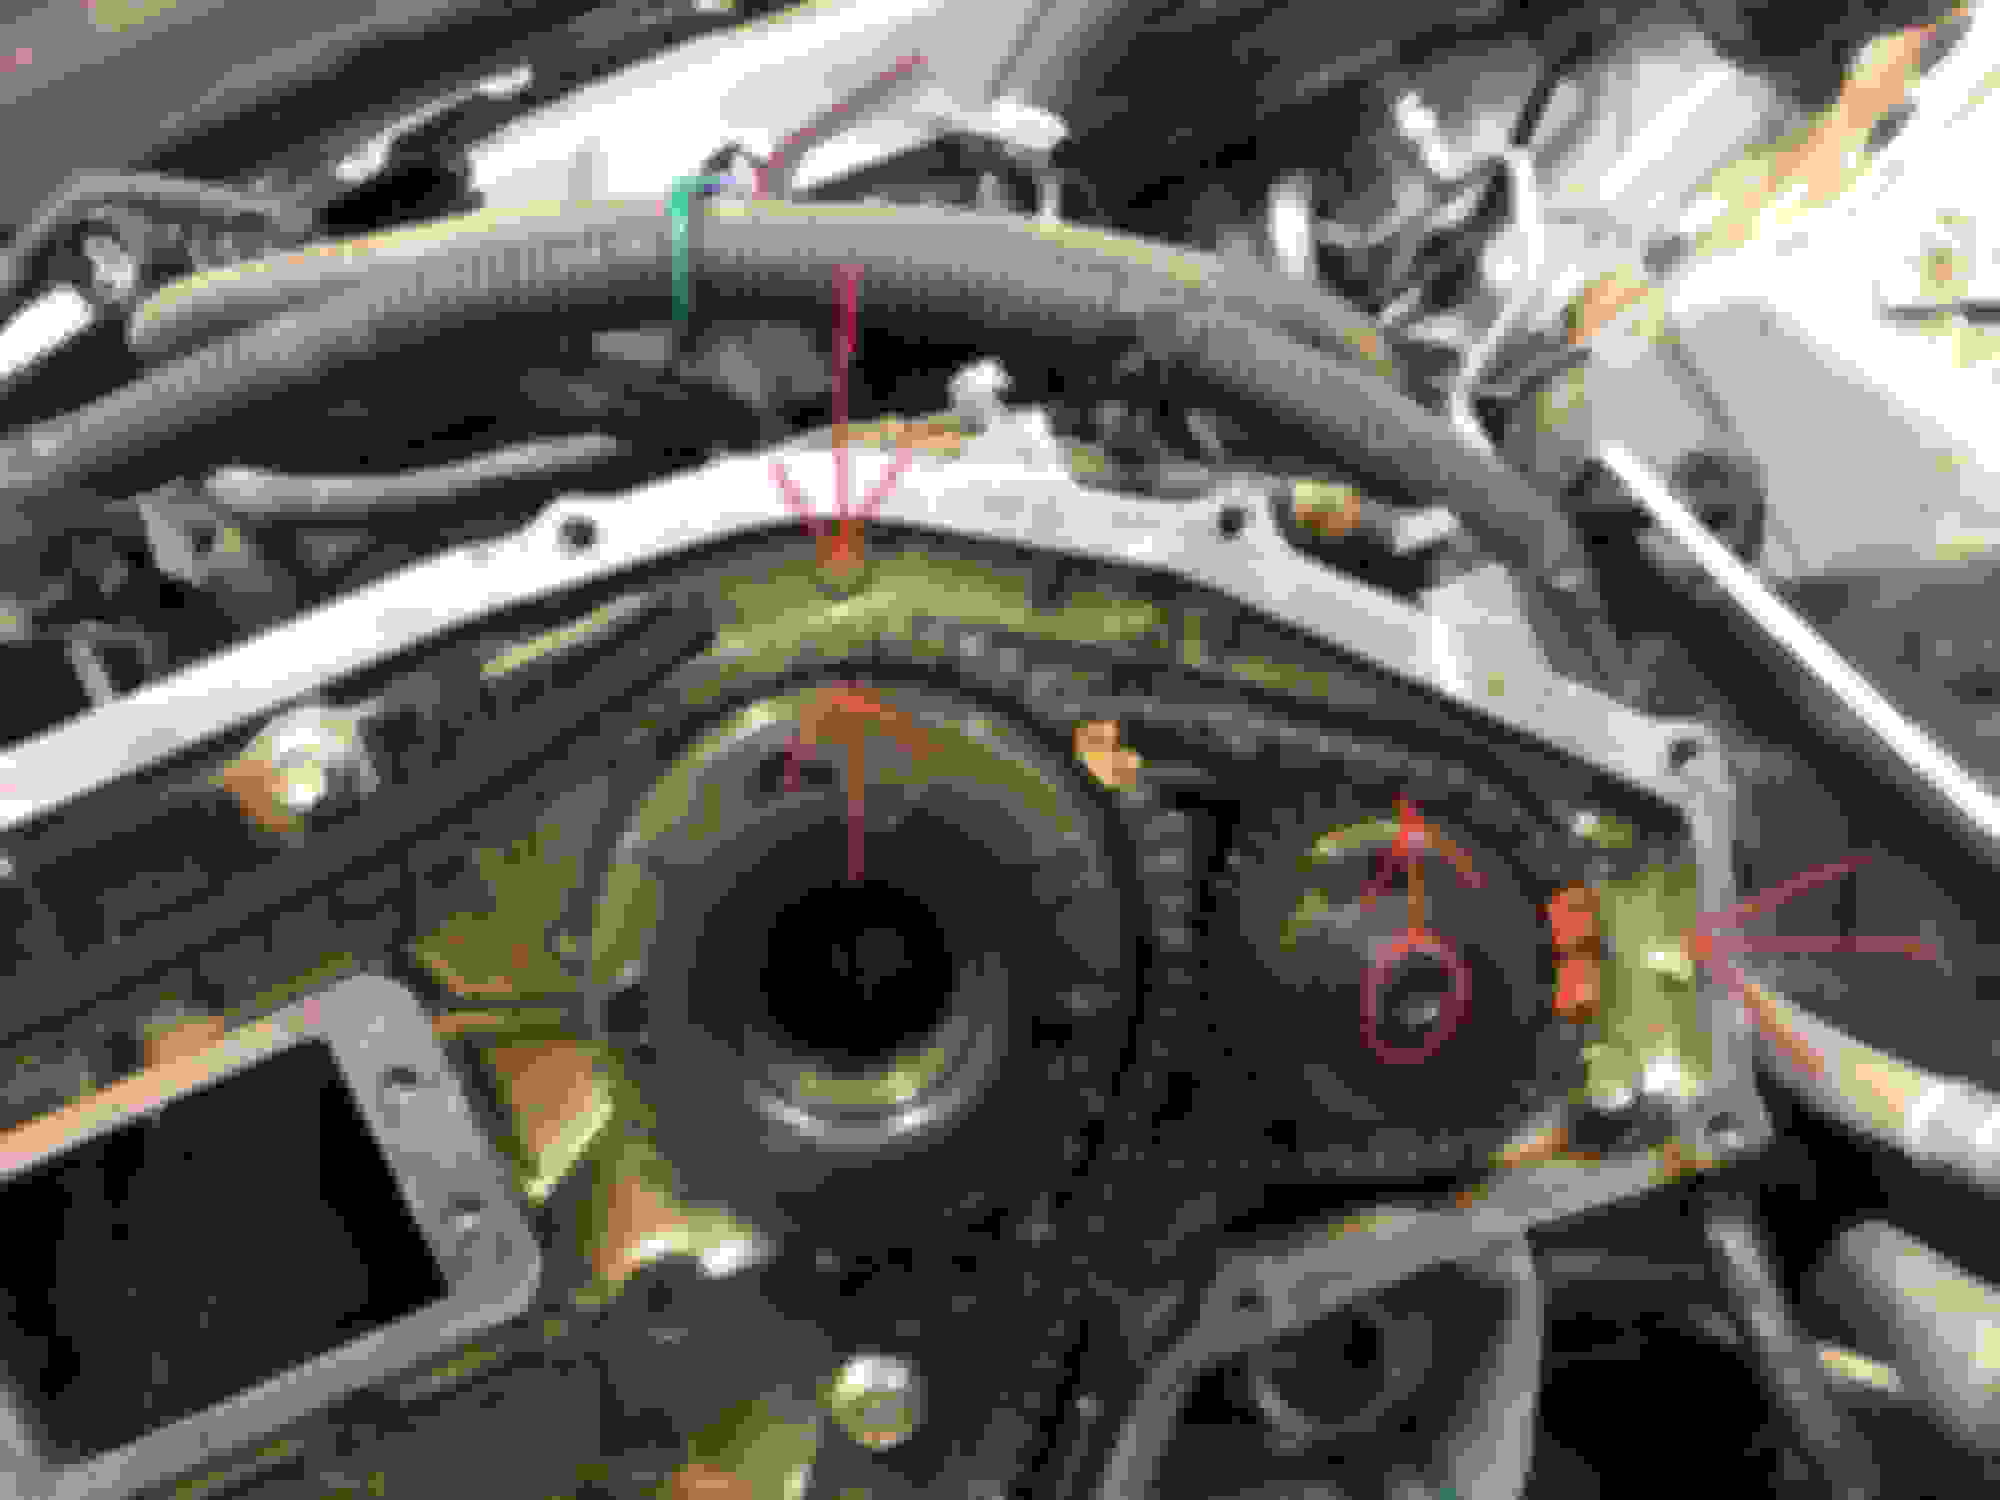
i know it could be misleading in the pics but you want the exhaust cam bludge to facing up that so assuming oem the two dots and long dots should face out lol that’s what I was trying to draw and secondary chain to line up with exhaust cam and the dot on the intake should face up for primary chain but that’s for install as well otherwise you car shouldnt have in the first place soooo top dead center.....crank until....
both exhaust cam bulge facing up ish
secondary chain line up with two dots and long dots facing out
so intake cam dots should face up but nothing needs to line up with them until install
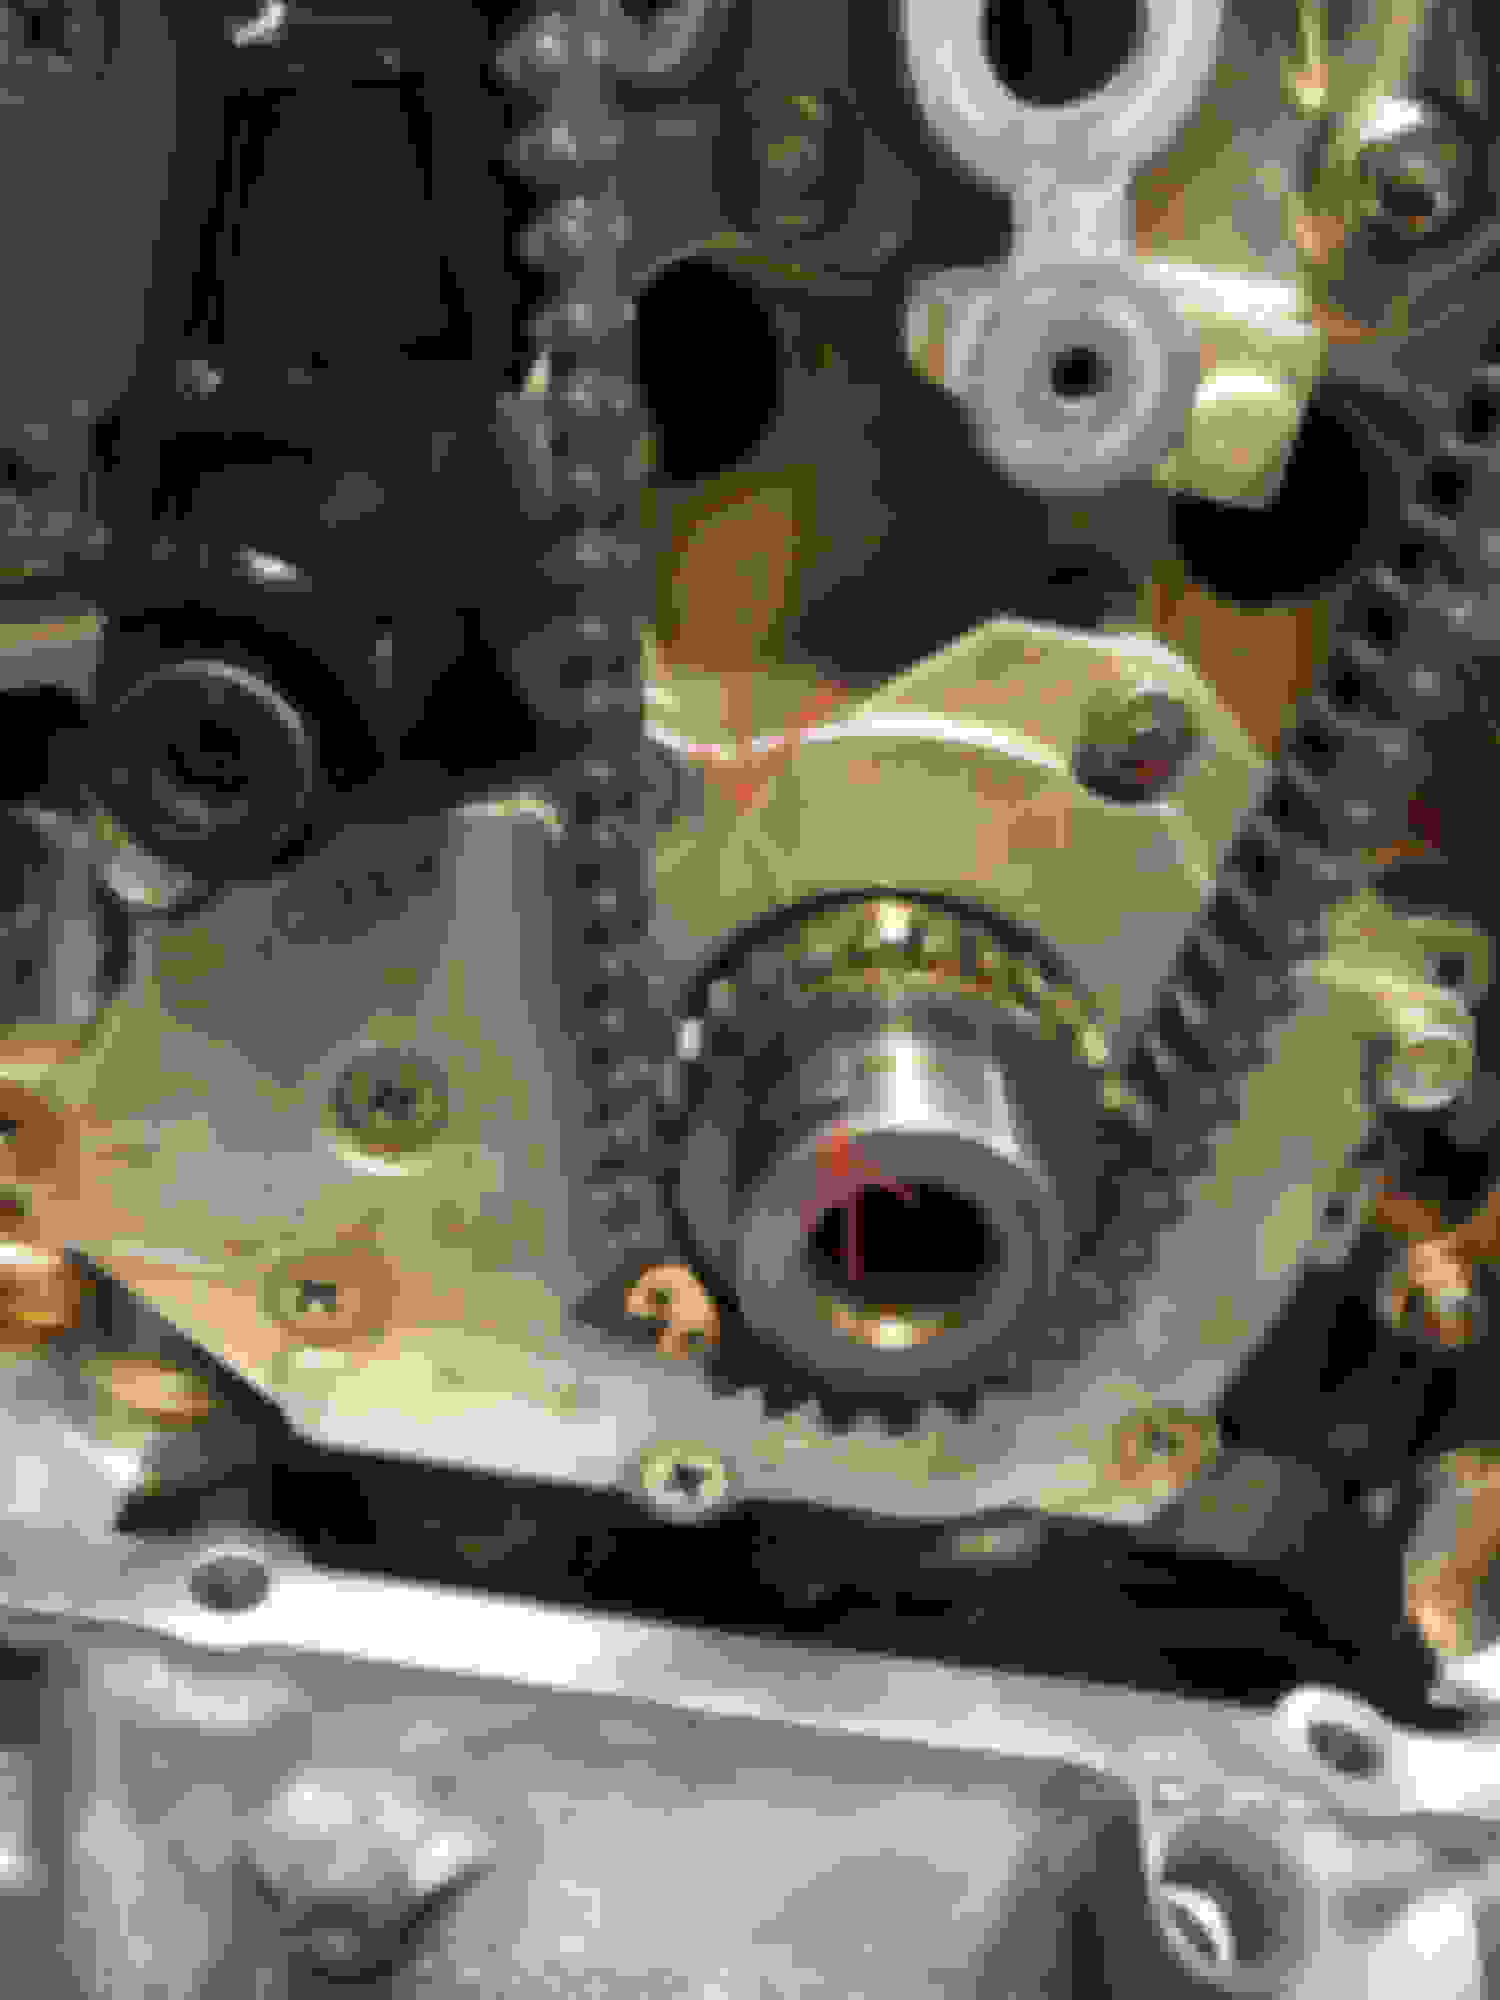
crank pin line up with oil pump mark
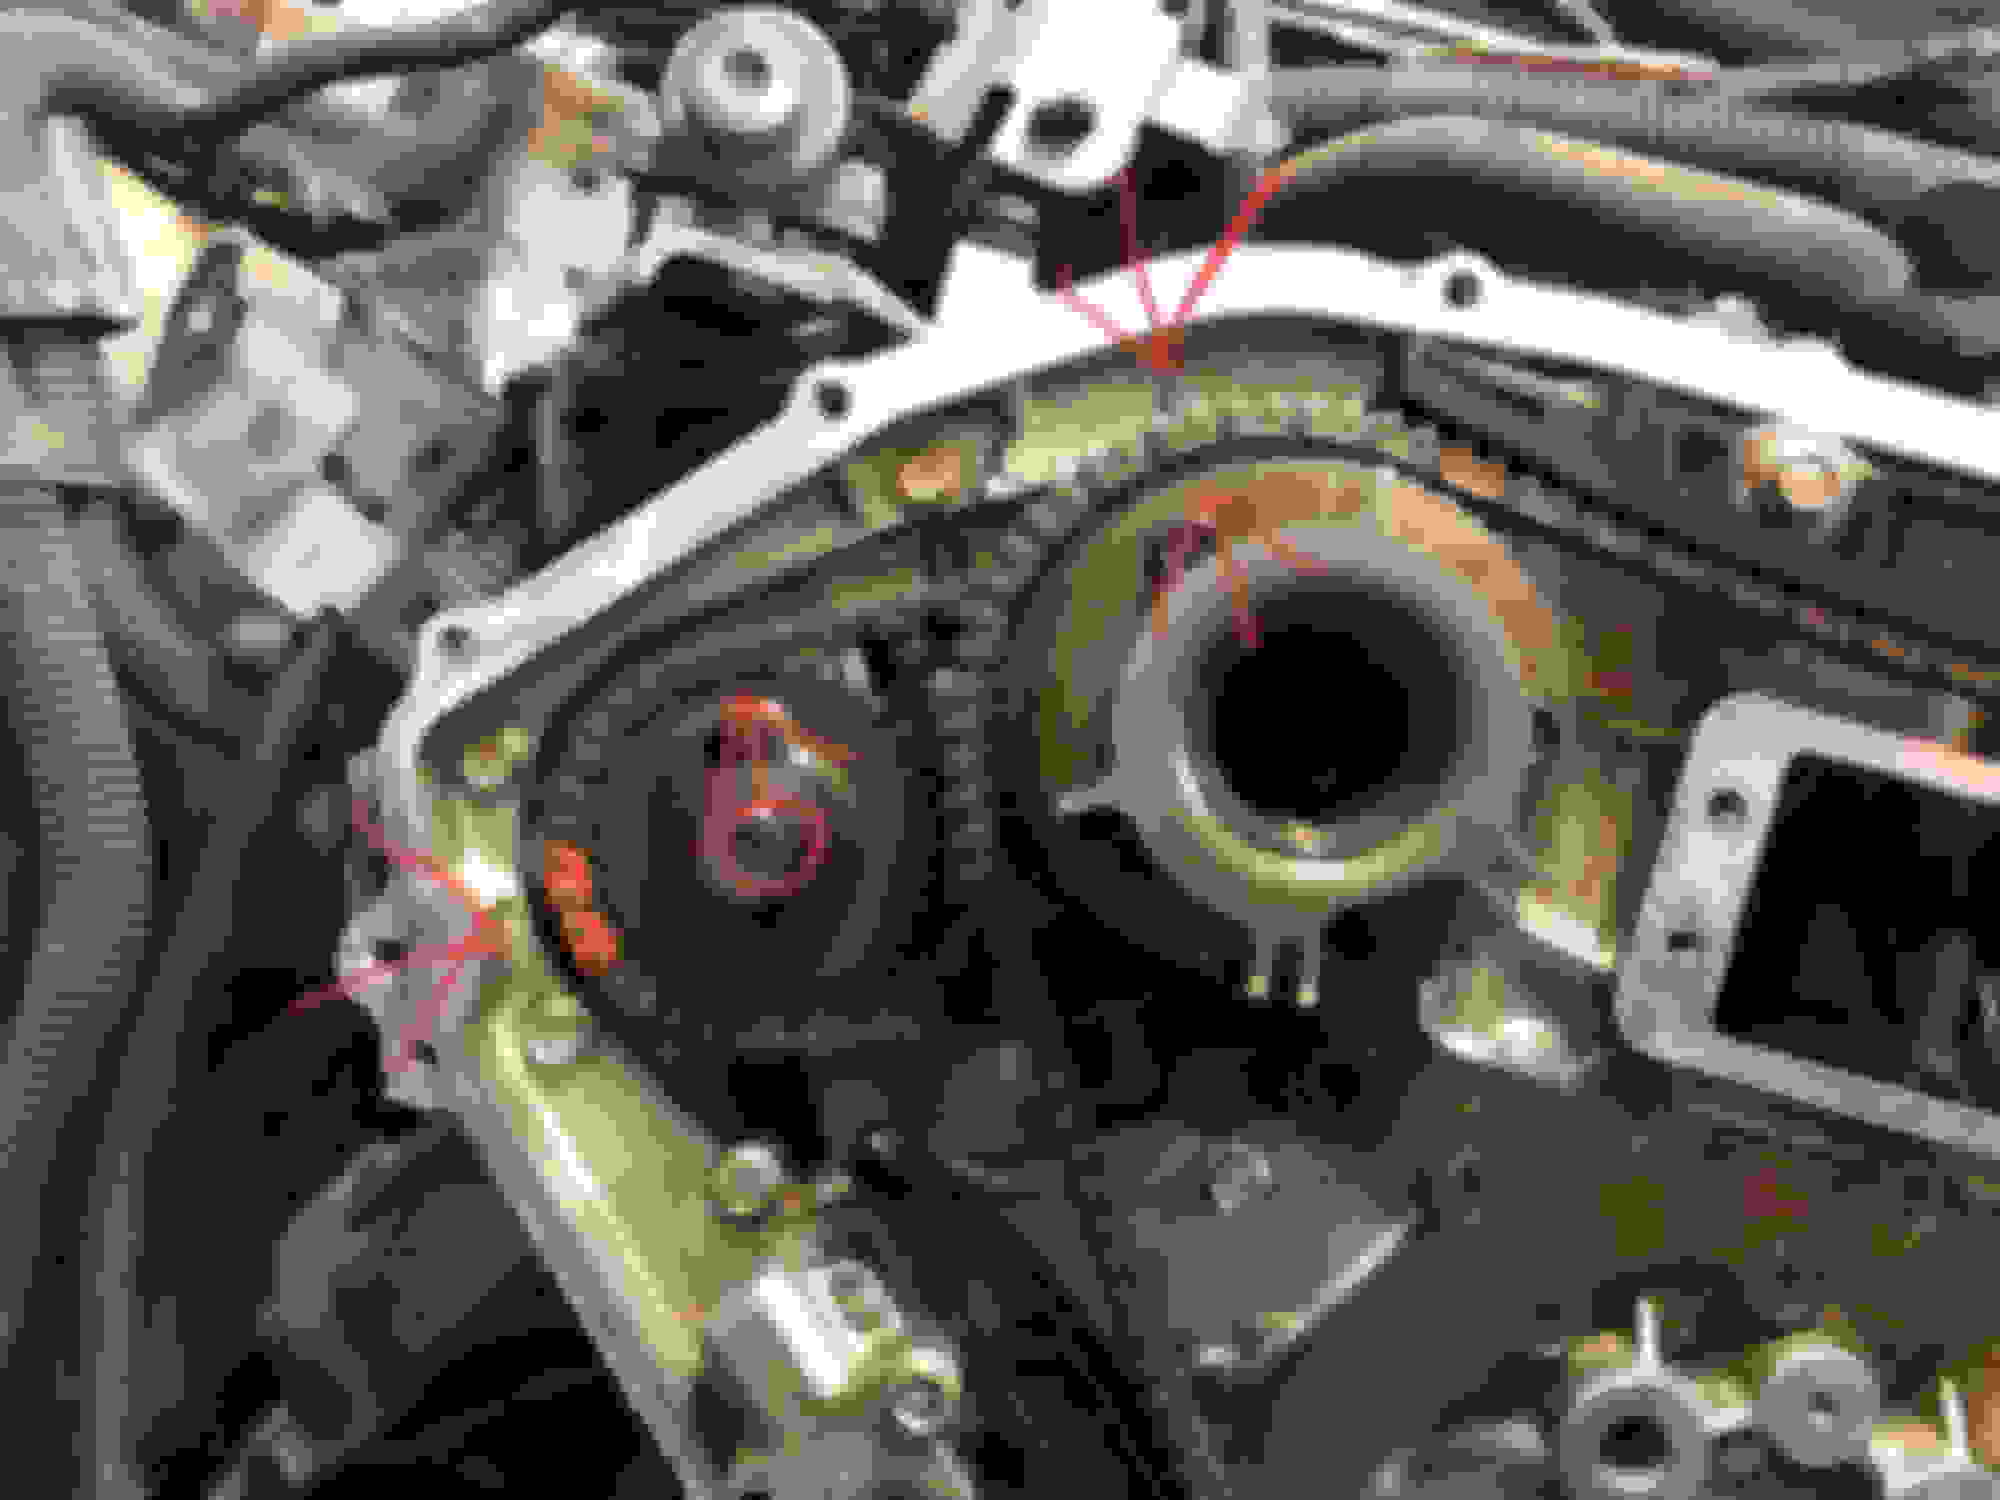
ignore primary chain marks unless you wanna spend ten years cranking for no reason, up to you
install same up top
but primary chain line up with intake cam dot facing up ish
and line primary chain with crank gear dot that should be facing lower right ish
install guides
pull pin on tensioner
Bam done
K
Last edited by Jamie Nguyen; Dec 9, 2018 at 10:46 PM.
Fantastic write up and great pics, I'm with newt this needs sticky status....
for the the gasket separation, i use this little guy https://www.amazon.com/Engine-Transm...+Pan+Separator, its the same tool called for in the FSM. Its basically a blade with a heavy metal block and a tiny handle attached to it so you can hit it with a ball peen ... I'm not sure if its actually faster (but I think it is) but its really good for preventing marring the metal surfaces and lets you get the parts apart without having to "peel" them and potentially warp them
question though, what are the arrows you put on the picture with the cam chains lining up with where the orange chain links are? ...I dont see any marking on the rear cover on those sides? Am i missing something (i'm sure its in the FSM but real pics like the ones you posted are so much easier to work off)
also, what silicone lube did you use on the o rings?
doesn�t really matter what brand you use, ppl used to just spit on them lol
the purpose of using one is to lube the o ring so you don�t damage or tear the o ring that you have bragged to your neighbor about lol and when it dries the silicone creates a water proof seal but that�s what the oring is for lol probably makes it last longer
ill take a pic when I get home, I think I stole it from my neighbor lol


 ok got it thanks agian for the pics and instructions awsome!


