
DIY for Custom Ambient Lights


DIY for Custom Ambient Lights
Parts List:
Switch- SPDT toggle, like Radio Shack model 275-625
Potentiometer- Radio Shack model 271-1714
LED�s- I used Linrose model B26LSM4 (White)
& model B26LSM6 (Blue)
Wire- 18-20 Gauge
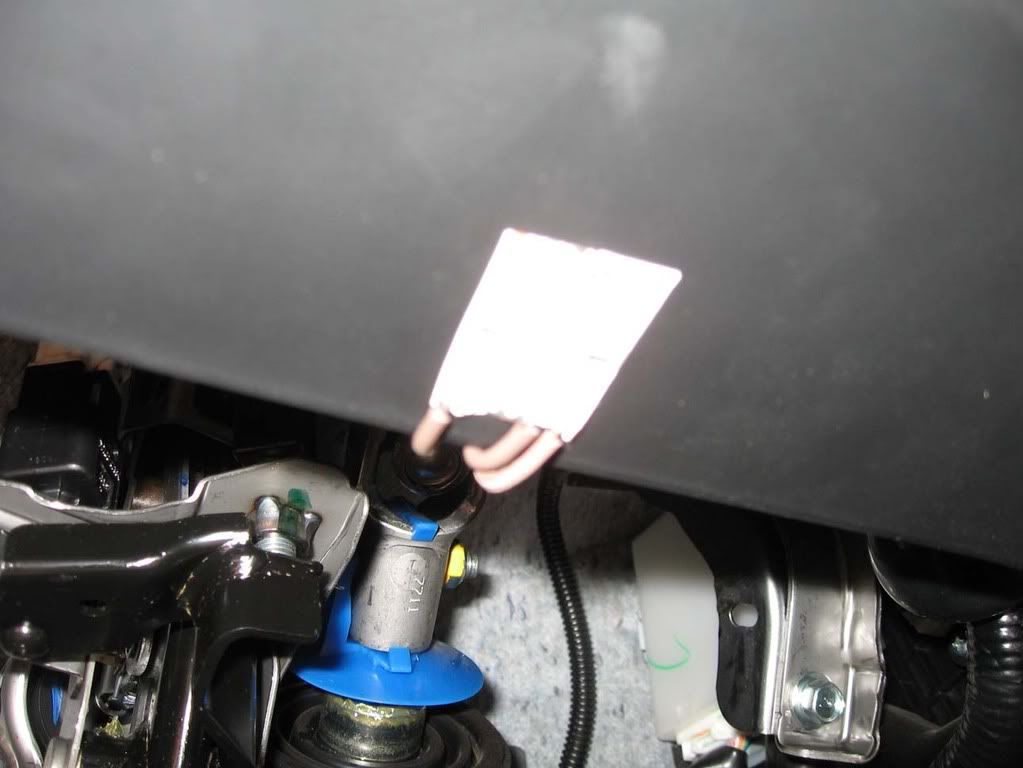
First grab power from the cigarette lighter socket. To get there you need to pry up the console finisher, which is the whole piece that houses the ash tray area and shifter boot. The easiest way to do this is to place your fingers inside the boot at the rear most part of the boot facing the back of the car and pull up. The whole console will pull up with no screws holding it. Next, disconnect the connector for the cigarette lighter. The wire that you need the yellow one.
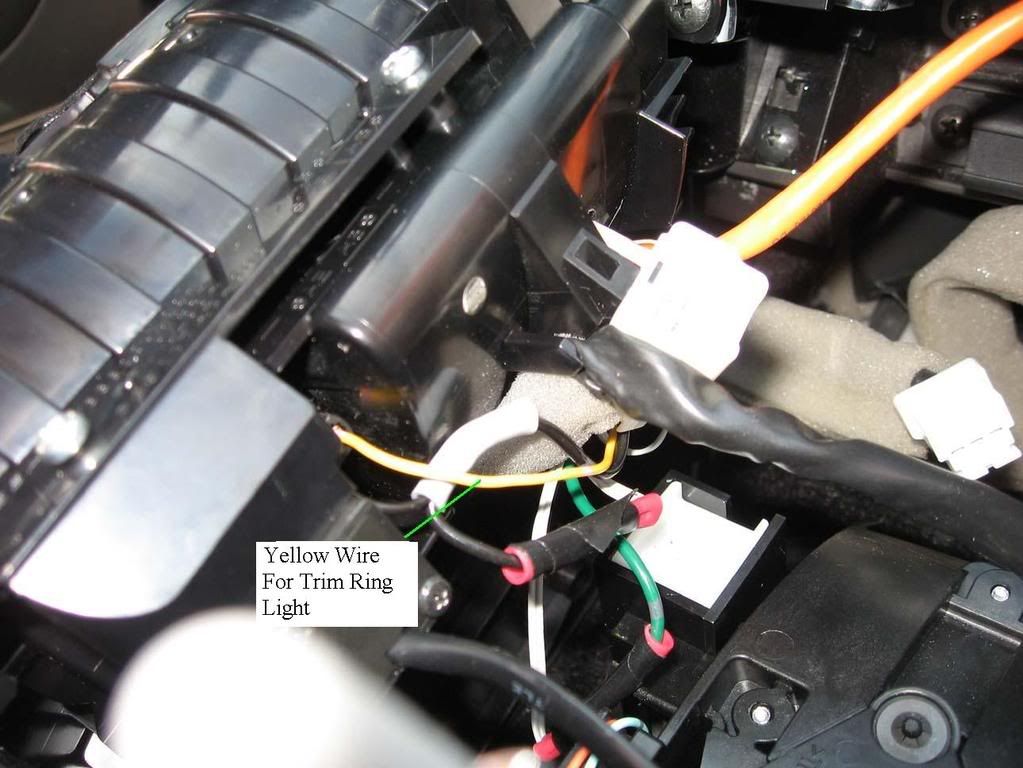
Just make sure that that is the one that lights up the trim ring around the holder. It is activated by turning on the headlights. The 3 wires are the positive and negative for the cigarette lighter and the positive for the lighted trim ring. You will need to find the positive for the trim ring. That is the wire that you will be tapping off of.
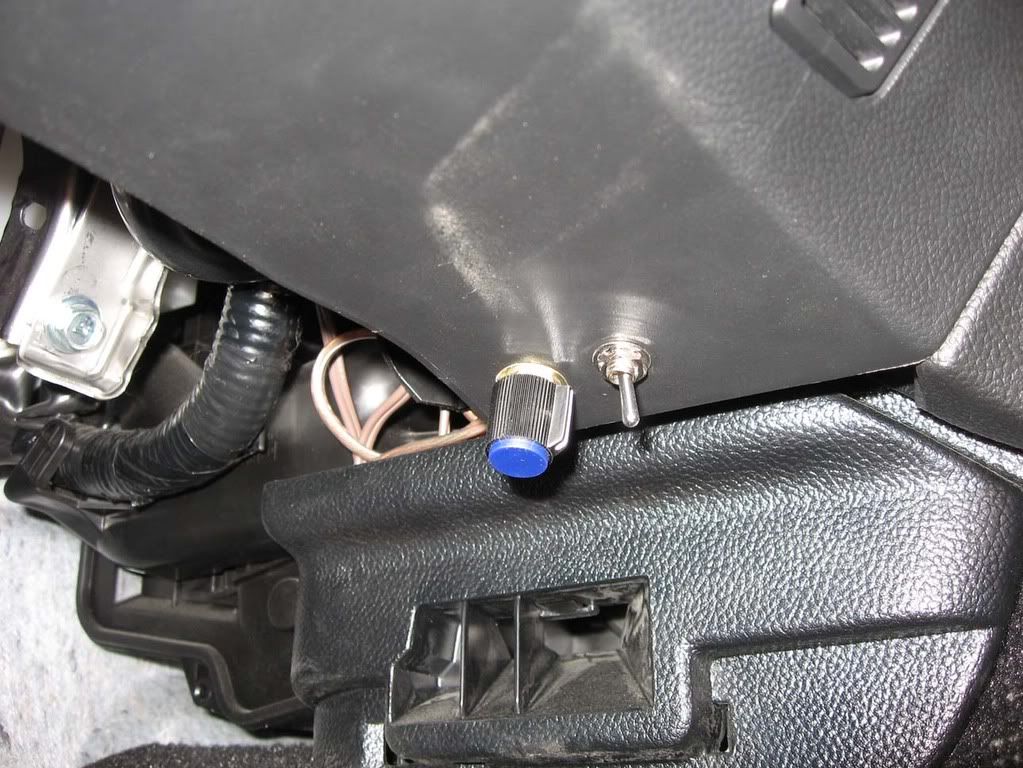
With your potentiometer and switch in hand find a good location to mount them. I put them under the drivers� side dash. There is a flat spot that is perfect and out of the way. Drill the holes necessary.
Use a small gauge wire (18-20 gauge) and solder one end to the trim ring light wire and run the other side to your potentiometer. There are 3 lugs to solder to on the POT. You only need 2 of them. Solder the wire you just run to one side of the pot. It doesn't really matter which side. Solder another wire to the middle lug and run that middle lug of the switch that you bought. Since you will use two colors of lights this will allow you to select between the two lights. Solder two wires on each other side lug of the switch. One wire from each lug will be run to the center of the drivers� side under the dash, on the same panel as the switches. The other two wires, one from each lug, will be run to the center to the passenger foot well.

It should be installed to the black panel mounted horizontally behind the glove box.
You will need to drill a hole in it to run the wires for the light.
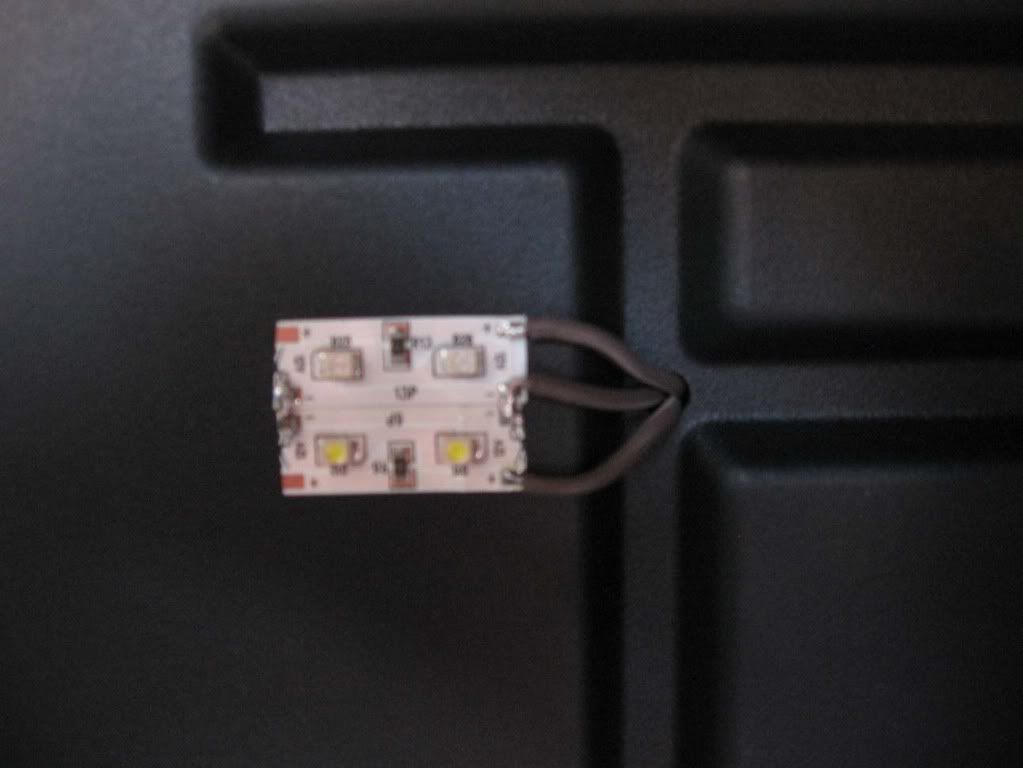
The two lights will need to be soldered together. Place lights, one blue and one white, side by side with the negative contact next to each other. Solder a length of wire to both negative light contacts. Find a good mounting location for the lights but do not install yet. Install both sides. Next find a good location for the ground wire. Cut the length of wire with some excess so you can remove the panel easily if needed.
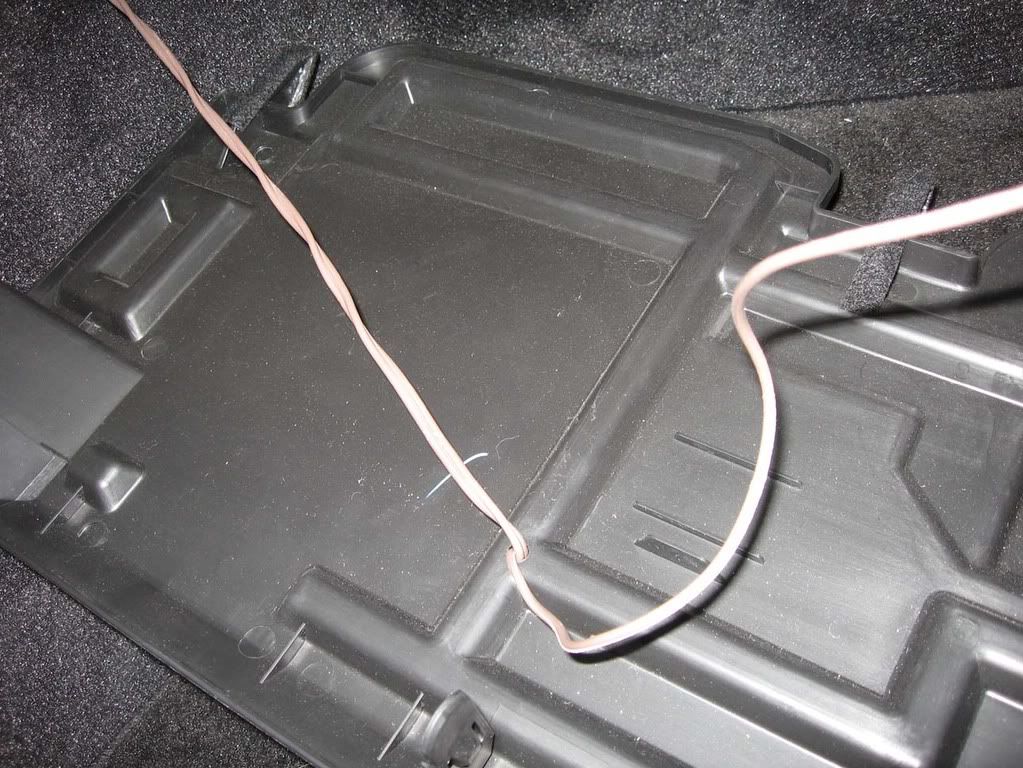
Run your positive leads to the passenger side, back behind the dash next to the fire wall. After you have decided which one is the blue lead and which is the white lead solder them to the appropriate contacts. Remember to run the wires through the hole you drilled earlier. Now clean the plastic with some alcohol and stick the adhesive LED�s to the panel. Reinstall panel and you are done with the passenger side.
For the drivers� side solder the other 2 wires to the appropriate contacts. Then clean the plastic with alcohol and stick the LED�s.
Now when you turn on the headlights the LED�s should light up. Flip the switch between white and blue to check the operation and try the dimmer.
Switch- SPDT toggle, like Radio Shack model 275-625
Potentiometer- Radio Shack model 271-1714
LED�s- I used Linrose model B26LSM4 (White)
& model B26LSM6 (Blue)
Wire- 18-20 Gauge
First grab power from the cigarette lighter socket. To get there you need to pry up the console finisher, which is the whole piece that houses the ash tray area and shifter boot. The easiest way to do this is to place your fingers inside the boot at the rear most part of the boot facing the back of the car and pull up. The whole console will pull up with no screws holding it. Next, disconnect the connector for the cigarette lighter. The wire that you need the yellow one.
Just make sure that that is the one that lights up the trim ring around the holder. It is activated by turning on the headlights. The 3 wires are the positive and negative for the cigarette lighter and the positive for the lighted trim ring. You will need to find the positive for the trim ring. That is the wire that you will be tapping off of.
With your potentiometer and switch in hand find a good location to mount them. I put them under the drivers� side dash. There is a flat spot that is perfect and out of the way. Drill the holes necessary.
Use a small gauge wire (18-20 gauge) and solder one end to the trim ring light wire and run the other side to your potentiometer. There are 3 lugs to solder to on the POT. You only need 2 of them. Solder the wire you just run to one side of the pot. It doesn't really matter which side. Solder another wire to the middle lug and run that middle lug of the switch that you bought. Since you will use two colors of lights this will allow you to select between the two lights. Solder two wires on each other side lug of the switch. One wire from each lug will be run to the center of the drivers� side under the dash, on the same panel as the switches. The other two wires, one from each lug, will be run to the center to the passenger foot well.
It should be installed to the black panel mounted horizontally behind the glove box.
You will need to drill a hole in it to run the wires for the light.
The two lights will need to be soldered together. Place lights, one blue and one white, side by side with the negative contact next to each other. Solder a length of wire to both negative light contacts. Find a good mounting location for the lights but do not install yet. Install both sides. Next find a good location for the ground wire. Cut the length of wire with some excess so you can remove the panel easily if needed.
Run your positive leads to the passenger side, back behind the dash next to the fire wall. After you have decided which one is the blue lead and which is the white lead solder them to the appropriate contacts. Remember to run the wires through the hole you drilled earlier. Now clean the plastic with some alcohol and stick the adhesive LED�s to the panel. Reinstall panel and you are done with the passenger side.
For the drivers� side solder the other 2 wires to the appropriate contacts. Then clean the plastic with alcohol and stick the LED�s.
Now when you turn on the headlights the LED�s should light up. Flip the switch between white and blue to check the operation and try the dimmer.
I have 4 sets of LED's left if you want a set. I am selling them for $5 a set. Total 8 LED's, 4 for each side, 2 blues and 2 whites. PM me and we can arrange something.

Thanks for the write-up! The lighting looked awesome in person.
Just a thought, but Doug, you could start selling a kit with detailed instructions and pics.
__________________
Best Car Insurance | Auto Protection Today | FREE Trade-In Quote
Just a thought, but Doug, you could start selling a kit with detailed instructions and pics.
__________________
Best Car Insurance | Auto Protection Today | FREE Trade-In Quote


Trending Topics
Here is a bad pic of what it will look like. I have the charcoal interior and the camera doesn't pick up the blue light on the carpet. The pic looks in now way as good as real life.
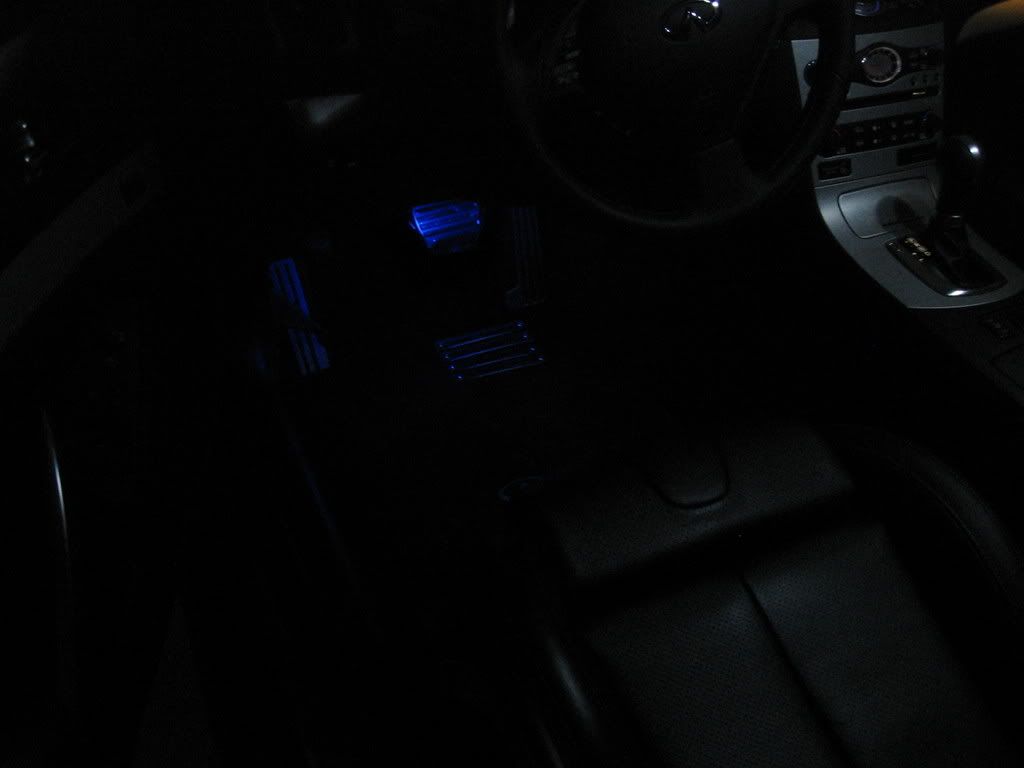
^That pic doesn't do the lights justice. It's actually brighter but not too bright. You can also change it to white if you don't like the blue. Believe me, those lights look amazing in person. If Doug made a kit, I'd definitely buy it.
btw, nice circuit diagram. Haha.
__________________
Best Car Insurance | Auto Protection Today | FREE Trade-In Quote
btw, nice circuit diagram. Haha.
__________________
Best Car Insurance | Auto Protection Today | FREE Trade-In Quote


Just to get an idea... Write your name here if you would be willing to by a pre-built kit for the Ambient lights. It would cost about $35 and you would need to drill three holes and solder onto one wire. Let me know if there is any interest.
1.
2.
3.
4.
5.
6.
7.
8.
9.
10.
1.
2.
3.
4.
5.
6.
7.
8.
9.
10.
I'd sign up if I didn't have stuff coming my way already.
__________________
Best Car Insurance | Auto Protection Today | FREE Trade-In Quote
__________________
Best Car Insurance | Auto Protection Today | FREE Trade-In Quote

I think there was a pic on the forum some time ago. I have to say Doug's kit looked better though, and it's waaay cheaper.
__________________
Best Car Insurance | Auto Protection Today | FREE Trade-In Quote
__________________
Best Car Insurance | Auto Protection Today | FREE Trade-In Quote