
Ape's IPL build (How Nissan should have done it)

That rear height adjusting collar uses that allen bolt to snug the collar tight rather than using another collar to but up against like most coilovers, brilliant design. Those billet perch sleeves are gorgeous too!


Thread Starter
Registered Member
iTrader: (3)
Joined: Aug 2015
Posts: 1,618
Likes: 323
From: San Antonio, Texas
I'm assuming you're talking about the spring perch that sits below the spring on the rear suspension. It's one piece but split on one end. It's threaded on the inside and you rotate it to raise or lower the vehicle. The allen bolt is a cinch bolt. Tighten it and it effectively locks the height adjustment ring in place. Honestly, it won't budge with any spring pressure at all. The other holes are for the end of the tool which is included, to rotate the base. But I find it's just easiest to remove the lower arm mounting bolt and relieve all the spring pressure.
I'm assuming you're talking about the spring perch that sits below the spring on the rear suspension. It's one piece but split on one end. It's threaded on the inside and you rotate it to raise or lower the vehicle. The allen bolt is a cinch bolt. Tighten it and it effectively locks the height adjustment ring in place. Honestly, it won't budge with any spring pressure at all. The other holes are for the end of the tool which is included, to rotate the base. But I find it's just easiest to remove the lower arm mounting bolt and relieve all the spring pressure.
The front height adjustment has a secondary ring but the preload adjustment uses the same split ring/cinch bolt design.
[QUOTE=Rochester;4100160]How accessible do you think the rear damping adjustment will be? Think you'll just have to raise the rear to lower the wheel, or remove the rims entirely?[/≥QUOTE]
I have a low profile aluminum jack that I slide under the pumpkin and jack the car up just enough that you can get your hand up there. It's actually very easy. The adjustment **** is large with very positive clicks. I literally adjust both sides and lower the car back down in about three minutes tops. Yes, it's be easier if the adjustment was in the trunk and I've actually thought of rotating the damper body 180 degrees and have the adjustment **** turn inward. I'd then drill a hole and use an extender for access. But it's fine as-is and I don't like to drill new holes.
The auto was completely intentional. It's a commuter car in the 7th largest metro area in the country. I've done rush-hour in a manual with a dual plate Exedy. I wouldn't call it fun. I do find myself using manual mode with the VDC off pretty much every day.
I'm still debating how long I'll keep the car. Today was a beautiful 75 degrees and the car just ran so darn well. I really enjoy it. But I have my eye on an RS3, second year of production.
With that said, my goal was to take the stock IPL and increase every aspect of performance by an appreciable amount (let's say 20%) but do so keeping a majority of the OEM components. I originally wanted to get a 370Z Nismo but the 370's NVH is just through the roof. Been there done that and I'm over it. So the G looked like a good compromise and it had a back seat for friends I want to torture. I think the Aragostas are the one component that takes it further from stock than anything else I've installed. I think it would be the first thing a driver would notice going from a stock IPL to mine. They've had a pretty dramatic impact on the overall feel of the car as well as it's outright mechanical grip. It really feels like the car is about 400-500 pounds lighter. Body motion is controlled far better and it's just a sharper scalpel.
And while the ride is definitely more firm, it's not harsh. And there's no increase in NVH. It's one of the reasons I went with the rubber upper mounts instead of the solid pillow ball mounts.
The front height adjustment has a secondary ring but the preload adjustment uses the same split ring/cinch bolt design.
[QUOTE=Rochester;4100160]How accessible do you think the rear damping adjustment will be? Think you'll just have to raise the rear to lower the wheel, or remove the rims entirely?[/≥QUOTE]
I have a low profile aluminum jack that I slide under the pumpkin and jack the car up just enough that you can get your hand up there. It's actually very easy. The adjustment **** is large with very positive clicks. I literally adjust both sides and lower the car back down in about three minutes tops. Yes, it's be easier if the adjustment was in the trunk and I've actually thought of rotating the damper body 180 degrees and have the adjustment **** turn inward. I'd then drill a hole and use an extender for access. But it's fine as-is and I don't like to drill new holes.

I'm still debating how long I'll keep the car. Today was a beautiful 75 degrees and the car just ran so darn well. I really enjoy it. But I have my eye on an RS3, second year of production.
With that said, my goal was to take the stock IPL and increase every aspect of performance by an appreciable amount (let's say 20%) but do so keeping a majority of the OEM components. I originally wanted to get a 370Z Nismo but the 370's NVH is just through the roof. Been there done that and I'm over it. So the G looked like a good compromise and it had a back seat for friends I want to torture. I think the Aragostas are the one component that takes it further from stock than anything else I've installed. I think it would be the first thing a driver would notice going from a stock IPL to mine. They've had a pretty dramatic impact on the overall feel of the car as well as it's outright mechanical grip. It really feels like the car is about 400-500 pounds lighter. Body motion is controlled far better and it's just a sharper scalpel.
And while the ride is definitely more firm, it's not harsh. And there's no increase in NVH. It's one of the reasons I went with the rubber upper mounts instead of the solid pillow ball mounts.
Thread Starter
Registered Member
iTrader: (3)
Joined: Aug 2015
Posts: 1,618
Likes: 323
From: San Antonio, Texas
I had a guest from Russia staying with me after getting her off to the office and taking my wife to the airport, I managed to start the installation rather later than planned, around 1pm. I finished by 6pm but did take on a few other tasks while I had the car on stilts. I managed to stab myself in the knee with one of the wheel studs which slowed me down quite a bit. It caused issues walking but it'll heal.
I put all four corners up on jacks and brought out a scale to measure the stock components as well as the Aragosta components. I lost some weight up front and I gained about a pound out back.

Everything came pre-assembled and adjusted. I made sure everything matched their own blueprint measurements. I'd highly recommend running their specs first and then lower to taste. I kept a very mild drop. about .9" front and about .7" rear.
Overall, the installation was pretty straightforward and not difficult. Hot and humid weather moved in just in time for the installation but I made it through. I'm back dating this so even though it's winter now, it was late spring for the installation.
I had two issues, one the driver's side 19mm lower shock mount bolt (turned out to be a real PITA but I got it off) and the rear spring upper/lower rubber mounts. The Aragostas did not come with a rubber upper isolator and I reused the stock conical rubber isolator. It fits fine but when I lowered the car, I found I was at a few mm above stock height in the rear. The fronts were spot on for Aragosta's specs. So...I lowered everything in the rear 20mm, rear spring and the shock as well to keep everything within range. That worked.
So a few photos.
Comparison of the stock Nissan (Tokico) next to the Aragosta front.


And just like that, installed up front. I did the passenger's side front/rear the the driver's side.

I don't have a digital scale but I ended up saving 5 pounds per damper up front. Here's the stock weight:

And the Aragostas.

Here's a comparison on the rears. The Aragosta was about a pound lighter.

But I lost that pound in the rear with the spring setup so I broke even. The Aragosta spring is definitely lighter but the height adjustment collar/perch adds weight.


Rears installed prior to me lowering everything another 20mm.

You do not have to remove the wheel to get to the rear adjusters. You do have to lift the car up.

Driver's side front adjuster.

Passenger's side. It sits under the wire looms, but does not touch them.

Final result! I'll most likely examine everything again tomorrow and I know things will probably settle a bit further over a week.

Few more notes. The fronts have 25 adjustment levels. The rears have 20. I currently have the fronts set at 10, the rears at 8. They came set at 8 front, 6 rear.
I do have spacers. For some reason I thought I had 20mm front, 20mm rear. I actually have 25mm rear. I discovered I had been rubbing, a bit more on the driver's rear. Managed to "peel" a thin strip of the liner which was still attached. I'm going to have to trim it back as backing down the driveway, I can hear it rubbing as the rear compresses.
The rear height adjustment was easier just taking the entire spring/perch out. I know some have issues getting the mid link bolt in and out but I did not mostly thanks to a jack and a rubber mallet Was just easier to turn everything and make sure it was locked. I put it all back together in less time than I would have if I'd been struggling to turn the collar with the tool while everything was in the car and under spring pressure. The shock height adjustment is made by loosening the black collar and turning the shock body itself.
I took a short trip and in all honestly, the NVH has gone down if anything. The "feel" is different from the OEM IPL dampers. How, I can't say yet. There's less jounce for sure. It ain't harsh by a long shot. I took the back road for a quick run to the grocery store and it's notoriously rough and bumpy. Didn't feel any worse and actually felt a bit more settled overall with the Aragostas on their current setting.
I did get a noise which I believe was the tires. I "rotated" the Bridgestones left to right and got a very feint thumping/drumming noise which increased in frequency with speed. I think it's just coming from a wear pattern.
I did one hard acceleration run and the rear seemed a more planted. Alignment feels the same but I won't know much til I take my "route" or the gauntlet as I like to call it. I won't be able to make any real judgements til then. I'll wait a week to get an alignment.
Interestingly, looking at the current wheels and how they're spaced out, I can see how a more aggressive offset would work. My wheels actually look a bit more tucked in than they had at the stock height.
Forgot to mention...I reused the OEM gaskets that sit in between the top mount and the shock tower front and rear..
And the ride height before and after...
Aragosta ride height
27.31 front
27.125
Stock
28.19 front
27.8 rear
I put all four corners up on jacks and brought out a scale to measure the stock components as well as the Aragosta components. I lost some weight up front and I gained about a pound out back.
Everything came pre-assembled and adjusted. I made sure everything matched their own blueprint measurements. I'd highly recommend running their specs first and then lower to taste. I kept a very mild drop. about .9" front and about .7" rear.
Overall, the installation was pretty straightforward and not difficult. Hot and humid weather moved in just in time for the installation but I made it through. I'm back dating this so even though it's winter now, it was late spring for the installation.
I had two issues, one the driver's side 19mm lower shock mount bolt (turned out to be a real PITA but I got it off) and the rear spring upper/lower rubber mounts. The Aragostas did not come with a rubber upper isolator and I reused the stock conical rubber isolator. It fits fine but when I lowered the car, I found I was at a few mm above stock height in the rear. The fronts were spot on for Aragosta's specs. So...I lowered everything in the rear 20mm, rear spring and the shock as well to keep everything within range. That worked.
So a few photos.
Comparison of the stock Nissan (Tokico) next to the Aragosta front.
And just like that, installed up front. I did the passenger's side front/rear the the driver's side.
I don't have a digital scale but I ended up saving 5 pounds per damper up front. Here's the stock weight:
And the Aragostas.
Here's a comparison on the rears. The Aragosta was about a pound lighter.
But I lost that pound in the rear with the spring setup so I broke even. The Aragosta spring is definitely lighter but the height adjustment collar/perch adds weight.
Rears installed prior to me lowering everything another 20mm.
You do not have to remove the wheel to get to the rear adjusters. You do have to lift the car up.
Driver's side front adjuster.
Passenger's side. It sits under the wire looms, but does not touch them.
Final result! I'll most likely examine everything again tomorrow and I know things will probably settle a bit further over a week.
Few more notes. The fronts have 25 adjustment levels. The rears have 20. I currently have the fronts set at 10, the rears at 8. They came set at 8 front, 6 rear.
I do have spacers. For some reason I thought I had 20mm front, 20mm rear. I actually have 25mm rear. I discovered I had been rubbing, a bit more on the driver's rear. Managed to "peel" a thin strip of the liner which was still attached. I'm going to have to trim it back as backing down the driveway, I can hear it rubbing as the rear compresses.
The rear height adjustment was easier just taking the entire spring/perch out. I know some have issues getting the mid link bolt in and out but I did not mostly thanks to a jack and a rubber mallet
Was just easier to turn everything and make sure it was locked. I put it all back together in less time than I would have if I'd been struggling to turn the collar with the tool while everything was in the car and under spring pressure. The shock height adjustment is made by loosening the black collar and turning the shock body itself.I took a short trip and in all honestly, the NVH has gone down if anything. The "feel" is different from the OEM IPL dampers. How, I can't say yet. There's less jounce for sure. It ain't harsh by a long shot. I took the back road for a quick run to the grocery store and it's notoriously rough and bumpy. Didn't feel any worse and actually felt a bit more settled overall with the Aragostas on their current setting.
I did get a noise which I believe was the tires. I "rotated" the Bridgestones left to right and got a very feint thumping/drumming noise which increased in frequency with speed. I think it's just coming from a wear pattern.
I did one hard acceleration run and the rear seemed a more planted. Alignment feels the same but I won't know much til I take my "route" or the gauntlet as I like to call it. I won't be able to make any real judgements til then. I'll wait a week to get an alignment.
Interestingly, looking at the current wheels and how they're spaced out, I can see how a more aggressive offset would work. My wheels actually look a bit more tucked in than they had at the stock height.
Forgot to mention...I reused the OEM gaskets that sit in between the top mount and the shock tower front and rear..
And the ride height before and after...
Aragosta ride height
27.31 front
27.125
Stock
28.19 front
27.8 rear
Last edited by Ape Factory; Jul 13, 2017 at 10:42 PM.
Thread Starter
Registered Member
iTrader: (3)
Joined: Aug 2015
Posts: 1,618
Likes: 323
From: San Antonio, Texas
Day two. Trimmed the rear lining on both sides. No more noises. No strange noises coming from anywhere as a matter of fact.
I've upped the dampers, 13 front, 10 rear. I could probably go to 14 front and that would make the front damping feel like the rear. I may end up backing down on the rear one notch as I'm not sure I'd want to run, on the road anyway, any firmer. The ride height is daily livable although the really large speed bumps will have to be taken a bit more slowly.
The rear end is PLANTED. (This would later change). I used to have tons of wheelspin, as in first three gears wheelspin. It just sticks now. Not a peep out of the traction light. (Well, yeah dummy, summer rolled around and it's 106 degrees out).
The steering is sharper and the whole car reacts more quickly in side to side transitions. Makes me wonder how sharp the pillow ball upper mount makes things. If you travel along at 15 miles an hour and just saw back and forth at the wheel, the car instantly reacts to every input and body roll is diminished. The car feels lighter.
I can't say understeer is hugely diminished from stock but we're headed in the right direction. Softening the rear may help in that regard.
I did some higher speed highway jaunts as well as some switchbacks at slower speeds to feel things out. Definitely taunter than stock but it's not harsh. Very much daily drivable without question. The rough stuff, at today's higher damping settings, was fine.
Thread Starter
Registered Member
iTrader: (3)
Joined: Aug 2015
Posts: 1,618
Likes: 323
From: San Antonio, Texas
Did a longer run on some pretty ****ty highways this morning. Definitely too hard in the rear for comfortable highway cruising. Going to back down two notches in the rear. Fronts feel great. Far more planted in high speed sweepers, more neutral and natural feeling. Sway? What sway?
No problem getting into my parking space this morning either. Was waiting to hear that scraping sound.
Update Edit: I've backed off the rears and I believe I'm at 7 from full soft and I ran both 10 and 8 at the front today. I believe, and I'll figure this out tomorrow, if I did 6 in the rear and 8 up front, I'd be about where the IPL shocks are without the additional body movement due to the lighter spring rates. Just to give you an idea of how firm these shocks can get! I think if greater control over stock with everyday real world ride is important, go with the E model over the S. When the road is smoother (read most other states outside Michigan, New Jersey and NYC), even at the higher settings, the ride is extraordinary. The sharp bumps don't upset the car as much as big undulations. We have a lot of clay earth here in San Antonio and roads get big ripples in them. Going over that sort of bump, with the suspension dialed up, I definitely feel the extra spring rate over stock. I can go around fast sweepers with sharp bumps mid corner and the car does not get upset. The rear doesn't skip out.
Update Edit #2: I'm at 6 front, 3 rear, basically as comfortable as the IPL suspension but without the "fuss" of the IPL suspension which can get fidgety and make the car move around. The Aragostas produce less body movement and maybe even a bit more compliance over the IPL Tokicos which is saying something as the Tokico's a twin tube. Just very supple, controlled damping that acts very quickly. No pogoing down, no float, no spring bounce, even at the lower damper settings. If you soften the dampers up, it does affect turn-in and you're able to affect the front/rear balance as well. The more firm things are up front, the more immediate the car is to input. Even at full soft, it's better than stock by a good bit. It's still forgiving and you can toss it around with more accuracy and confidence.
Going to go to 7 front, four rear for daily driving. In all honesty, a remote electronic adjuster, like the EDFC, would be killer with these shocks. We have some very smooth roads where I could take advantage of the increase in stiffness but there are a few sections of my daily commute which are like riding off road in the Paris-Dakar. Big mid-corner bumps, rippled asphalt that resemble whoop-de-do's on a motocross track, etc...a real test for daily, real-world livability.
These things would absolutely rock on a road or autocross course with stickier rubber.
Thread Starter
Registered Member
iTrader: (3)
Joined: Aug 2015
Posts: 1,618
Likes: 323
From: San Antonio, Texas
One mistake I made with the installation was the lower rubber isolator for the rear spring. It has an indentation for the spring shape and it needs to be rotated accordingly so the spring will sit in the isolator correctly. If you don't do this, you'll find your ride height, like I did, was 20mm higher than expected I thought I had spring sag but it was the isolator. I installed it correctly and no issues. I think the amount of spring sag I've had since I installed them over six months ago is a few mm at best.
I've not had to make any height adjustments in the rear and I ended up adding about a half turn of the lower spring perch up front for preload.
I did go back and adjust the rear shock length to Aragosta's specs and that helps.
The dampers themselves will have a break-in period and they "loosen" up a bit. Now this happened up front far, far more quickly than in the rears. You'll end up adjusting the damping UP two notches firmer. The rears, with less weight on them, take a lot longer and like every other kit out there, it feels more firm in the rear than in the front.
In fact, made a trip to Lowe's today and grabbed five 25 pound bags of sand. I was amazed at just how compliant the rear suspension was.
I also recommend, despite the mild drop, getting upper camber arms up front and camber links in the rear. More on that later.
I thought I had spring sag but it was the isolator. I installed it correctly and no issues. I think the amount of spring sag I've had since I installed them over six months ago is a few mm at best. I've not had to make any height adjustments in the rear and I ended up adding about a half turn of the lower spring perch up front for preload.
I did go back and adjust the rear shock length to Aragosta's specs and that helps.
The dampers themselves will have a break-in period and they "loosen" up a bit. Now this happened up front far, far more quickly than in the rears. You'll end up adjusting the damping UP two notches firmer. The rears, with less weight on them, take a lot longer and like every other kit out there, it feels more firm in the rear than in the front.
In fact, made a trip to Lowe's today and grabbed five 25 pound bags of sand. I was amazed at just how compliant the rear suspension was.
I also recommend, despite the mild drop, getting upper camber arms up front and camber links in the rear. More on that later.
Thread Starter
Registered Member
iTrader: (3)
Joined: Aug 2015
Posts: 1,618
Likes: 323
From: San Antonio, Texas
It's really hard for me to leave well enough alone. I think I mentioned I'm a recovering modaholic? I'm pretty happy with the suspension at this point. The car's overall handling still needs some minor tweaks to make me happy but on to power!
I'm not going to cover much of the same ground that's been shared/debated ad nauseam on the forum already. I'm also not a strong believer of intakes on our cars as I rank quality filtration highly and many of the offerings have compromises.
So...with the R2C, I bought a set used out of curiosity. Installed them today and wanted to share a few notes.
The most important interface is the elbow portion of the intake as it mates to the throttle body. Get it off and you could cost yourself 5hp easily. With that in mind, I installed the intakes with that as a priority.
The OEM cold air inlets for the OEM airboxes sit fairly low in relation to where the R2C "airboxes" sit. If I were to do a redesign, I'd make them a bit deeper.
Sealing around the airbag is suspect at best. I added door/garage strip sealer in appropriate places. It's super malleable and conforms well to odd shapes, open celled so it'll expand and collapse as needed, and it has a sticky back. You can double it up to add thickness. I bought it at Home Depot and it's made by Frost king. I actually use it mostly for my guitar pickups. I do a lot of direct mounting of pickups with wood inserts and machine screws and I keep them level with this foam. Works like a charm.
I did additional sealing around the top of the airbox and around the radiator hose on the passenger's side. I tried to get them as low as possible to have a more direct line of cool air from the stock cold air intake tubes instead of half of it flowing past the underside of the R2C.
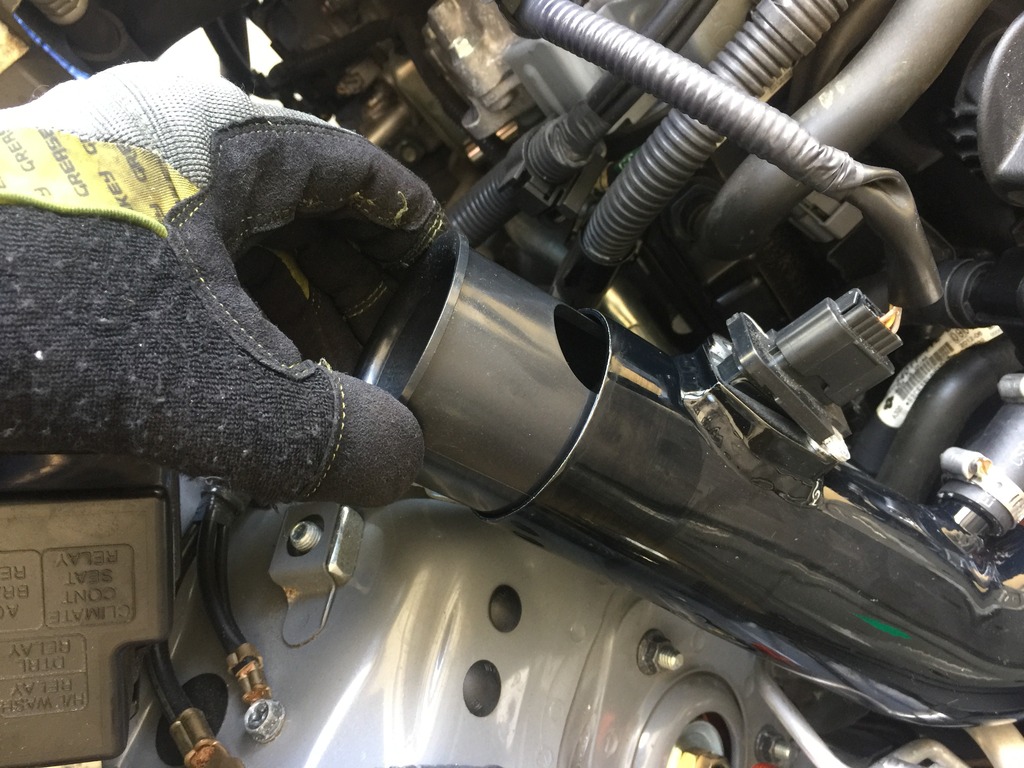
One area of concern is on the passenger's side. The valve cover breather hose touches the fuel pressure regulator vacuum line. If I were to keep this intake long term, i'd either shorten the metal elbow coming off the R2C tube or see if I could locate silicon hosing with an elbow. I'd also install some sort of shielding or another larger hose over the FPR vacuum line. I'll watch it closely over the coming week.
I went for a quick ride and yep, they sound awesome. Can't tell if there's much, if any, hp difference but acceleration seems a bit smoother and it does seem to pull a bit harder on top. It sure as hell didn't make the car slow. I'll have OBDII bluetooth dongle here tomorrow and I can monitor IAT's. It's summer here and we may have our first 100 degree day later in the week.
I have a Nismo R-tune intake coming the end of the week and that'll be installed early next week.
I'm not going to cover much of the same ground that's been shared/debated ad nauseam on the forum already. I'm also not a strong believer of intakes on our cars as I rank quality filtration highly and many of the offerings have compromises.
So...with the R2C, I bought a set used out of curiosity. Installed them today and wanted to share a few notes.
The most important interface is the elbow portion of the intake as it mates to the throttle body. Get it off and you could cost yourself 5hp easily. With that in mind, I installed the intakes with that as a priority.
The OEM cold air inlets for the OEM airboxes sit fairly low in relation to where the R2C "airboxes" sit. If I were to do a redesign, I'd make them a bit deeper.
Sealing around the airbag is suspect at best. I added door/garage strip sealer in appropriate places. It's super malleable and conforms well to odd shapes, open celled so it'll expand and collapse as needed, and it has a sticky back. You can double it up to add thickness. I bought it at Home Depot and it's made by Frost king. I actually use it mostly for my guitar pickups. I do a lot of direct mounting of pickups with wood inserts and machine screws and I keep them level with this foam. Works like a charm.
I did additional sealing around the top of the airbox and around the radiator hose on the passenger's side. I tried to get them as low as possible to have a more direct line of cool air from the stock cold air intake tubes instead of half of it flowing past the underside of the R2C.
One area of concern is on the passenger's side. The valve cover breather hose touches the fuel pressure regulator vacuum line. If I were to keep this intake long term, i'd either shorten the metal elbow coming off the R2C tube or see if I could locate silicon hosing with an elbow. I'd also install some sort of shielding or another larger hose over the FPR vacuum line. I'll watch it closely over the coming week.
I went for a quick ride and yep, they sound awesome. Can't tell if there's much, if any, hp difference but acceleration seems a bit smoother and it does seem to pull a bit harder on top. It sure as hell didn't make the car slow. I'll have OBDII bluetooth dongle here tomorrow and I can monitor IAT's. It's summer here and we may have our first 100 degree day later in the week.
I have a Nismo R-tune intake coming the end of the week and that'll be installed early next week.
Thread Starter
Registered Member
iTrader: (3)
Joined: Aug 2015
Posts: 1,618
Likes: 323
From: San Antonio, Texas
Stopped by a local speed shop called Black Jack, owned by Spurs player Tim Duncan, and a mile from my house, to schedule an alignment. Saw THIS there. was amazing in person....


They had a few high end Audi R8's, a Diablo in the back and who knows what else....
Anyway, on to the intake.
Installed!


I know the extra sealer looks a bit wonky but all I care is that it works and helps seal the boxes. Air will always be drawn in by the path of least resistance and I'm hoping there's a bit of ram air thing going on with the OEM cold air ducts. WHY R2C didn't just map out the stock airbox and go from there...
Here's where the two hoses, fuel pressure regulator and the valve cover vent, touch. Not good. Like I said, I'll watch it closely.

A bit hard to tell here but the cold air inlet on the top of the photo...the bottom edge comes in below the bottom of the R2C intake. I tried reversing the side bracket which determines the R2C box's height but it cause too much of an alignment issue with the throttle body.

Acceleration felt smoother. I still suffer from traction issues despite the extra heat, in the lowest three gears. Seems to pull more quickly to redline and a bit harder from 5K on up. Can't say it's a huge difference as the temps just took a turn north around here. Hoping, praying, the Nismo intake retains some of the intake growl I get with these puppies.
They use the 10509B filter, these are the dimensions in inches...
CO10509B
Outlet 2.5
Open End 5.75
Closed end 4.5
Media 5.38
Flange 1.31
Overall (length) 6.69
Ideally, the boxes should be bigger and give more clearance between it and the sides of the filter. I took a look at where the Nismo filters will go and it's a pretty large void.
They had a few high end Audi R8's, a Diablo in the back and who knows what else....
Anyway, on to the intake.
Installed!
I know the extra sealer looks a bit wonky but all I care is that it works and helps seal the boxes. Air will always be drawn in by the path of least resistance and I'm hoping there's a bit of ram air thing going on with the OEM cold air ducts. WHY R2C didn't just map out the stock airbox and go from there...
Here's where the two hoses, fuel pressure regulator and the valve cover vent, touch. Not good. Like I said, I'll watch it closely.
A bit hard to tell here but the cold air inlet on the top of the photo...the bottom edge comes in below the bottom of the R2C intake. I tried reversing the side bracket which determines the R2C box's height but it cause too much of an alignment issue with the throttle body.
Acceleration felt smoother. I still suffer from traction issues despite the extra heat, in the lowest three gears. Seems to pull more quickly to redline and a bit harder from 5K on up. Can't say it's a huge difference as the temps just took a turn north around here. Hoping, praying, the Nismo intake retains some of the intake growl I get with these puppies.
They use the 10509B filter, these are the dimensions in inches...
CO10509B
Outlet 2.5
Open End 5.75
Closed end 4.5
Media 5.38
Flange 1.31
Overall (length) 6.69
Ideally, the boxes should be bigger and give more clearance between it and the sides of the filter. I took a look at where the Nismo filters will go and it's a pretty large void.
Last edited by Ape Factory; Jul 13, 2017 at 10:56 PM.
Thread Starter
Registered Member
iTrader: (3)
Joined: Aug 2015
Posts: 1,618
Likes: 323
From: San Antonio, Texas
In between intakes, I went and had my alignment measured.
As I said earlier, I really want to keep as many of the stock suspension components as possible to keep NVH down. I still have that rear traction issue that I think only stickier tires and wider rims will fix (and less camber in the rear!).

Distant cousins.

As I said earlier, I really want to keep as many of the stock suspension components as possible to keep NVH down. I still have that rear traction issue that I think only stickier tires and wider rims will fix (and less camber in the rear!).
Distant cousins.
Last edited by Ape Factory; Jul 13, 2017 at 10:59 PM.
Thread Starter
Registered Member
iTrader: (3)
Joined: Aug 2015
Posts: 1,618
Likes: 323
From: San Antonio, Texas
Monitored the intake air temps with the R2C intakes on my way home tonight. Ambient, once on the highway, was 87 degrees (@10pm!) and my IAT's were 93.2 degrees. So the whole heat soak thing is a non-issue. Yeah, it heat soaks at idle but I could care less what the IAT's are when I'm standing still. They drop pretty rapidly once moving at anything over 25mph. We'll see what the Nismo produces temp wise.
Thread Starter
Registered Member
iTrader: (3)
Joined: Aug 2015
Posts: 1,618
Likes: 323
From: San Antonio, Texas
I installed the Nismo R-tune dual intake on my IPL to get a fresh, direct comparison to the stock airbox system and the R2C intake system which the Nismo replaced.
This is not a direct bolt-on kit and modifications to the kit will be necessary. I don't have a full list yet as I haven't made all the final adjustments. I'll try to detail them all for the next person who buys and installs the kit.
I currently have just the intake part of the kit installed. It comes with a smaller washer fluid reservoir and I have not installed any of those parts yet.
I'm going to list the issues you'll have right off the bat if you go to install this kit on an IPL. As the IPL bumper looks to be a bit longer between the fog lights and the wheel well, there may be additional issues with Sport and non-Sport front bumpers.
-I have LED fogs and the heat sink portion of the LED's behind the housing WILL interfere with the filters on both sides. I've pulled both fogs until I can make adjustments.
-The bypass valves which prevent water from being sucked into the engine, in their current state, will rub the hood liner. I may be able to rotate the upper pipe enough to prevent this.
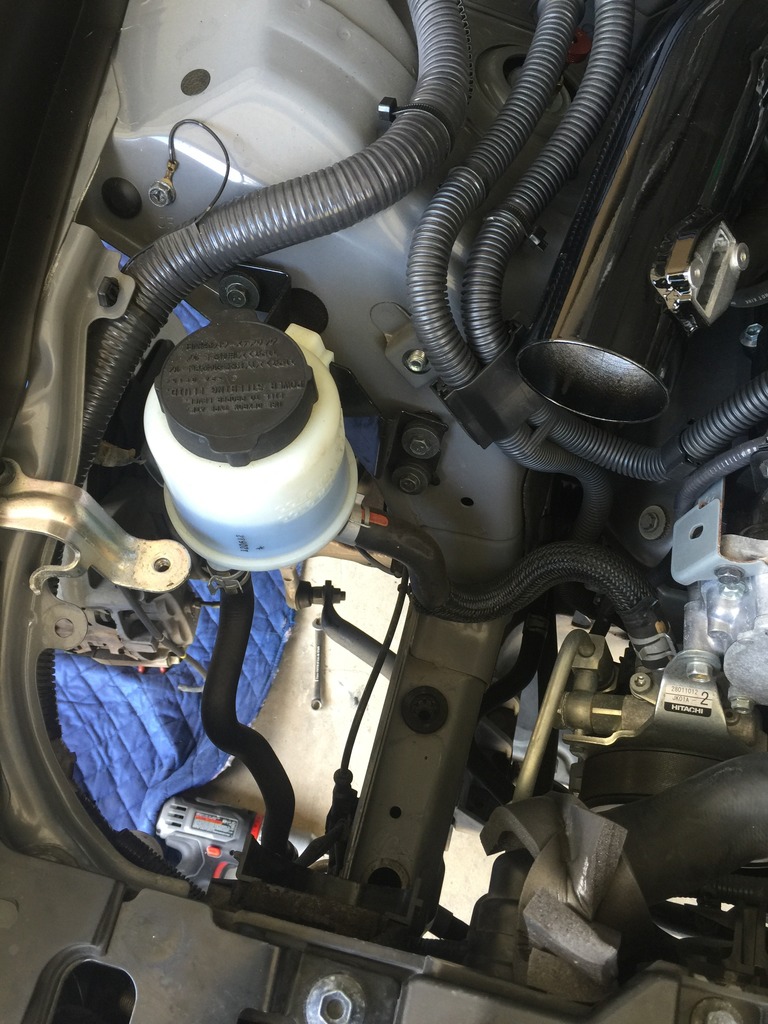
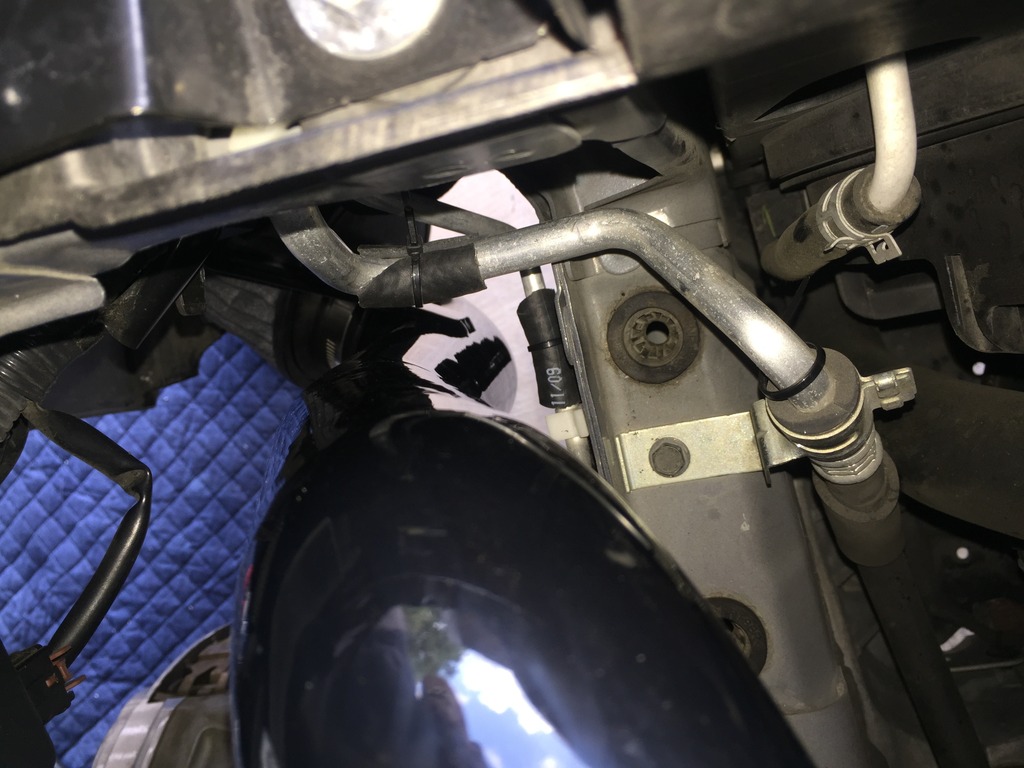
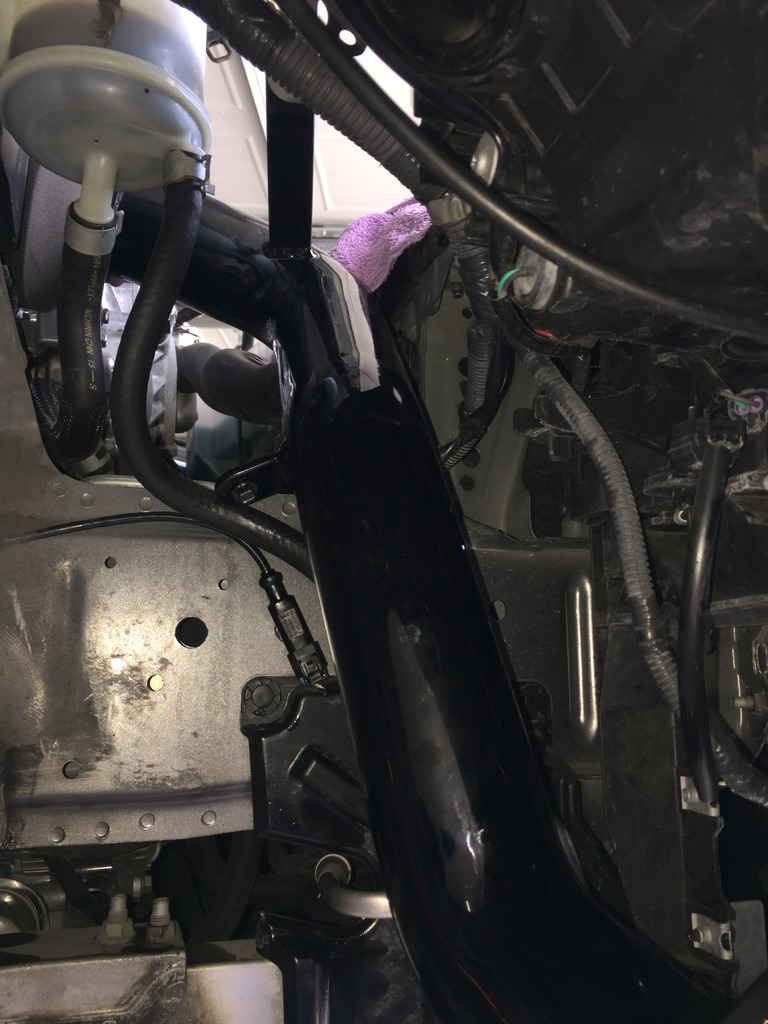
-The Passenger's side lower intake pipe touches the send (or return, not sure which) hose from the bottom of the power steering reservoir. It's not bad and you could theoretically just wrap it with a split hose or some foam. I plan on replacing the offending hose and rerouting it ever so slightly to clear everything.
-The driver's side lower pipe will rub agains the inner fender liner (towards the front of the car. I believe I can adjust a bit to accommodate for this.
-Not all the bracket arms coming off the intake tubes have an opposing bracket to screw into on the car. It's designed for a 370Z so there are some things which are quite different. I have a gaggle of aluminum bar and other bracket-making material to solve this.
THE GOOD....
-They most definitely make power. Easily registers on the butt dyno. It's hot as hell here and the car is still hauling pretty hard, aka traction limited, even from a roll with a 7AT.
-They change the exhaust note ever so slightly. Sounds meaner. Isn't as loud on the intake side as the R2C but the car sounds bad *** with these intakes.
-REALLY well-thought out kit and has a ton of parts to make a truly quality installation with great long-term durability. They thought of everything and included it in the kit. Too bad it's designed for the 370! With some minor changes, could be a bolt-in for the G37 (IPL anyway). All the parts, even the band clamps, are high quality. The instructions have black and white photos which are grainy but they are fairly easy to follow.
-Looks good. I like the gloss (almost translucent) paint on the intake tubes. They'll scratch however so install them with care.
As I mentioned earlier, I have yet to install the smaller washer fluid reservoir. I plan on making an "in between" harness so there's no splicing of the original harness anywhere. I have to source the correct male/female plug ends first however so that may take a while but I'll be sure to share all the part numbers.
I've been monitoring intake air temps. When in stop and go traffic, I have yet to see above 125 degrees after a hot restart. I started the car this morning (sitting in a cool garage, and the IAT's measured 100 degrees). I'm thinking the sensor isn't too accurate. Generally speaking, I'm seeing between 100 and 110 at speed, less at WOT. Usually within 8-11 degrees of ambient. I am going to be adding two small NACA ducts to the underside to direct a bit of air to this area. Not too big as I don't want it to pressurize the back side of the wheel well. They're being 3D printed (cool!) and I should have them by the end of the month.
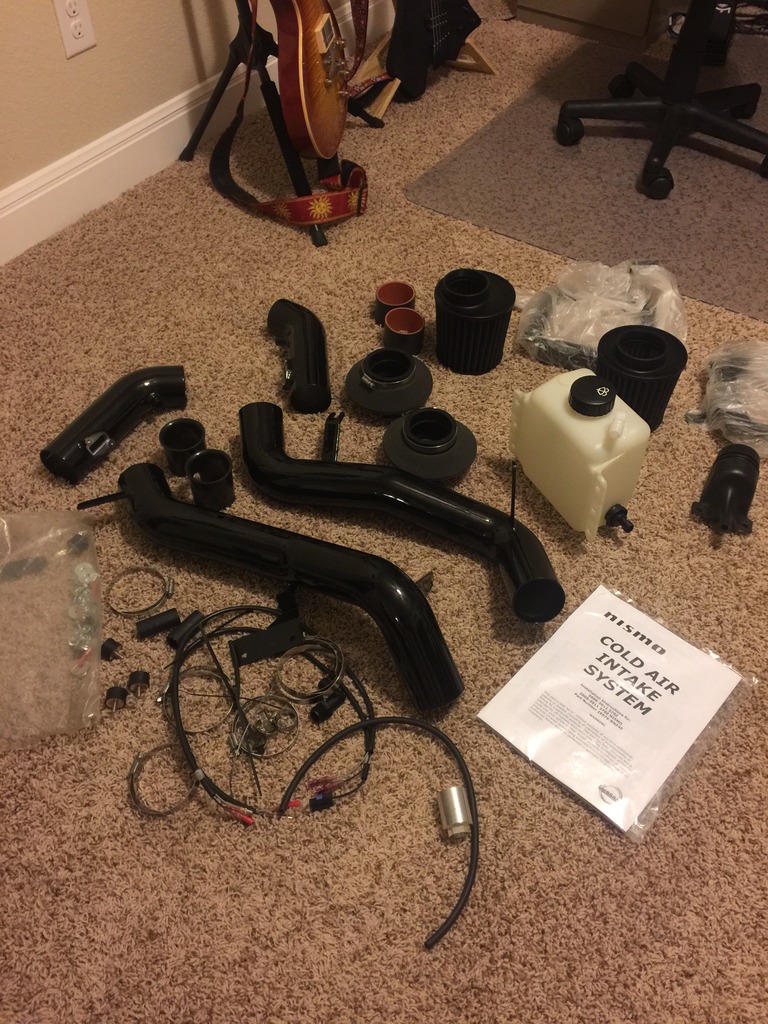
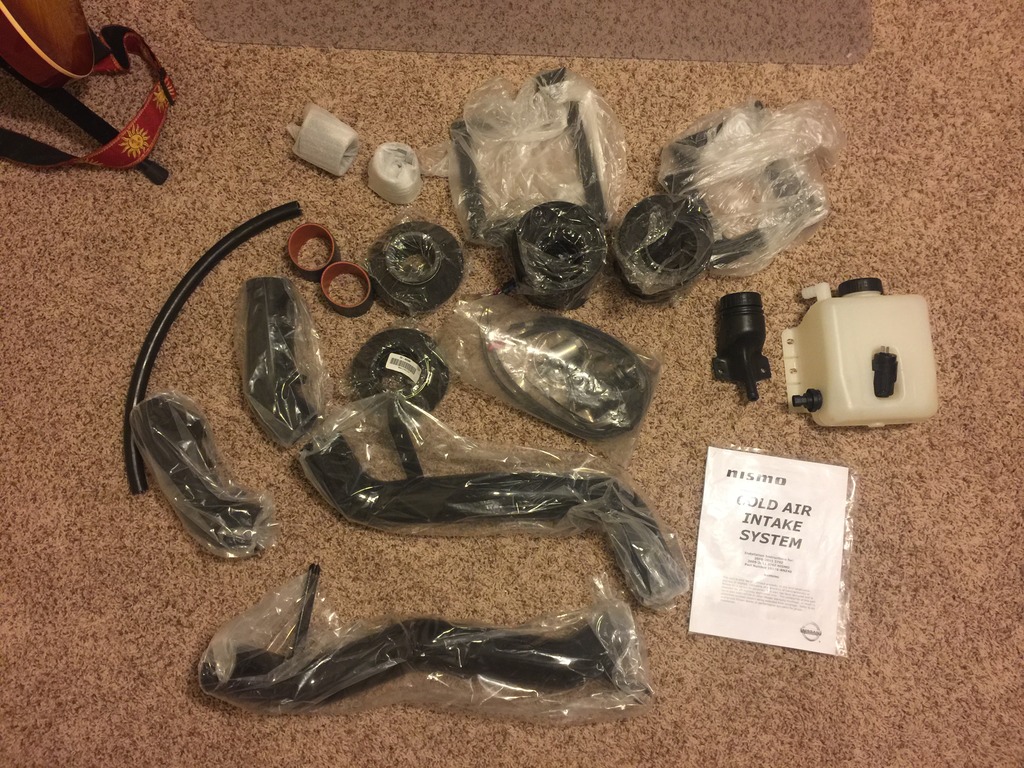
Photos! Just throwing some stuff up for now and I'll organize and update them later.
Pretty much the whole kit after unpacking and spreading out over the floor of my studio:
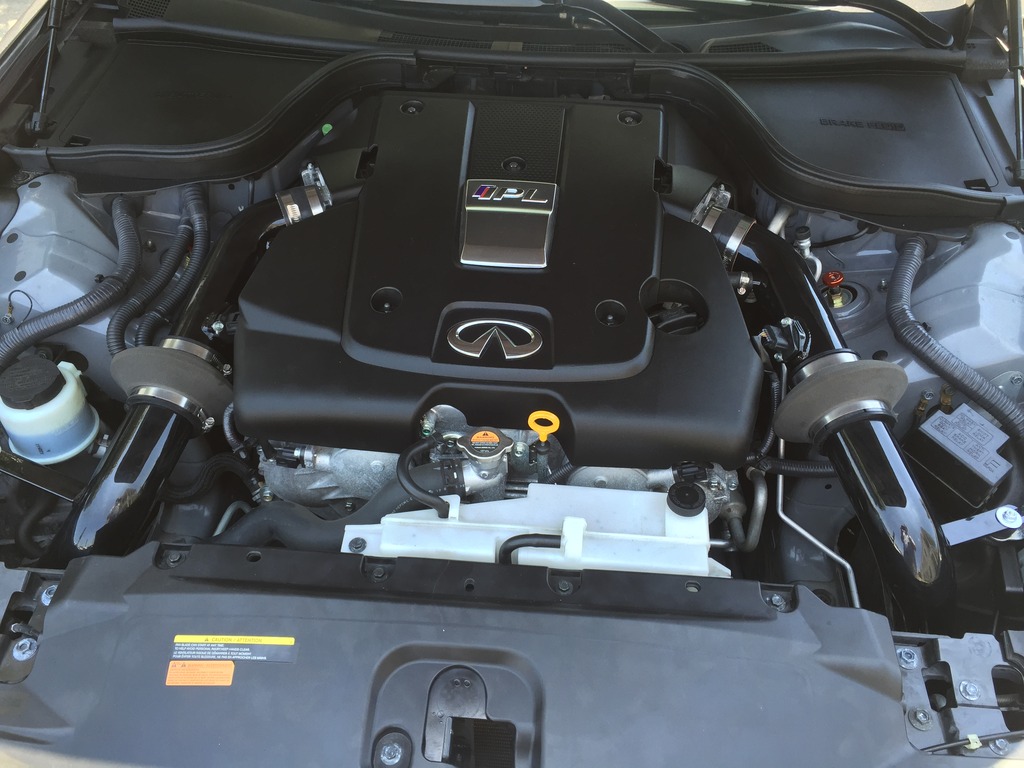
Installed.
Venturi. Used on both sides just before the MAF. Keeps the ECU happy.
Yes, it uses most of the valve cover resonators. Maybe that's why it's not as loud? Might have to swap those out!
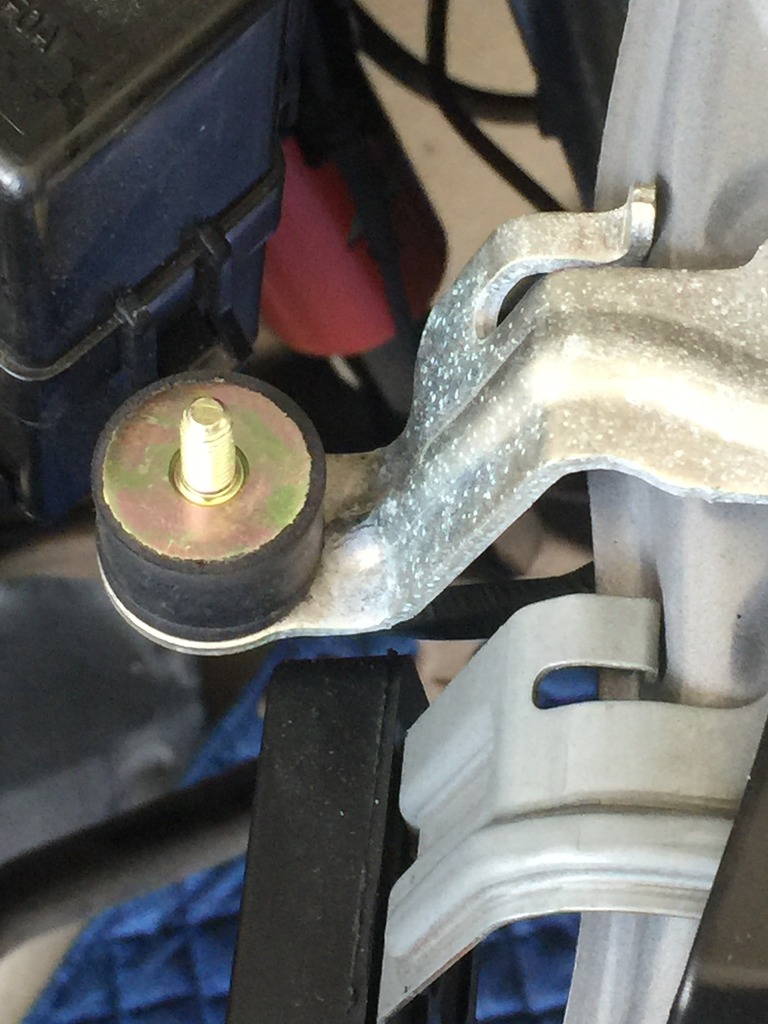
Nice little details like rubber mounts is what I really like about this kit.
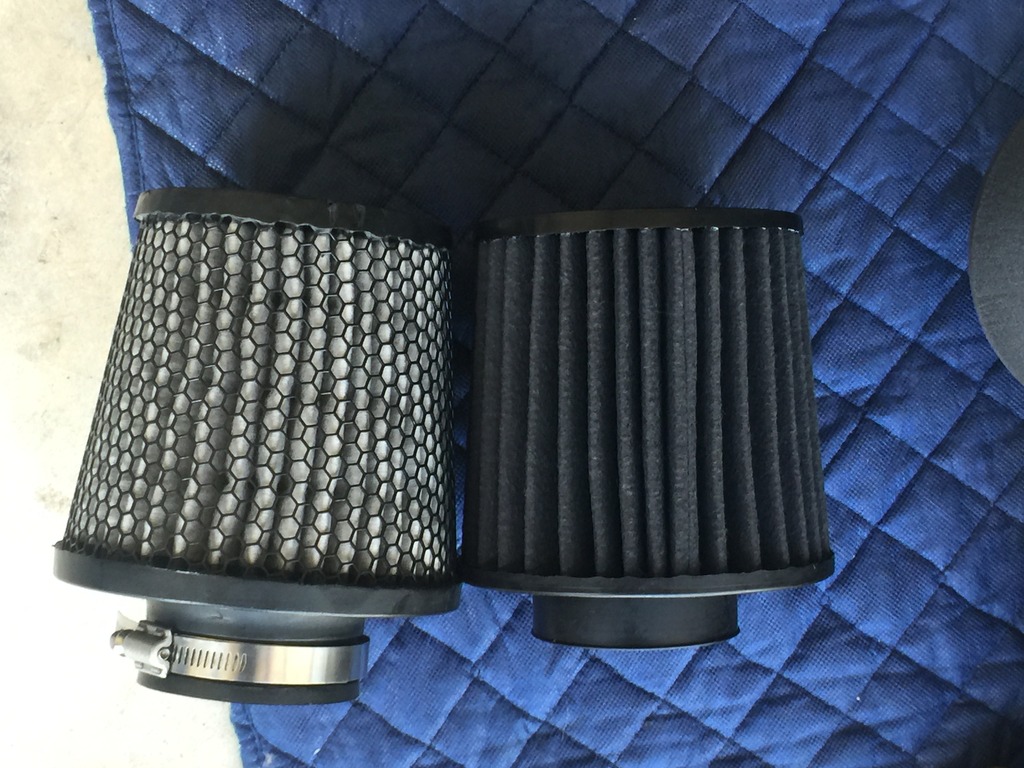
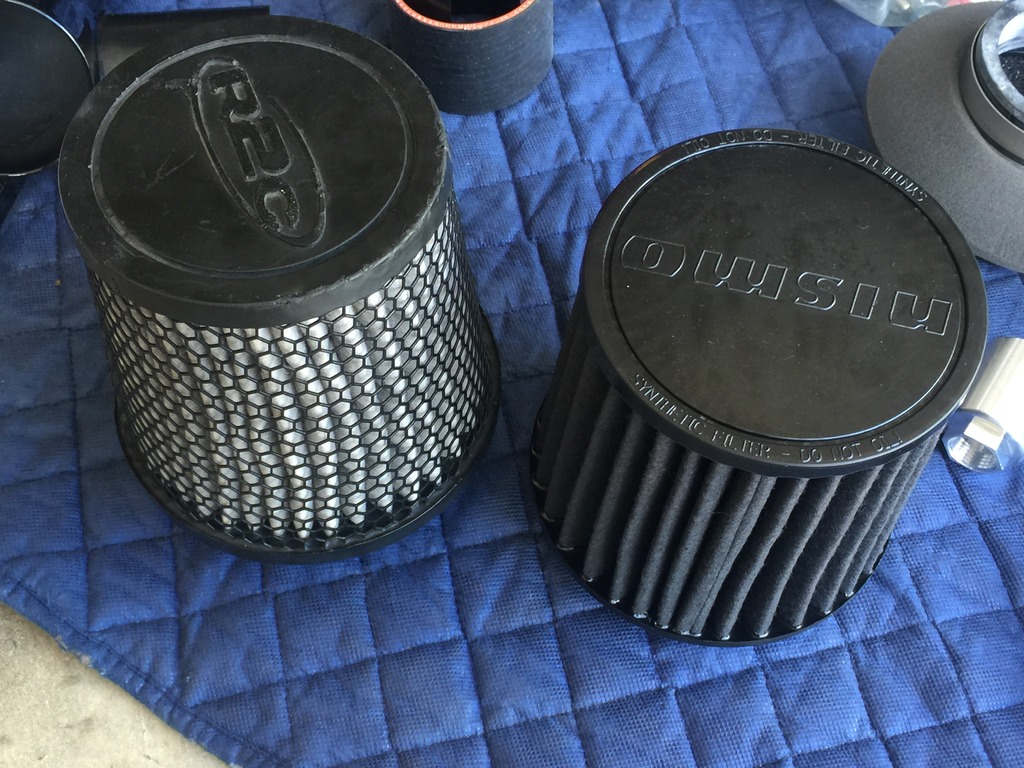
R2C on the left, Nismo on the right. The Nismo has an offset exit and it needs it. They're pretty much the same size, the R2C's base is a bit larger in diameter at its base.
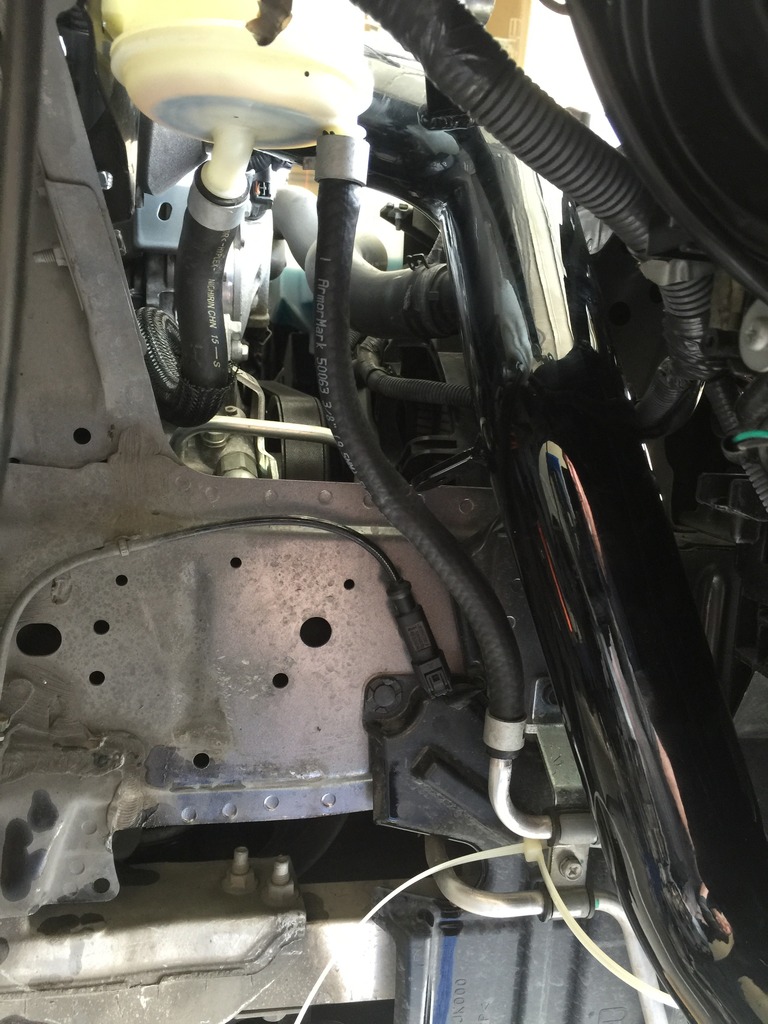
Power steering fluid reservoir. See the hose on the bottom left coming out of the bottom? That one WILL get in the way. You can rotate the hose from the reservoir base to make clearance a bit easier but it'll touch the tube. You'll need to wrap or replace that hose.
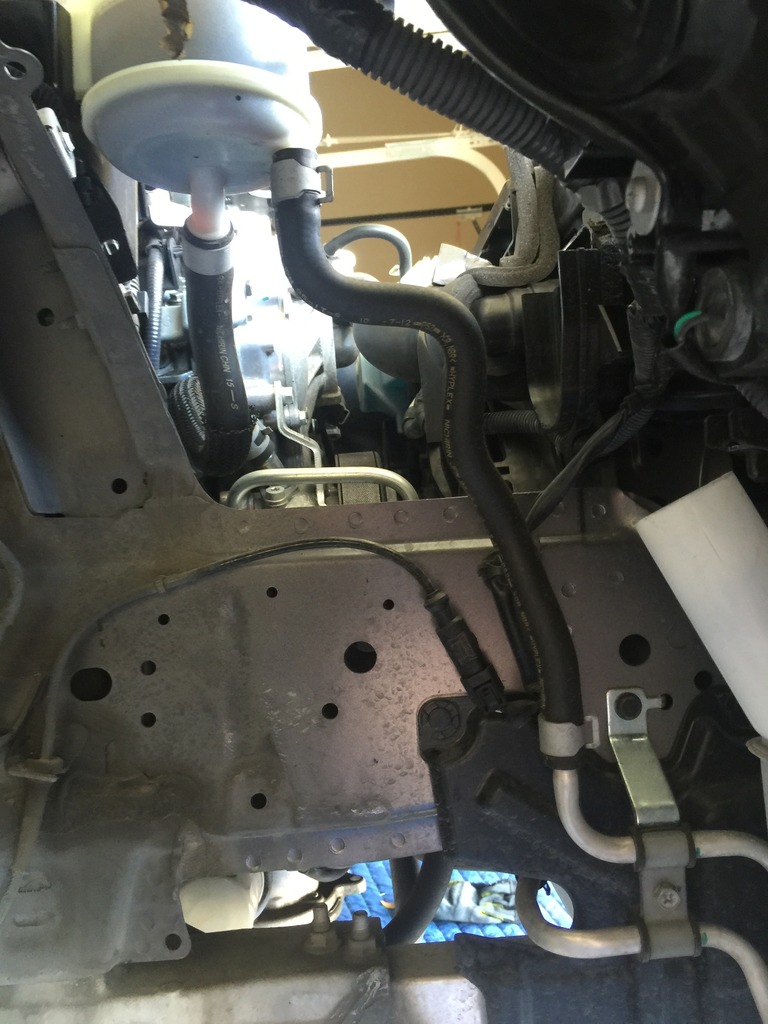
Another shot from underneath:
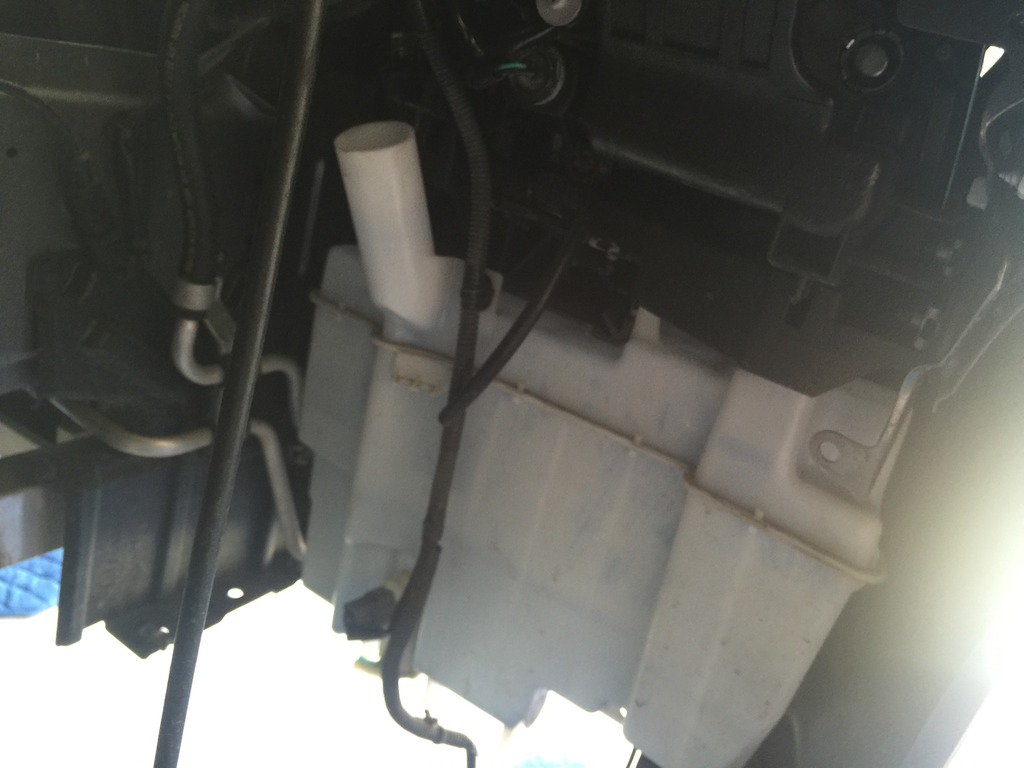
Yep, that'll be going...wiper fluid reservoir.
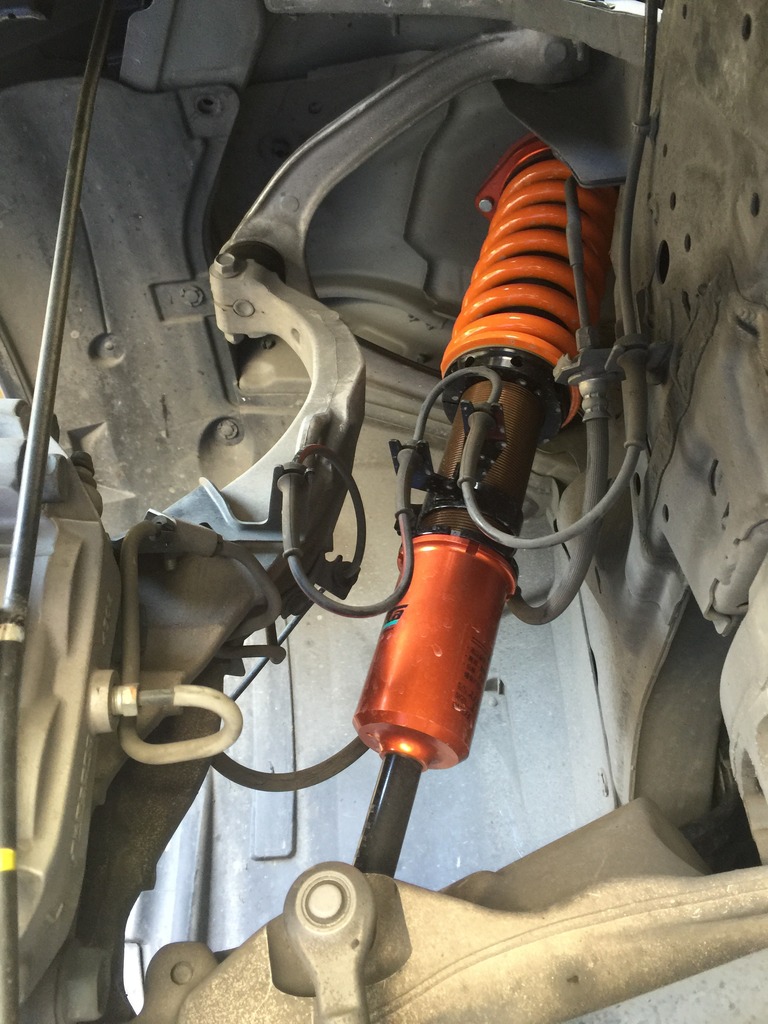
Gratuitous shot of one of the Aragosta dampers.
My next step will be to make sure the filters are positioned so they don't touch or rub anything (and with my LED bulbs installed in my fogs). This may necessitate shortening the pipes on both sides by a few inches. I'm going to examine everything carefully a dozen times before actually cutting anything. The filters are just not at quite the right angle which is possibly due to the brackets for the lower tube mounts not being where they need to be. But I think the driver's intake tube, which dives almost straight down to the front of the wheel well, needs to be pushed forward to clear the fender liner. I think there's room to do that.
More to come.
This is not a direct bolt-on kit and modifications to the kit will be necessary. I don't have a full list yet as I haven't made all the final adjustments. I'll try to detail them all for the next person who buys and installs the kit.
I currently have just the intake part of the kit installed. It comes with a smaller washer fluid reservoir and I have not installed any of those parts yet.
I'm going to list the issues you'll have right off the bat if you go to install this kit on an IPL. As the IPL bumper looks to be a bit longer between the fog lights and the wheel well, there may be additional issues with Sport and non-Sport front bumpers.
-I have LED fogs and the heat sink portion of the LED's behind the housing WILL interfere with the filters on both sides. I've pulled both fogs until I can make adjustments.
-The bypass valves which prevent water from being sucked into the engine, in their current state, will rub the hood liner. I may be able to rotate the upper pipe enough to prevent this.
-The Passenger's side lower intake pipe touches the send (or return, not sure which) hose from the bottom of the power steering reservoir. It's not bad and you could theoretically just wrap it with a split hose or some foam. I plan on replacing the offending hose and rerouting it ever so slightly to clear everything.
-The driver's side lower pipe will rub agains the inner fender liner (towards the front of the car. I believe I can adjust a bit to accommodate for this.
-Not all the bracket arms coming off the intake tubes have an opposing bracket to screw into on the car. It's designed for a 370Z so there are some things which are quite different. I have a gaggle of aluminum bar and other bracket-making material to solve this.
THE GOOD....
-They most definitely make power. Easily registers on the butt dyno. It's hot as hell here and the car is still hauling pretty hard, aka traction limited, even from a roll with a 7AT.
-They change the exhaust note ever so slightly. Sounds meaner. Isn't as loud on the intake side as the R2C but the car sounds bad *** with these intakes.
-REALLY well-thought out kit and has a ton of parts to make a truly quality installation with great long-term durability. They thought of everything and included it in the kit. Too bad it's designed for the 370! With some minor changes, could be a bolt-in for the G37 (IPL anyway). All the parts, even the band clamps, are high quality. The instructions have black and white photos which are grainy but they are fairly easy to follow.
-Looks good. I like the gloss (almost translucent) paint on the intake tubes. They'll scratch however so install them with care.
As I mentioned earlier, I have yet to install the smaller washer fluid reservoir. I plan on making an "in between" harness so there's no splicing of the original harness anywhere. I have to source the correct male/female plug ends first however so that may take a while but I'll be sure to share all the part numbers.
I've been monitoring intake air temps. When in stop and go traffic, I have yet to see above 125 degrees after a hot restart. I started the car this morning (sitting in a cool garage, and the IAT's measured 100 degrees). I'm thinking the sensor isn't too accurate. Generally speaking, I'm seeing between 100 and 110 at speed, less at WOT. Usually within 8-11 degrees of ambient. I am going to be adding two small NACA ducts to the underside to direct a bit of air to this area. Not too big as I don't want it to pressurize the back side of the wheel well. They're being 3D printed (cool!) and I should have them by the end of the month.
Photos! Just throwing some stuff up for now and I'll organize and update them later.
Pretty much the whole kit after unpacking and spreading out over the floor of my studio:
Installed.
Venturi. Used on both sides just before the MAF. Keeps the ECU happy.
Yes, it uses most of the valve cover resonators. Maybe that's why it's not as loud? Might have to swap those out!
Nice little details like rubber mounts is what I really like about this kit.
R2C on the left, Nismo on the right. The Nismo has an offset exit and it needs it. They're pretty much the same size, the R2C's base is a bit larger in diameter at its base.
Power steering fluid reservoir. See the hose on the bottom left coming out of the bottom? That one WILL get in the way. You can rotate the hose from the reservoir base to make clearance a bit easier but it'll touch the tube. You'll need to wrap or replace that hose.
Another shot from underneath:
Yep, that'll be going...wiper fluid reservoir.
Gratuitous shot of one of the Aragosta dampers.
My next step will be to make sure the filters are positioned so they don't touch or rub anything (and with my LED bulbs installed in my fogs). This may necessitate shortening the pipes on both sides by a few inches. I'm going to examine everything carefully a dozen times before actually cutting anything. The filters are just not at quite the right angle which is possibly due to the brackets for the lower tube mounts not being where they need to be. But I think the driver's intake tube, which dives almost straight down to the front of the wheel well, needs to be pushed forward to clear the fender liner. I think there's room to do that.
More to come.
Thread Starter
Registered Member
iTrader: (3)
Joined: Aug 2015
Posts: 1,618
Likes: 323
From: San Antonio, Texas
Worked on getting everything just right today and it necessitated a lot of tweaking specifically of how the pipes are oriented plus most of the factory brackets. The drivers side required 5.5" of pipe removed from the bottom where the filter goes. The left side required a custom bracket which I made out of aluminum bat stock. Took very little effort to fav that up.
I tweaked a bunch of the stock brackets to get everything just right and I ran a new power steering hose. I'll tackle the washer reservoir next week. Will post photos later.
I tweaked a bunch of the stock brackets to get everything just right and I ran a new power steering hose. I'll tackle the washer reservoir next week. Will post photos later.
Thread Starter
Registered Member
iTrader: (3)
Joined: Aug 2015
Posts: 1,618
Likes: 323
From: San Antonio, Texas
Ok so one of the big issues with my setup is the fact I'm using LED's in the stock housing. The extra protrusion of the heat sink causes problems. If you're using the stock bulbs, you'll have far less of an issue. I know there are aftermarket LED-integrated fogs out there and I may look into those.
Here's a shot of the driver's side cavity and the offending LED. They're fairly low profile from what I can tell.
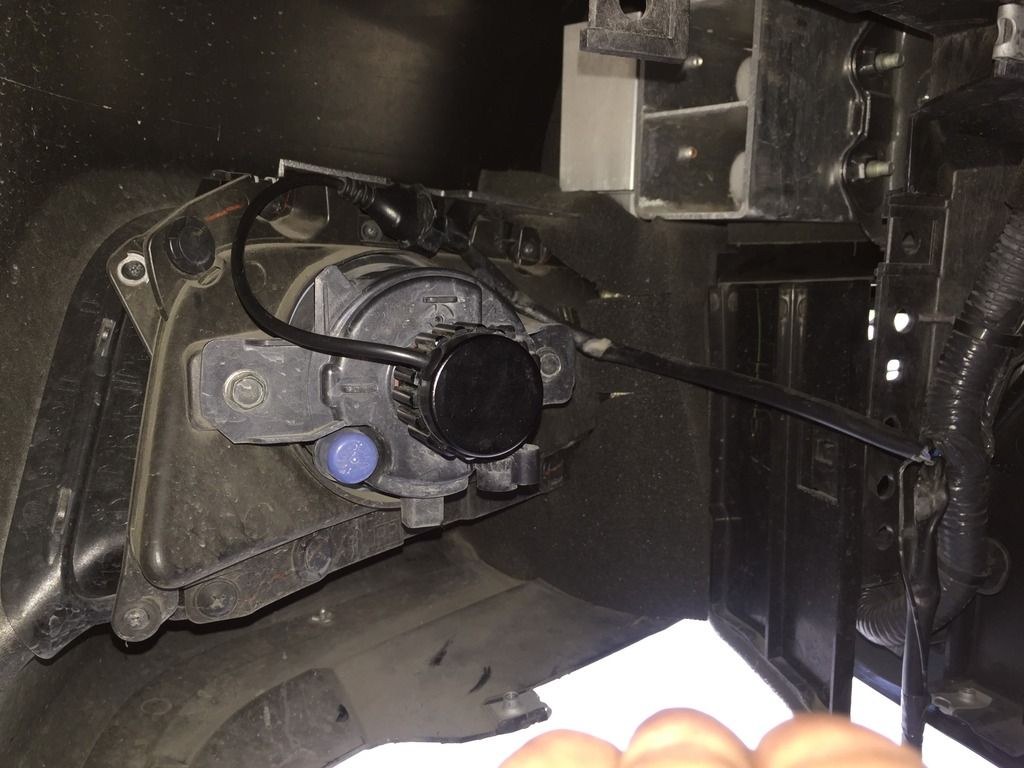
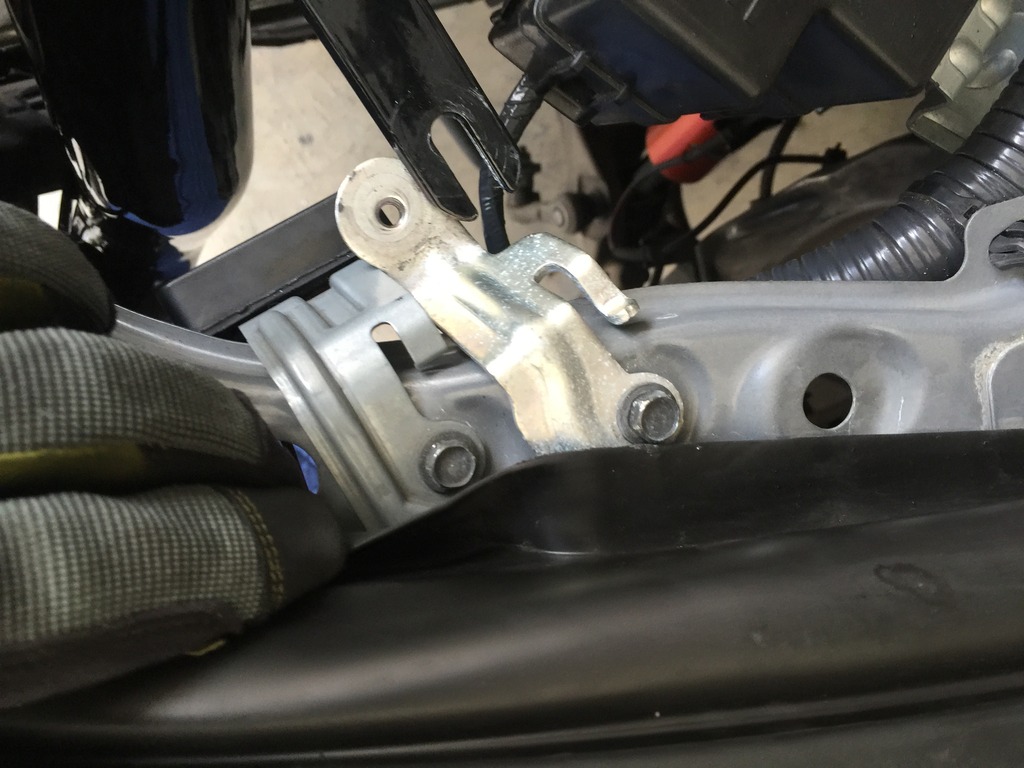
This is the stock airbag bracket. With a bit of massaging with a rubber mallet, you can "finesse" it a bit and change the angle enough to work with the necessary Nismo pipe orientation. It'll also rotate on the driver's side. Just undo the 10mm bolt a bit and rotate as necessary.
I put rubber hose around the a/c lines even though there's enough clearance that the lower Nismo pipe and the lines don't touch. Better safe than sorry.
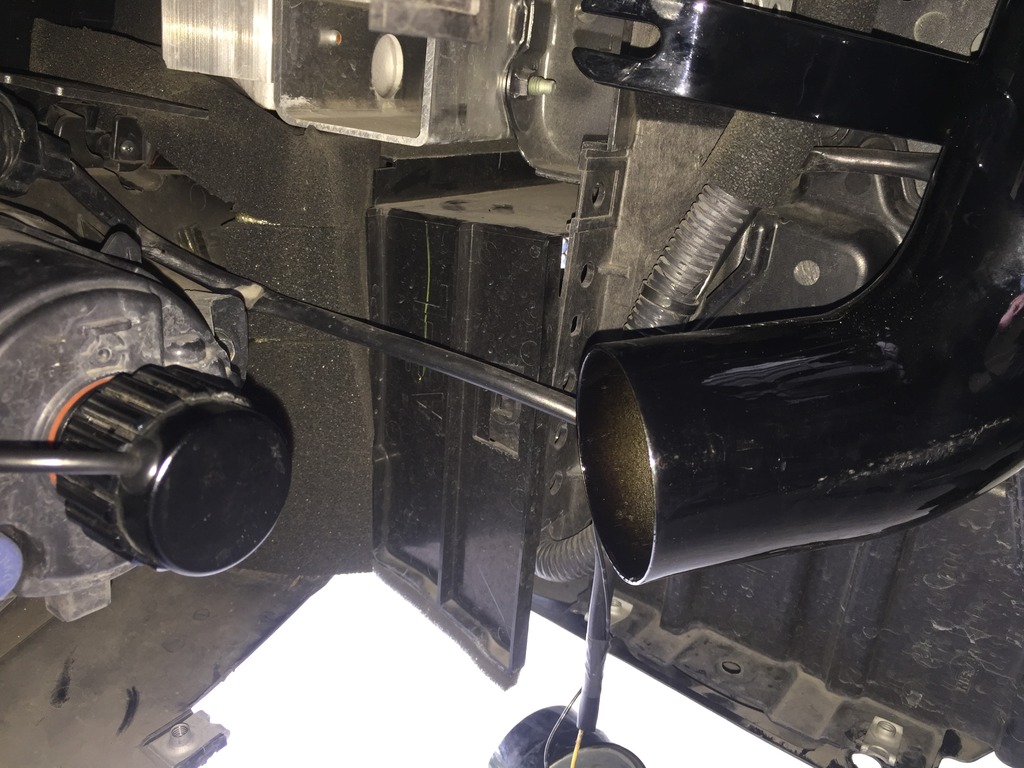
Lower pipe sans filter. Not much clearance between it and the light/housing.
Chopped 5.5". Be sure to deburr the edge with a file and wash the **** out of the pipe inside and out. You don't want the engine ingesting metal particles!

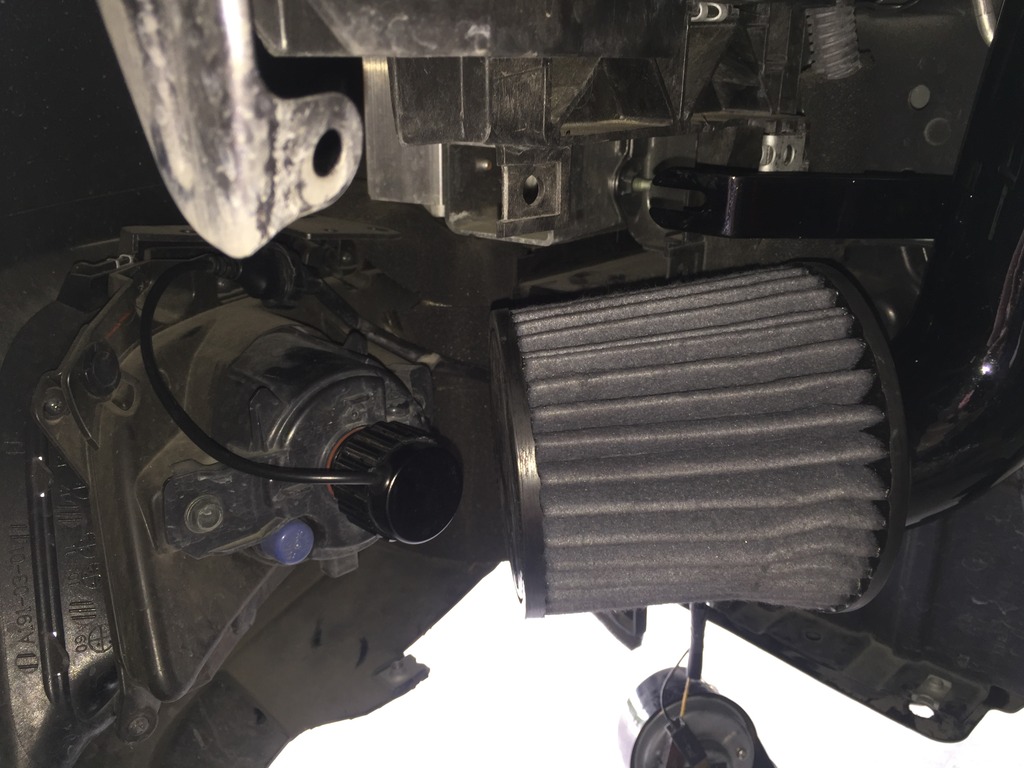
Filter installed. Plenty of clearance. I worked on the alignment for everything and ended up with less than half that clearance.
Looking straight down from the top. Plenty of clearance there too.
New power steering hose installed on the passenger's side. I used a 5/8" hose. I guessed it was a 10mm hose stock but I think it's actually 9mm. The 5/8" hose works fine.
So on the passenger's side, the pipe is actually not as long as the driver's side to begin with and it's at a different angle. Compounding things, the pipe's bracket, which attaches to a mount, is very close to the end of the pipe. So I didn't cut this side and it wouldn't accomplish what it did on the driver's side anyway. Hard to see, I've attached the lower bracket with one of the supplied rubber mounts which is attached to an aluminum bracket I cut, drilled two holes through and bent to shape. It's attached to the bottom of three screw clips. You have to pull it off and turn it around so the screw going in faces the front of the car. They actually mention this in the instructions but due to the differences between the IPL and 370, it's not in quite the same place and there's no factory bracket.
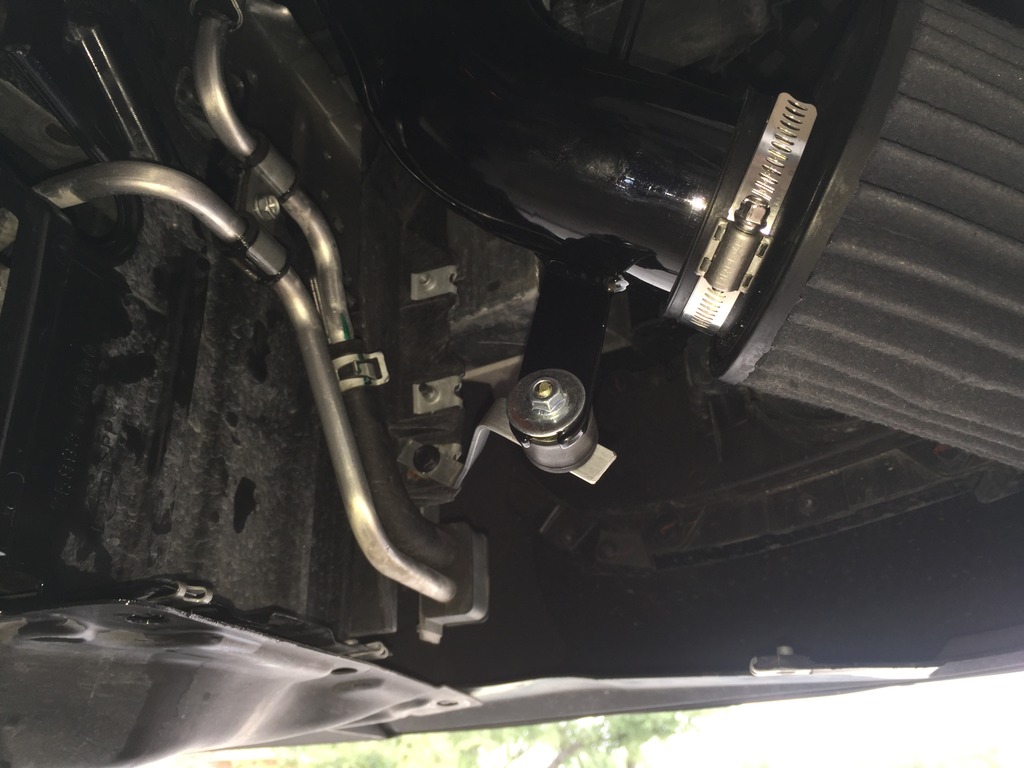
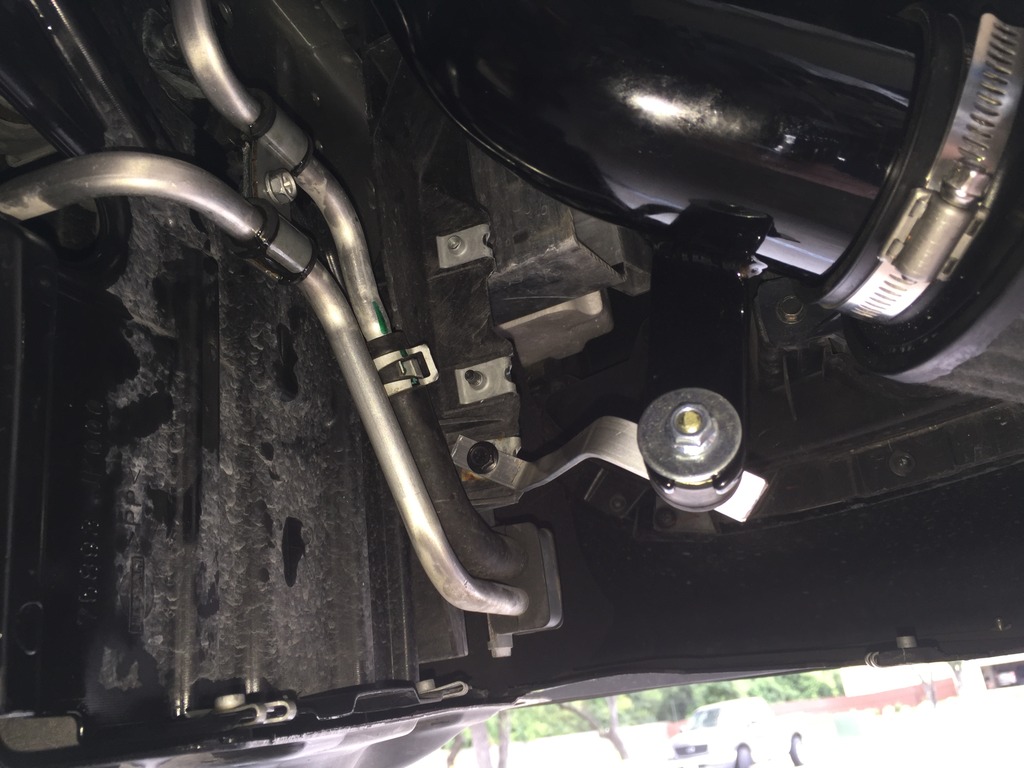
Another shot of the new power steering line this time with the lower pipe installed.
That's it for now! The passenger's side is a more difficult fit and it still has clearance issues so I don't consider the retrofit to be OEM quality. As far as installation difficulty, I give it a 6 out of 10 due to the patience needed and a but of custom fab work. It'll be an all-day endeavor. And I haven't even gotten to the wiper fluid reservoir yet!
Here's a shot of the driver's side cavity and the offending LED. They're fairly low profile from what I can tell.
This is the stock airbag bracket. With a bit of massaging with a rubber mallet, you can "finesse" it a bit and change the angle enough to work with the necessary Nismo pipe orientation. It'll also rotate on the driver's side. Just undo the 10mm bolt a bit and rotate as necessary.
I put rubber hose around the a/c lines even though there's enough clearance that the lower Nismo pipe and the lines don't touch. Better safe than sorry.
Lower pipe sans filter. Not much clearance between it and the light/housing.
Chopped 5.5". Be sure to deburr the edge with a file and wash the **** out of the pipe inside and out. You don't want the engine ingesting metal particles!
Filter installed. Plenty of clearance. I worked on the alignment for everything and ended up with less than half that clearance.
Looking straight down from the top. Plenty of clearance there too.
New power steering hose installed on the passenger's side. I used a 5/8" hose. I guessed it was a 10mm hose stock but I think it's actually 9mm. The 5/8" hose works fine.
So on the passenger's side, the pipe is actually not as long as the driver's side to begin with and it's at a different angle. Compounding things, the pipe's bracket, which attaches to a mount, is very close to the end of the pipe. So I didn't cut this side and it wouldn't accomplish what it did on the driver's side anyway. Hard to see, I've attached the lower bracket with one of the supplied rubber mounts which is attached to an aluminum bracket I cut, drilled two holes through and bent to shape. It's attached to the bottom of three screw clips. You have to pull it off and turn it around so the screw going in faces the front of the car. They actually mention this in the instructions but due to the differences between the IPL and 370, it's not in quite the same place and there's no factory bracket.
Another shot of the new power steering line this time with the lower pipe installed.
That's it for now! The passenger's side is a more difficult fit and it still has clearance issues so I don't consider the retrofit to be OEM quality. As far as installation difficulty, I give it a 6 out of 10 due to the patience needed and a but of custom fab work. It'll be an all-day endeavor. And I haven't even gotten to the wiper fluid reservoir yet!
Thread Starter
Registered Member
iTrader: (3)
Joined: Aug 2015
Posts: 1,618
Likes: 323
From: San Antonio, Texas
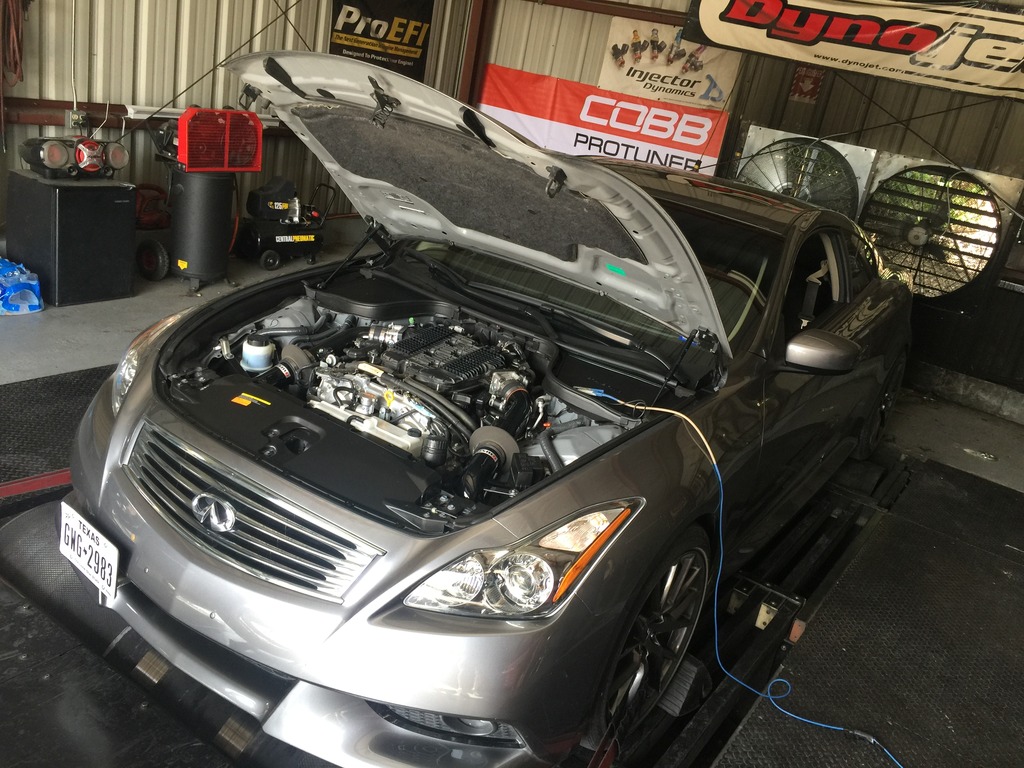
Car on the dyno today. I'm waiting on jpegs of the runs, STD, SAE and uncorrected.
I was pig rich in the top end. Tuner thinks the intake is messing with the MAF readings. So there's a good gain to come from tuning. I was in the mid to low 10's from 6K on up from what I can remember.
SAE numbers were in the high 270's. Will post graphs as soon as I have them.
I was pig rich in the top end. Tuner thinks the intake is messing with the MAF readings. So there's a good gain to come from tuning. I was in the mid to low 10's from 6K on up from what I can remember.
SAE numbers were in the high 270's. Will post graphs as soon as I have them.