

Review AIT Kit Fitment


AIT Kit Fitment
I get messages from a few member asking about the fitment on the AIT kit every now and then. I figure I will post up since I had first hand experience with it since I didn't go to a body shop for it.
KEEP IN MINE THIS IS JUST THE PRE-PRODUCTION KIT MADE and NOT THE FINISH PRODUCTION KIT!
Front Bumper
I didn't have first hand experience with this since I didn't use it. I however did pin it up against my car to take a look at the fitment. It look like the fitment was dead on except the holes for the kit still had to be drilled out. If you are pretty good with a drimmel and a drill like I am then it could be done pretty easy at home.
Here are some pictures( I didn't take pictures of driver side because fitment was same on both side)


Sideskirt
The sideskirt was pretty dead on! I did no modifying to this except sanding the rough spot for painting. I didn't feel a need to take pictures for this cause the fitment was great. The only part that wasn't great was the part that goes directly behind the door. This didn't matter to me because its not visible when the door is close and it still worked.
Picture before any sanding was done
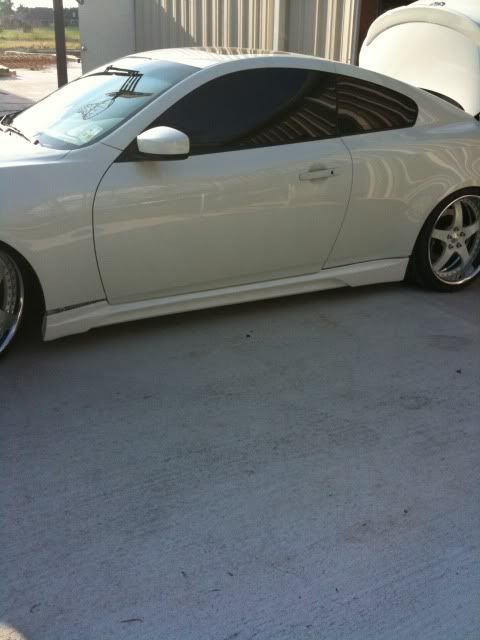

completed

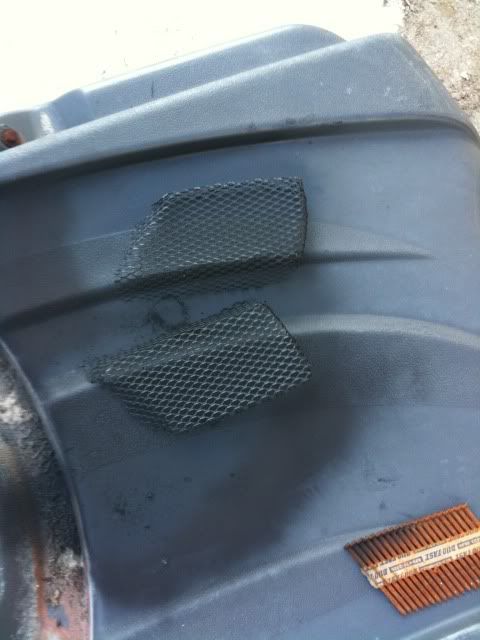
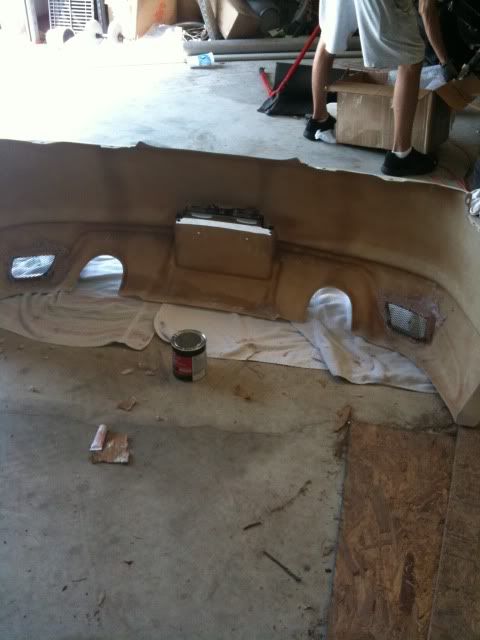
Rear Bumper
The rear bumper was pretty dead on too! the only problem was it was way too thick to fit the clips and etc. I sand it down and it work fine. Like the rest of the kit the holes will need to be drilled out. The holes on the front and rear bumper is different. You will need to drill a hole then drag down which is a little harder.
Pictures of holes that need to be drilled out.
stock


ait


Here is the picture of the part that really needs to be sand down to fit the clips


Here is other fitment pictures


OVERALL
I would say this kit is about 95% fitment. Drilling will need to be done unless AIT production kit will pre-drill it. Sanding will need to be done because some area are too thick. Some area will also have rough spots or wrinkle that need to be sanded down. I just used 300 fine grit sanding paper. Bondo will also need to be use for the low spot when sanding. I had to fill a few dimples on the rear bumper but that was about it.
Any shop will be able to do it with ease! You can also do it at home if you get off of work for two weeks like I did. It took a week before it was ready to paint. Two of days it rained.
Everyone saw my finish product already and the fitment was great.
PM me if you need to know anything else.
ONE MORE THING! AIT doesn't include it but I think this is a must! Go to Lowe's and buy some drain guard! cut it for the rear back piece like I did.

KEEP IN MINE THIS IS JUST THE PRE-PRODUCTION KIT MADE and NOT THE FINISH PRODUCTION KIT!
Front Bumper
I didn't have first hand experience with this since I didn't use it. I however did pin it up against my car to take a look at the fitment. It look like the fitment was dead on except the holes for the kit still had to be drilled out. If you are pretty good with a drimmel and a drill like I am then it could be done pretty easy at home.
Here are some pictures( I didn't take pictures of driver side because fitment was same on both side)
Sideskirt
The sideskirt was pretty dead on! I did no modifying to this except sanding the rough spot for painting. I didn't feel a need to take pictures for this cause the fitment was great. The only part that wasn't great was the part that goes directly behind the door. This didn't matter to me because its not visible when the door is close and it still worked.
Picture before any sanding was done
completed
Rear Bumper
The rear bumper was pretty dead on too! the only problem was it was way too thick to fit the clips and etc. I sand it down and it work fine. Like the rest of the kit the holes will need to be drilled out. The holes on the front and rear bumper is different. You will need to drill a hole then drag down which is a little harder.
Pictures of holes that need to be drilled out.
stock
ait
Here is the picture of the part that really needs to be sand down to fit the clips
Here is other fitment pictures
OVERALL
I would say this kit is about 95% fitment. Drilling will need to be done unless AIT production kit will pre-drill it. Sanding will need to be done because some area are too thick. Some area will also have rough spots or wrinkle that need to be sanded down. I just used 300 fine grit sanding paper. Bondo will also need to be use for the low spot when sanding. I had to fill a few dimples on the rear bumper but that was about it.
Any shop will be able to do it with ease! You can also do it at home if you get off of work for two weeks like I did. It took a week before it was ready to paint. Two of days it rained.
Everyone saw my finish product already and the fitment was great.
PM me if you need to know anything else.
ONE MORE THING! AIT doesn't include it but I think this is a must! Go to Lowe's and buy some drain guard! cut it for the rear back piece like I did.
Last edited by jnguyen; Oct 7, 2009 at 02:26 PM.


Good job J,
Keep in mind guys that this was a pre production kit, and was made here in the US as a favor for me for some guys that was doing car shows this year. The production kit which is now ready should be more refined, less rough around the edges, and is made out of FRP,which is a little more flexible
Anyone want to jump on this let me know
thanks
Lou

Trending Topics
![]\[ /-\ ]\/['s Avatar](data:image/svg+xml;utf8,<svg xmlns='http://www.w3.org/2000/svg' viewBox='0 0 50 50'><circle class='avatar-circle-default' fill='%23de8a71' cx='25px' cy='25px' r='20px'></circle><text class='avatar-text-default' x='49%' y='53%' fill='white' text-anchor='middle' alignment-baseline='middle'>]</text></svg>)
But if you buy the AIT one, then you can keep your OEM one when you go back to stock.
Both are good options, just depends on what is best for you.

Thread
Thread Starter
Forum
Replies
Last Post
optikol
Private Classifieds
2
Jan 28, 2016 07:31 PM

