DIY: 2011 Non Sport Fogs on 2008-2010 Sport Bumper
 01-07-2012, 08:47 PM
#1

2011 Non Sport Fogs on 2008-2010 Sport Bumper
This is dedicated to P CASEY who started all this mess with the 2011 bumper swap,
then getting into the fog lights, which touched a nerve, because I always felt that they were missing.
So now Im going crazy trying to make this happen.
I hate you!!
Seriously P Casey sparked the idea, and researched part numbers that made me realize that it CAN work. PEACE
A great big shout out to Brad at orderinfinitiparts.com, for the advice, and prices.
I will be updating this through the next week as parts come in:
The wiring part will work for the IPL bumper swap with fogs too.
I am wiring it into a separate circuit triggered by the running lights.
Which means I dont need to have the headlights on to use these, only the running lights.
Since the running lights trigger the relay, and I have auto lights, theres no forgetting to turn them off.
I can also use them with the high beams on!!!
The switch allows me to not have them on at all.
First thing was to install a switch.
Daystar KU80011 20 Amp Blue Light Rocker Switch Kit
The switch fits perfectly in the blank next to the hood release.
The lower instrument panel just pulls off via clips.
Pop off the left finish panel first, then the 2 screws for the hood release, and 2 screws for the ALDL connector under the panel.
switch.jpg?t=1325285373
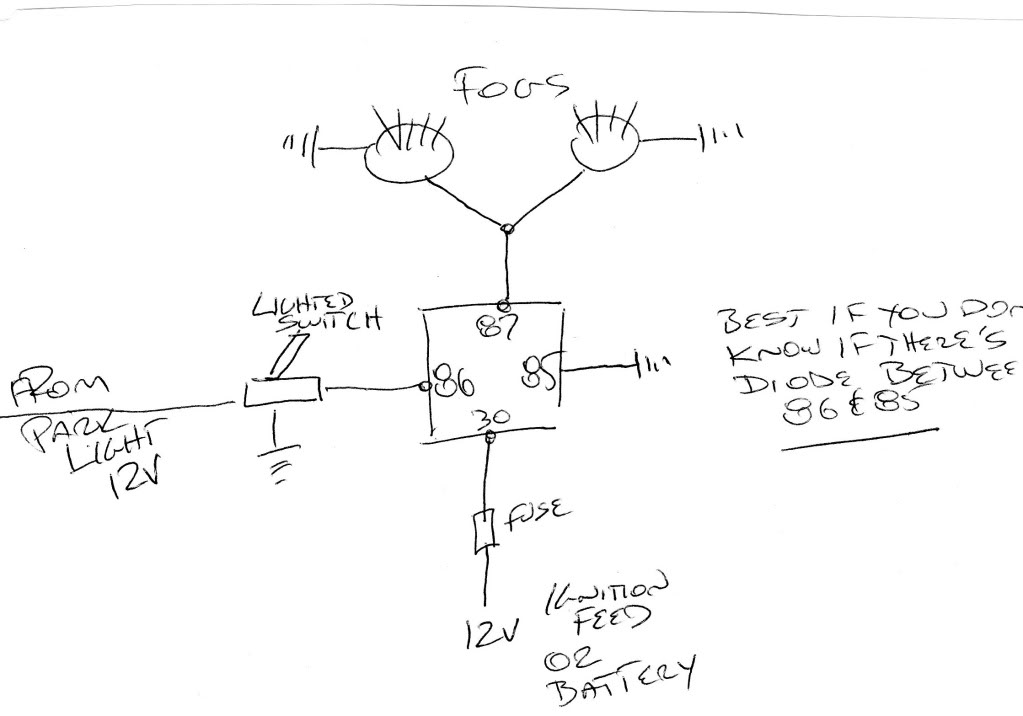
I chose to use a relay and isolate the circuit from the existing fogs.
There is a relay box in front of the passenger wheel well.
I dropped a standard 20/30A Bosch relay in an empty slot. Also bought a (Bosch Style) connector with pigtails.
Notice where the blue wire is? thats the harness for climate controlled seats.
We Coupe owners dont have that, only vert owners.
So they left the relay out. Im tapping 12V from that unused circuit, and its already fused.
So the Blue wire is 12V battery feed, the white wire is grounded on the fender well.
I tapped into the running light circuit to run a wire through the switch into the relay trigger circuit (Black wire)..
The yellow wire is ready to attach to my fog lights.
Relay:
http://www.parts-express.com/pe/show...number=330-070
Harness:
http://www.parts-express.com/pe/show...Number=330-075
The wiring diagram is below:
Im waiting for the mounting parts/bezels etc, from orderinfinitiparts.com/
This is the parts list for the 2011 G37 base model coupe (2008-2010 sport model bumper):
62256-1NX0A
62256-1NX0B
62256-1NX0C
62257-1NX0A
62257-1NX0B
62257-1NX0C
IMG_0104.jpg?t=1325986337
The 2011 Non Sport uses the same fog as the 2011 Sport, so I bought TYC OEM replacements, they are as good if not better than
the $190.00 per side OEMs for $48.00 per side. I compared them to my wifes EX35 fogs!!
I replaced the Osram OEM H11 bulbs with the PIAA H11 Yellow Ion Plasma 2500K bulbs, same as the PIAA Yellow H1s Im using in my upper fogs, in the existing lamp housing.
I also used the AC Delco PT120 weather tight connectors with pigtails.
IMG_0105.jpg?t=1325987909
Testing the wiring etc.
Here's the test with PIAA Plasma Ion Yellow 168 wedge running lights only,
Fogs using PIAA 2500K Plasma Ion Yellow H11s.
Headlights OFF OEM FOGS OFF
Here's the test with PIAA Plasma Ion Yellow 168 wedge running lights,
PIAA 2500K Plasma Ion Yellow H1 in the OEM fog position ,
Fogs using PIAA 2500K Plasma Ion Yellow H11s.
Headlights ON OEM FOGS ON

Parts arrived:
Fog bolts to bracket.
Bracket screws to 4 ears on "faux" vent with holes.
"Faux" vent installs the same way as the originals. 4 clips to the bumper, and 1 screw to lock it.
Chrome ring covers all.
IMG_0112.jpg?t=1326329588
Ill pull the bumper this Saturday!!
Meanwhile all bolted together:
Caution, the holes for the brackets use #10 sheet metal screws, but they feel loose,, I grabbed #12 X 1"
now theyre tight!
The fogs I used M6 X 15MM shouldered SS bolts.
Now all I need to do is remove the bumper, and these things will just pop in after removing the OEM faux vents.
New instructions:
The fogs need to be installed on piece at a time, not as an assembly.
The faux vent with the cut out goes on first, push in from behind till you hear all 4 ears click into place.
The fog bracket goes on next, you can have the fog bolted into the bracket.
Align and slide the bracket from behind the faux vent with hole, then install the 5 screws, the bracket will then fully
lock the pieces together. It will pinch the vent tabs to the ears on the bumper.
IMG_0117.jpg?t=1326337339
IMG_0114.jpg?t=1326337336
UPDATE....The bumper does NOT have to come off!!
All I had to do was jack up the front end, and remove the front fender liners.
The three washer bottle bolts can be removed from underneath, it was easier to install the slim one, as there was way more room!!
The slim washer bottle is the same fluid capacity as the original. How did they do that, you say??
Its longer!!
IMG_0121.jpg?t=1326489591
IMG_0123.jpg?t=1326489785
IMG_0119.jpg?t=1326489784
OK, project is a success!!
I will be spraying the chrome trim rings with Duplicolor Shadow this weekend.
PIAA 4000K H11 Halogens, nice match!!
IMG_0130.jpg?t=1326763054
More picture to come soon.
Plasti Dip??? What do you think??
IMG_0138.jpg?t=1327119228
ADDENDUM:
The TYC 19-5719-00 and 195720-00 fog lights work, but the fit within the ring is not perfect.
Yes, I am ****!!
I found out by cross referencing numbers with TYC's catalog that the
TYC 19-5915-00 and 19-5916-00 fit much better within the ring, on both the 2011 non-sport, and 2011 Aero bumper.
I just received them and fitted to my new 2011/2012 Aero Bumper.
.
License plate plugs installed:
Hillman 008236715958 domed plastic plugs from Lowes. Fits the existing holes.
Scotchbrite the plastic.
1 coat Duplicolor Adhesion Promoter (Clear Primer)
3 coats Duplicolor Perfect Match spray.
2 coats Duplicolor Clear Enamel.
.
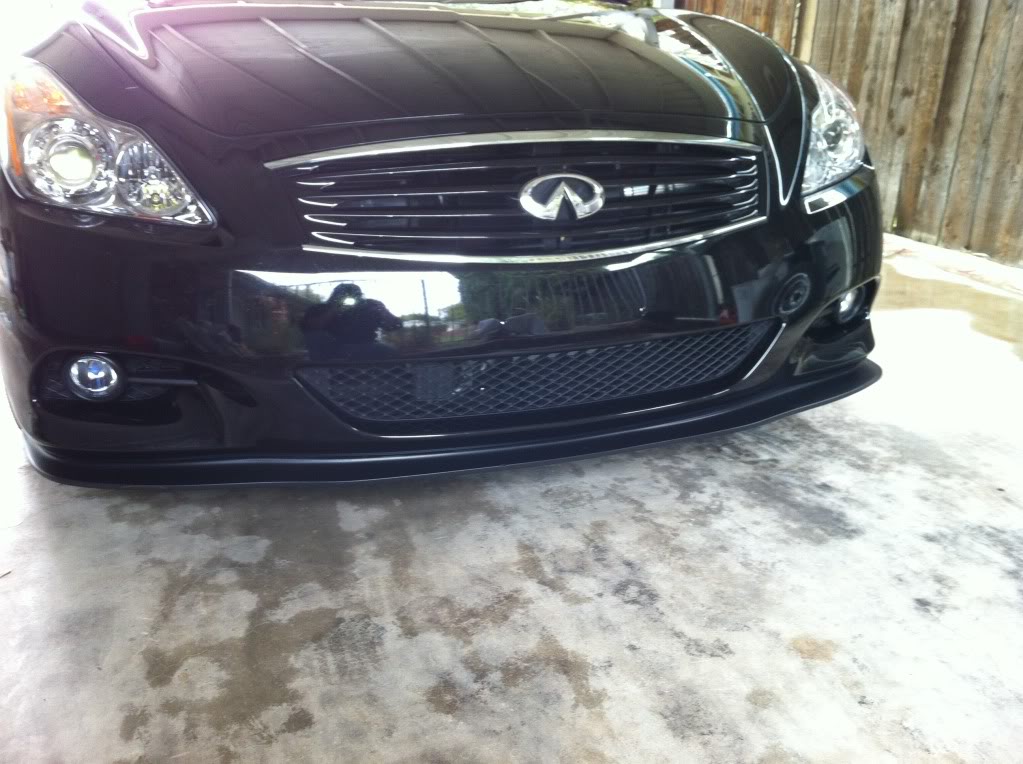
FINAL PICTURE
.
FINAL.jpg?t=1329683833
then getting into the fog lights, which touched a nerve, because I always felt that they were missing.
So now Im going crazy trying to make this happen.
I hate you!!
Seriously P Casey sparked the idea, and researched part numbers that made me realize that it CAN work. PEACE
A great big shout out to Brad at orderinfinitiparts.com, for the advice, and prices.
I will be updating this through the next week as parts come in:
The wiring part will work for the IPL bumper swap with fogs too.
I am wiring it into a separate circuit triggered by the running lights.
Which means I dont need to have the headlights on to use these, only the running lights.
Since the running lights trigger the relay, and I have auto lights, theres no forgetting to turn them off.
I can also use them with the high beams on!!!
The switch allows me to not have them on at all.
First thing was to install a switch.
Daystar KU80011 20 Amp Blue Light Rocker Switch Kit
The switch fits perfectly in the blank next to the hood release.
The lower instrument panel just pulls off via clips.
Pop off the left finish panel first, then the 2 screws for the hood release, and 2 screws for the ALDL connector under the panel.
switch.jpg?t=1325285373
I chose to use a relay and isolate the circuit from the existing fogs.
There is a relay box in front of the passenger wheel well.
I dropped a standard 20/30A Bosch relay in an empty slot. Also bought a (Bosch Style) connector with pigtails.
Notice where the blue wire is? thats the harness for climate controlled seats.
We Coupe owners dont have that, only vert owners.
So they left the relay out. Im tapping 12V from that unused circuit, and its already fused.
So the Blue wire is 12V battery feed, the white wire is grounded on the fender well.
I tapped into the running light circuit to run a wire through the switch into the relay trigger circuit (Black wire)..
The yellow wire is ready to attach to my fog lights.
Relay:
http://www.parts-express.com/pe/show...number=330-070
Harness:
http://www.parts-express.com/pe/show...Number=330-075
The wiring diagram is below:
Im waiting for the mounting parts/bezels etc, from orderinfinitiparts.com/
This is the parts list for the 2011 G37 base model coupe (2008-2010 sport model bumper):
62256-1NX0A
62256-1NX0B
62256-1NX0C
62257-1NX0A
62257-1NX0B
62257-1NX0C
IMG_0104.jpg?t=1325986337
The 2011 Non Sport uses the same fog as the 2011 Sport, so I bought TYC OEM replacements, they are as good if not better than
the $190.00 per side OEMs for $48.00 per side. I compared them to my wifes EX35 fogs!!
I replaced the Osram OEM H11 bulbs with the PIAA H11 Yellow Ion Plasma 2500K bulbs, same as the PIAA Yellow H1s Im using in my upper fogs, in the existing lamp housing.
I also used the AC Delco PT120 weather tight connectors with pigtails.
IMG_0105.jpg?t=1325987909
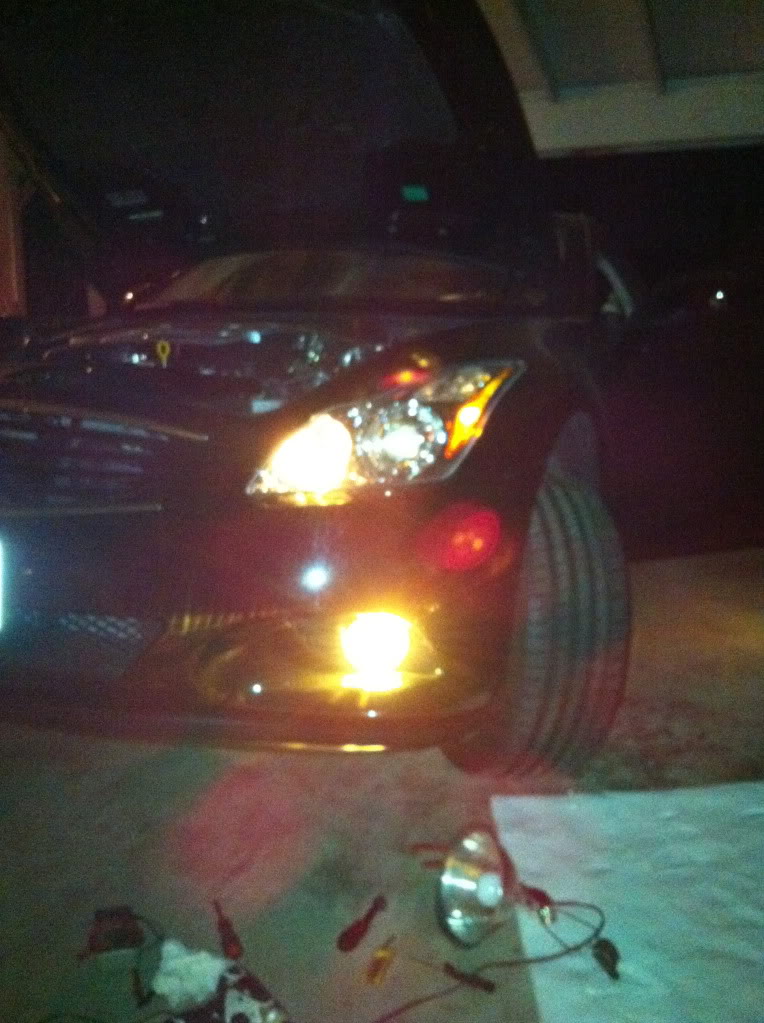
Testing the wiring etc.
Here's the test with PIAA Plasma Ion Yellow 168 wedge running lights only,
Fogs using PIAA 2500K Plasma Ion Yellow H11s.
Headlights OFF OEM FOGS OFF
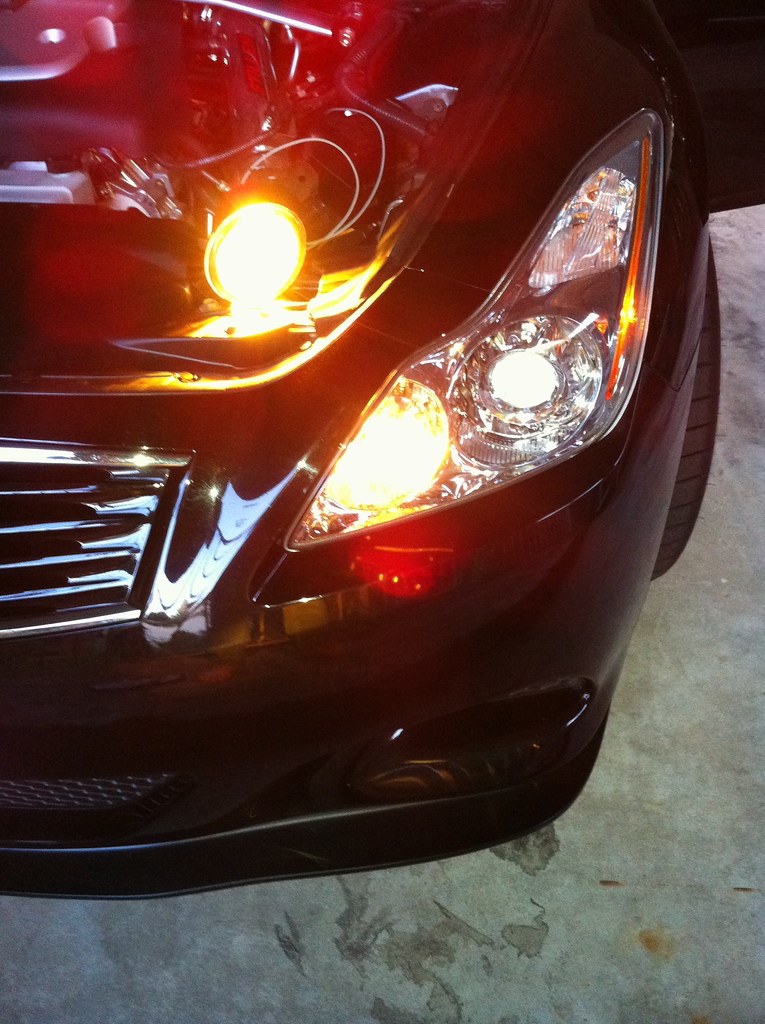
Here's the test with PIAA Plasma Ion Yellow 168 wedge running lights,
PIAA 2500K Plasma Ion Yellow H1 in the OEM fog position ,
Fogs using PIAA 2500K Plasma Ion Yellow H11s.
Headlights ON OEM FOGS ON
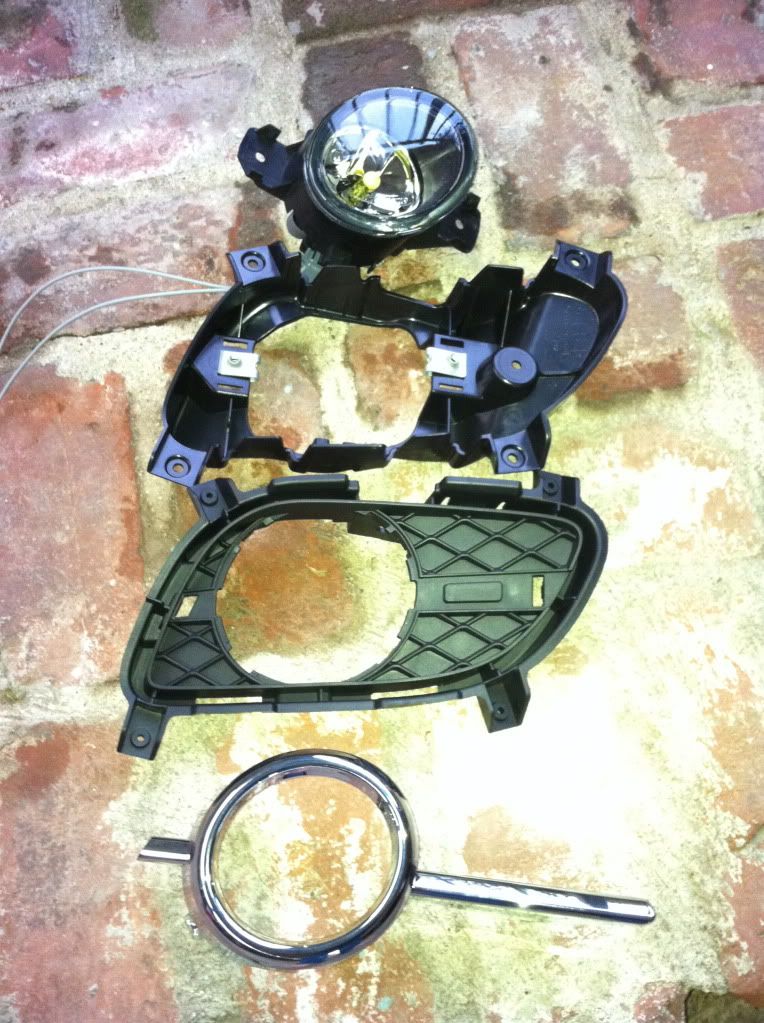
Parts arrived:
Fog bolts to bracket.
Bracket screws to 4 ears on "faux" vent with holes.
"Faux" vent installs the same way as the originals. 4 clips to the bumper, and 1 screw to lock it.
Chrome ring covers all.
IMG_0112.jpg?t=1326329588
Ill pull the bumper this Saturday!!
Meanwhile all bolted together:
Caution, the holes for the brackets use #10 sheet metal screws, but they feel loose,, I grabbed #12 X 1"
now theyre tight!
The fogs I used M6 X 15MM shouldered SS bolts.
Now all I need to do is remove the bumper, and these things will just pop in after removing the OEM faux vents.
New instructions:
The fogs need to be installed on piece at a time, not as an assembly.
The faux vent with the cut out goes on first, push in from behind till you hear all 4 ears click into place.
The fog bracket goes on next, you can have the fog bolted into the bracket.
Align and slide the bracket from behind the faux vent with hole, then install the 5 screws, the bracket will then fully
lock the pieces together. It will pinch the vent tabs to the ears on the bumper.
IMG_0117.jpg?t=1326337339
IMG_0114.jpg?t=1326337336
UPDATE....The bumper does NOT have to come off!!
All I had to do was jack up the front end, and remove the front fender liners.
The three washer bottle bolts can be removed from underneath, it was easier to install the slim one, as there was way more room!!
The slim washer bottle is the same fluid capacity as the original. How did they do that, you say??
Its longer!!
IMG_0121.jpg?t=1326489591
IMG_0123.jpg?t=1326489785
IMG_0119.jpg?t=1326489784
OK, project is a success!!
I will be spraying the chrome trim rings with Duplicolor Shadow this weekend.
PIAA 4000K H11 Halogens, nice match!!
IMG_0130.jpg?t=1326763054
More picture to come soon.
Plasti Dip??? What do you think??
IMG_0138.jpg?t=1327119228
ADDENDUM:
The TYC 19-5719-00 and 195720-00 fog lights work, but the fit within the ring is not perfect.
Yes, I am ****!!
I found out by cross referencing numbers with TYC's catalog that the
TYC 19-5915-00 and 19-5916-00 fit much better within the ring, on both the 2011 non-sport, and 2011 Aero bumper.
I just received them and fitted to my new 2011/2012 Aero Bumper.
.
License plate plugs installed:
Hillman 008236715958 domed plastic plugs from Lowes. Fits the existing holes.
Scotchbrite the plastic.
1 coat Duplicolor Adhesion Promoter (Clear Primer)
3 coats Duplicolor Perfect Match spray.
2 coats Duplicolor Clear Enamel.
.
FINAL PICTURE
.
FINAL.jpg?t=1329683833
Last edited by TVPostSound; 04-27-2012 at 05:32 PM.


 01-08-2012, 07:22 PM
#4
Not IPL.
The brackets, bezels, and trim will arrive Tuesday.
Yes, the brackets will mount where the "faux" vents are now, then bezels with holes will fill the area, then those gawd awful chrome trim things.
This is the parts list for the 2011 G37 base model coupe (2008-2010 sport model bumper):
62256-1NX0A
62256-1NX0B
62256-1NX0C
62257-1NX0A
62257-1NX0B
62257-1NX0C
These are the inner bezel brackets, outer grille bezels, and the chrome trim ring to finish off hole for the fog lamp.
This is what it will look like:
This is not mine, but someone elses 2011 non-sport.
 01-08-2012, 08:53 PM
#5
I get that much but from what I understand the fog lights bracket is build into the bumper, not the faux vents......if they are on the faux vents then i'm ordering my set up as soon as receive yours and verified.
01-08-2012, 09:04 PM
#6
The "brackets" will take the place of the now existing "faux" vents, mount from the inside to the bumper. Then you bolt the fogs from the outside to the brackets.
Then comes the bezels which look like the old "faux" vents with holes that mount over the fogs, then come the chrome trim, because the fog lamp lenses are angled, and stick out.
I will get them Wednesday, and take a pic.
The following users liked this post:
monytx (09-16-2014)

Trending Topics

 01-10-2012, 09:25 AM
#10

Thanks for the the great information! I'm a little confused on what you mean by tapping into the city light wire. Do you mean you spliced into that 12V signal so your fog lights will only come on when the city lights are on?
Last edited by thejumpoff; 01-10-2012 at 09:37 AM.
01-10-2012, 10:40 AM
#13
Relay:
12 VDC Tyco 5-Pin Relay SPDT 20/30A (Formerly Bosch) 330-070
Harness:
12 VDC 5-Pin Relay Socket For Bosch Type Relay 330-075
01-10-2012, 01:23 PM
#15
Another reason, is that the relay only draws 250mA from the running lamps to energize.
The current for the fogs themselves come from an empty fused circuit.
If you were to tap directly into the fog lamp circuit, you would draw 10 amps, from a circuit that is already drawing 10 amps, for a total of 20 amps.
Thats too much for a circuit made for 15 amps.
PS, to all others. This is MY DIY, MY OPINIONS we dont need comments on how you tapped into the fog circuit and it works fine!!
 Thank You in advance.