My Progress Thread - 2013 G37xS Coupe


The following users liked this post:
dwb993 (03-30-2017)
 05-25-2016, 03:22 PM
#62


Feel free to post up pics of the turtle when you get the chance!
The following users liked this post:
dwb993 (03-30-2017)

The following users liked this post:
dwb993 (03-30-2017)
05-25-2016, 05:41 PM
#64
Premier Member

Thread Starter

Thanks Venom. I found your "Deals" thread and saw a couple of them there, along with IPL wheels which I also like. Gotta sell the Acura first!
05-27-2016, 11:27 AM
#65
Premier Member
Thread Starter
Turtle pics taken from the 8th floor balcony of our hotel. This is a Kemp's Ridley Sea Turtle (https://en.wikipedia.org/wiki/Kemp's_ridley_sea_turtle) which is the rarest of all sea turtles in the Florida area with fewer than 1000 animals estimated to be living.
While there seems to be a bunch of people around the turtle, most of them were from the Florida Conservation group charged with protecting the turtle population. Because this particular species is so rare, almost all of the conservation folks came to our beach to see this one.
She spent a total of about 3 hours on the beach nesting. Once she was on her way back to the sea, they measured and weighed her and got a blood sample. Then they cordoned off the nest, marking it with caution tape and recording the exact GPS coordinates. I am hoping the hotel posts updates on their website when the hatchlings emerge, about 90 days or so from laying.


 06-20-2016, 11:23 AM
#66
Premier Member
Thread Starter
Last weekend, I replaced the fluids in my differentials and transfer case. Car is at almost 30K miles. I had to purchase a 10mm hex socket to get the fill/drain caps off. Replaced with LE1605 (diff) and Redline D4 (xfer). Was an easy job and I am happy with the results.
07-11-2016, 10:19 AM
#67
Premier Member
Thread Starter
Update on Parts
I have a couple of updates to my already installed parts:
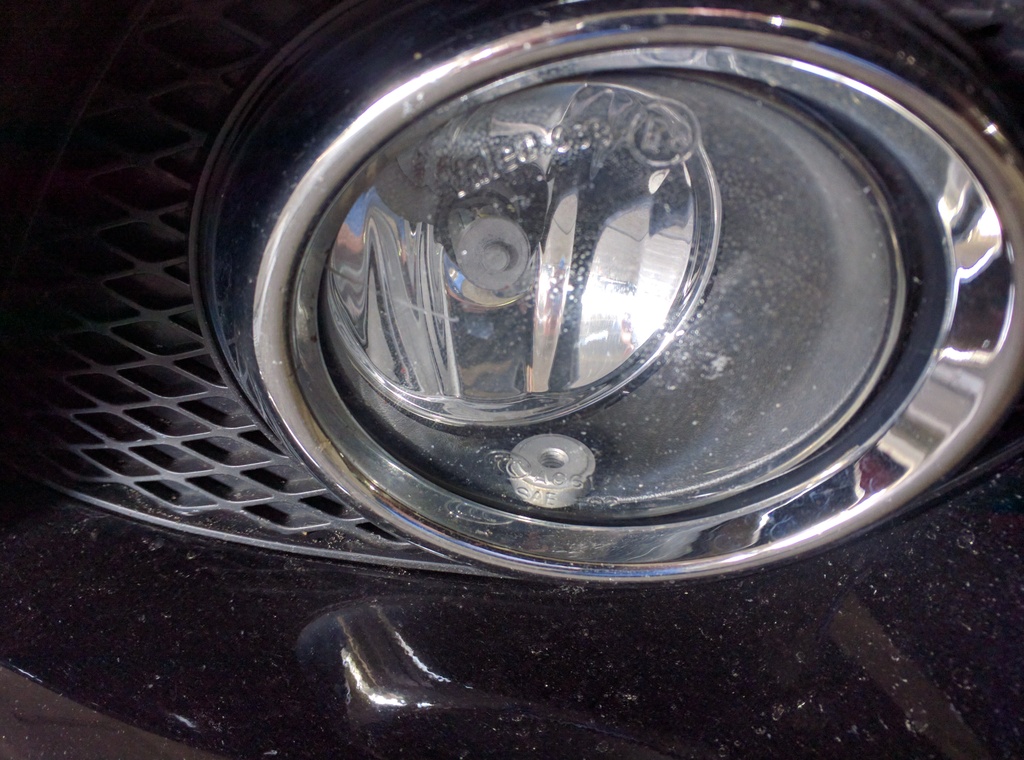
1) The DD LED foglights have a metal cap on the bulbs. I have one unit where the cap came off of the bulb and is sitting in the foglight housing. Of course, its the passenger side, so it will be a bitch to remove and re-install. FML Diode Dynamics says to fish out the piece and use some threadlock when re-installing.
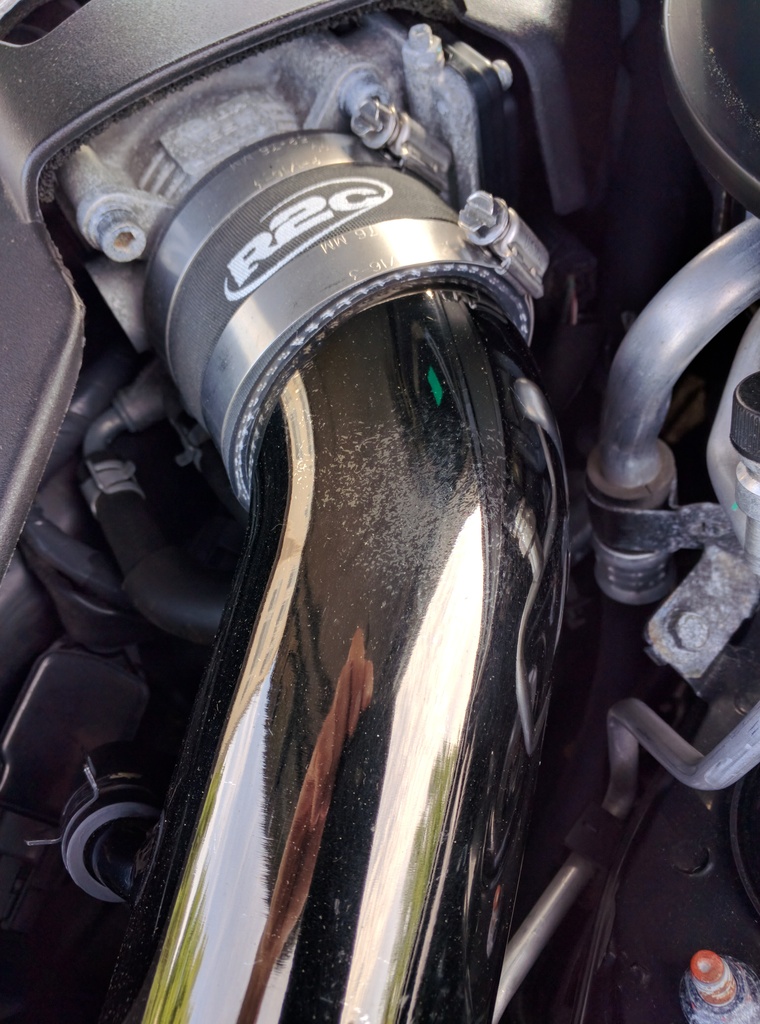
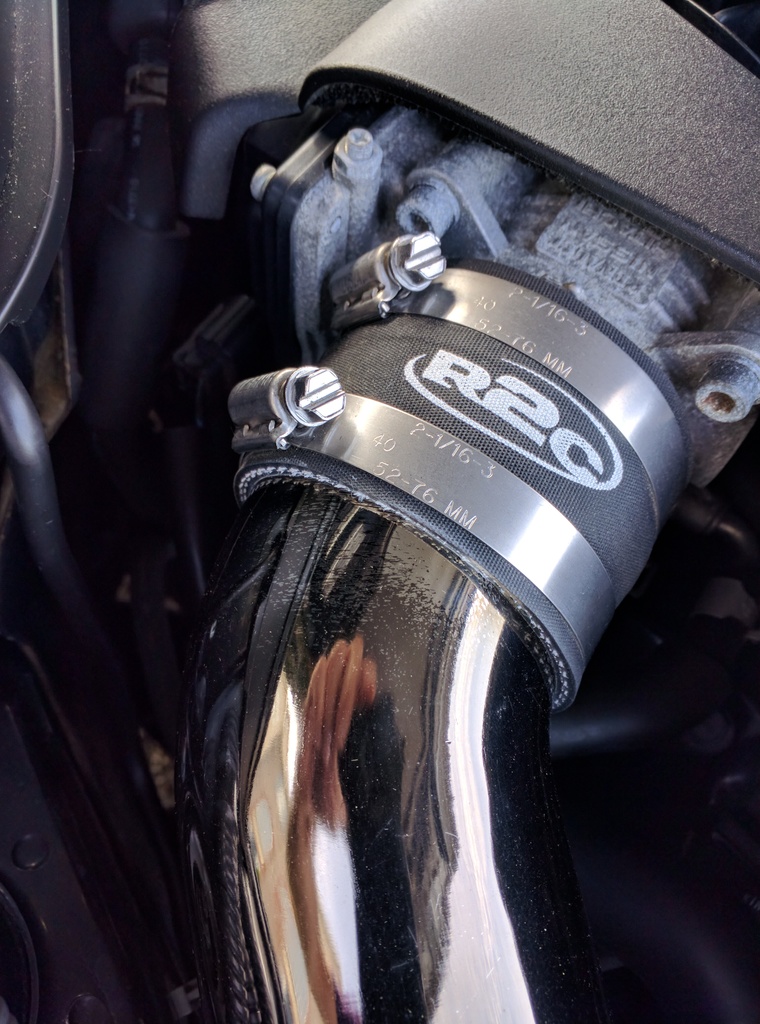
2) The finish on my R2C intake tubes has become discolored or something. I emailed my vendor (On this site, but I will not identify them right now---I want to wait until all is resolved) who emailed R2C. After a couple weeks, I got an email back saying R2C was going to replace the tubes! I was told it would take about a week for them to ship the new tubes and I will have to return my defective ones for them inspect. Good news! I hope it all pans out.
1) The DD LED foglights have a metal cap on the bulbs. I have one unit where the cap came off of the bulb and is sitting in the foglight housing. Of course, its the passenger side, so it will be a bitch to remove and re-install. FML Diode Dynamics says to fish out the piece and use some threadlock when re-installing.

2) The finish on my R2C intake tubes has become discolored or something. I emailed my vendor (On this site, but I will not identify them right now---I want to wait until all is resolved) who emailed R2C. After a couple weeks, I got an email back saying R2C was going to replace the tubes! I was told it would take about a week for them to ship the new tubes and I will have to return my defective ones for them inspect. Good news! I hope it all pans out.


Last edited by dwb993; 07-11-2016 at 11:46 AM.
07-11-2016, 11:36 AM
#68
Premier Member
Thread Starter
Subwoofer Install
I really am impressed by the Bose Audio in the G Coupe. 2 big 10" woofers in the doors and the Drivers Stage Audio make for a nice clean sounding system that can jam when the volume is turned up. Laurie looked at me like I was crazy when I mentioned it was missing something---"This is the best sounding car I've ever been in!". That may be true, but I could tell the system needed some more "AZZ".
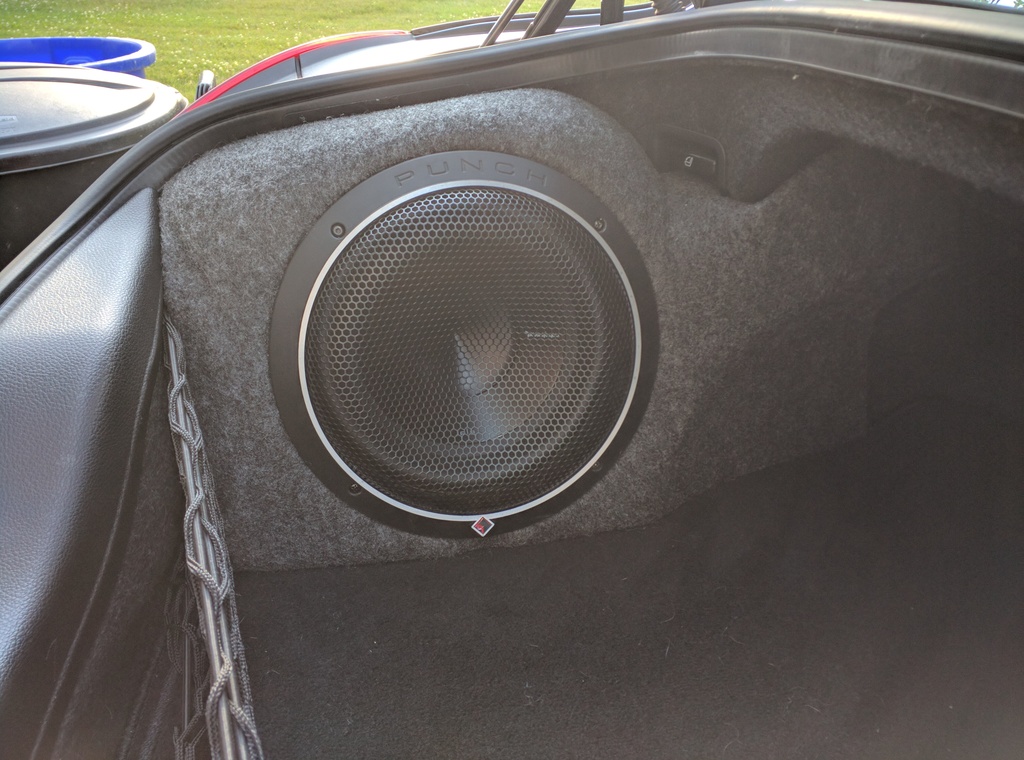
I had a custom 10" subwoofer box in the TL that sat on the driver's side trunk. I purchased a Rockford Fosgate P3D2-10 subwoofer and it really thumped. It sounded great paired with an Alpine MR500 and I did not have to sacrifice my trunk to a huge box.
I cannibalized the subwoofer from that box and was able to locate a used 4080 box from MyG37.com Classifieds. The old Alpine amp had long since died, so I bought a Rockford Fosgate R500X1D 500W amplifier + wiring kit for less than $150 on Amazon. https://www.amazon.com/gp/product/B0...?ie=UTF8&psc=1
On to the install:
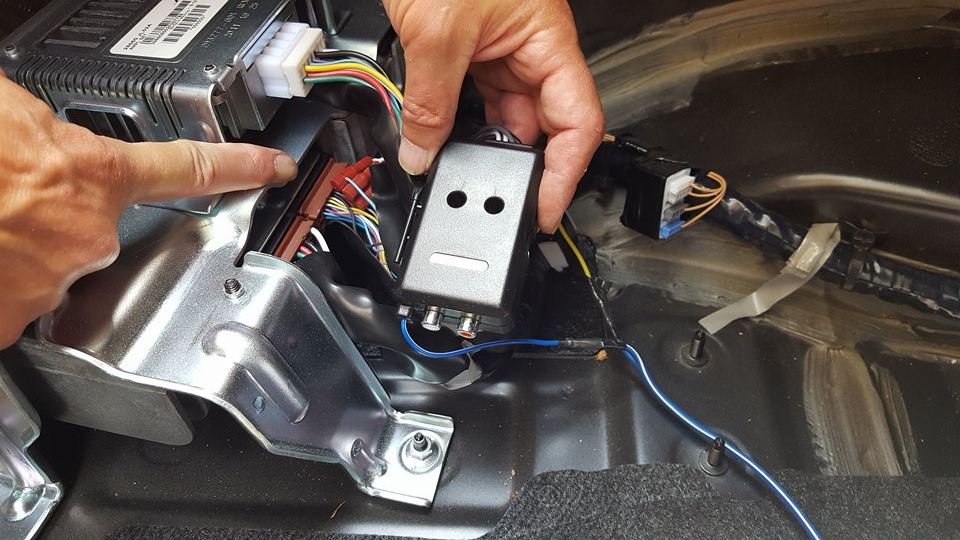
I spent quite a bit of effort researching wiring. While I love MyG37, finding a correct wiring diagram and instructions specific to my 2013 Coupe with Bose and Navigation was a bit daunting. I finally was able to find a single post in one of the many threads I went through that explained it all. I do not recall the member's name who posted it, but many thanks to you. Here is his post:
UPDATE: I noticed the sub was not hitting like it should, even with the gains turned up high on the amp. I expected 300 watts from the amp, but it was not "getting it" like it should. More research on myg37 found a thread where the OP had the same problem. Turned out it was the LOC robbing signal. I removed mine and the sub is MUCH better now.
Bottom line, do not use a LOC when wiring to the low level signals.
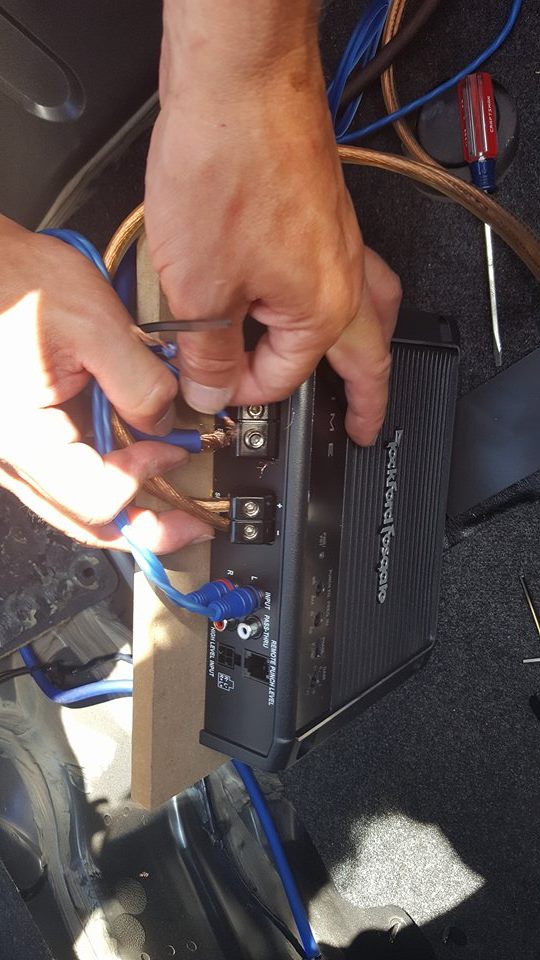
Here is the Scoche unit tapped into the signal wires:
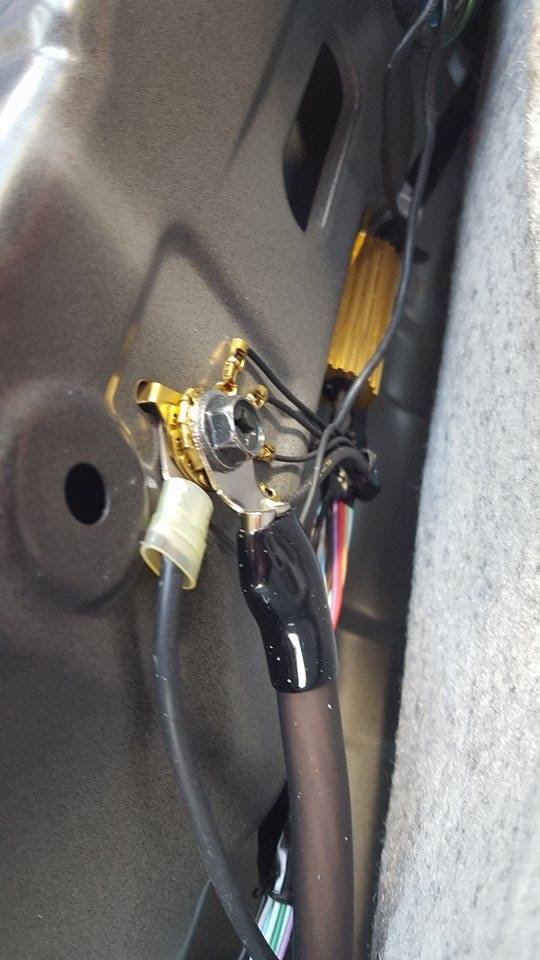
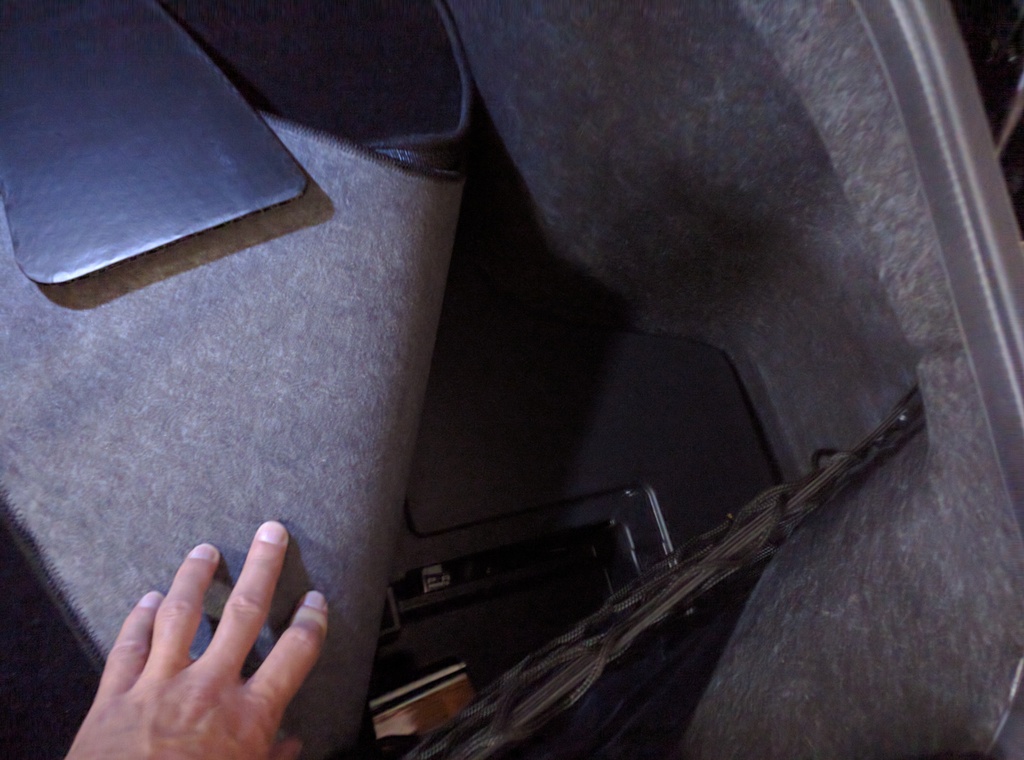
Because I wanted to install the amp under the trunk tray plastics, I chose a different ground than mentioned in the post above. I used the OEM ground at the rear of the trunk:
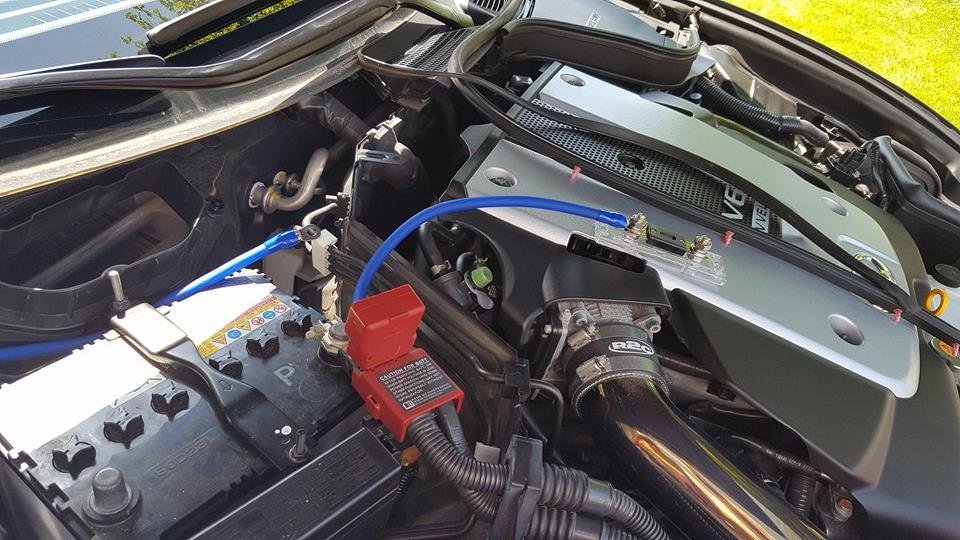
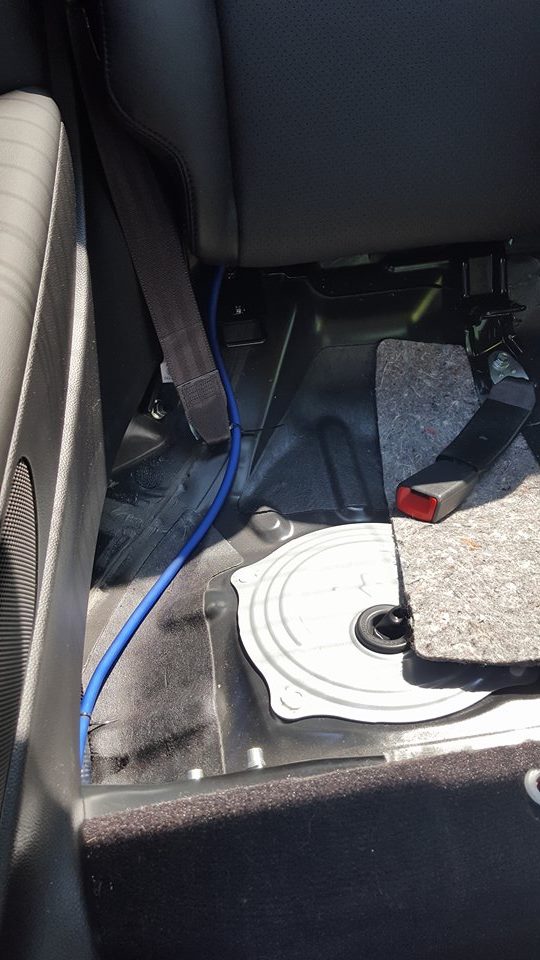
Then I ran the power line from the battery. Use a razor blade to make a slit in the rubber wiring grommet located behind the battery on the firewall. Feed the line through and grab it up behind the glove compartment (its not difficult to find). Apply silicone sealant to the cut grommet to seal it up. Pull up the passenger side sill plastics and remove the lower back seat (just pull straight up and it comes out). Run the line into the trunk.

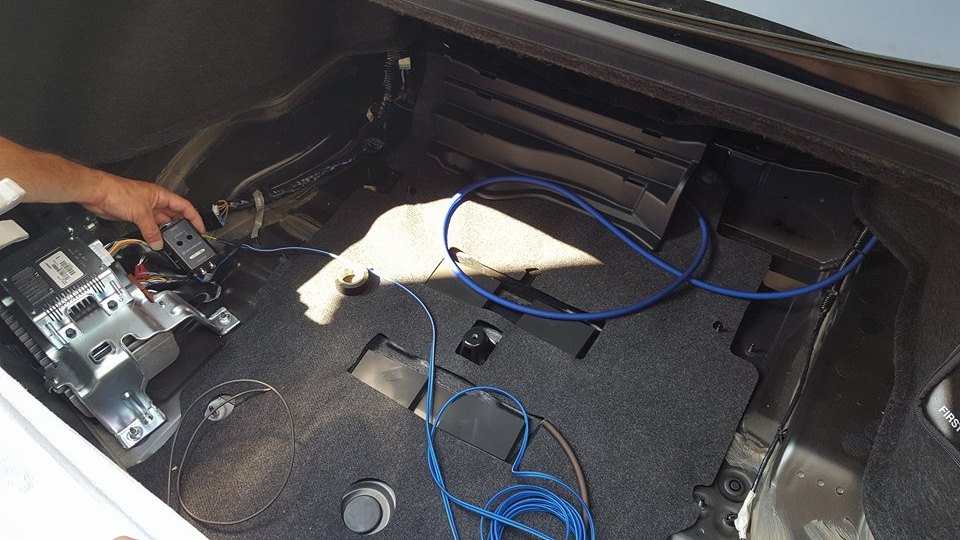
I purchased some MDF to mount the amp to. Wired it all up:
...and placed it under the tray plastics. I can still get to the amp settings through the pass through, but I will likely go back in and turn the unit around for better access.
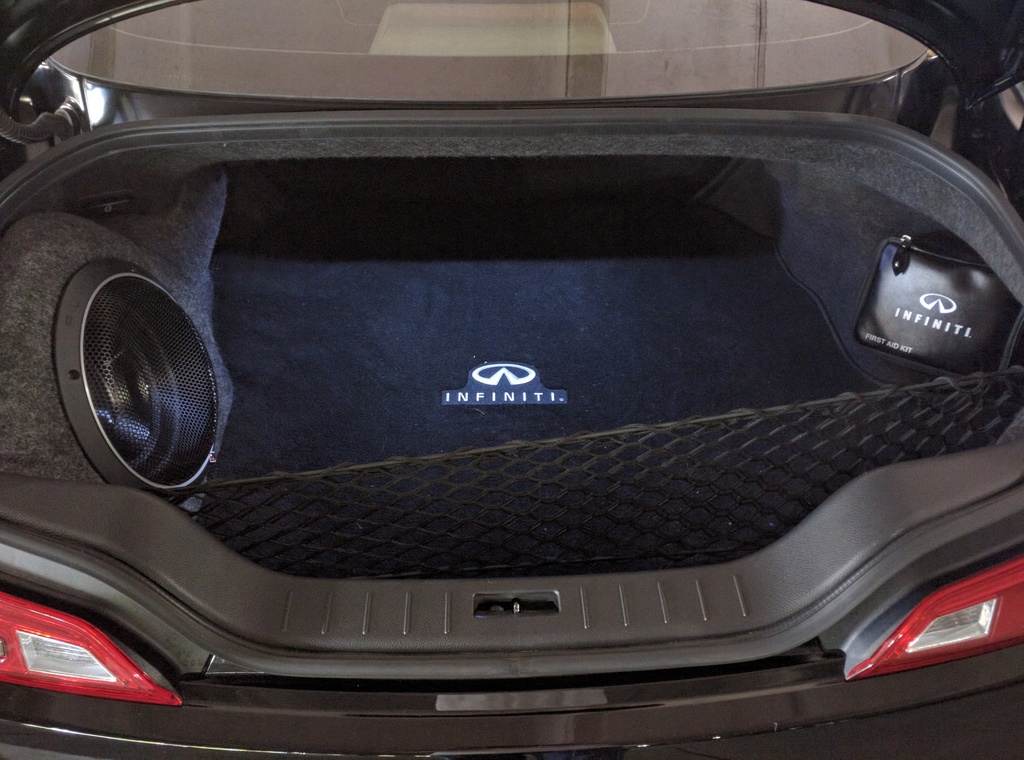
Completely stealthy:
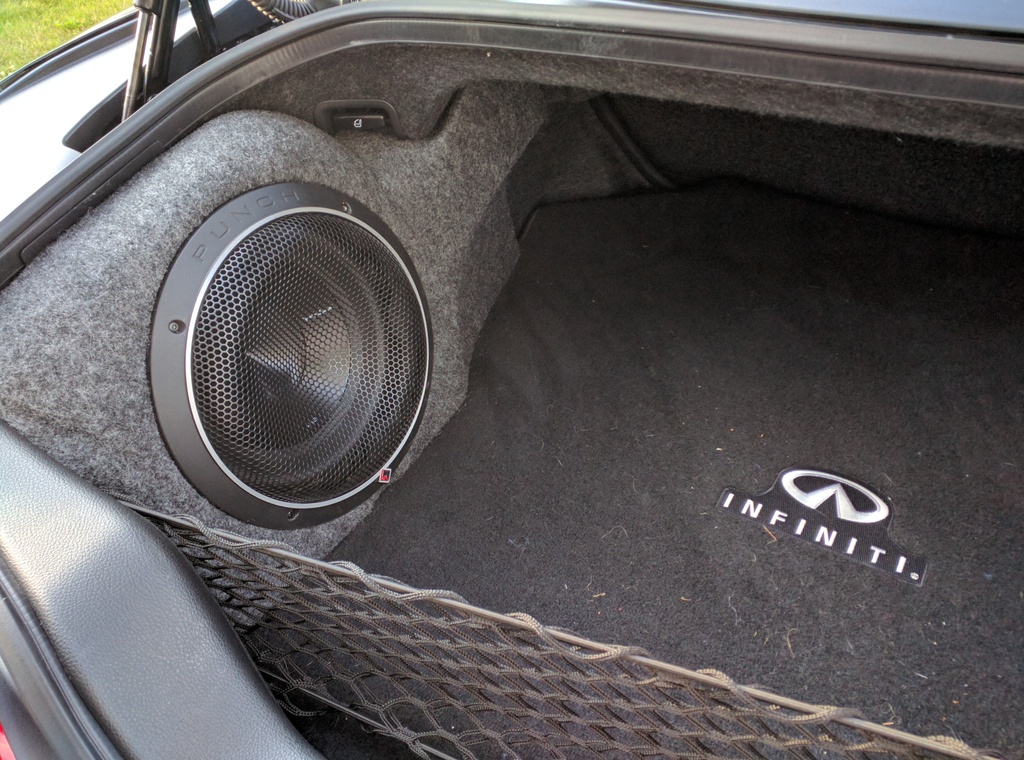
In my opinion, a 10" subwoofer on 300-500W power is all that is needed to give the OEM system the low end oomph it needs. I highly recommend everyone consider just throwing a subwoofer into the mix and calling it a day. Sure, the sub box was on the expensive side, but any customized box will cost more $$$. If you are willing to sacrifice some more trunk space, this could be done on the cheap.
I had a custom 10" subwoofer box in the TL that sat on the driver's side trunk. I purchased a Rockford Fosgate P3D2-10 subwoofer and it really thumped. It sounded great paired with an Alpine MR500 and I did not have to sacrifice my trunk to a huge box.
I cannibalized the subwoofer from that box and was able to locate a used 4080 box from MyG37.com Classifieds. The old Alpine amp had long since died, so I bought a Rockford Fosgate R500X1D 500W amplifier + wiring kit for less than $150 on Amazon. https://www.amazon.com/gp/product/B0...?ie=UTF8&psc=1
On to the install:
I spent quite a bit of effort researching wiring. While I love MyG37, finding a correct wiring diagram and instructions specific to my 2013 Coupe with Bose and Navigation was a bit daunting. I finally was able to find a single post in one of the many threads I went through that explained it all. I do not recall the member's name who posted it, but many thanks to you. Here is his post:
Let me make it simple for ya, I went through the same thing!
1. Locate the stock amplifier, which is under the plastic near the spare tire to the left side.
2. Tap into wires 23-26 with an RCA (cut one sides plugs off). What I did was is took some extra remote wire, soldered it onto the rca's 4 wires, then tapped that in so I had more slack to work with. I used quick connectors.
3. Tap in to wire 22, its the one right beside the sky blue rear speaker wire, with your remote wiring.
4. Put everything back in place and run the wires through and out on to the carpet.
*Note* If you want a fool proof 12v signal buy this PAC TR-4 (tr4) - Trigger Modules - Sonic Electronix (<--I did not need this part)
Connect the remote wire you just ran to the input. The rest go in the amp (ground, power, and the output goes in the remote on slot)
5. Now you need a ground. Pull up the rear seat cushion and look in the left corner for a bracket held down by 2 bolts. Remove both of them and pull the bracket up. Now attach the ring terminal UNDER the metal piece, to the bolt that is closest to the trunk. This gives you a fool proof ground, almost equivalent to a self tapping screw because you are making direct contact with the chassis.
6. Run this wire into the trunk and bam you now have a solid ground lead.
7. Now you need power, All you must do is remove the trim around the battery until the grommet is exposed. Take some scissors and cut a hole to run the power wire through, and feed it into the cabin. Seal this up with silicone.
8. Remove the trim piece inside, everything should pull right out. Theres one plastic bolt you can twist off with your hands to allow you to pull the carpet up, and from there run the wire to the trunk.
9. There hook everything up to the amp and enjoy!
Note due to confusion let me make all this clear:
1. The stock turn on voltage is 10v, thus the pac tr-4 provides a 12v out to power on any amp you want to install.
2. Wires 8&9 are high level and need to either be processed to low level by either a LOC or the amp itself. I would not recommend using these are they are processed signals that have the potential to sound distorted or even clip. Wires 23-26 are low level, and as long as you match up all the wires correctly (Left, right, positive, negative), you will be alright.
He mentions 2 different wiring options---low level and high level. I opted to use the low level method. I purchased a LOC from Walmart by Scoche and began making my connections. I read about the mini Posi-Taps on this site and wow, what a great product: much smaller than 3M Wiretaps and much easier to work with. I got them here: Posi Tap 20 22 AWG Mini Wire Tap Red Quick Reusable Reliable PTA2022MINI | eBay1. Locate the stock amplifier, which is under the plastic near the spare tire to the left side.
2. Tap into wires 23-26 with an RCA (cut one sides plugs off). What I did was is took some extra remote wire, soldered it onto the rca's 4 wires, then tapped that in so I had more slack to work with. I used quick connectors.
3. Tap in to wire 22, its the one right beside the sky blue rear speaker wire, with your remote wiring.
4. Put everything back in place and run the wires through and out on to the carpet.
*Note* If you want a fool proof 12v signal buy this PAC TR-4 (tr4) - Trigger Modules - Sonic Electronix (<--I did not need this part)
Connect the remote wire you just ran to the input. The rest go in the amp (ground, power, and the output goes in the remote on slot)
5. Now you need a ground. Pull up the rear seat cushion and look in the left corner for a bracket held down by 2 bolts. Remove both of them and pull the bracket up. Now attach the ring terminal UNDER the metal piece, to the bolt that is closest to the trunk. This gives you a fool proof ground, almost equivalent to a self tapping screw because you are making direct contact with the chassis.
6. Run this wire into the trunk and bam you now have a solid ground lead.
7. Now you need power, All you must do is remove the trim around the battery until the grommet is exposed. Take some scissors and cut a hole to run the power wire through, and feed it into the cabin. Seal this up with silicone.
8. Remove the trim piece inside, everything should pull right out. Theres one plastic bolt you can twist off with your hands to allow you to pull the carpet up, and from there run the wire to the trunk.
9. There hook everything up to the amp and enjoy!
Note due to confusion let me make all this clear:
1. The stock turn on voltage is 10v, thus the pac tr-4 provides a 12v out to power on any amp you want to install.
2. Wires 8&9 are high level and need to either be processed to low level by either a LOC or the amp itself. I would not recommend using these are they are processed signals that have the potential to sound distorted or even clip. Wires 23-26 are low level, and as long as you match up all the wires correctly (Left, right, positive, negative), you will be alright.
UPDATE: I noticed the sub was not hitting like it should, even with the gains turned up high on the amp. I expected 300 watts from the amp, but it was not "getting it" like it should. More research on myg37 found a thread where the OP had the same problem. Turned out it was the LOC robbing signal. I removed mine and the sub is MUCH better now.
Bottom line, do not use a LOC when wiring to the low level signals.
Here is the Scoche unit tapped into the signal wires:

Because I wanted to install the amp under the trunk tray plastics, I chose a different ground than mentioned in the post above. I used the OEM ground at the rear of the trunk:

Then I ran the power line from the battery. Use a razor blade to make a slit in the rubber wiring grommet located behind the battery on the firewall. Feed the line through and grab it up behind the glove compartment (its not difficult to find). Apply silicone sealant to the cut grommet to seal it up. Pull up the passenger side sill plastics and remove the lower back seat (just pull straight up and it comes out). Run the line into the trunk.


I purchased some MDF to mount the amp to. Wired it all up:

...and placed it under the tray plastics. I can still get to the amp settings through the pass through, but I will likely go back in and turn the unit around for better access.

Completely stealthy:


In my opinion, a 10" subwoofer on 300-500W power is all that is needed to give the OEM system the low end oomph it needs. I highly recommend everyone consider just throwing a subwoofer into the mix and calling it a day. Sure, the sub box was on the expensive side, but any customized box will cost more $$$. If you are willing to sacrifice some more trunk space, this could be done on the cheap.
Last edited by dwb993; 11-14-2016 at 09:57 AM.

The following users liked this post:
dwb993 (07-12-2016)
07-14-2016, 06:48 PM
#70
Premier Member
Thread Starter
I noticed the sub was not hitting like it should, even with the gains turned up high on the amp. I expected 300 watts from the amp, but it was not "getting it" like it should. More research on myg37 found a thread where the OP had the same problem. Turned out it was the LOC robbing signal. I removed mine and the sub is MUCH better now.
Bottom line, do not use a LOC when wiring to the low level signals.
Bottom line, do not use a LOC when wiring to the low level signals.
07-14-2016, 07:00 PM
#72
Registered Member

Nice clean install! I've contemplated adding a sub to the mix but not sure about placement. I've been thinking about making a custom fiberglass enclosure in the trunk floor as I have some other things I want hidden away while maintaining as much trunk space as I can.
Curious if you needed sound deadening in the trunk or license plate? One of my big pet peeves is the car stereo rattle. My plate still has dynamat from a few car stereo installs ago. lol
Also agree with Kenny ^^ keep us posted about the R2C's, I'm giving serious thought about intake set up and by far those are the nicest looking (provided the pipes don't discolor), hopefully they take care of you and it was just a fluke.
07-14-2016, 07:34 PM
#73
Premier Member
Thread Starter
Thanks guys.
My initial rattle test found the license plate needs something. But the real offenders are the mirrors and door handles! REALLY bad! I have to do some research before I try any remediation.
My initial rattle test found the license plate needs something. But the real offenders are the mirrors and door handles! REALLY bad! I have to do some research before I try any remediation.
07-14-2016, 07:51 PM
#74
Registered Member
On a related note if you want to solve the plate without going full dynamat you can buy waterproof repair tape used for roofing/flashing repair. Its same concept but much cheaper. It has some smell to it but for a license plate or small places would be easy. I've actually done a whole trunk in it in the past without issue. That said for the G I'll go all Dynamat.
FYI: USEAL USA Band 6 in. Aluminum Foil Self-Adhesive Repair Tape-8872AF6 - The Home Depot
07-19-2016, 09:58 AM
#75
Premier Member
Thread Starter
Grounding Kit
I purchased a Black Betty Grounding Kit from another member and installed it today:
(please forgive the dirty R2C pipes---they should be getting replaced soon)
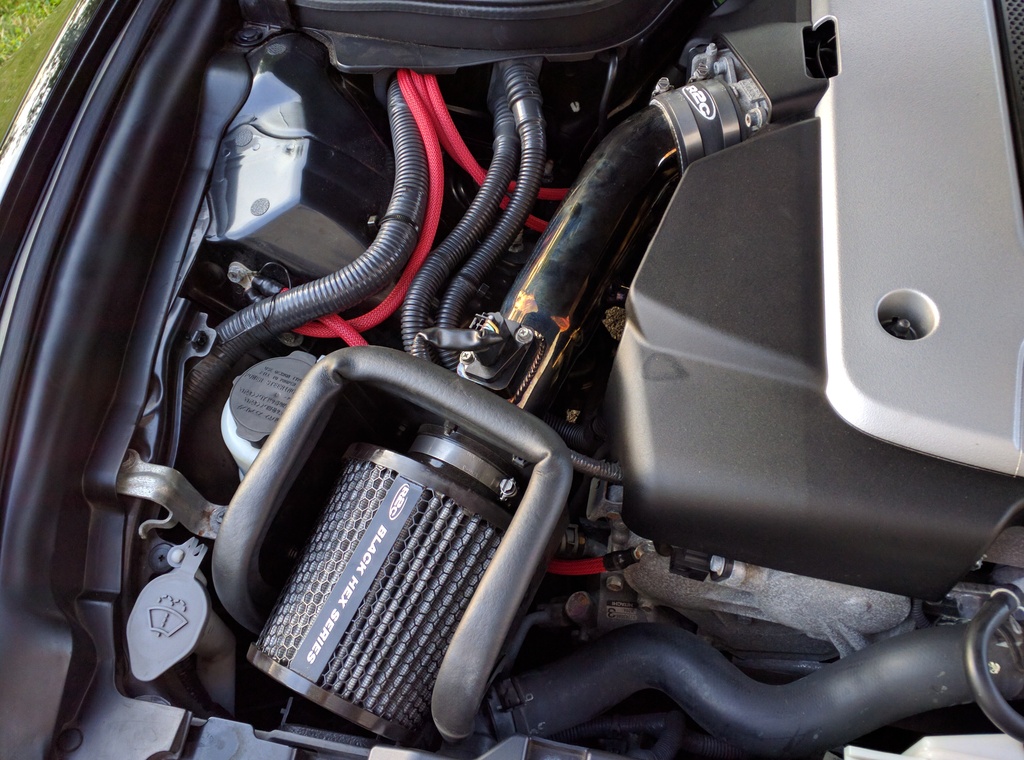
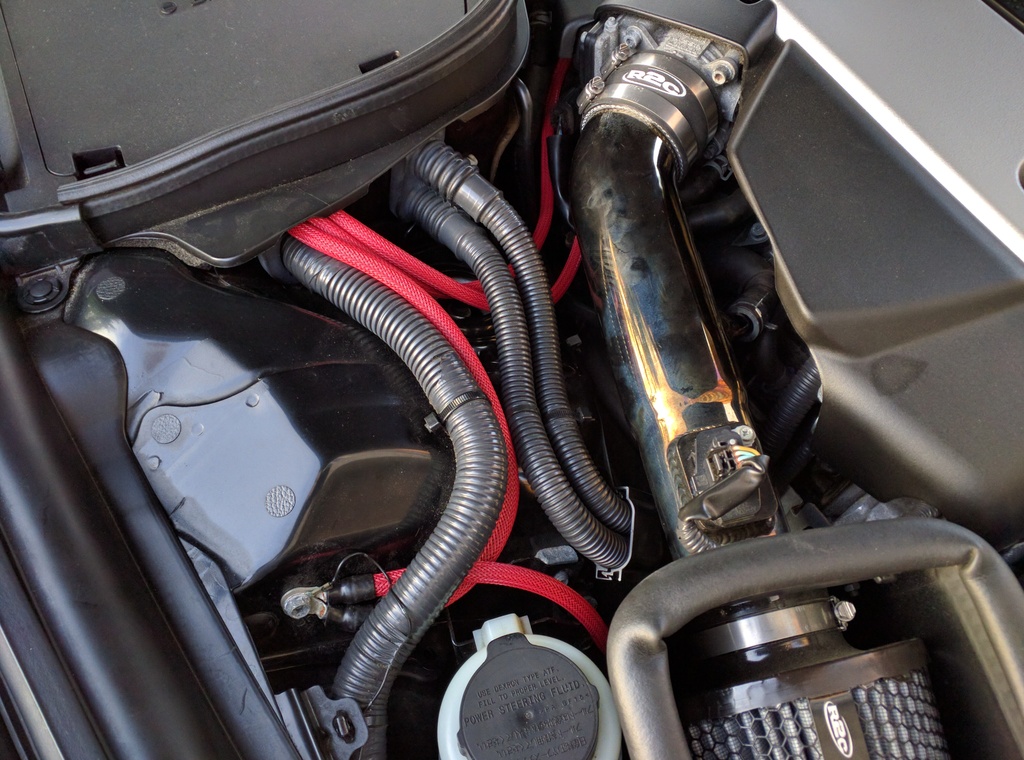
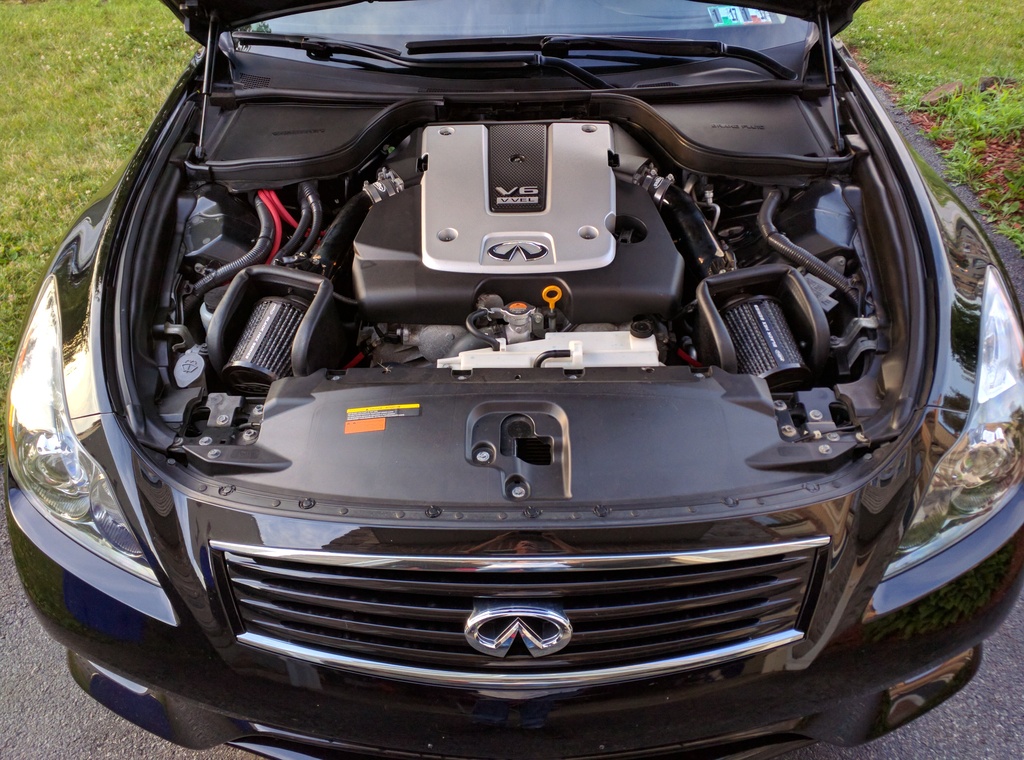
Was an easy install---the hex screws on the TBs were a PITA.
Impressions:
I feel the car is smoother now. I can't really explain, but everything just seems to happening a hair faster and smoother---upshifts, downshifts, throttle response. A lot can be attributed to the ECU reset that occurs when you disconnect the battery. We shall see how it performs as the ECU re-learns.
It looks really nice---BB did a fantastic job assembling these. Its a shame he no longer makes them.
(please forgive the dirty R2C pipes---they should be getting replaced soon)


Was an easy install---the hex screws on the TBs were a PITA.
Impressions:
I feel the car is smoother now. I can't really explain, but everything just seems to happening a hair faster and smoother---upshifts, downshifts, throttle response. A lot can be attributed to the ECU reset that occurs when you disconnect the battery. We shall see how it performs as the ECU re-learns.
It looks really nice---BB did a fantastic job assembling these. Its a shame he no longer makes them.