DIY: Quick headlight removal w/ pics
#1
DIY: Quick headlight removal w/ pics
A lot of DIY's show you the hard way to take your headlights out, by telling you to completely remove your bumper, remove the engine cover, which is all unnecessary. Working on 3-4 G37's a week, this is my method on dropping the bumper and removing headlights.
PS. Not all pictures are completed, I will update it with more pictures over time but for now I'll type it out as detailed as I can.
Tools Needed:
·Ratchet w/ extension & 10MM socket
·Flat head screw driver
·Philips screw driver
·Wire cutters (for stock non modified headlights)
Repeat each step for each side.
Step 1: Pop open your hood, start your car and turn the wheels one way.
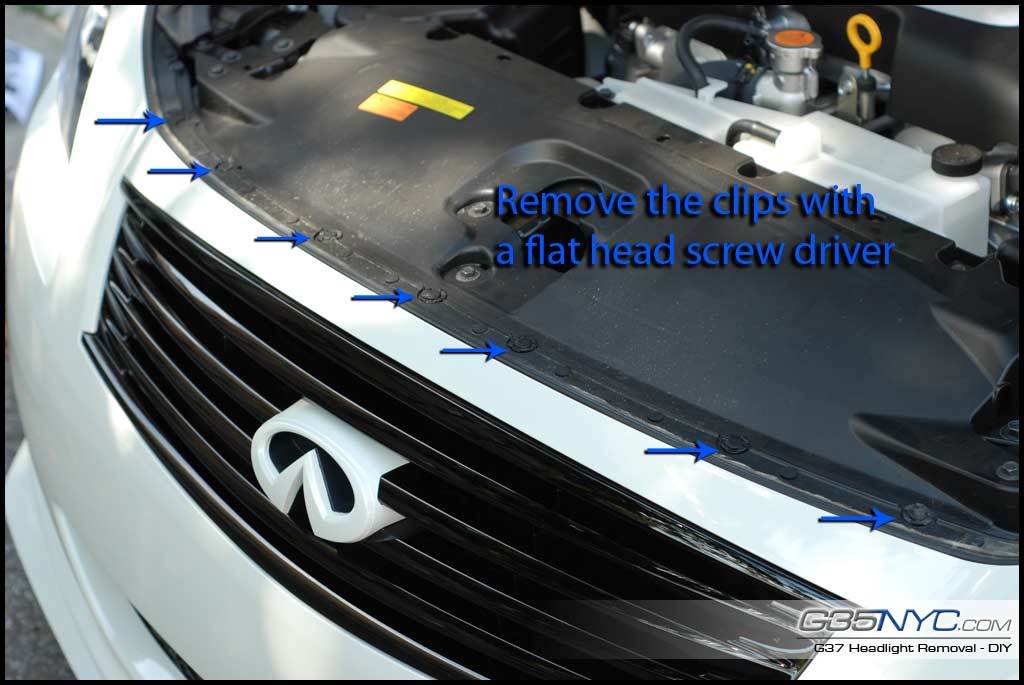
Step 2: Lift the hood and remove 7 clips holding the top of the bumper to the top of the engine cover. Remove the clips using a flat head screw driver, slide the screw driver into the slit, twist it, and push it up, make sure when you're pushing the screw driver down, do it towards the engine bay or on the sides, never towards the front like this:
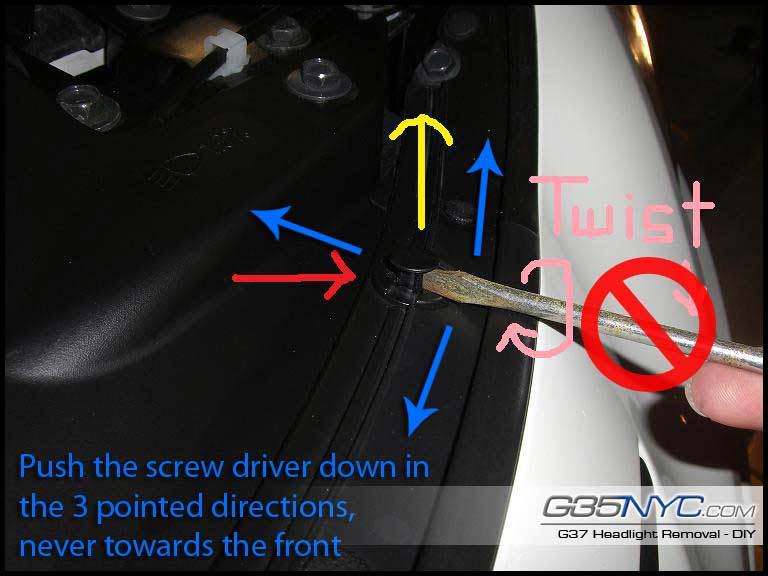
Doing it that way will leave little dents in your bumper and possibly chip it.
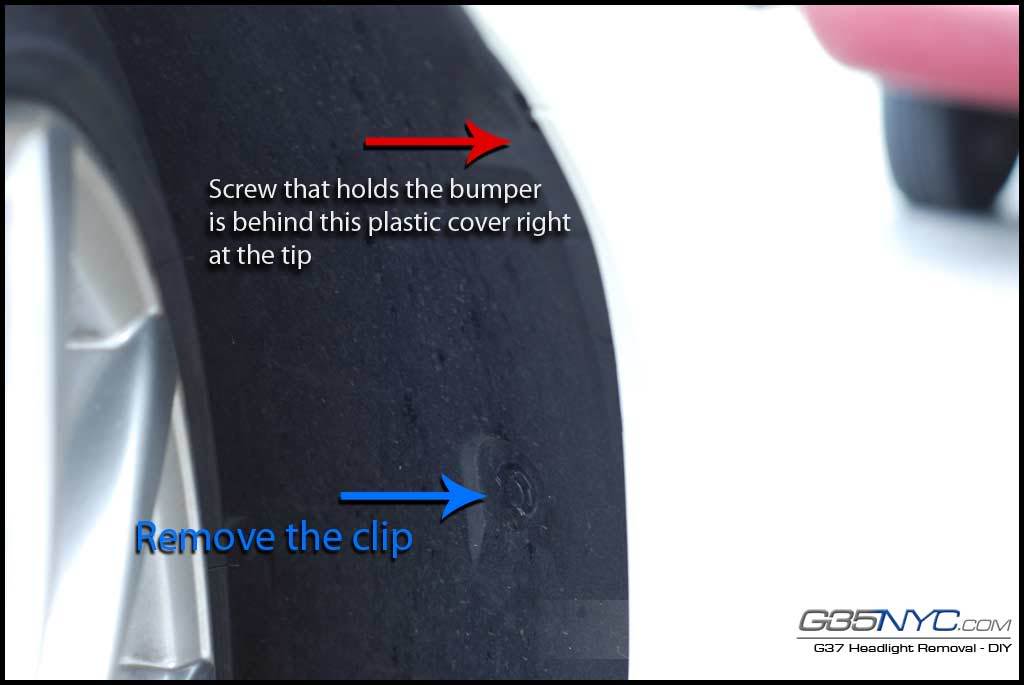
Step 3: With the wheels facing inwards, proceed to that side and remove 1 clip. Once you remove that clip, pull back the wheel well cover just a bit to expose the screw behind it which secures the bumper to the fender.
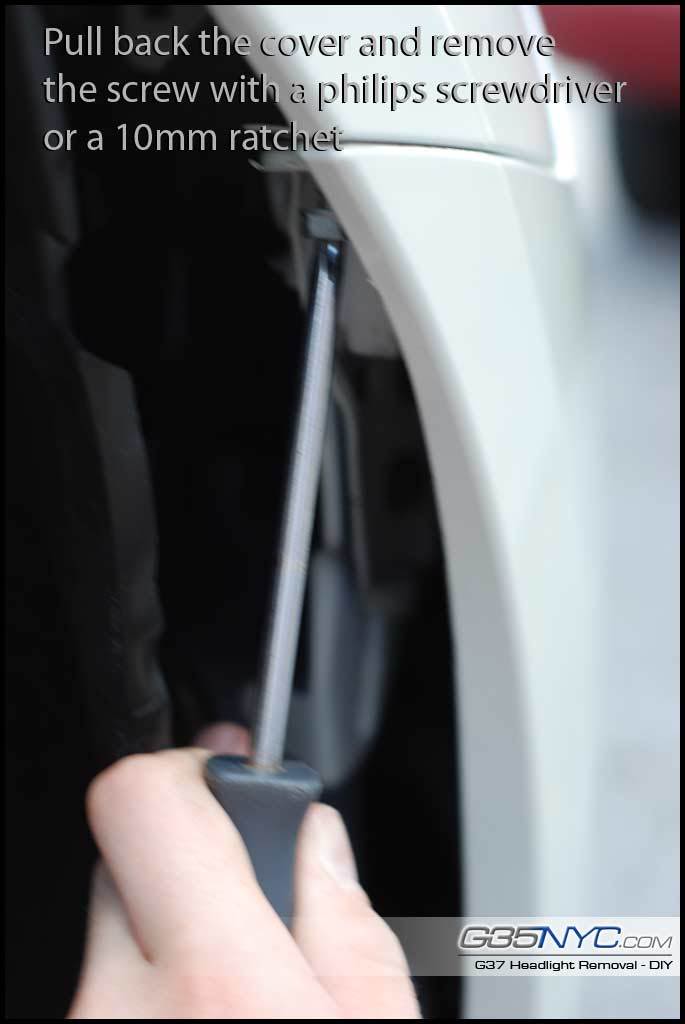
Step 4: While holding the cover back with one hand, use either a 10mm ratchet or a philips screw driver to remove the screw, I prefer to use the screw driver.
Step 5: Once the screw is removed, pull the corner of the bumper towards yourself, don't be afraid, its not going to break, just snap off. Sometimes the bumper tends to catch onto the last clip right near the headlight, all you have to do is carefully stick a flat head screwdriver in between the headlight and the bumper, and pop it out, careful not to damage your paint.
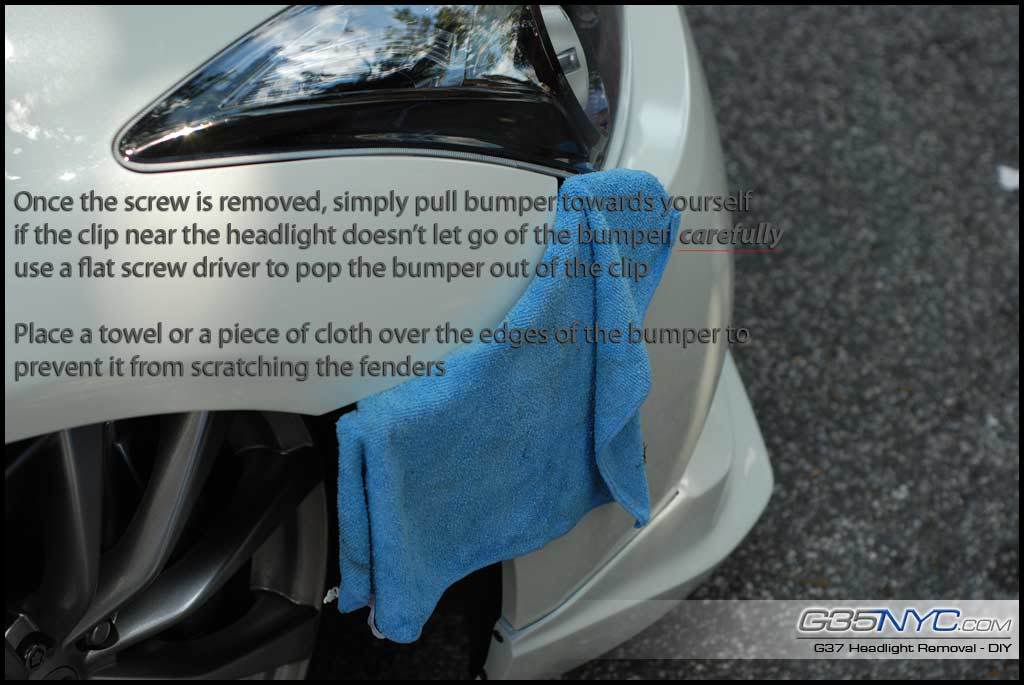
Once the corner is free, pull the corner forward towards front so the clips underneath the headlight release the bumper. Bull back the edge of the bumper and place a towel over it so it doesn't scratch the fender when the bumper drops.
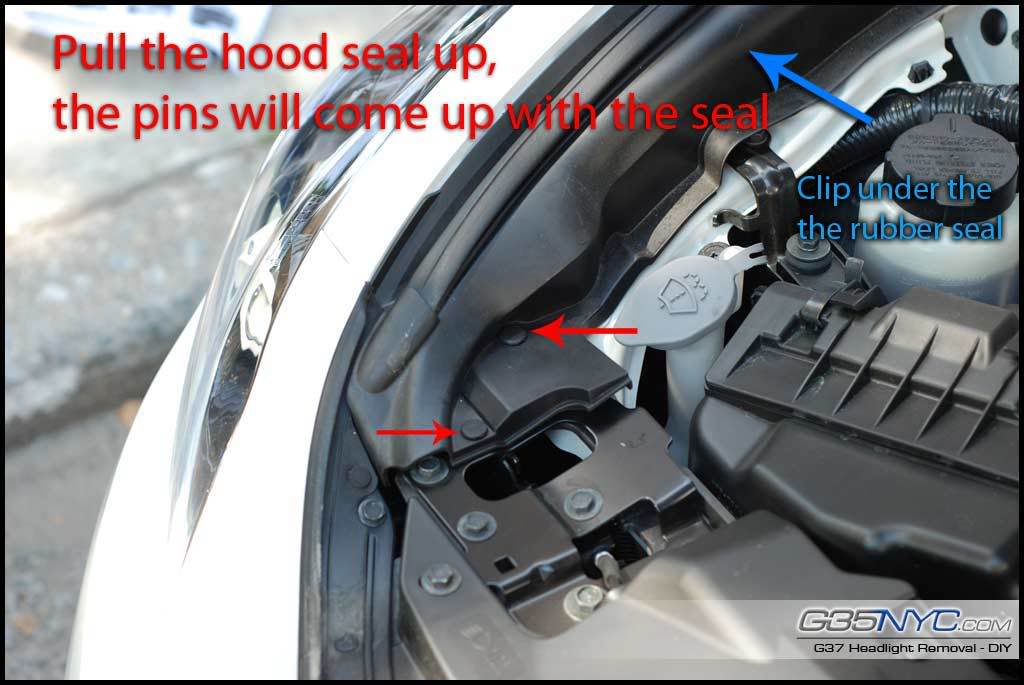
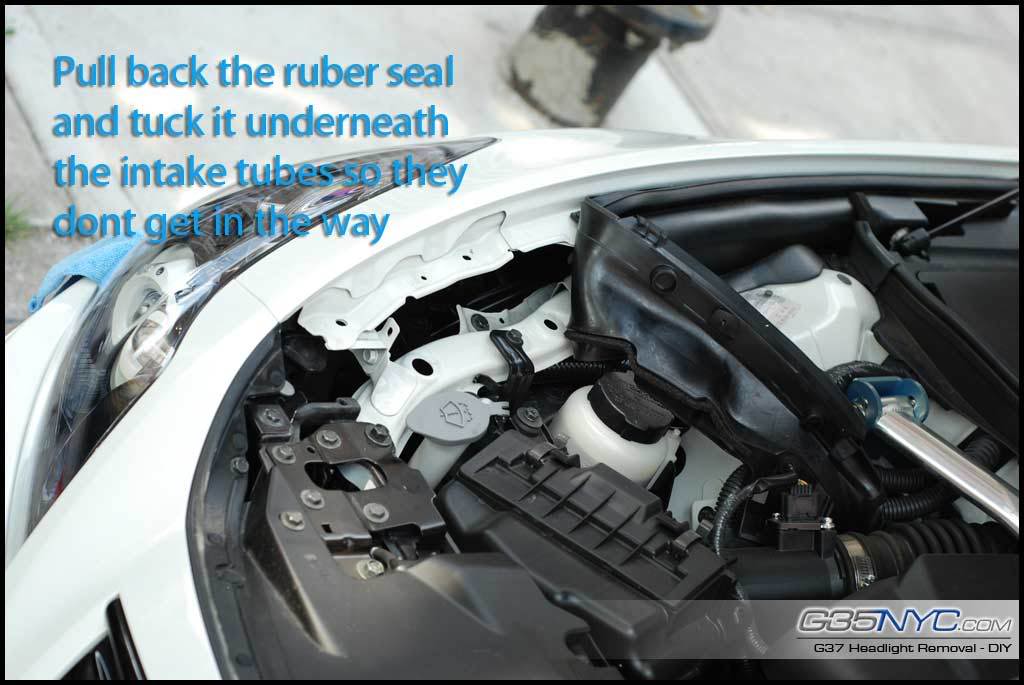
Step 6: Now you need to free the top part of the bumper from the fender above the headlight. You will need to pull back the rubber hood seal. It's held on by 3 clips, 2 are visible, 1 is not. The clips dont break, if you pull on the rubber seal by grabbing onto the area where the 2 clips are, the rubber seal will come off with the clips still instact to it, dont be afraid to pull it, the pins wont break.
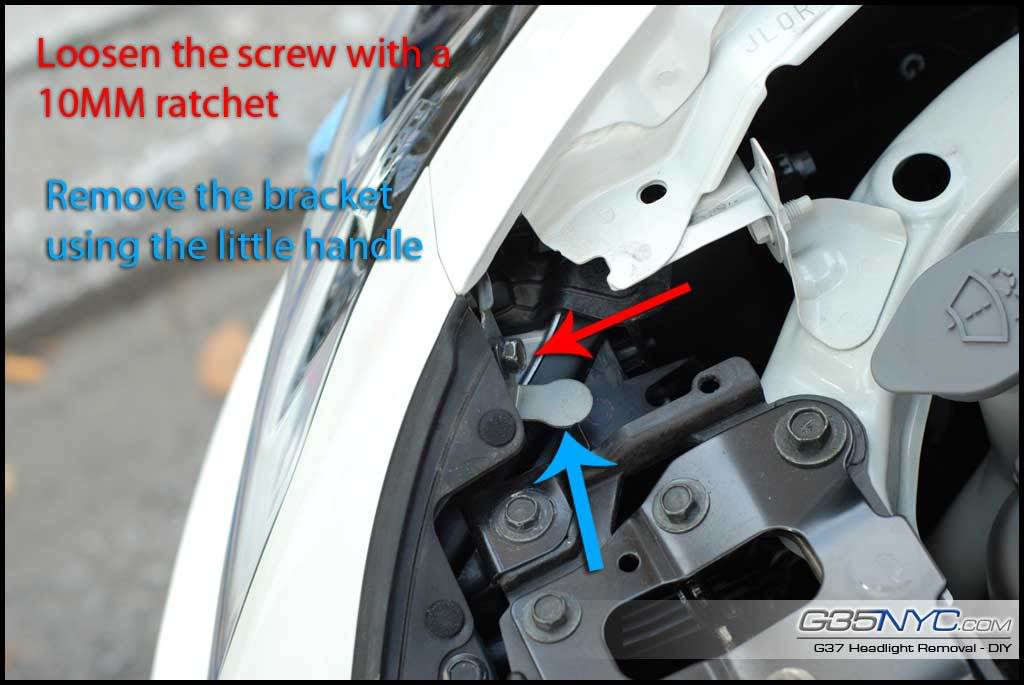
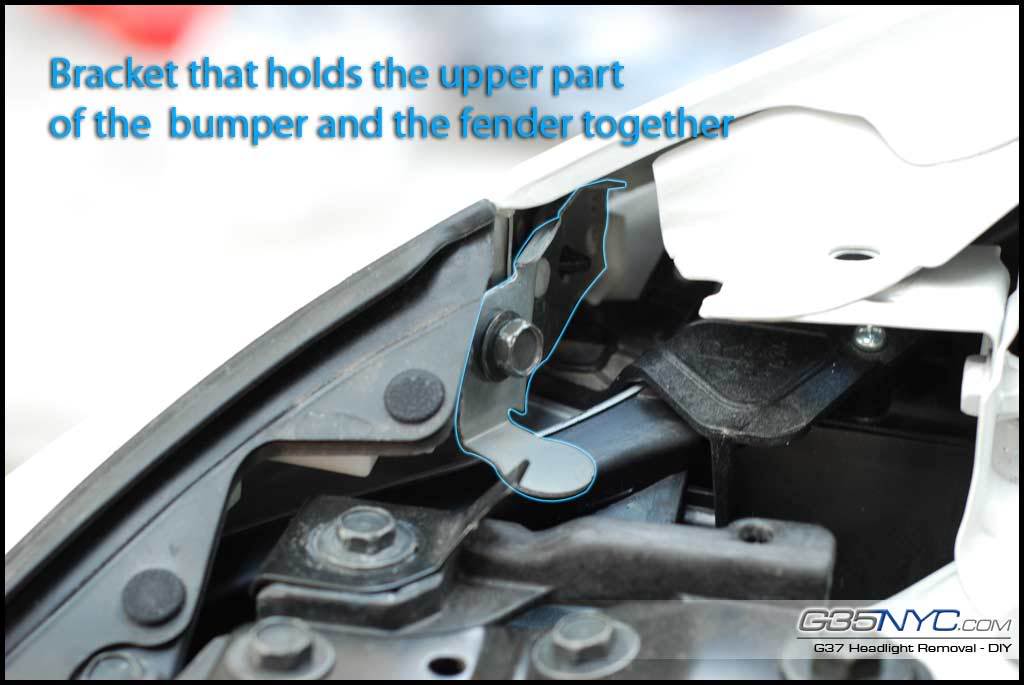
Step 7: Once the rubber hood seal is out of the way, you will see a metal bracket held on by 1 10MM screw. That metal bracket holds the tip of the bumper to the tip of the fender. Remove the 10MM screw with the ratchet, and pull out the bracket. Once the bracket is off, pull the bumper towards the front.
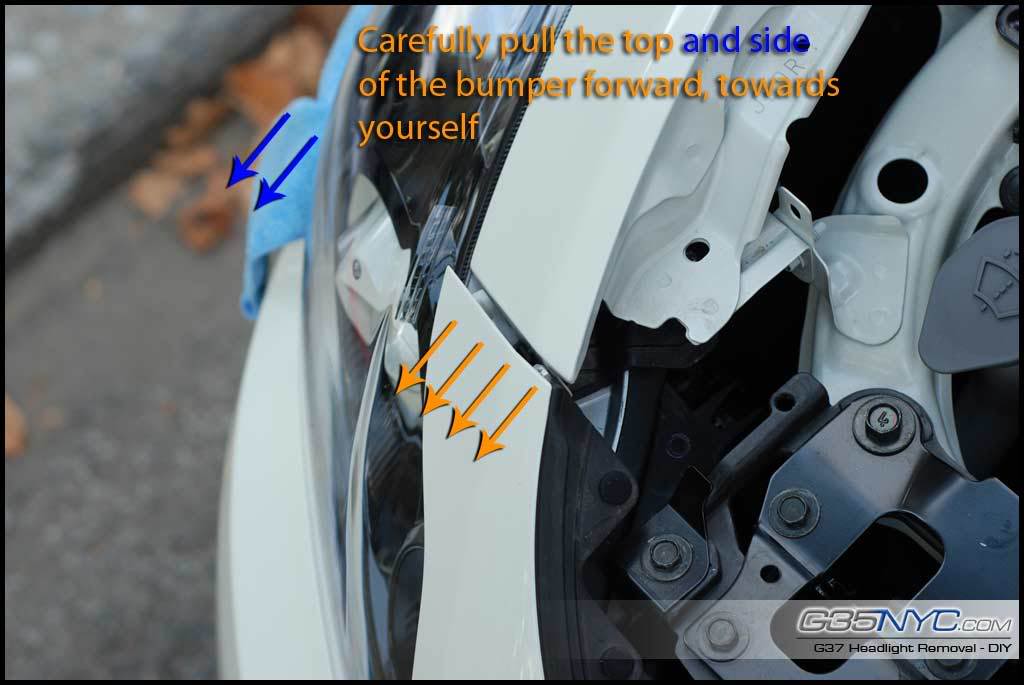
Step 8: Once you loosened the bumper on the top, and on the sides, pull the bumper towards yourself till you see an opening on top between the bumper and the engine cover. With the opening you can grab the bumper a little tighter to help you pull it towards the front, pull it enough so the clips of grille are able to go over the Styrofoam bumper support pieces, once you see that it can just push the bumper down and it'll hold get loose and loosen the pressure and rest at an angle. With the bumper dropped at an angle, all screws holding the headlight are exposed.
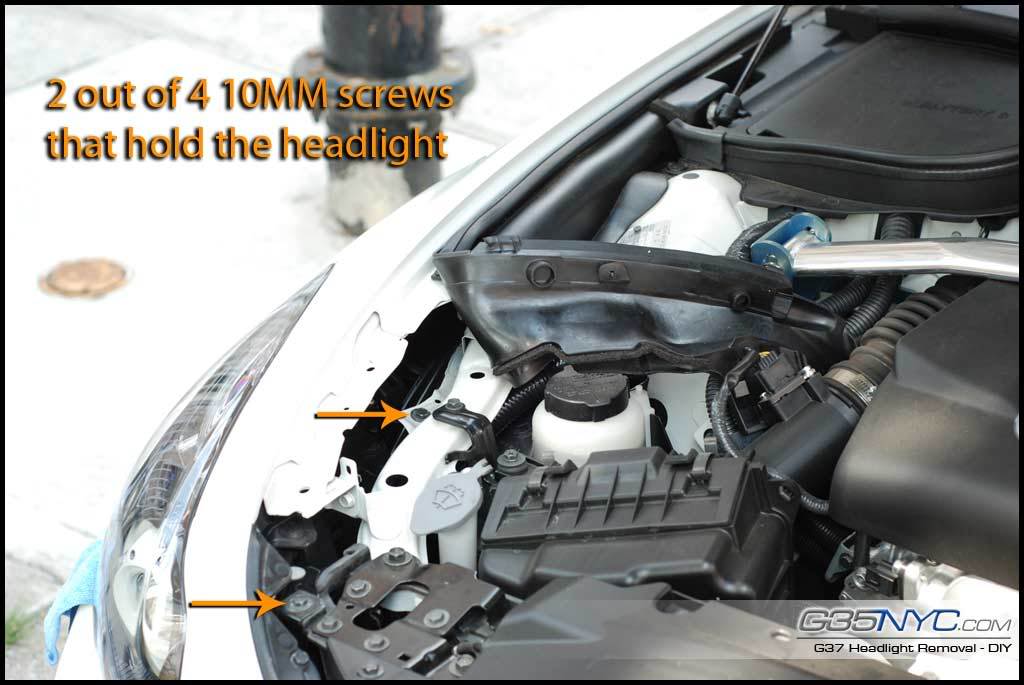
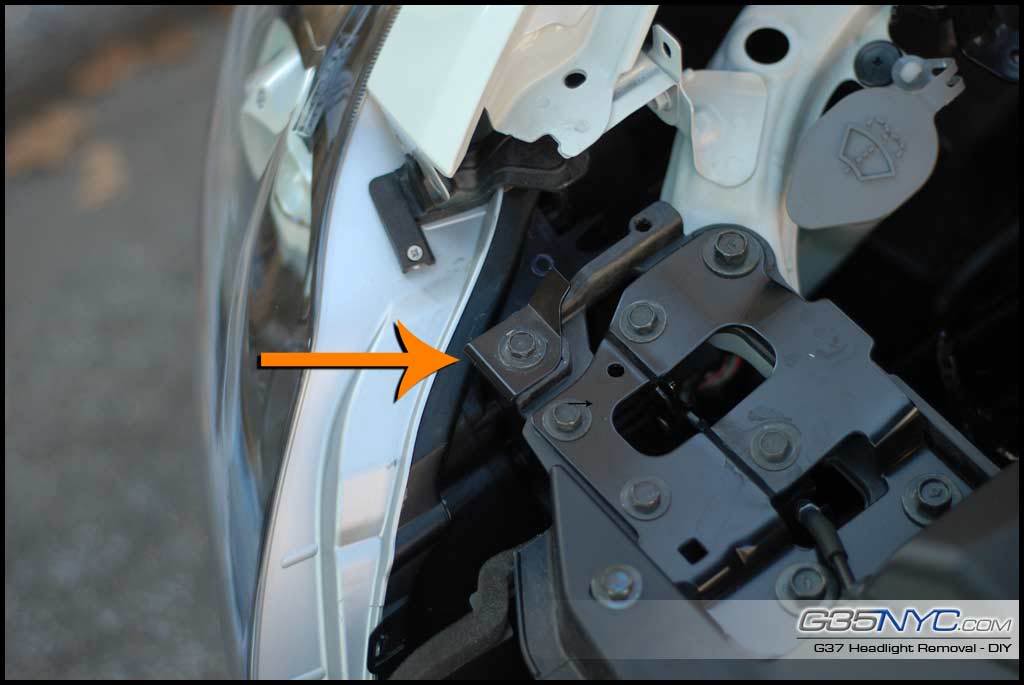
Step 9: The headlight is held on by 4 screws, 2 are in the spot underneath the rubber hood holding, 1 on the side of the headlight by the side fender, and another right underneath the foglight.
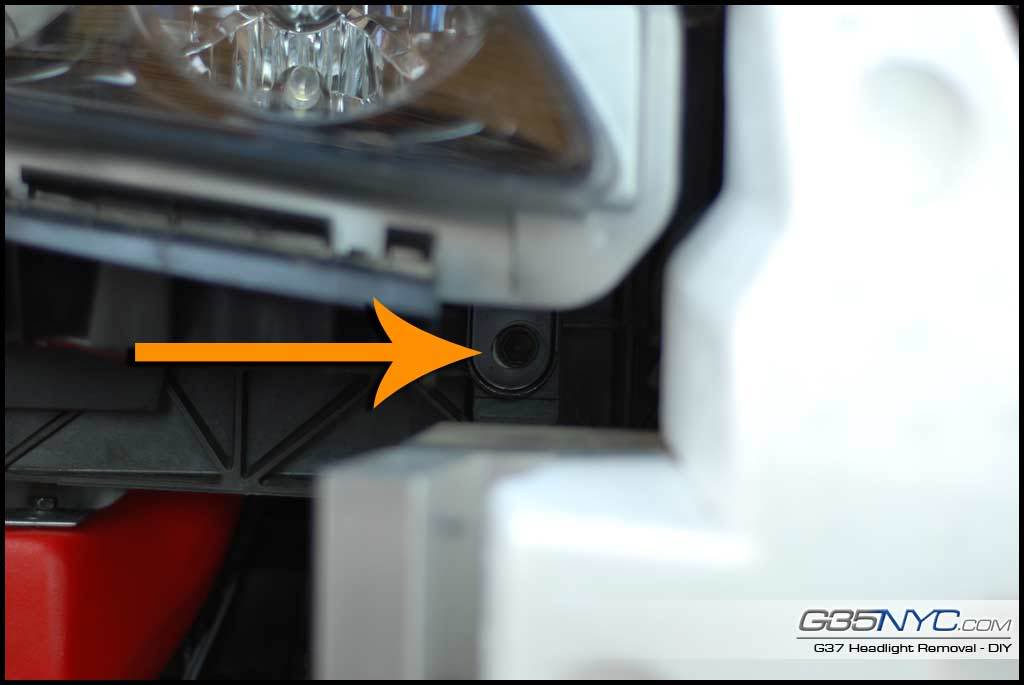
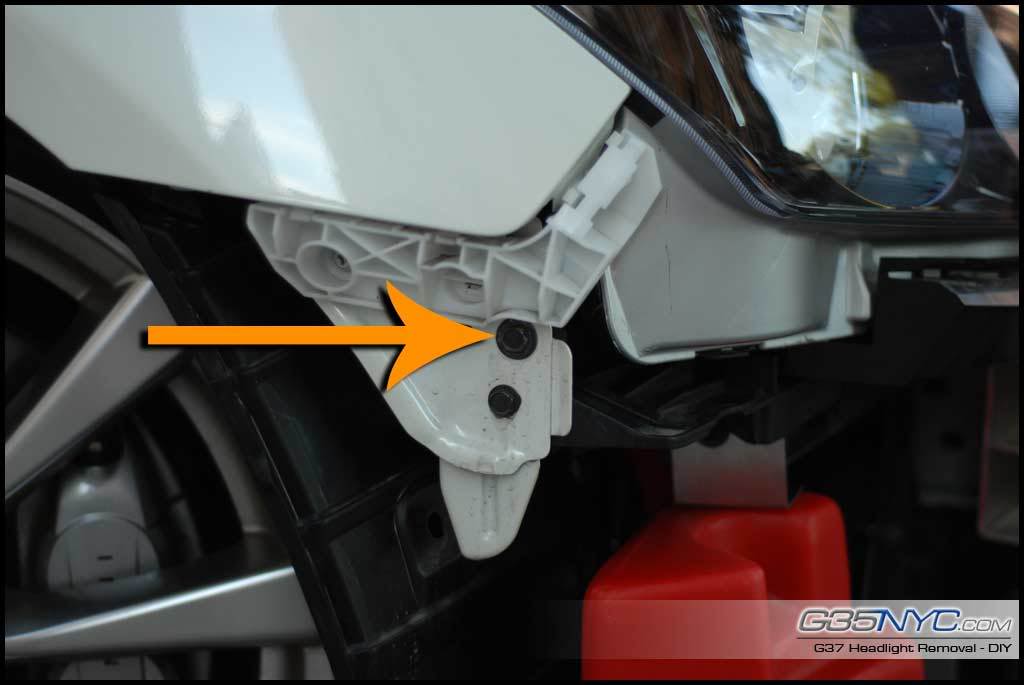
Step 10: Once the headlight is free, pull the headlight forward, you might have to wiggle it a little bit. Carefully pull the headlight out, and unplug it, use a flat screw driver to press down the pin.
Important: If your headlights were never removed before, they will be ziptied to 1 thick wire housing, all you gotta do is pull the headlight far out enough to reach in there with a pair of wire cutters and snap the black zip tie. On the driverside headlight, there is a plastic piece with a cable that's attached to the headlight, its there to help guide the hood release cable, just pull that plastic piece towards the front of the car and up, it should easily unclip.
Follow the steps backwards to put the headlights back on the car.
PS. Not all pictures are completed, I will update it with more pictures over time but for now I'll type it out as detailed as I can.
Tools Needed:
·Ratchet w/ extension & 10MM socket
·Flat head screw driver
·Philips screw driver
·Wire cutters (for stock non modified headlights)
Repeat each step for each side.
Step 1: Pop open your hood, start your car and turn the wheels one way.
Step 2: Lift the hood and remove 7 clips holding the top of the bumper to the top of the engine cover. Remove the clips using a flat head screw driver, slide the screw driver into the slit, twist it, and push it up, make sure when you're pushing the screw driver down, do it towards the engine bay or on the sides, never towards the front like this:

Doing it that way will leave little dents in your bumper and possibly chip it.

Step 3: With the wheels facing inwards, proceed to that side and remove 1 clip. Once you remove that clip, pull back the wheel well cover just a bit to expose the screw behind it which secures the bumper to the fender.

Step 4: While holding the cover back with one hand, use either a 10mm ratchet or a philips screw driver to remove the screw, I prefer to use the screw driver.

Step 5: Once the screw is removed, pull the corner of the bumper towards yourself, don't be afraid, its not going to break, just snap off. Sometimes the bumper tends to catch onto the last clip right near the headlight, all you have to do is carefully stick a flat head screwdriver in between the headlight and the bumper, and pop it out, careful not to damage your paint.
Once the corner is free, pull the corner forward towards front so the clips underneath the headlight release the bumper. Bull back the edge of the bumper and place a towel over it so it doesn't scratch the fender when the bumper drops.

Step 6: Now you need to free the top part of the bumper from the fender above the headlight. You will need to pull back the rubber hood seal. It's held on by 3 clips, 2 are visible, 1 is not. The clips dont break, if you pull on the rubber seal by grabbing onto the area where the 2 clips are, the rubber seal will come off with the clips still instact to it, dont be afraid to pull it, the pins wont break.


Step 7: Once the rubber hood seal is out of the way, you will see a metal bracket held on by 1 10MM screw. That metal bracket holds the tip of the bumper to the tip of the fender. Remove the 10MM screw with the ratchet, and pull out the bracket. Once the bracket is off, pull the bumper towards the front.


Step 8: Once you loosened the bumper on the top, and on the sides, pull the bumper towards yourself till you see an opening on top between the bumper and the engine cover. With the opening you can grab the bumper a little tighter to help you pull it towards the front, pull it enough so the clips of grille are able to go over the Styrofoam bumper support pieces, once you see that it can just push the bumper down and it'll hold get loose and loosen the pressure and rest at an angle. With the bumper dropped at an angle, all screws holding the headlight are exposed.
Step 9: The headlight is held on by 4 screws, 2 are in the spot underneath the rubber hood holding, 1 on the side of the headlight by the side fender, and another right underneath the foglight.


Step 10: Once the headlight is free, pull the headlight forward, you might have to wiggle it a little bit. Carefully pull the headlight out, and unplug it, use a flat screw driver to press down the pin.
Important: If your headlights were never removed before, they will be ziptied to 1 thick wire housing, all you gotta do is pull the headlight far out enough to reach in there with a pair of wire cutters and snap the black zip tie. On the driverside headlight, there is a plastic piece with a cable that's attached to the headlight, its there to help guide the hood release cable, just pull that plastic piece towards the front of the car and up, it should easily unclip.
Follow the steps backwards to put the headlights back on the car.
Last edited by ONEighty; 04-07-2009 at 02:30 AM.
The following 6 users liked this post by ONEighty:
37 Ace (01-16-2020),
7thLetterOfABC (12-25-2021),
AirJoe (08-16-2020),
Al Czervik (10-13-2017),
bikezilla (04-22-2017),
and 1 others liked this post.
#7
Registered User
Join Date: Sep 2008
Location: Rocklin Ca
Posts: 54
Likes: 0
Received 0 Likes
on
0 Posts
I agree,,, Thank you for this DIY.
Also, do you have a picture on how you open the lense up?
I would like to send you mine when I get the lights out, I would just need a rush back to me as I would have to drive the car soon... lol.
Also, do you have a picture on how you open the lense up?
I would like to send you mine when I get the lights out, I would just need a rush back to me as I would have to drive the car soon... lol.

Trending Topics
#15
Administrator

you got PM bro


