How to do a Fuel Injection Flush
#1
How to do a Fuel Injection Flush
Anyone ever performed a fuel injection system flush on a G37?
I have a 2009 Sedan and I have an OTC Fuel Injection Cleaning kit with canister and air pressure regulator and various fuel fittings for various models. I'm a little reluctant on this engine since it is a little more sophisticated than I'm used to dealing with. Hoping I won't mess anything up!!! It has 75,000 miles and its time, even though it is running good. I'm thinking I just have to find the fuel feed connection on the rear passenger side of the motor and disconnect the fuel line quick connector and connect my cleaning canister w/ regulator to that quick connector. Of course I have to pull the fuel pump fuse.
Anyone ever performed this or have advice if I should even attempt this myself?
#3
Registered Member
I'd be reluctant to use any kit like this. Maybe the old port fuel injection systems were OK with this type of cleaning kit, but not the G. You're taking a risk with just disconnecting the high pressure fuel line (do you know how to do THAT?) and despite the mileage, there's more to lose than to gain by using it.
#4
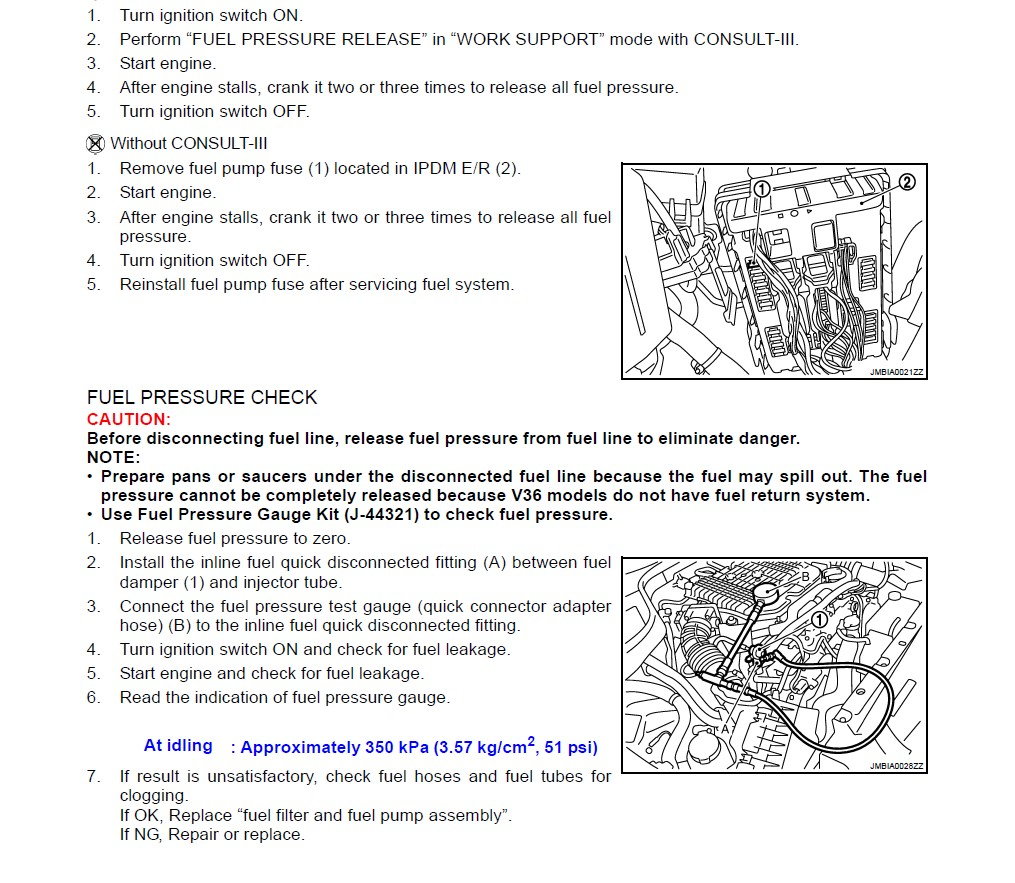
Trying to revive this post. I never found the answer. It is not risky to perform. I have done it on many of my vehicles. I have an OTC container that requires filling with specialized fuel injector cleaning solution that I have (same as shops). I have tied into the fuel injector rail (downstream of injector at regulator and confirmed the infiniti documented fuel rail pressure of 51 psig. There is an air pressure hookup on the OTC canister. You set the OTC canister regulator at 5 psi below the normal warm operating pressure of 51 psig (46 psig) so that the regulator wont waste your cleaning fluid and return it to gas tank. It wont harm gas tank of fuel pump if it does, it just waste your expensive cleaning solution. Only problem I have is finding the location to tie into the fuel injection line upstream of the fuel injectors. I tried tying into the fuel injector rail regulator that can be seen on the front of the motor (left side), but that just allowed the cleaning solution to go to the tank and didn't get enough into the injectors. It helped very minimally, but I really need to find the upstream location. I have most of the available fuel system adaptors. Any insight would be appreciated!
#6
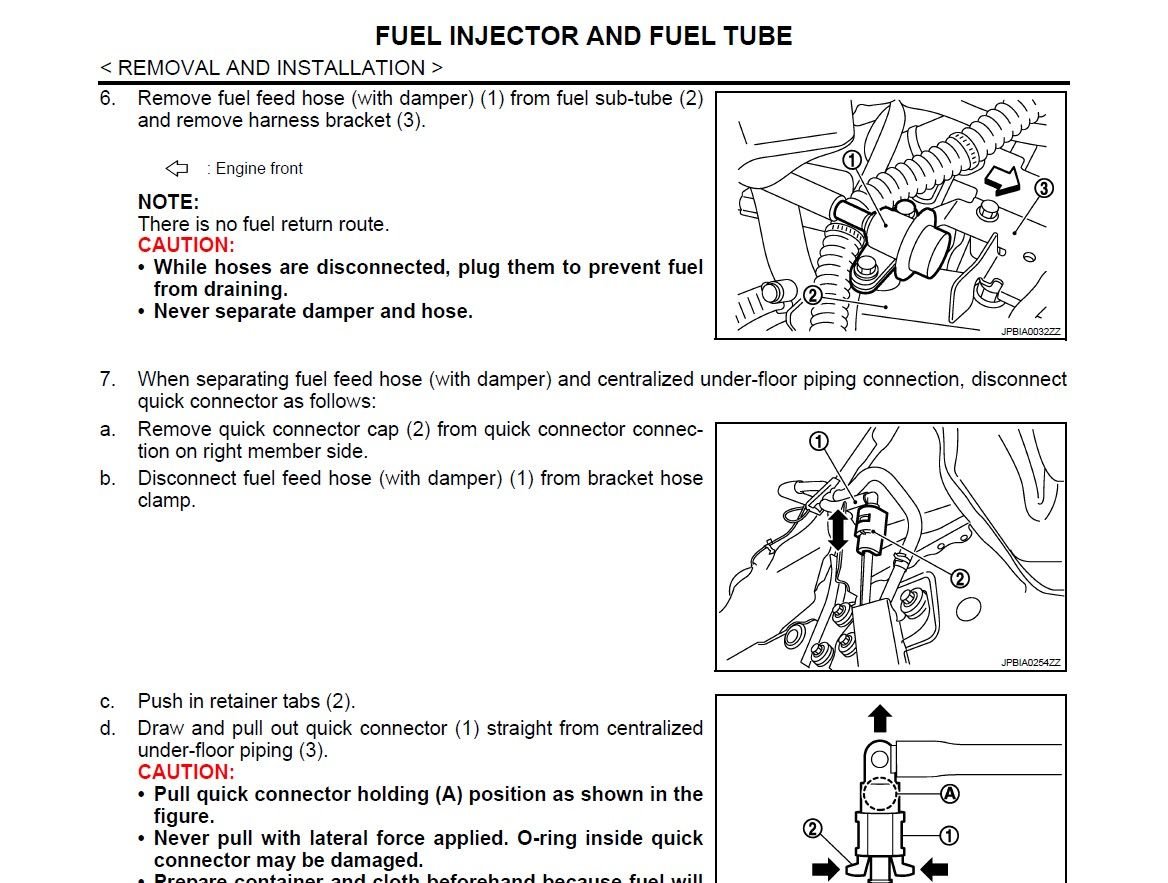
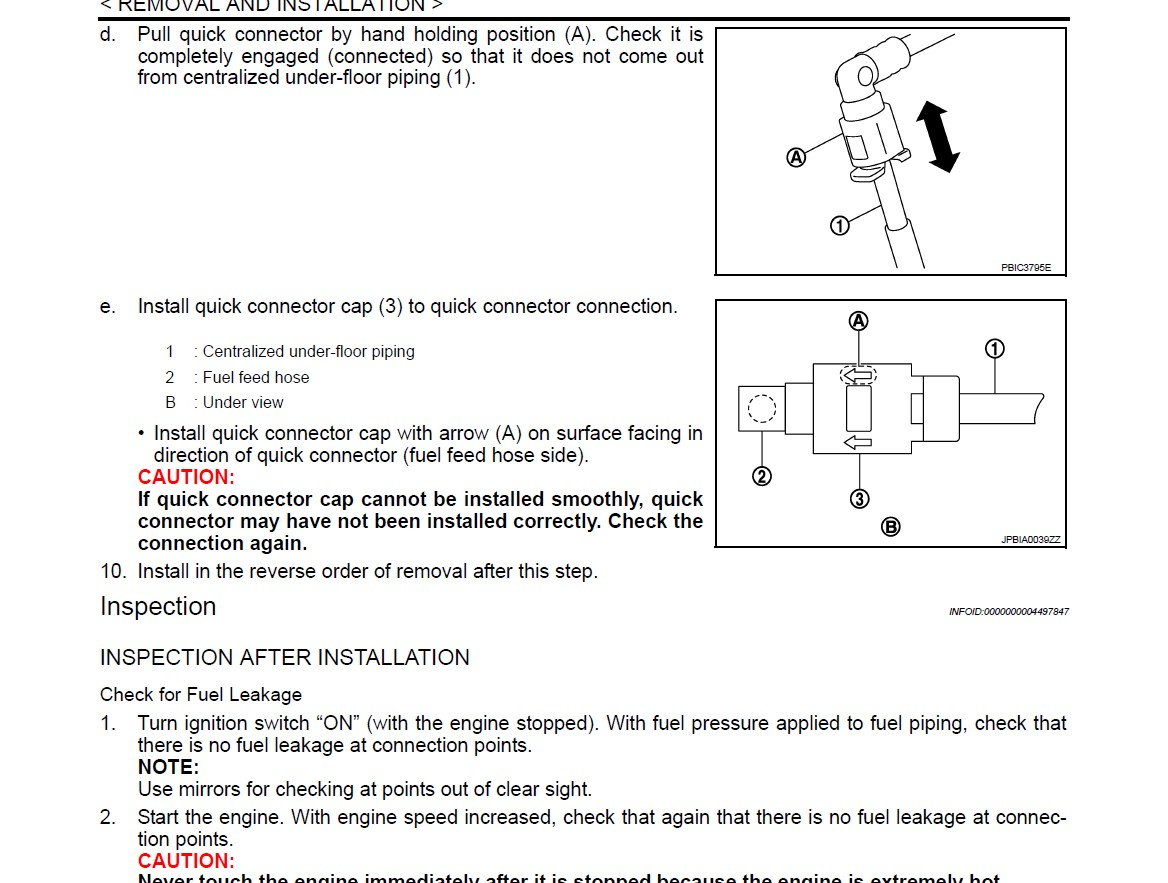
I found this fuel rail diagram. I had tied into the location at O-ring 3. This is a fuel damper. It appears that there is NO Fuel Return line per Removal & Installation Note on Step 6 in manual. The adaptor I used tied in between the damper and the injectors. When I pressured it up to 46 psig, it allowed the fuel to flow backwards back to the fuel tank through the fuel feed line. I would have had to block off the fuel feed line to prevent this. It appears that the only way to provide the injector cleaner solution it to tie into the Connector at t item 1 on the injector side. This way the line back to the tank will be disconnected and cleaning solution is forced only to the injectors. The problem with this is that this Connector (Item 1) is located on the passenger side wall of the engine compartment and doesn't appear easy to get to. I have the quick connector to tie into this location, but will have to figure out how to get to this. It is a tight space on passenger side of motor!!
Trending Topics
#9
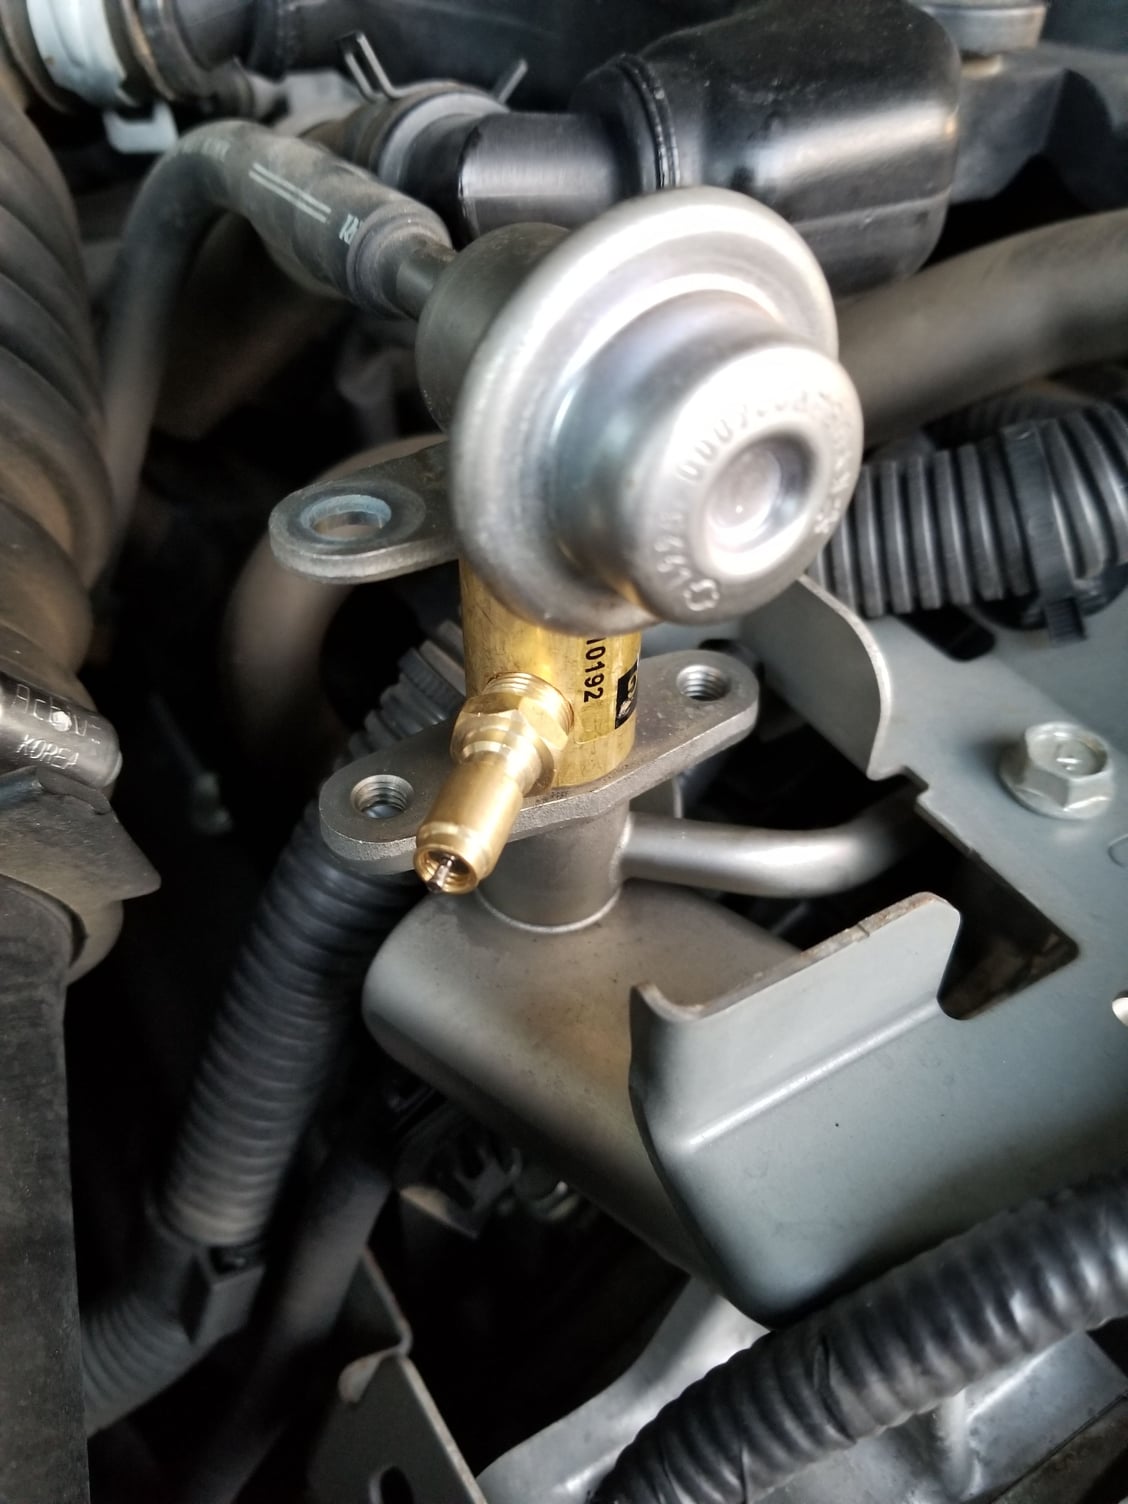
This is a picture of the adaptor I tired that didn't work. I used 2 long screws to secure it. But as I stated in the above post, this allowed cleaner solution to flow in both directions and the path of least resistance was back to the fuel tank. Only a minimal amount went through the injectors as I ran the vehicle on the cleaning solution at 46 psig air pressure. I don't have a way to block off the upstream part of this adaptor.
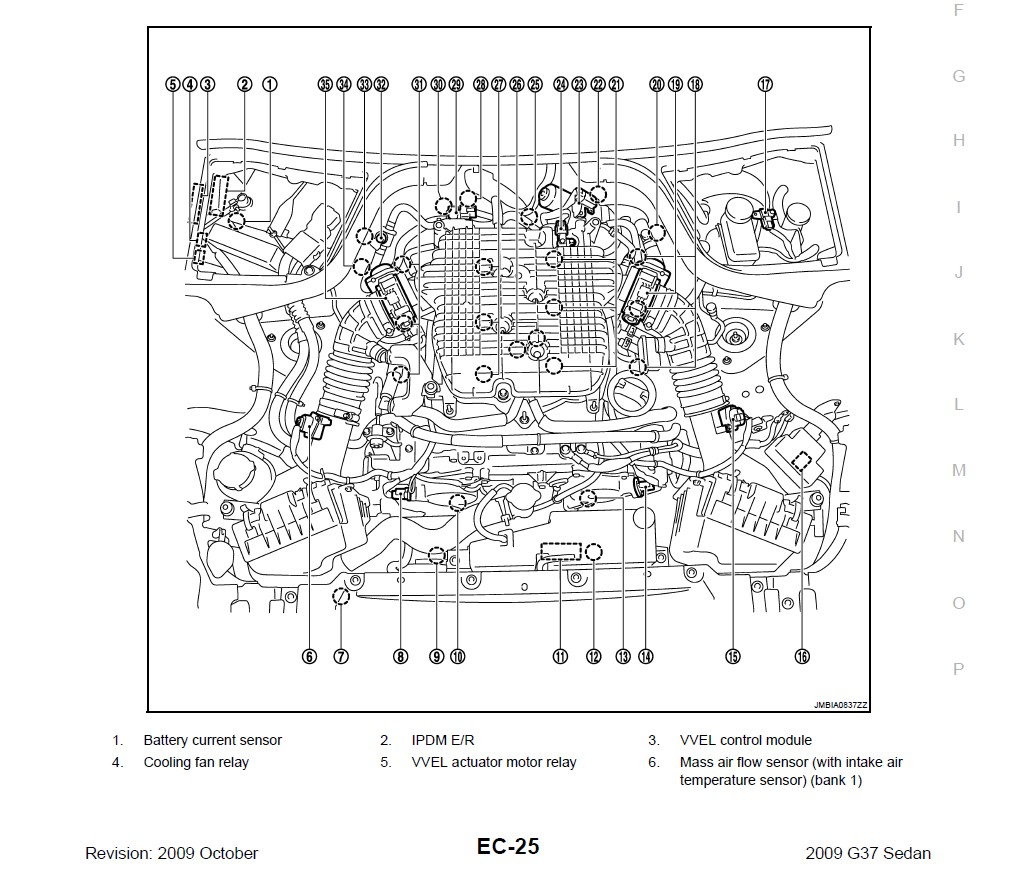
BTW, you also have to remove the fuel pump 15 amp fuse in the fuse box on the outside of the battery (closest to passenger front fender). You have to remove the battery to remove the use box cover. The fuse is located on the top left corner of the fuse box when looking at the fuses.
BTW, you also have to remove the fuel pump 15 amp fuse in the fuse box on the outside of the battery (closest to passenger front fender). You have to remove the battery to remove the use box cover. The fuse is located on the top left corner of the fuse box when looking at the fuses.
#13
To remove fuel pump the fuse (do NOT remove the fuel injector fuse), you have to remove the fuse box cover. To remove the cover, you have to lift up the fuse box. First remove the battery. (2) Depress the two tabs in the back of the fuse box (and on top of fuse box) to lift the entire fuse box out of the compartment. The wire bundle has about 8" of slack to allow the box to be pulled up. Depress the two tabs on the bottom of the fuse box cover and pull the bottom of the cover out slightly, then depress the fuse box cover tabs on the top of the box to remove the cover the rest of the way. There is a little lip around the top of the cover that has to be worked loose to remove the cover. It is a little bit of a pain, but it is only held on by these tabs at bottom and top. Once cover is removed, remove fuel pump fuse (Item 1 in diagram above) and replace fuse box in slot and re-install battery. You are no ready to start the car and run engine on fuel injector cleaner alone.
#14
These are the steps in order:
(1) Turn off engine and hook up injector cleaner canister to fuel rail system to confirm fuel operating pressure at normal operating temperature. It should be 51 psig. I used OTC fuel adaptor part # 528770 as seen in picture above. Be careful! There will be a short burst of fuel pressure once the O-ring is removed at the fuel damper. Just remove the 2 10mm screws and pull up. It is a simple O-ring seal. Have a rag surrounding it. Its not much fuel that will come out. Since there is no return, there is no way to relieve residual pressure that I know of. Once engine is off, pressure will still be about 45 psig. Perhaps you could turn engine over once fuel pump fuse is removed, but its not that much fuel. Wear glasses just in case.
(2) Remove fuel pump fuse and reinstall battery.
(3) Disconnect fuel line connector and connect cleaner canister hose to fuel rail side of fuel line. Line to tank side (bottom) can be left open, but may want to wrap with rag or bag to prevent dirt intrusion. Close cleaner canister valve downstream of pressure gauge and fill canister with injector cleaner. Close cap and connect shop air pressure to canister. Adjust canister pressure regulator to 46 psig. This is not critical since there is no fuel return on this system, but I would be leery to overpressure system, so 46 psig should work fine, although 51 wouldn't hurt. This 5 psi delta is usually just to prevent the engine fuel pressure regulator from opening and allowing your expensive cleaner from being wasted and returning to fuel tank. You want the straight solution to go through injectors for a good cleaning.
(4) Open cleaner canister valve to allow cleaner solution to flow to injectors and start the car as normal. It will run on the cleaner solution until it runs out of solution. Rev engine between 1000 - 1500 rpm. The car will start to misfire when solution is empty. It wont hurt anything, but it may set of the engine code for misfire and it would have to be erased or cleared to turn engine light off. You can eliminate this by turning engine off once it starts to sputter or misfire. It should take about 15 - 30 minutes to run all of the solution.
(5) Once engine is off, close valve on canister and bleed canister pressure and remove canister and hose from fuel line and reconnect fuel line and fuel pump fuse and start engine as normal. Good to go!
#15
The OTC fuel pressure adaptor to tie into Item 1 is either OTC part # 518476 (5/16" T-fitting Hair Pin Adaptor or 518527 3/8" T-fitting Hair Pin Adaptor. OTC list them as Adaptor 32 or 33. I am not sure which one yet since I haven't got to this connection yet.
My adaptor shown in the picture above to check fuel pressure (OTC 528770) is their adaptor 59. It is a 11mm diameter (0.430") Oring nipple.
My adaptor shown in the picture above to check fuel pressure (OTC 528770) is their adaptor 59. It is a 11mm diameter (0.430") Oring nipple.
The following users liked this post:
Calg37USMC (11-04-2017)


