
Midnight LOWER grille?
 01-27-2015, 07:20 PM
#31
Administrator

iTrader: (9)
And you're right about the half-glass. For all the times I'd described someone else's genuine misfortune as an opportunity to mod, this little snafu is more than apt comeuppance. So I'm debating between keeping them to experiment with, or returning them for my $39 back. Either way, I need to contact OrderInfinitiParts.com and let them know their diagram is incorrect.
Truth is, I think I prefer the chrome rings over painted ones. Just do, is all. Maybe because the car is white, and I don't want to slip into that whole Oreo-theme, like so many people with white cars. Then again, the idea of switching things up, chrome to black back to chrome, whenever I want. That has some appeal.

 01-29-2015, 12:18 PM
#32
Administrator
iTrader: (9)
OP, I'm taking your advice, and just dropped the new fog rings off at the body shop. While certainly overkill considering the parts and the effort to rattle-can, the results will be professional. And more importantly, I don't have to do it seeing as how it's 10*F outside, and I'm not interested in painting inside.
So anyway, I'm making lemonade.
So anyway, I'm making lemonade.
01-29-2015, 12:37 PM
#33
Registered User
Thread Starter

OP, I'm taking your advice, and just dropped the new fog rings off at the body shop. While certainly overkill considering the parts and the effort to rattle-can, the results will be professional. And more importantly, I don't have to do it seeing as how it's 10*F outside, and I'm not interested in painting inside.
So anyway, I'm making lemonade.
So anyway, I'm making lemonade.
Given your situation, I figure not having to freeze your twigs and berries off is a compromise you're willing to make.
01-29-2015, 12:43 PM
#34
Administrator
iTrader: (9)
Well, you're halfway taking my advice. I would technically advise anyone who wants both a painted and chrome set of rings...to paint the original rings, and keep the pristine, brand-spanking-new rings as the chrome set. I'm sure there's at least 1 or 2 dings on the original rings.
Given your situation, I figure not having to freeze your twigs and berries off is a compromise you're willing to make.
Given your situation, I figure not having to freeze your twigs and berries off is a compromise you're willing to make.
Some people can remove those rings directly, from the outside. I've tried that a number of times, and came up short... having instead to squeeze my arm between the fender and the wheel-well cover. So I'm saving that bit of fun for Springtime.
And when that comes around, I'll probably re-do the amber window tint over the lenses, because like you just said, 2+ years of nicks and dings.
01-29-2015, 12:59 PM
#35
Registered User
Thread Starter
I finished this project this past Sunday, and finally got around to posting some pictures. Overall, I am happy with the darker color, and I like the extra sheen, but I am not wild about the texture. It's kinda bumpy (the original lower grill is sorta bumpy too) and since it's rubber, the glossifier final coating feels weird too. Maybe it needs to cure...but it feels different than the black plastidip I used on my rear emblems. Those are a smoother feel.
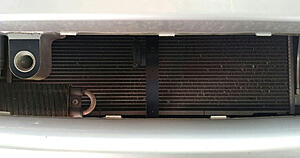
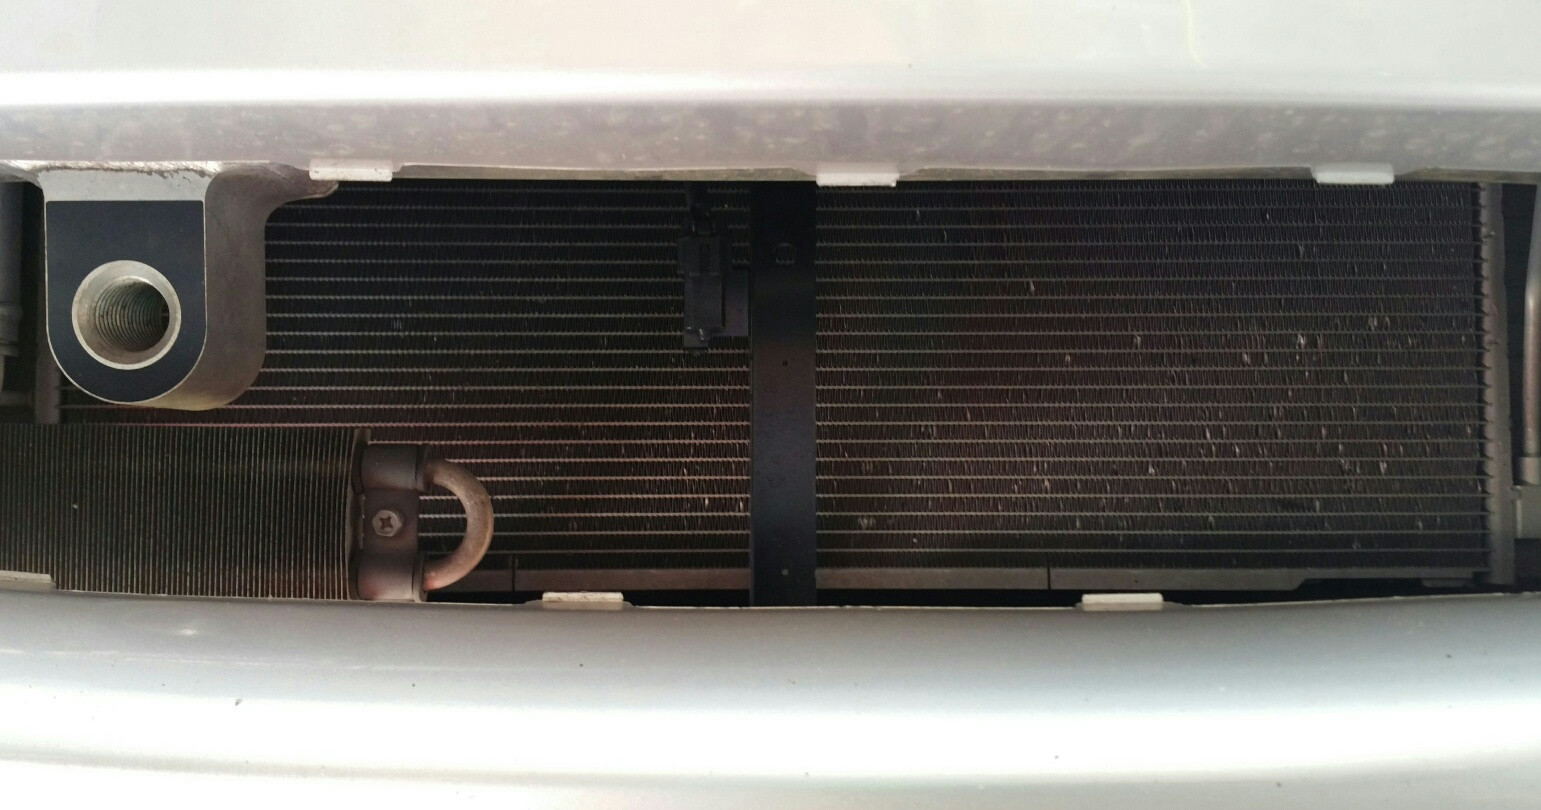
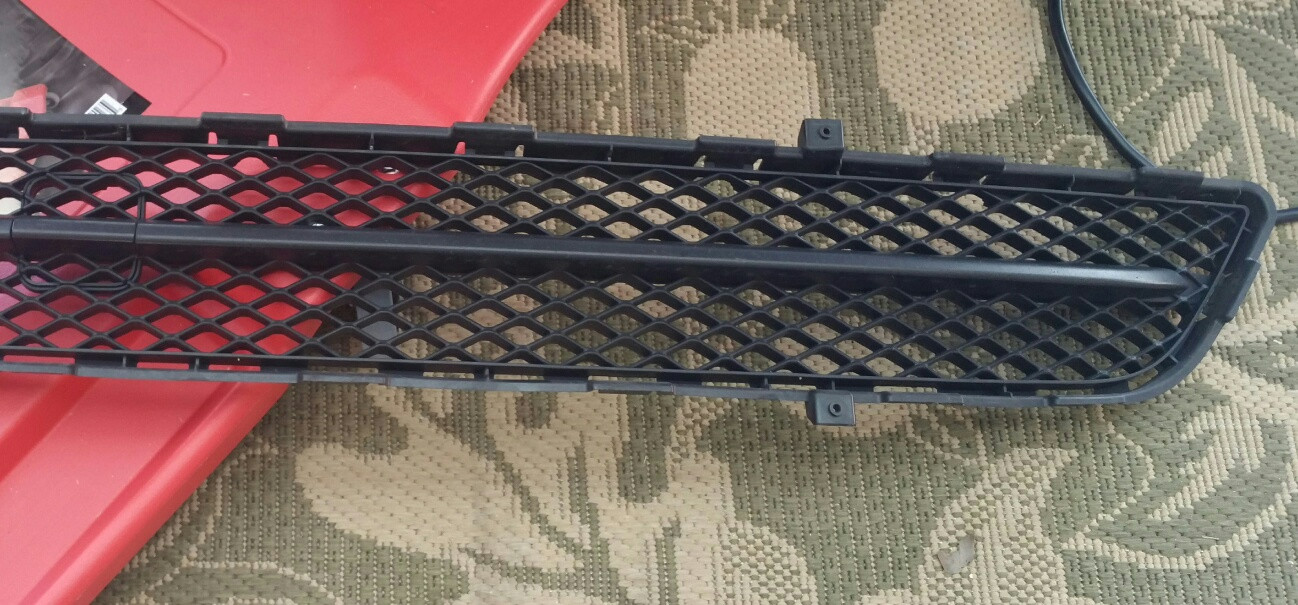
Here's the before shot.

The lower grille is kept in place by like 15 clips which are integrated into the bumper. My finger hurt trying to push on them, so I switched to a 6mm punch. That gave me the leverage needed to lift each clip off the retaining portion built into the lower grille.
I started at one side and worked my way to the middle, then went to the other side and worked to the middle. My lower grille, once unclipped, pushes INWARD (towards the radiator) to remove.
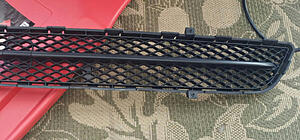
I accessed everything from under the car. All I had to to was remove the splash guard, my bumper stayed on the whole time. I would not suggest going in from the top.
Here's the final product. I wish I could get the same light for the before and after shot, but I just can't. The same angle would be nice too, but I'll need to wait until the weekend when I can get the shot from the same angle under roughly the same lighting (unless it rains). You can see how dull the passenger fog light surround looks compared to the lower grille.
I think within a year or so, I'll find a paint shop to tackle this project and make it look really nice. I'd like to see how Rochester's paint holds up to road debris, but given that he works from home...he doesn't drive it as often as I would drive mine. Don't mind the holes in my bumper. I made some plugs, but when I took my car in to Infiniti for service last week, one of them was lost during the complimentary wash. I have another set of plugs that need 1-2 more coats of clear before I put them on. I forgot about that little project...gotta remember tonight.
Here's the before shot.

The lower grille is kept in place by like 15 clips which are integrated into the bumper. My finger hurt trying to push on them, so I switched to a 6mm punch. That gave me the leverage needed to lift each clip off the retaining portion built into the lower grille.
I started at one side and worked my way to the middle, then went to the other side and worked to the middle. My lower grille, once unclipped, pushes INWARD (towards the radiator) to remove.
I accessed everything from under the car. All I had to to was remove the splash guard, my bumper stayed on the whole time. I would not suggest going in from the top.
Here's the final product. I wish I could get the same light for the before and after shot, but I just can't. The same angle would be nice too, but I'll need to wait until the weekend when I can get the shot from the same angle under roughly the same lighting (unless it rains). You can see how dull the passenger fog light surround looks compared to the lower grille.
I think within a year or so, I'll find a paint shop to tackle this project and make it look really nice. I'd like to see how Rochester's paint holds up to road debris, but given that he works from home...he doesn't drive it as often as I would drive mine. Don't mind the holes in my bumper. I made some plugs, but when I took my car in to Infiniti for service last week, one of them was lost during the complimentary wash. I have another set of plugs that need 1-2 more coats of clear before I put them on. I forgot about that little project...gotta remember tonight.
Last edited by G37Xtreme; 01-29-2015 at 04:03 PM.
01-29-2015, 01:09 PM
#36
Administrator
iTrader: (9)
Good info and pics on removing the lower grille. And good for you playing with this project.

You're right, the lower grille looks glossy, which makes the fog bezels look dull. Hmm. And even in these pics, you can see the newly painted section isn't smooth at all.
Have you considered just painting that single bar across the middle of the lower grille, rather than the entire thing? You could sand it down perfectly smooth, and paint it gloss black to match your midnight grille slats. I've been thinking through that idea with mine; (which has two bars across the lower grille.)
That's very true. Exactly three years now since I bought the car, and I'm averaging 6000 miles per year.
You're right, the lower grille looks glossy, which makes the fog bezels look dull. Hmm. And even in these pics, you can see the newly painted section isn't smooth at all.
Have you considered just painting that single bar across the middle of the lower grille, rather than the entire thing?
You could sand it down perfectly smooth, and paint it gloss black to match your midnight grille slats. I've been thinking through that idea with mine; (which has two bars across the lower grille.)That's very true. Exactly three years now since I bought the car, and I'm averaging 6000 miles per year.
Last edited by Rochester; 01-29-2015 at 01:14 PM.
01-29-2015, 03:56 PM
#37
Registered User
Thread Starter
Have you considered just painting that single bar across the middle of the lower grille, rather than the entire thing? You could sand it down perfectly smooth, and paint it gloss black to match your midnight grille slats. I've been thinking through that idea with mine; (which has two bars across the lower grille.)
You could sand it down perfectly smooth, and paint it gloss black to match your midnight grille slats. I've been thinking through that idea with mine; (which has two bars across the lower grille.)This Spring/Summer, I may tackle this again. I'll probably talk to more paint shops and see what they think. Next time you talk to yours, can you ask their opinion on chipping?
I'm also undecided if I should peel the dip of mine or buy a new one when the time comes to address this again. If I see a super deal pop up, I may snag one...otherwise, I think they're like $95 or so new.
I can also go with a billet aluminum one for roughly that same cost...so we'll see. That may clash with my upper grille though.
02-02-2015, 12:09 PM
#38

I finished this project this past Sunday, and finally got around to posting some pictures. Overall, I am happy with the darker color, and I like the extra sheen, but I am not wild about the texture. It's kinda bumpy (the original lower grill is sorta bumpy too) and since it's rubber, the glossifier final coating feels weird too. Maybe it needs to cure...but it feels different than the black plastidip I used on my rear emblems. Those are a smoother feel.
Here's the before shot.

The lower grille is kept in place by like 15 clips which are integrated into the bumper. My finger hurt trying to push on them, so I switched to a 6mm punch. That gave me the leverage needed to lift each clip off the retaining portion built into the lower grille.

I started at one side and worked my way to the middle, then went to the other side and worked to the middle. My lower grille, once unclipped, pushes INWARD (towards the radiator) to remove.

I accessed everything from under the car. All I had to to was remove the splash guard, my bumper stayed on the whole time. I would not suggest going in from the top.
Here's the final product. I wish I could get the same light for the before and after shot, but I just can't. The same angle would be nice too, but I'll need to wait until the weekend when I can get the shot from the same angle under roughly the same lighting (unless it rains). You can see how dull the passenger fog light surround looks compared to the lower grille.

I think within a year or so, I'll find a paint shop to tackle this project and make it look really nice. I'd like to see how Rochester's paint holds up to road debris, but given that he works from home...he doesn't drive it as often as I would drive mine. Don't mind the holes in my bumper. I made some plugs, but when I took my car in to Infiniti for service last week, one of them was lost during the complimentary wash. I have another set of plugs that need 1-2 more coats of clear before I put them on. I forgot about that little project...gotta remember tonight.
Here's the before shot.
The lower grille is kept in place by like 15 clips which are integrated into the bumper. My finger hurt trying to push on them, so I switched to a 6mm punch. That gave me the leverage needed to lift each clip off the retaining portion built into the lower grille.
I started at one side and worked my way to the middle, then went to the other side and worked to the middle. My lower grille, once unclipped, pushes INWARD (towards the radiator) to remove.
I accessed everything from under the car. All I had to to was remove the splash guard, my bumper stayed on the whole time. I would not suggest going in from the top.
Here's the final product. I wish I could get the same light for the before and after shot, but I just can't. The same angle would be nice too, but I'll need to wait until the weekend when I can get the shot from the same angle under roughly the same lighting (unless it rains). You can see how dull the passenger fog light surround looks compared to the lower grille.
I think within a year or so, I'll find a paint shop to tackle this project and make it look really nice. I'd like to see how Rochester's paint holds up to road debris, but given that he works from home...he doesn't drive it as often as I would drive mine. Don't mind the holes in my bumper. I made some plugs, but when I took my car in to Infiniti for service last week, one of them was lost during the complimentary wash. I have another set of plugs that need 1-2 more coats of clear before I put them on. I forgot about that little project...gotta remember tonight.

Thread
Thread Starter
Forum
Replies
Last Post
cconklin2
Private Classifieds
7
01-09-2016 07:21 PM