GB Cheap Adjustable Sway Bar End Links $80


 04-22-2012, 02:01 PM
#20
Registered User
iTrader: (1)

Join Date: Mar 2012
Location: Plano, Texas
Posts: 141
Likes: 0
Received 0 Likes
on
0 Posts
I have never used adjustable end links, how do you know how to set them up? Remove the factory end link and see where the sway bar sits at, and then just replace at that height?
04-22-2012, 02:15 PM
#21
That's a good way to start.
The car has to sit evenly on its wheels. Ideally, all four wheels should be on a flat surface. However, if you were to elevate the rear, the rear suspension has to be loaded. You can elevate the rear suspension by placing the rear wheels on ramps or on wood blocks. The rear wheels should not be dangling in the air.
I would remove both stock end links. Adjust one of the end link to stock length and install onto the car. Then you can lengthen the endlink slightly to make the sway bar more parallel to the body of the car. But you should leave some room between the sway bar and the camber arm so they dont hit each other. After one side is set, then you can install the other side. Adjust the length of the other side so that it smoothly goes into the sway bar hole without any resistance. That's how you achieve 0 preload.
Last edited by Modme; 04-23-2012 at 05:27 PM.
04-23-2012, 10:39 AM
#22
Registered User

1 Modme
2 Legz *paid*
3. Infamousstunna1
4 TVPostSound
5 soundmike *paid*
6 kevmo420
7 NeverBoneStock
8 Mattster
9 dk85
10 J2S2M
11 presto
12 jujubii
13 Will.B.
14 JimmiesG
15
16
17
18
19
20
2 Legz *paid*
3. Infamousstunna1
4 TVPostSound
5 soundmike *paid*
6 kevmo420
7 NeverBoneStock
8 Mattster
9 dk85
10 J2S2M
11 presto
12 jujubii
13 Will.B.
14 JimmiesG
15
16
17
18
19
20
04-23-2012, 05:19 PM
#24

That's a good way to start.
The car has to sit evenly on its wheels. Ideally, all four wheels should be on a flat surface. However, if you just elevate the rear wheels evenly, it should be fine.
I would remove both stock end links. Adjust one of the end link to stock length and install onto the car. Then you can lengthen the endlink slightly to make the sway bar more parallel to the body of the car. But you should leave some room between the sway bar and the camber arm so they dont hit each other. After one side is set, then you can install the other side. Adjust the length of the other side so that it smoothly goes into the sway bar hole without any resistance. That's how you achieve 0 preload.
04-23-2012, 05:23 PM
#25
Yes, thats what I was trying to get at. The rear suspension has to be loaded, sitting on the rear wheels. The wheels can be resting on a ramp or wood blocks with the same height.
Just read my post and it was confusing. I edited it to be more clear.
Just read my post and it was confusing. I edited it to be more clear.
 04-23-2012, 05:31 PM
#27
OK. I was pretty sure that is the case, but I didn't understand if you were saying that the axle could be unladen. Thanks for clearing it up for me or anyone else that misunderstood what you posted. Good luck with these, they look good. Makes me wish I hadn't paid $150 for the Whitelines a while back.
04-23-2012, 07:11 PM
#28
Quick DIY:
This should clarify what I failed to describe in words. The car's weight should be fully loaded on its wheels like this:

These type of lifts are great, because all four wheels are flat on the ground:

However, two post lifts like this will not work:

The reason being that the suspension geometry changes from loaded to unloaded state. You want to install and setup the end links in a your normal driving condition, which is with all four wheels on the ground.
To save time and trouble, you can just put both rear wheels on a ramp. The key is to have both rear suspensions evenly loaded.
Next step is pretty self explanatory, remove both stock end links. I believe the nuts are 14mm.
Next, take the adjustable end links and adjust them to approximately stock length. Install one of the end links to the car.
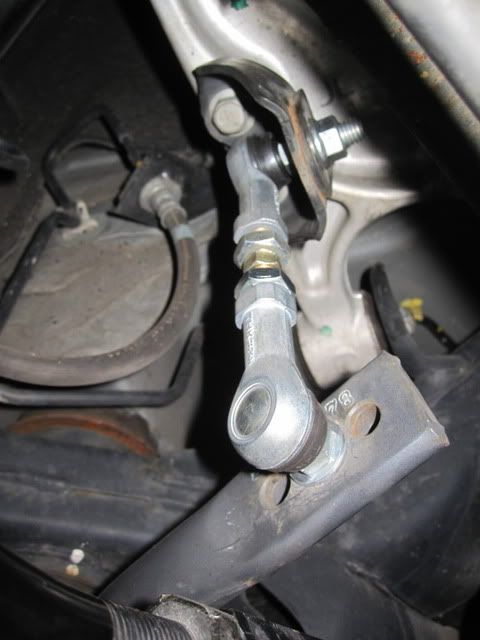
Notice the washer is on the end link side. The nut side is flanged and does not need a washer.
Torque the nuts to 41 foot pounds or 55 N. The nuts are 15mm and you can use a 14mm wrench to hold on to the screw hex head to tighten the nuts.
Now install the top of the other end link. Increase or decrease the end link until the bottom bolt slides freely into the sway bar hole. Then tighten the nuts to 41 lbs.
That's it!
This should clarify what I failed to describe in words. The car's weight should be fully loaded on its wheels like this:
These type of lifts are great, because all four wheels are flat on the ground:
However, two post lifts like this will not work:
The reason being that the suspension geometry changes from loaded to unloaded state. You want to install and setup the end links in a your normal driving condition, which is with all four wheels on the ground.
To save time and trouble, you can just put both rear wheels on a ramp. The key is to have both rear suspensions evenly loaded.
Next step is pretty self explanatory, remove both stock end links. I believe the nuts are 14mm.
Next, take the adjustable end links and adjust them to approximately stock length. Install one of the end links to the car.
Notice the washer is on the end link side. The nut side is flanged and does not need a washer.
Torque the nuts to 41 foot pounds or 55 N. The nuts are 15mm and you can use a 14mm wrench to hold on to the screw hex head to tighten the nuts.
Now install the top of the other end link. Increase or decrease the end link until the bottom bolt slides freely into the sway bar hole. Then tighten the nuts to 41 lbs.
That's it!
04-24-2012, 04:40 AM
#29
Registered Member

Join Date: Nov 2006
Posts: 6
Likes: 0
Received 0 Likes
on
0 Posts
1 Modme
2 Legz *paid*
3. Infamousstunna1 *paid*
4 TVPostSound
5 soundmike *paid*
6 kevmo420
7 NeverBoneStock
8 Mattster
9 dk85
10 J2S2M
11 presto *paid*
12 jujubii
13 Will.B.
14 JimmiesG *paid*
15 Omegasrk
16
17
18
19
20
2 Legz *paid*
3. Infamousstunna1 *paid*
4 TVPostSound
5 soundmike *paid*
6 kevmo420
7 NeverBoneStock
8 Mattster
9 dk85
10 J2S2M
11 presto *paid*
12 jujubii
13 Will.B.
14 JimmiesG *paid*
15 Omegasrk
16
17
18
19
20