Engine Bay Idea - Back Panel Blank
 02-04-2018, 12:42 PM
#46
Registered Member

You should be able to pry open the channel a little bit to make it easier to work with, it has the little metal tabs in it which should be fairly flexible.
 02-04-2018, 12:51 PM
#47
Administrator

Thread Starter
iTrader: (8)
Yep. Got that covered. However, the Trim-Lok is a lot more difficult to loosen than the OEM trim seal. Not just a little, but a lot. It is what it is.
 02-05-2018, 01:35 PM
#48
Administrator
Thread Starter
iTrader: (8)
I reverted the 4-foot section of trim seal at the back to the OEM piece. Something wasn't quite right. As it turns out, it doesn't really clash in any obvious or unacceptable way with the Trim-Lok. Here's a pic approximating where I want to go with this project. Again... not the final piece, just something I've been hacking at to explore this thing.

Getting one big, 5-foot section of trim seal to wrap around the front... that's definitely the right move, IMO.

The fitment here is fine, because it's a consistent, vertical, 1/16" substrate. I still have some issues to work through on the panel itself... padding or something for the bottom edge, and how to properly adhere it.

This here is an interesting perspective, with the Trim-Lok piece installed without the new back panel, just stretched over the gap.

Getting one big, 5-foot section of trim seal to wrap around the front... that's definitely the right move, IMO.
The fitment here is fine, because it's a consistent, vertical, 1/16" substrate. I still have some issues to work through on the panel itself... padding or something for the bottom edge, and how to properly adhere it.
This here is an interesting perspective, with the Trim-Lok piece installed without the new back panel, just stretched over the gap.
 02-05-2018, 03:14 PM
#50
Administrator
Thread Starter
iTrader: (8)
Thanks.
I feel like I need to step back from this for a while. I've learned a few things, I've got a section of 5-ft trim seal which makes this project work. And I can certainly pick this back up again when it gets warmer outside.
I've been wanting a Dremel tool for years, and if I put this project on the back burner, it could be a good excuse to buy one sometime in the next few months.
02-05-2018, 03:43 PM
#51
Thanks.
I feel like I need to step back from this for a while. I've learned a few things, I've got a section of 5-ft trim seal which makes this project work. And I can certainly pick this back up again when it gets warmer outside.
I've been wanting a Dremel tool for years, and if I put this project on the back burner, it could be a good excuse to buy one sometime in the next few months.
I feel like I need to step back from this for a while. I've learned a few things, I've got a section of 5-ft trim seal which makes this project work. And I can certainly pick this back up again when it gets warmer outside.
I've been wanting a Dremel tool for years, and if I put this project on the back burner, it could be a good excuse to buy one sometime in the next few months.
03-17-2018, 11:55 AM
#52
Administrator
Thread Starter
iTrader: (8)
I keep coming back to the problem of how to afix the panel, and I had this idea I've been rolling around for a while. What if I use black plastic rivets? Maybe two little ones at each wing. Typical rivets have a 20mm collar, but you can get them smaller, like 15mm.

03-17-2018, 12:16 PM
#53
Registered Member
What about a plastic adhesive on the back side of it? I don't imagine there will be much of any movement on that piece once it's on there. Even a two part epoxy would do it. Smear a bit over the back side of it where you won't see and it'll be on forever.
03-17-2018, 12:21 PM
#54
Administrator
Thread Starter
iTrader: (8)
However, if I do try rivets, it's worth knowing the plastic I'm playing with doesn't really bend much. It's actually somewhat brittle. If you bend it too much, it snaps. I should drill a few holes and see how it holds up.
[edit]
So I drilled a few 1/4" holes within 1/8" to the unsupported edge of an excess piece of plastic, and it drilled without cracking, while still seeming pretty sturdy. I think I need to learn up on plastic rivets. And I need to take a closer look at the engine bay back piece I'm thinking of drilling into.
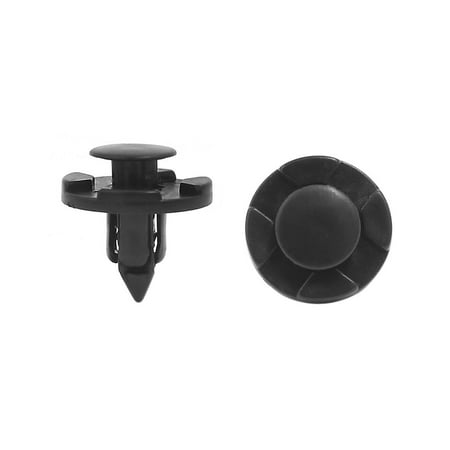
Something like this... with a 15mm head diameter:
Toyota Push-Type Retainer 15mm Head Dia.
Screw Type Retainers Toyota Mazda
http://www.clipsandfasteners.com/Bod...pas1975-25.htm
Or just the familiar Nissan retainer clip, but maybe too wide, IDK:
Last edited by Rochester; 03-17-2018 at 03:50 PM.
03-20-2018, 04:23 PM
#55
Administrator
Thread Starter
iTrader: (8)
Found these little guys at LOWES yesterday. They're a 5mm screw-in rivet, with a 13mm top collar. I think it's got potential. It makes for a nice, finished look, IMO.
A few days ago, I started in on my second (third?) attempt at hacking out a back panel.

A few days ago, I started in on my second (third?) attempt at hacking out a back panel.
 03-20-2018, 05:52 PM
#57
Administrator
Thread Starter
iTrader: (8)

 03-20-2018, 08:06 PM
#59
Administrator
Thread Starter
iTrader: (8)
https://www.dttrllc.com/store/p46/G3...sh_cover_.html
Hit up Shawn Lane at Synergy Composites and he can hook this up if anyone is interested.
Hit up Shawn Lane at Synergy Composites and he can hook this up if anyone is interested.
 Hahahahahahahahaha
So much for trailblazing, LOL. Well, I'm going to keep on keeping on here anyway. I've got a slightly different idea, but still, this is awesome. Very cool that someone did this. If my project goes south and gets abandoned, I'm absolutely going to reach out to this guy for one of these (sans logo, maybe sans CF wrap. Or maybe just the angled back wall in CF... yeah.
 )
)

Last edited by Rochester; 03-20-2018 at 08:15 PM.
