DIY Taillight Blinking LED's Mod
 04-10-2014, 11:38 PM
#1

DIY Taillight Blinking LED's Mod
I figured i will tackle the mod i had sitting in my trunk for a few months. The kit from Andy Rushing that changes the way that your tail lights blink. (instead of the single center bulb, the entire LED ring would light up when signaling). I think that gives much more light output to let the driver behind you that you are turning since its hard to see the bulb if you have the brakes depressed. I was scared of doing this myself since you have to cut the wires from the back of the tail light, but i just went for it.
The directions provided are quite simple and i understand if it might be a bit complicated if you have a different year G as the wires are different colors. For this DIY, It was installed on a 2008 G35x , which luckily , is what the instructions were for. I was waiting for a DIY to pop up but no one was able to provide one so i hope this can help anyone looking to install it. Def. do it yourself as it is quite easy.
BEFORE YOU BEGIN THIS PROJECT, JUST KNOW THAT I AM IN NO WAY RESPONSIBLE FOR ANY NEGLECT OR DAMAGE THAT YOU DO TO YOUR CAR. THIS IS JUST A HELPFUL DEMONSTRATION.
Tools you will need:
Electric tape
Pliers to strip wires
Flathead and philips screwdrivers
Patience
45Minutes - 2 Hours Depending on experience.
Wire Tester
You can get the kit from Andy and here is his thread on how they look and you can PM him for the kit.
https://www.myg37.com/forums/body-in...led-rings.html
When i refer to the device, it means the kit you purchased from Andy. It is basically a small black box with 3 wires running out of it. The Ground blue wire and 2 Grey strands that hold 3 wires each that are color coded REd, Black and white.
Step 1: Open the trunk and Disconnect Negative battery Terminal.
Step 2: Remove the trunk Mat and pull back the drivers side plastic to reveal the taillight.
Step 3: Use the flathead screwdriver to remove the clips holding the plastic shroud that holds the cargo net (4 clips). Then just pull up on the piece. (yank on it if you have to, its just clips)
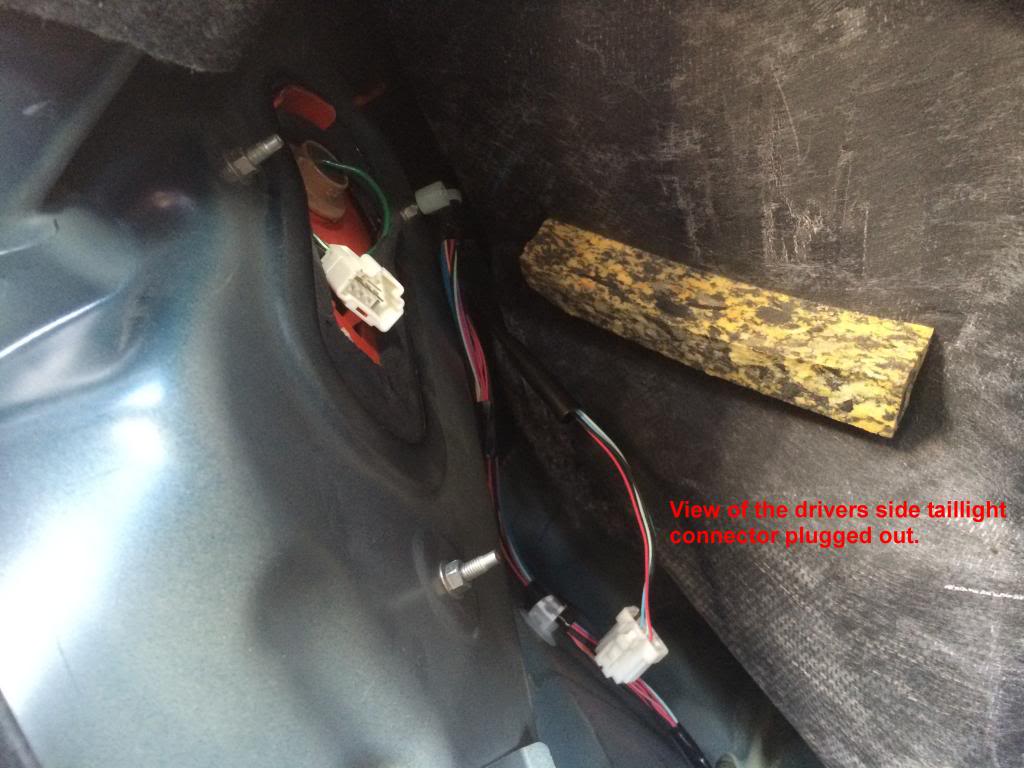
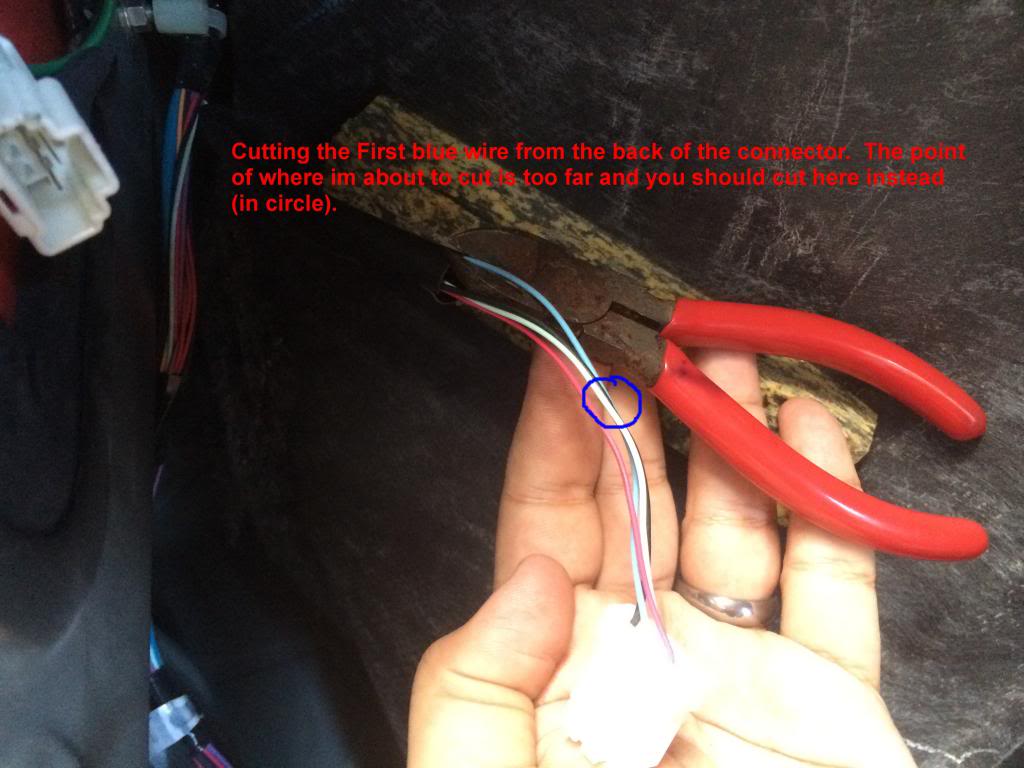
Step 4: On the Drivers Side Tailight, Disconnect the Tab from the back. You will now see about 4-6 wires that are color coded. You then test and cut the wires according to the instructions.
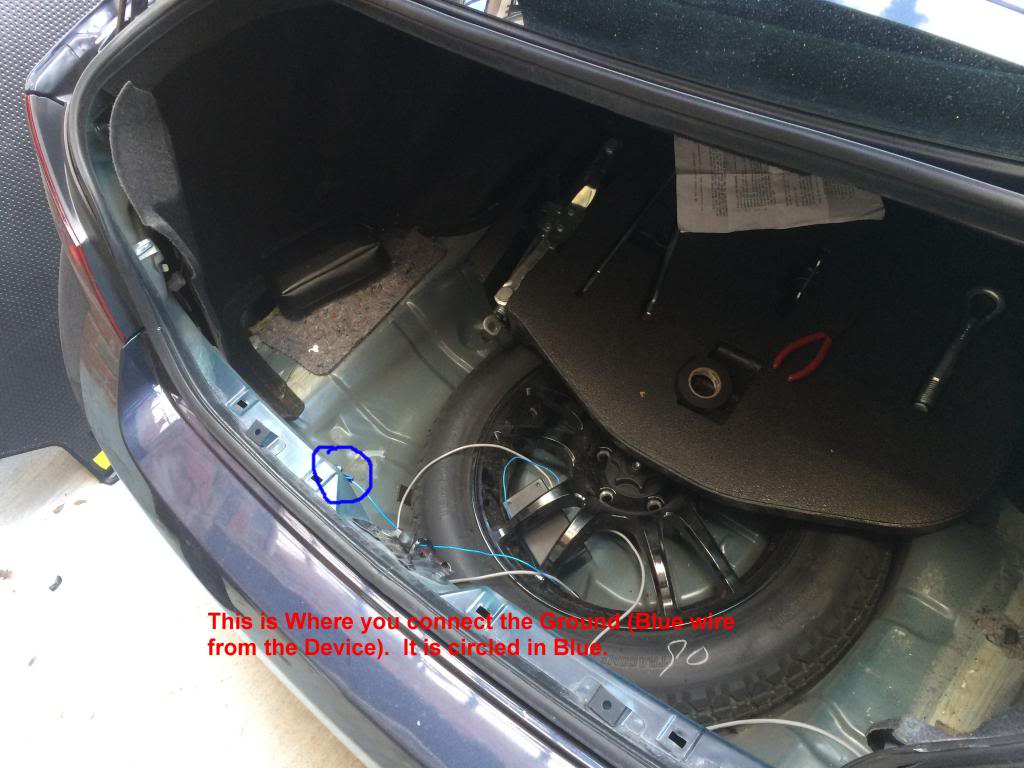
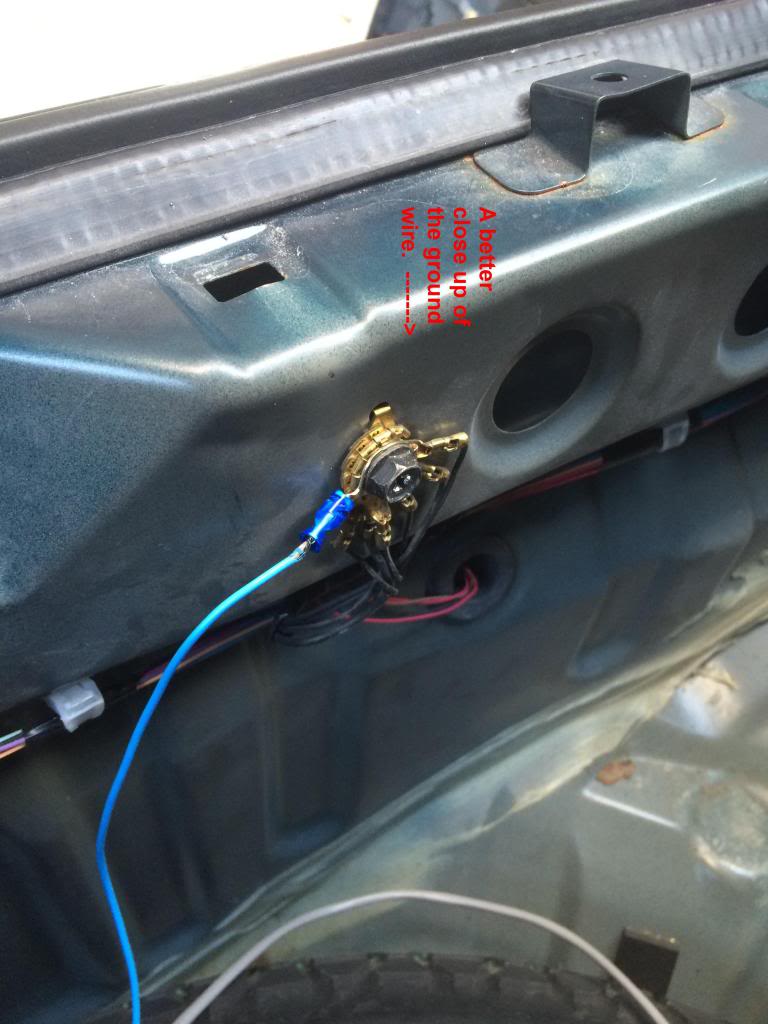
Step 5: First Ground the unit (blue wire) to the factory ground location near trunk latch. Pic Reference. Then place the device you purchased under the tool tray closer to the drivers side or somewhere close to the drivers side taillight without the wires getting in the way when you put back the rear mat.
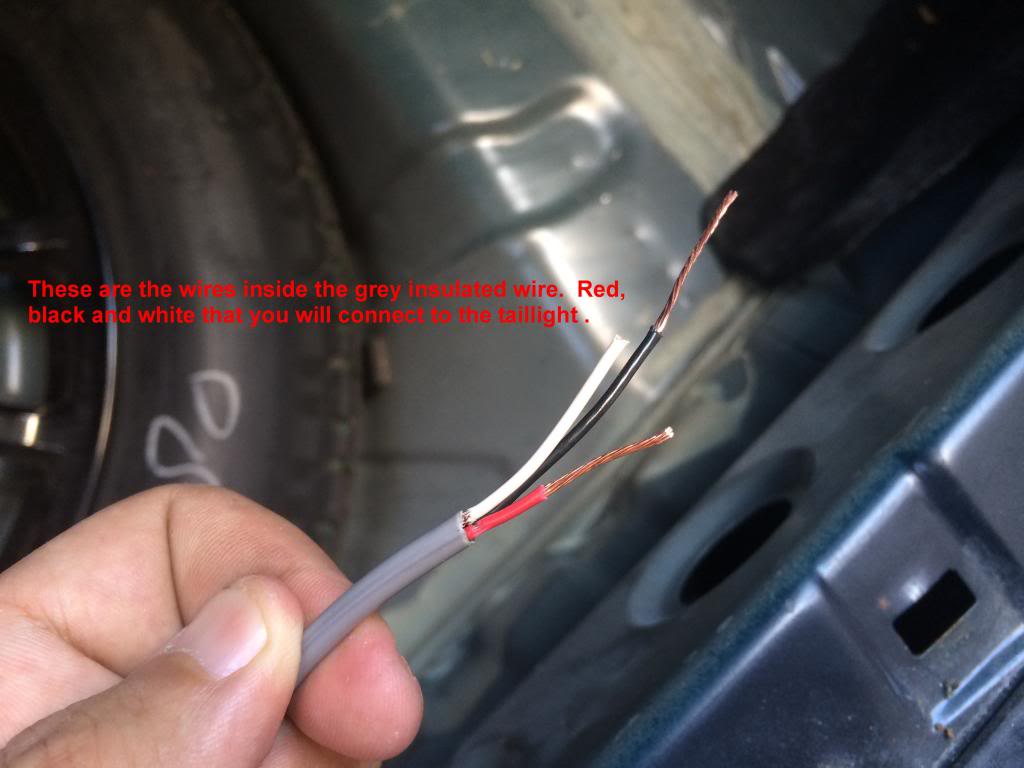
Step 6: Strip the wiring from the 2 large Grey wires and reveal the Black, red and White wires and strip them to be ready to connect to the taillight wires.
Step 7: Now go to drivers side tail light and we start with the Blue wire, Cut it about 2 -3 inches from the connector. Tape up the side sticking from the connector with electrical tape. For the other side, connect the black wire to it. You can use the included connectors or just simply twist both wires onto each other.
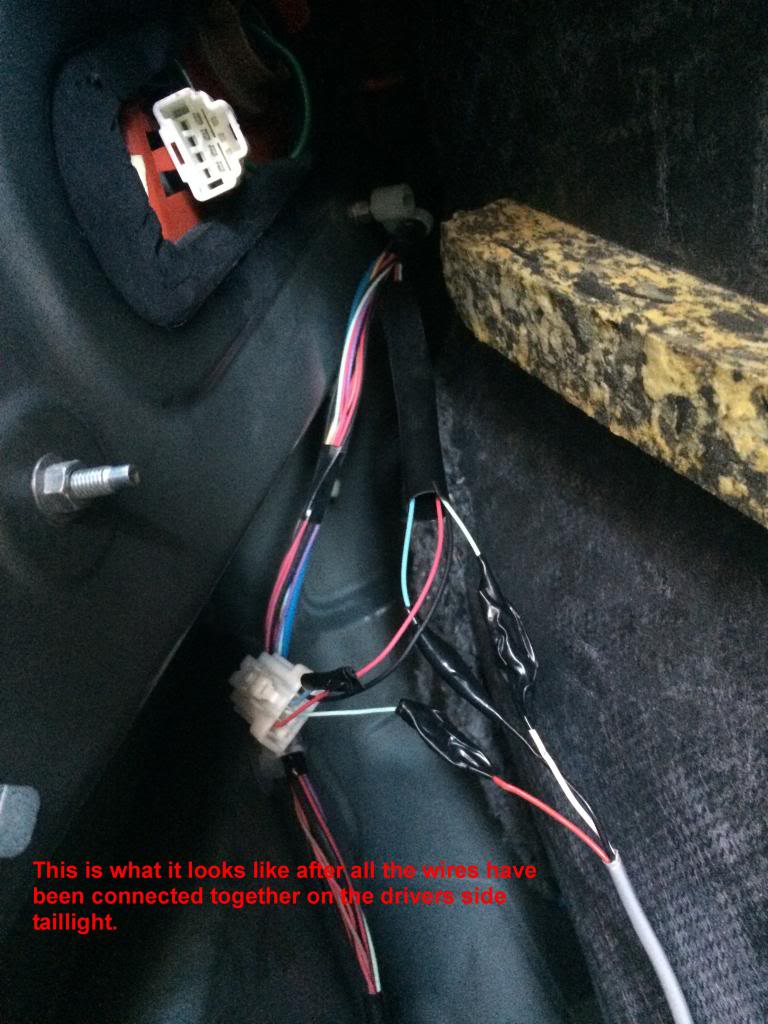
Step 8: Next wire is Teal, cut it 2-3 inches from connector. This wire will be connected to the two other wires (red and white). The red wire connects to the teal wire that is still attached to the connector of the tail light and the white wire connects to the other side of the teal wire. (Picture reference to show all the wires connected and taped accordingly). That is all for the tail light for drivers side.

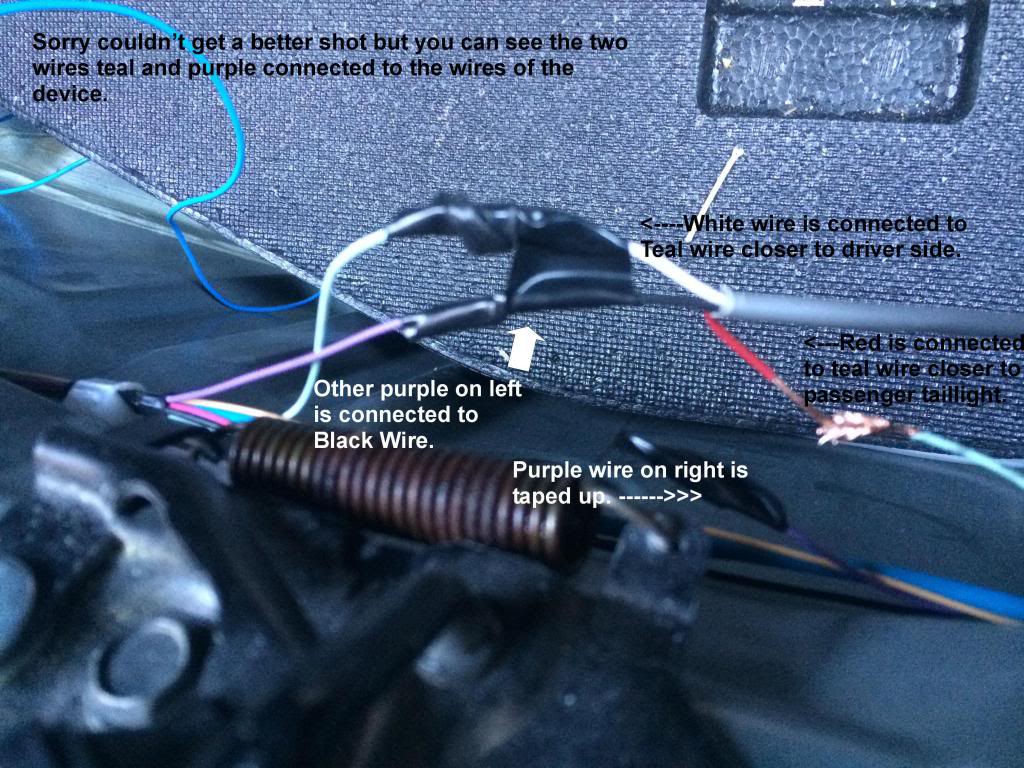
Step 9: Next step is to access the wires right under the trunk latch lock. They run across the bottom of the trunk. Here you will only need to cut the purple and Teal. First Cut the Teal Wire somewhere near the latch (as long as the device wires can reach it). Then Connect Red wire from the device to the teal side (the one going to the passenger taillight). For the other end of the teal wire, you connect the white wire.
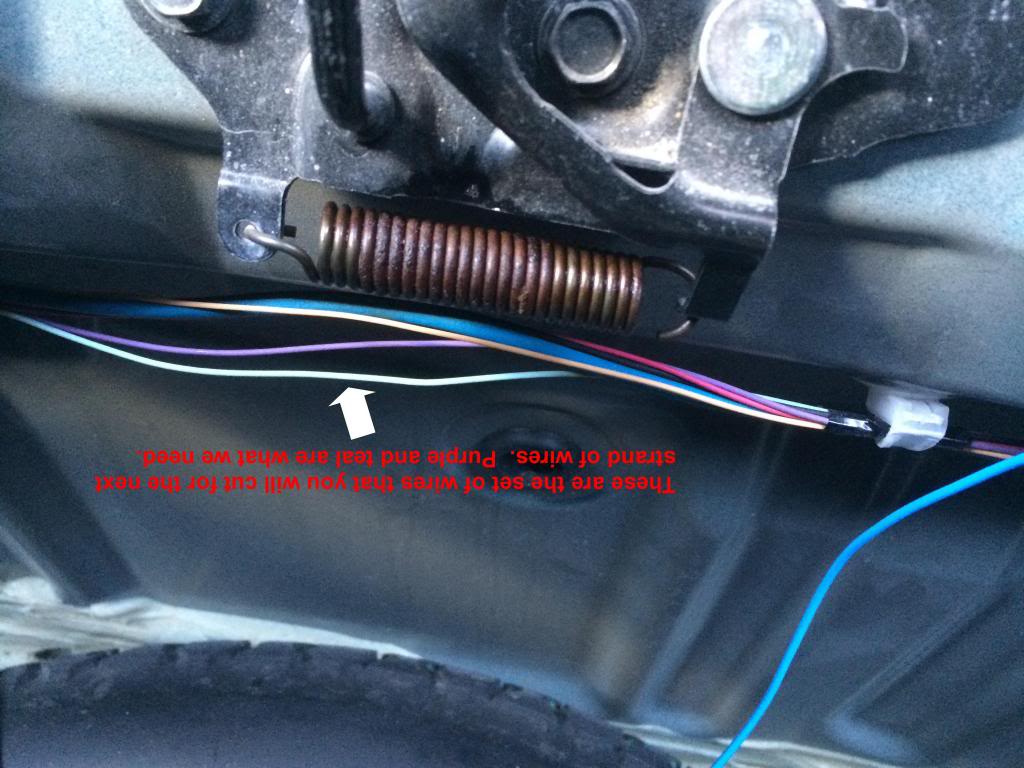
Step 10: now cut the purple wire and tape of the side that is going to the passenger side light. For the other side of the purple wire, connect it to the black wire from the Device).
Step 11: You are now done with the connecting of the wires and time to reconnect the battery and test the connection to see if it works. That is all that is needed and remember that each G Coupe or Sedan is different in wiring depending on your year/model. Always test the wires to know that you are cutting the correct ones.
Side notes: I didn't mention which wires are which (Brake wire, turn signal wire etc...) as i followed directions that were made for my specific car. But you can easily test for each wire to know which to cut. Once you are done and the signals are now blinking using the LED's, just return everything in the trunk and snap the plastic piece down and you are good to go.
Thanks to Andy again for the kit and the installation instructions provided. Hope this tutorial can help others who were afraid to cut any wires on their Sedan or Coupe. It does sound scary but it is really quite easy. Good luck.
The directions provided are quite simple and i understand if it might be a bit complicated if you have a different year G as the wires are different colors. For this DIY, It was installed on a 2008 G35x , which luckily , is what the instructions were for. I was waiting for a DIY to pop up but no one was able to provide one so i hope this can help anyone looking to install it. Def. do it yourself as it is quite easy.
BEFORE YOU BEGIN THIS PROJECT, JUST KNOW THAT I AM IN NO WAY RESPONSIBLE FOR ANY NEGLECT OR DAMAGE THAT YOU DO TO YOUR CAR. THIS IS JUST A HELPFUL DEMONSTRATION.
Tools you will need:
Electric tape
Pliers to strip wires
Flathead and philips screwdrivers
Patience
45Minutes - 2 Hours Depending on experience.
Wire Tester
You can get the kit from Andy and here is his thread on how they look and you can PM him for the kit.
https://www.myg37.com/forums/body-in...led-rings.html
When i refer to the device, it means the kit you purchased from Andy. It is basically a small black box with 3 wires running out of it. The Ground blue wire and 2 Grey strands that hold 3 wires each that are color coded REd, Black and white.
Step 1: Open the trunk and Disconnect Negative battery Terminal.
Step 2: Remove the trunk Mat and pull back the drivers side plastic to reveal the taillight.
Step 3: Use the flathead screwdriver to remove the clips holding the plastic shroud that holds the cargo net (4 clips). Then just pull up on the piece. (yank on it if you have to, its just clips)
Step 4: On the Drivers Side Tailight, Disconnect the Tab from the back. You will now see about 4-6 wires that are color coded. You then test and cut the wires according to the instructions.
Step 5: First Ground the unit (blue wire) to the factory ground location near trunk latch. Pic Reference. Then place the device you purchased under the tool tray closer to the drivers side or somewhere close to the drivers side taillight without the wires getting in the way when you put back the rear mat.


Step 6: Strip the wiring from the 2 large Grey wires and reveal the Black, red and White wires and strip them to be ready to connect to the taillight wires.

Step 7: Now go to drivers side tail light and we start with the Blue wire, Cut it about 2 -3 inches from the connector. Tape up the side sticking from the connector with electrical tape. For the other side, connect the black wire to it. You can use the included connectors or just simply twist both wires onto each other.


Step 8: Next wire is Teal, cut it 2-3 inches from connector. This wire will be connected to the two other wires (red and white). The red wire connects to the teal wire that is still attached to the connector of the tail light and the white wire connects to the other side of the teal wire. (Picture reference to show all the wires connected and taped accordingly). That is all for the tail light for drivers side.


Step 9: Next step is to access the wires right under the trunk latch lock. They run across the bottom of the trunk. Here you will only need to cut the purple and Teal. First Cut the Teal Wire somewhere near the latch (as long as the device wires can reach it). Then Connect Red wire from the device to the teal side (the one going to the passenger taillight). For the other end of the teal wire, you connect the white wire.

Step 10: now cut the purple wire and tape of the side that is going to the passenger side light. For the other side of the purple wire, connect it to the black wire from the Device).

Step 11: You are now done with the connecting of the wires and time to reconnect the battery and test the connection to see if it works. That is all that is needed and remember that each G Coupe or Sedan is different in wiring depending on your year/model. Always test the wires to know that you are cutting the correct ones.
Side notes: I didn't mention which wires are which (Brake wire, turn signal wire etc...) as i followed directions that were made for my specific car. But you can easily test for each wire to know which to cut. Once you are done and the signals are now blinking using the LED's, just return everything in the trunk and snap the plastic piece down and you are good to go.
Thanks to Andy again for the kit and the installation instructions provided. Hope this tutorial can help others who were afraid to cut any wires on their Sedan or Coupe. It does sound scary but it is really quite easy. Good luck.
Last edited by doublea88; 08-15-2014 at 06:01 PM.

The following 5 users liked this post by doublea88:
828 (04-11-2014),
flipmode007 (07-17-2014),
HoldmyMouse (04-11-2014),
Legz (04-10-2014),
twin_snails (03-02-2015)

 04-11-2014, 11:49 AM
#4

I just did this the other day, meant to take pictures too but I forgot. I actually soldered my connections though. I also hope you ran your wires under the spare, and not through the spare like your first picture otherwise you won't be able to take it out lol.
Great little mod that 95% of the people probably won't even notice unless you own G. Only downside is that the caulk or whatever is used inside the black box is quite strong.. I've been having to roll down the windows when I first get in. Hoping it will cure soon and the smell will go away
Great little mod that 95% of the people probably won't even notice unless you own G. Only downside is that the caulk or whatever is used inside the black box is quite strong.. I've been having to roll down the windows when I first get in. Hoping it will cure soon and the smell will go away
04-11-2014, 03:00 PM
#5
That location was at the beginning at first as I thought I would have to run wires to both taillights. After setting the ground, I realized it didn't need to be there. It is now tucked under the tray close to the ground wire. So I can easily take out the spare without getting in the way of wires.
04-13-2014, 11:25 AM
#6

I recently installed mine and I had Andy lengthen my wires. I made the same connections except my box is mounted to the left side of the Bose amp mount. I didn't really want the box laying at the spare. Mine is a coupe, so the amp mount is on the left side of the trunk under the plastic left side floor panel.
Andy has been great to work with and this is an awesome modification.
Thanks again, Andy
Andy has been great to work with and this is an awesome modification.
Thanks again, Andy

Trending Topics

 07-02-2014, 11:52 AM
#10

seriously...its like the 3rd paragraph down from op
You can get the kit from Andy and here is his thread on how they look and you can PM him for the kit.
https://www.myg37.com/forums/body-int...led-rings.html
You can get the kit from Andy and here is his thread on how they look and you can PM him for the kit.
https://www.myg37.com/forums/body-int...led-rings.html
09-17-2015, 12:31 PM
#11
09-17-2015, 01:25 PM
#12
Damn... me like!


 09-30-2015, 01:36 PM
#15
Former Sponsor
iTrader: (11)

Blame Infiniti for making it impossible to source the sedan's connectors lol. We are working on it though.
We will have plenty of sedan love to go around, once the components arrive
Nick C.
We will have plenty of sedan love to go around, once the components arrive
Nick C.