Difficulty of Lowering Springs/Camber Kit D.I.Y?
 05-04-2017, 05:27 PM
#1
Registered Member
Thread Starter

Difficulty of Lowering Springs/Camber Kit D.I.Y?
Sup guys  Sooo, I've been thinking about trying to install my lowering springs and camber kit myself. Just our of curiosity, I've decided to call a few shops to see how much they'll do it for. All the quotes I've been getting have been in the $400 range!!
  That's expensive! Especially compared to the $150 install for my HFC's which everyone told me was quite difficult when I previously asked for a D.I.Y. So that had me thinking, if it wasn't recommended for me to attempt the HFC install, and it only costed me that much, how difficult is it to do this if the shops are charging ~3x more?
Should I not even be thinking about doing this myself?
Sooo, I've been thinking about trying to install my lowering springs and camber kit myself. Just our of curiosity, I've decided to call a few shops to see how much they'll do it for. All the quotes I've been getting have been in the $400 range!! That's expensive! Especially compared to the $150 install for my HFC's which everyone told me was quite difficult when I previously asked for a D.I.Y. So that had me thinking, if it wasn't recommended for me to attempt the HFC install, and it only costed me that much, how difficult is it to do this if the shops are charging ~3x more? Should I not even be thinking about doing this myself?
 05-04-2017, 07:36 PM
#2

I just put mine in last week. (swift springs with spc front camber arms and a rear toe bolt kit)Not a big deal if you have worked on stuff like that before. I did take my front struts to a shop to have the springs swapped. It was 40 bucks.
More info would be good if you want help. What brand springs are you installing? What camber kit are you intending to put in? Front? Back? What model do you have? I have the awd model which means the front install is a little more involved.
There are vids in the diy section that cover most of what you need to know. I used them. Use the search function also. Tons of info that will answer most any detail you need to know about. I did that too. This is a great place to learn!! MyG37.com ROCKS!
05-04-2017, 10:04 PM
#3

Only thing that's not straightforward wrenching would be elongating the oem toe slots & compressing/changing out the springs, everything else is pretty simple as long as you have your vehicle safely lifted and the proper tools.
The lower shock bolt/nut is very tight (over 100 ft. lbs IIRC) but if you use a 19 or 21mm backing wrench (don't recall which one, lol) it's not too hard to break free.
The lower shock bolt/nut is very tight (over 100 ft. lbs IIRC) but if you use a 19 or 21mm backing wrench (don't recall which one, lol) it's not too hard to break free.
 05-11-2017, 10:33 AM
#5
Registered Member
Thread Starter
Only thing that's not straightforward wrenching would be elongating the oem toe slots & compressing/changing out the springs, everything else is pretty simple as long as you have your vehicle safely lifted and the proper tools.
The lower shock bolt/nut is very tight (over 100 ft. lbs IIRC) but if you use a 19 or 21mm backing wrench (don't recall which one, lol) it's not too hard to break free.
The lower shock bolt/nut is very tight (over 100 ft. lbs IIRC) but if you use a 19 or 21mm backing wrench (don't recall which one, lol) it's not too hard to break free.
05-11-2017, 10:56 AM
#6


I haven't installed my rear camber arms yet but that looks pretty straight forward as well. As others have said, with the toe bolt you'll need to elongate the hole so I ordered some bits for my dremel. I'm going to hold off getting front upper control arms until after I get an alignment as I've heard others say they didn't need it with Eibach springs. Good luck!
The following users liked this post:
HotSawce (05-11-2017)
05-11-2017, 03:36 PM
#7
Registered Member
Thread Starter
I got similar quotes so I decided to installed Eibach Pro Kit springs myself. You'll need sockets/wrenches, extensions (not required but useful), breaker bar, spring compressor (I borrowed from Advance Auto), and jack stands would be helpful as well. If you have an impact drill that'll help a lot with the spring compressors. I was having a hard time getting the struts out by just pushing the rotors so I ended up removing the upper control arm and attaching the spring compressor to bring it down enough to pull it out. An extra set of hands would certainly help.
I haven't installed my rear camber arms yet but that looks pretty straight forward as well. As others have said, with the toe bolt you'll need to elongate the hole so I ordered some bits for my dremel. I'm going to hold off getting front upper control arms until after I get an alignment as I've heard others say they didn't need it with Eibach springs. Good luck!
I haven't installed my rear camber arms yet but that looks pretty straight forward as well. As others have said, with the toe bolt you'll need to elongate the hole so I ordered some bits for my dremel. I'm going to hold off getting front upper control arms until after I get an alignment as I've heard others say they didn't need it with Eibach springs. Good luck!
Trending Topics
 05-11-2017, 05:41 PM
#11
Registered Member
Thread Starter
Well considering every shop is quoting me around that, I suppose it is "Reasonable".. but very expensive nonetheless.. I think I'm gonna give it a go.
05-11-2017, 05:49 PM
#13
Registered Member
Thread Starter
Quibble; Never heard that word before. I like it lol. 400 bucks is a huge stretch for me. I'm a broke, just graduated college person lol. The only reason I can do all these mods is because I've been scouring the classifieds for deals. The only reason I was able to get this car is because I got a tremendous deal, it being a rebuilt. I've been very economical thus far and it's been working out.
05-11-2017, 05:49 PM
#14
05-11-2017, 11:34 PM
#15
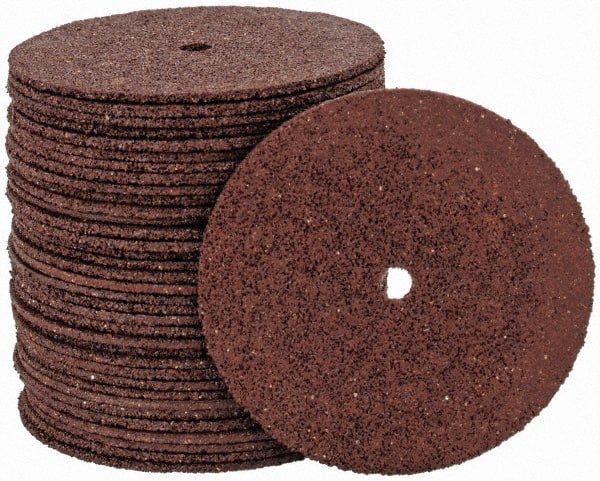
I used the metal cutoff wafer-wheels, these work awesome and you can get a much better view of teh work if you aren't lucky enough to have a lift. Just get some scrap metal to grind down the wheel diameter a bit then start cutting, you want to test fit the bolt as you go, you want it to be snug so it turns but without any slop. Here's the link and here's a pic of the wafers I'm referring to, get a pack of 10-20, they're cheap so you don't want to run out. IIRC I used about 5 or 6.
https://www.mscdirect.com/browse/tnp...FZeEaQodQpkNOg
And a good DIY link for the process
https://www.myg37.com/forums/brakes-...-template.html
Also for that front lower shock mount nut, use a backer wrench (there is a nut on the other side) of 19 or 21mm, not sure exactly which, this will make breaking that bolt easier, and you should have a 1/2" breaker bar, they're about $15 at Harbor Frieght.